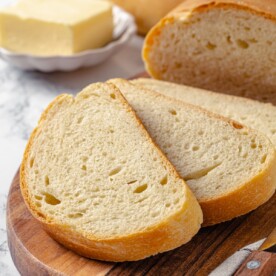
French Bread
An easy recipe for soft French bread from scratch! You can have freshly baked bread that is better than store bought with 4 ingredients in under 2 hours!
Servings: 24 slices
Ingredients
- 1 ¾ cups water warmed to 100°F-110°F
- 2 ½ teaspoons instant yeast 1 packet (mine is rapid rise)
- 4 ½ cups all-purpose flour or bread flour
- 2 ½ teaspoons kosher salt or half the amount of table salt
- ¼ cup unsalted butter cubed
Instructions
- In a small bowl combine warm water and the instant yeast. Whisk or stir together with a fork, then let sit while you measure the remaining ingredients but no longer than 10 minutes.
- In the bowl of a stand mixer fitted with the dough hook attachment, combine all-purpose flour, salt, and the yeast mixture. Mix on low speed until the dough is hydrated and all the ingredients have incorporated. It will only take a minute.
- Increase the mixer to medium speed for 4-5 minutes, or until a soft, strong, elastic dough forms that you can pull a rough window pane. This isn’t the perfectly smooth window pane of a brioche dough, rather it is a clear window with some visible veining and striations.
- Add the pieces of butter to the mixer bowl and reduce the speed to low. Mix on low speed until all the butter has worked into the dough. If kneading by hand, I do recommend using room temperature butter but it isn’t essential and I used cold butter cut into tiny cubes when incorporating with my stand mixer.
- Use a bowl scraper or a stiff silicone spatula to scrape the dough out into a lightly oiled medium bowl, turn to coat. Cover with plastic wrap and proof at room temperature 45-60 minutes. The dough should have doubled.
- Turn the dough out onto a very lightly dusted work surface and divide into two equal pieces. They will each weigh about 485g if you choose to be precise.
- Preshape one piece of dough into a round (boule) by flipping it over and folding each of the four sides towards the center. Flip back over (seam-side-down) and gently shape it into a round by pulling it towards you with both hands. Rotate a quarter turn and repeat until you have a round dough ball that sits up on your work surface. Try not to over tighten at this stage, shape just enough to form that tight ball then set aside. Repeat with the second piece of dough.
- Cover the dough with plastic wrap and allow to bench rest 15-20 minutes. This is longer than most bench rests because it needs that time to relax.
- Flip the dough back over and take the side furthest from you, pick it up, give it a little shake to stretch slightly and then place it back on the bench folding the stretched side down to the center. Rotate the dough 180 degrees and repeat by folding the other side down towards the center.
- Shape a traditional bâtard by shaping as you would a log for sandwich bread or another bread baked in a loaf pan but tapering and sealing both ends so it is pointed at each end and fatter in the center. Perform 2 sets of thumb folds by wrapping the dough around the thumb of the left hand and sealing the edge with the heel of the right hand. Start this motion towards the right side (keeping it tighter at the end) and gradually move left, rolling and sealing as you go. The first thumb fold will not fully close the dough log. Perform 1 more thumb fold to fully create a tapered log shape.
- Line a sheet pan with a piece of parchment paper and place the shaped pieces of dough seam-side down on the diagonal at each end of the baking sheet. I used a flat (not rimmed) baking sheet to give myself a little more room for expansion. Cover loosely with plastic wrap (you can spray it with non-stick cooking spray as cheap insurance) and allow to proof in a warm spot for 30-45 minutes or until the dough has visibly doubled and is light and airy to the touch.
- While the dough is final proofing, preheat the oven to 375°F conventional (no fan).
- Right before baking, gently remove the plastic wrap and score each loaf using a razor blade, bread lame, or very sharp knife. I score the dough similar to a baguette by making 3 slashes on the diagonal. The ends of each slash should overlap but be spaced about an inch apart. Unlike sourdough bread or baguettes, I score this French bread perpendicularly to the dough and not on an angle. All of these steps together allow the dough to expand evenly. Try to get each cut as close to ½ inch deep as possible. Too shallow and the dough will have a difficult time expanding the way you want it to.
- Bake in a preheated oven for 28-30 minutes to an internal temperature of 205°F. Remove the loaf from the oven and slide onto a wire rack to cool at least 15 minutes before slicing with a serrated knife.
Video
Notes
Note: I do not use any bench flour when working with this dough. I lightly oil my hands from the proof bowl and this dough does not stick. If you add more flour at this point not only will the dough be difficult to shape but the resulting bread will be dry.
Yield – 2 loaves
Technique – I give them an extra serious pinch seal.
Variations – Make rolls or baguettes. Top with seeds or butter and sea salt.
Storage – Keep in airtight container up to a week. Freeze sliced for toast or sandwiches.
Nutrition
Serving: 1slice | Calories: 106kcal | Carbohydrates: 18g | Protein: 3g | Fat: 2g | Saturated Fat: 1g | Polyunsaturated Fat: 0.2g | Monounsaturated Fat: 1g | Trans Fat: 0.1g | Cholesterol: 5mg | Sodium: 244mg | Potassium: 38mg | Fiber: 1g | Sugar: 0.1g | Vitamin A: 59IU | Vitamin C: 0.004mg | Calcium: 5mg | Iron: 1mg