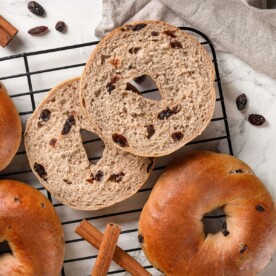
Cinnamon Raisin Bagels
Soft, chewy homemade cinnamon raisin bagels! Delightfully spiced and lightly sweetened with brown sugar and plump raisins. This professional recipe guides you step-by-step and shows you that chewy bagels are easier than you think!
Servings: 10 bagels
Ingredients
For the bagel dough:
- 2 cups water warm (approximately 100°F)
- 2 ¼ teaspoons dry active yeast 1 package
- 5 cups high-gluten flour King Arthur
- 3 tablespoons light brown sugar
- 2 teaspoons ground cinnamon
- 2 teaspoons kosher salt
- 1 cup raisins
Instructions
Make and Mix the Dough
- In the bowl of a stand mixer, whisk together dry active yeast and water and optionally a bit of the brown sugar. Allow to sit for 10 minutes or until foamy.
- To the stand mixer bowl add high-gluten flour, brown sugar, cinnamon, and kosher salt. Use the dough hook attachment to combine all the ingredients on low speed.
- Mix on medium speed until a smooth dough forms. You should be able to pull a window pane. This is a stiffer dough because it only has 52% hydration, so it might seem developed when it is not. You are looking for a smooth dough. The surface shouldn’t look like scar tissue, if it does, it isn’t mixed.
- Incorporate raisins until they are well distributed or you will have some bagels with a lot and some with hardly any.
- Turn the dough out onto a smooth surface. Divide into 10 equal pieces, approximately 120g each.
- Working with one piece at a time, pre-shape the dough into a log shape. Do this by stretching the dough into a rectangle. Fold the top 1/3 down to the center and then continue folding the folded dough over the final 1/3, sealing it against the counter with your fingers. Place it to the side and keep covered while you repeat with all remaining pieces.
Shape the Bagels
- Starting with the first piece of dough that you pre-shaped, gently work it into a square or rectangle. The size isn’t important. Place it down on the bench. Fold one straight side towards you into the center. Press to seal. Rotate the dough 180 degrees or so the part you just folded is on the opposite side (close to your body).
- Fold the other side of the dough towards you overlapping with the first fold. Press to seal. You just folded it like you would a letter (that’s why it’s called an “envelope fold.”) Place your left thumb on the seam that you just made. Your hand will make an “L” shape. Using your left hand, fold the dough in towards your body around your left thumb and then seal it with the heel of your right hand. Repeat this down the length of the rectangle. You are making a log shape.
- Repeat once more to make a tight log shape. ?Now roll that log out using both hands like a snake or rope. Start with both hands in the center and gently roll it back and forth while moving your hands apart. This will lengthen the rope. Get it to around 8 inches.
- Take the rope and wrap it around your hand, overlapping the ends by about 1 ½ - 2 inches. Flip your palm flat with the overlapped portion underneath it. Roll the overlap gently underneath your palm to seal them together. The goal isn’t further lengthening, rather just to seal the ends together. This is the traditional way to shape bagels, not by poking a hole in the center.
Proof, Boil, and Bake
- Place shaped bagel on parchment or silicone mat lined baking sheet. Repeat with all 8 pieces of dough. Cover loosely with plastic wrap so the surface doesn’t dry out.
- If baking the same day, allow to proof for 45-60 minutes at room temperature then refrigerate at least 60 minutes until they feel light and airy. It is a little tricky when the dough is cold but you can still feel the difference.
- If you are baking the next day, immediately refrigerate the shaped bagels for up to 24 hours.
- Preheat the oven to 450°F (no fan). Set up your boiling station. Place a wire rack inside a rimmed baking sheet, gather a spider (like for frying) or large slotted spoon, and bring about 4 inches of water in a large pot to a boil. Reduce the heat to a simmer and then begin boiling bagels.
- Take the cold bagels from the refrigerator and cook them 1-3 at a time (depending on your comfort, for 25-35 seconds in the simmering water. I like to place each one in the water gently, top side down, then flip after about 15 seconds. Remove to the wire rack.
- Repeat with all bagels.
- Bake in preheated oven for 18-25 minutes until they are a nice golden brown. Rotate the racks top to bottom and front to back after 10 minutes. Cool before slicing, if you can wait that long!
Notes
Yield – 10 Bagels
Presentation – The only way to get that smooth, professional exterior is to hand-roll them properly. You can poke a hole in the center and stretch it out instead, but the surface will be uneven and rough.
Variations – Add nuts, use a different spice or a different dried fruit! Add a cinnamon sugar topping for extra sweetness.
Storage – Allow bagels to cool to room temperature before storing. No matter the timeline, I prefer to store bagels that will not be consumed within 1 day in an airtight container or zip top baggie in the freezer. You can also store them for up to a week at room temperature, though they will gradually dry out.
Nutrition
Serving: 1bagel | Calories: 280kcal | Carbohydrates: 58g | Protein: 9g | Fat: 0.1g | Saturated Fat: 0.03g | Polyunsaturated Fat: 0.02g | Monounsaturated Fat: 0.03g | Sodium: 473mg | Potassium: 133mg | Fiber: 3g | Sugar: 4g | Vitamin A: 1IU | Vitamin C: 1mg | Calcium: 13mg | Iron: 1mg