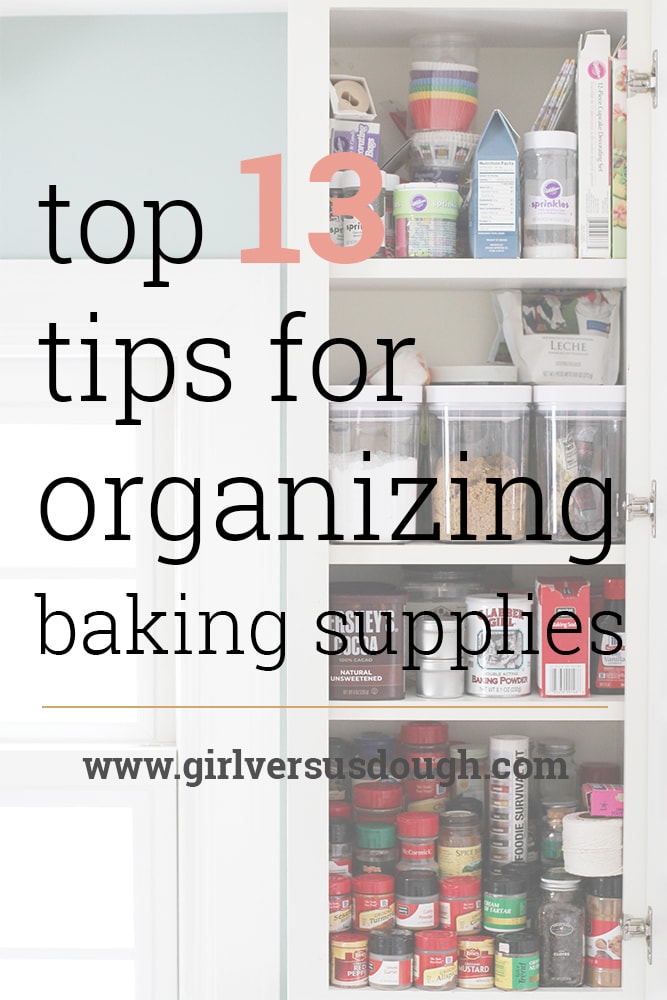
a baker’s dozen: my top 13 tips for organizing baking supplies
This post is the third in a short series I’ll be doing this month on the blog called “A Baker’s Dozen.” Each week, I’ll share a post with 13 (get it?) tips, tricks and/or tools to help you become a better baker (though I think you’re pretty great already). Today’s post: My top 13 tips for organizing baking supplies. Enjoy!
I am back from a week’s vacation to Jamaica and Haiti and all I can say is COOOOOLLLLLDDD. Like, 80 degrees colder than where I was just 48 hours ago. Like, takes-one’s-breath-away cold. Like, one of the windows in our house shattered because it was. so. cold., and a wall in another room has ice crystals forming on it (I’m serious). Sometimes I wonder why I live in Minnesota and not on that beautiful island beach on which I was sipping slushy drinks just mere days ago. WHY.
Alas, crazy as it may be, this is home and so here I am, waist-high in blankets and neck-high in a scarf wearing fleece-lined leggings and wool socks, writing to you from the tundra about my top 13 tips for organizing baking supplies (in small spaces!). My kitchen may be tiny, but I’ve learned over the years how to make the most of my few available cabinets, one of which is dedicated entirely to my baking supplies. Lately, another cabinet seems to be completely dedicated to my husband’s and daughter’s love of crackers and chips, but that’s another post entirely.
How to Start Organizing Baking Supplies
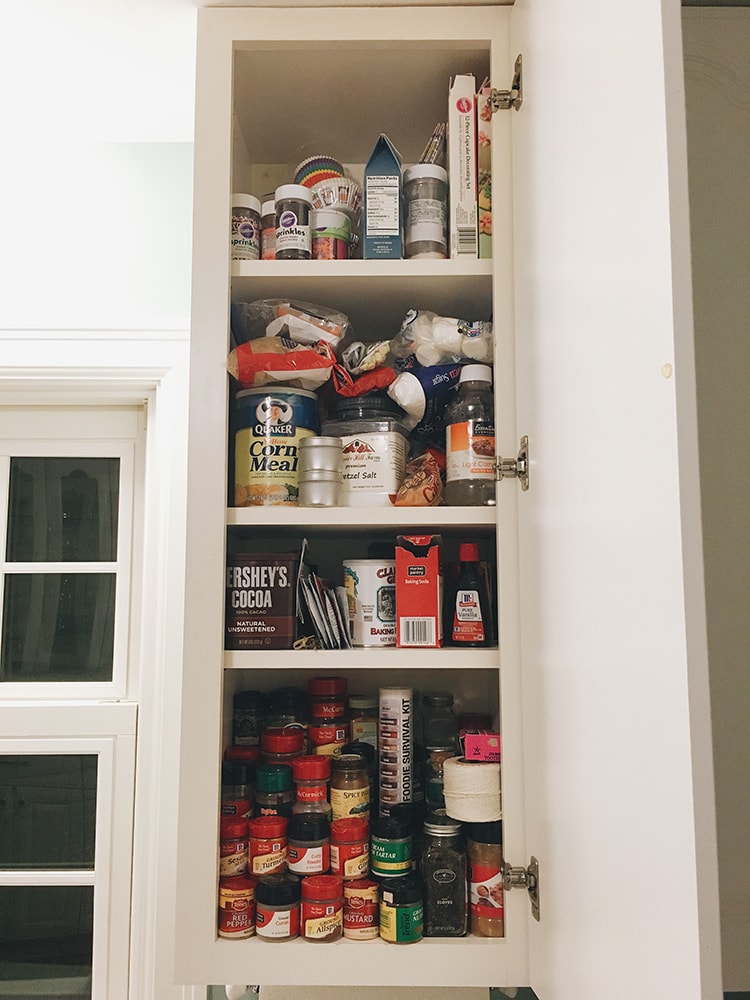
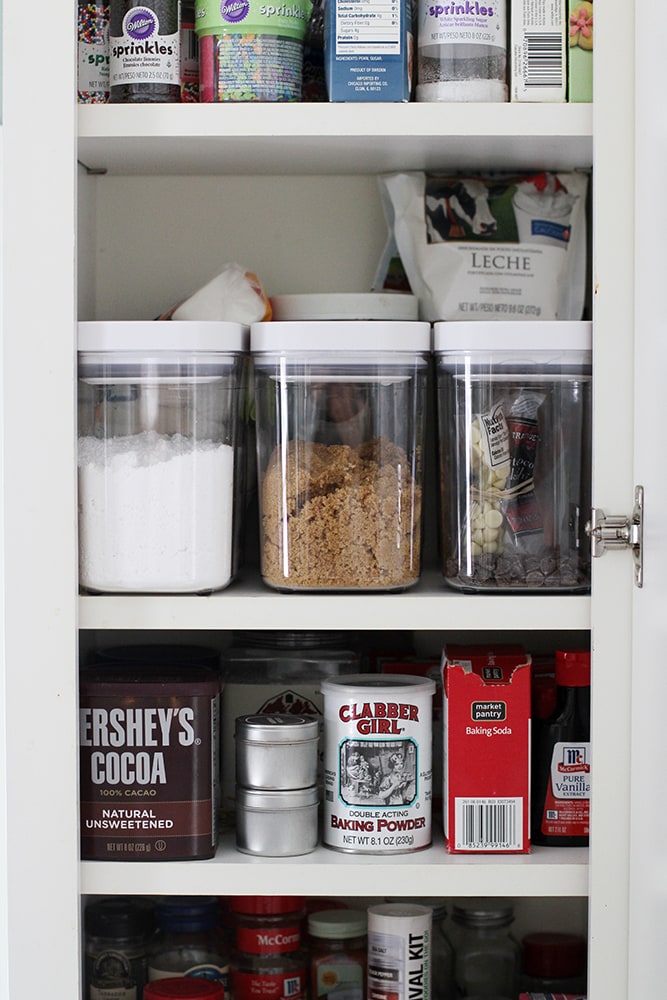
So we are going to get really real here: This is what my baking cabinet looked like before I organized it. And the bottom shelf with all the spices actually already had been organized before I took this photo (I forgot to take one before that, go me), so don’t be fooled by the half-organized state of this cabinet. If you see the other shelves, you have a pretty good idea of what the bottom shelf looked like, too.
But how to organize it all, you ask? How to keep track of all the yeast and brown sugar and cocoa powder and cupcake liners and decorating bags? Here are my 13 tips to answer all your questions and more! (I feel like I should bust out into song and dance now, but I’ll spare you.)

1. Make a plan: Don’t just go into this organizing situation all willy nilly, now. Decide how you are going to organize your baking space, no matter how big or how small. My best suggestion is to choose one (or two) shelving unit, cabinet or drawer for all of your baking supplies, that way you know just where to go when that cookie craving hits.
2. Start from scratch: Take everything out of the cabinet, clean the shelves and start organizing from the bottom up.
3. Think high to low, then low to high: What items do you use on a daily or weekly basis? Keep those on the bottom shelves or near the front. What items do you use on a monthly basis? Store those items a little higher or more toward the back. I store my most-used baking items on the lower shelves in the front, and work my way up to the top with the least-used items.
4. Take inventory: Keep a running list of baking ingredients and supplies you store in your baking cabinet. When you run out of that item, cross it off your list so you know you need to stock up next time you go to the store. This also helps avoid those situations where you just KNOW you have a block of baking chocolate hiding behind that mountain of marshmallow bags and you destroy the whole cabinet before you realize, oh, you actually are out of baking chocolate. Yeaaaahh.
5. Purge and consolidate: Have two bags of dried cranberries in your baking cabinet? Hey, me too! Consolidate them into one bag. Have a million half-used boxes of cocoa powder? Hey, me too! Consolidate it all into one box. You get the gist.
Best Tools & Tips for Organizing Baking Supplies
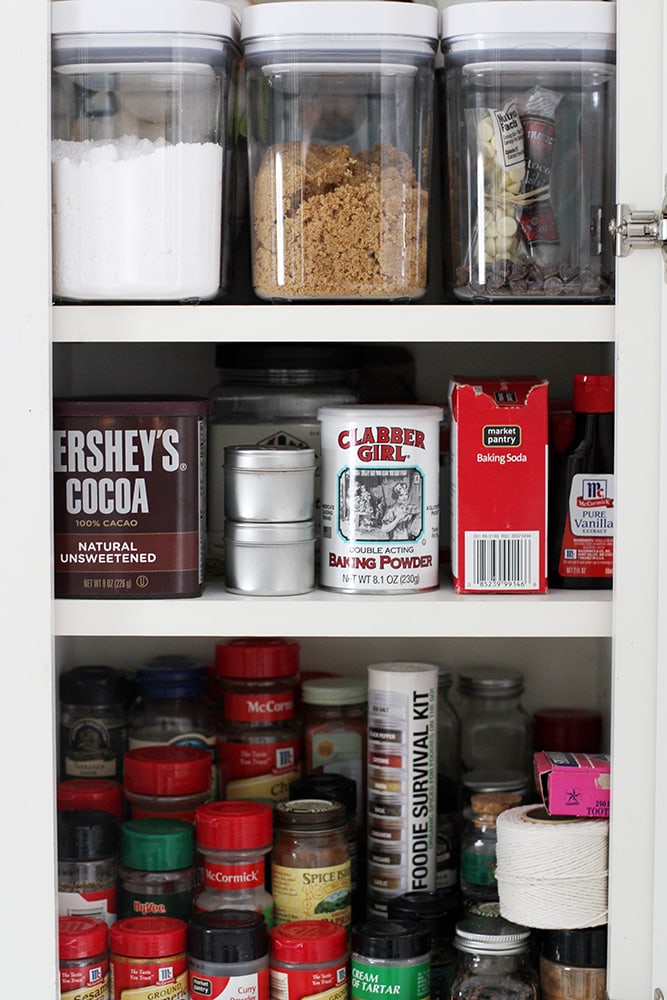
6. Use containers: This is a no-brainer to some, but to Before-Organized-Baking-Cabinet Me just threw a bunch of bags of brown sugar, powdered sugar, marshmallows and chocolate chips onto one shelf. That same Me also endured many a time of said bags falling on her head every time she opened the cabinet. After-Organized-Baking-Cabinet Me now knows the joys of having good-quality sealed containers to store those items so not only will they stay fresher longer, they’re easier to see, to store and to get to when it’s time to bake.
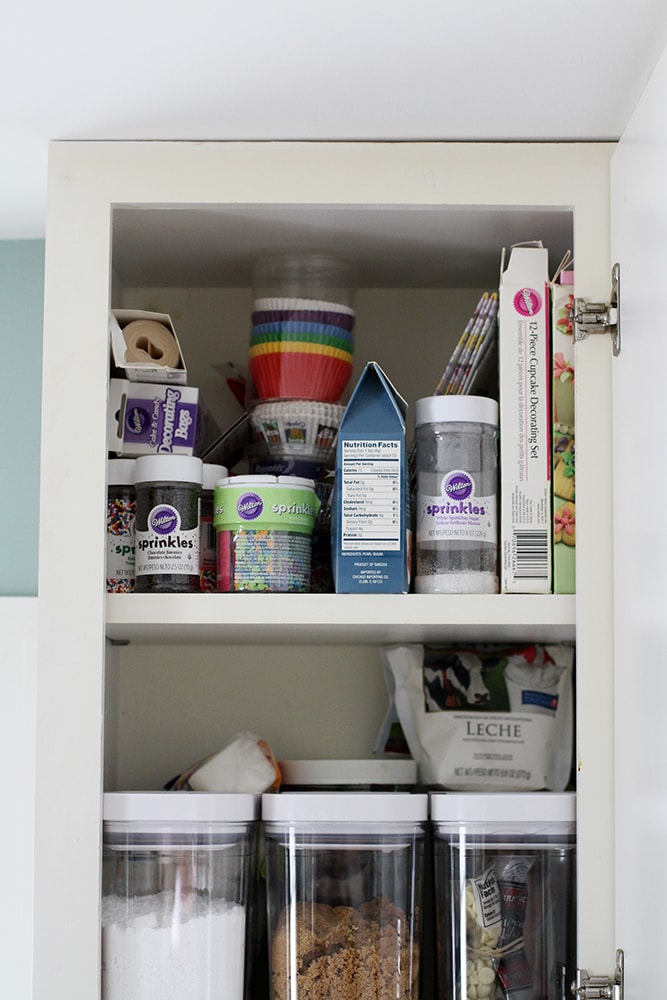
7. Group like items: Keep cookie cutters together in a box or tray. Same goes for decorating tips and small bottles, like food coloring and extracts. A turntable or round cake pan works great for these items, too, if you’ve got the space.
8. Label everything: As you can see from my photos I don’t always follow this rule, but do as I say, not as I do and label EVERYTHING. And for extra credit, mark expiration dates or the date when you opened the package. This will help ensure that everything in your baking cabinet is fresh.
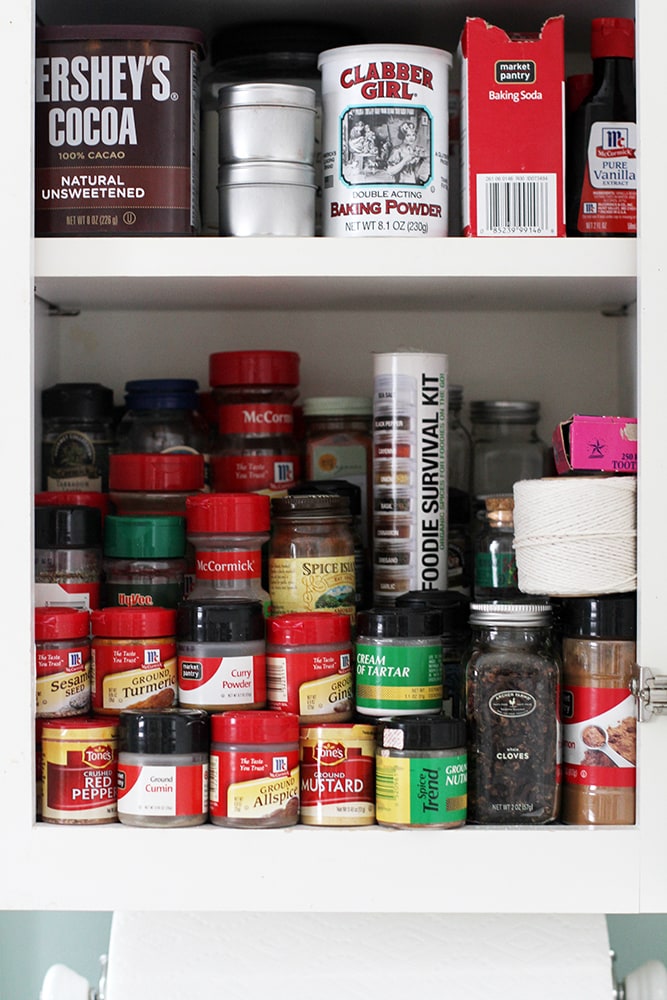
9. Use a storage shelf: I have a nifty little storage step shelf from yesteryear (I think it was my grandpa’s) that I use to store my spices. It takes up a little more space on a shelf than I would like, BUT it allows me to see all of my spices at once. Win!
10. Have a backup space: OK, here is where I get really really real with you and tell you that, in fact, not all of my baking supplies fit in this one cabinet. So I also have a drawer dedicated to overflow items that don’t fit, like measuring spoons and measuring cups, rolling pins, etc. These items also just aren’t conducive to a vertical cabinet setup, so it’s nice to have both spaces.
Don’t Forget to Have Fun
11. Make it fun: OK I’m officially nerding out here, but I do jazz hands whenever I see really awesome ways to organize. So look to the Pinterest for inspiration on how to make this a fun afternoon project (see also: this playlist).
12. Maximize your space: Use the inside of the cabinet door to hang baking supplies or a dry-erase board where you can keep inventory of your items. Make more shelves if needed to use up a gap in your cabinets. Store taller items vertically and divide them with magazine racks or tension rods.
13. Constantly re-evaluate. Not using those dried cranberries as often as you thought you would? Store them higher up or farther back, or take them out of the baking cabinet entirely. If you find a few (non-expired and un-opened) items that you just haven’t and won’t ever use, take them out of there and give them to the local food bank.
Now go forth and organize!
P.S. Want more of this series? Check out my post on my top 13 essential baking ingredients, top 13 essential baking tools and top 13 baking tips and tricks.
Disclosure: This post contains affiliate links.
Inspired to re-organise my baking cupboard(s) now- thanks! Loving the Baker’s Dozen Series!
Want your baking POWDER to retain its leavening qualities longer? Store the can upside down (first making sure the lid is on snugly.) Ages ago, I read that some of the leavening ingredients in baking powder tend to sink to the bottom of the can over time. Sure, you could give the can a shake before you use it, IF you remember. But when you store the can upside down, you’ll automatically mix everything when you turn it over, thereby redistributing the leavening.
Organized baking heaven! I love glass jars for all of my stuff – I recently re-organized my pantry and it gives me so much joy. Thanks for letting me be nosy and see your organized cabinets. 🙂
Emma — Thank you so much! Happy organizing! 🙂
Gloria — OMG that’s genius.
Sara — Pretty glass jars make everything better! 😉
ugh yes yes yesss. I have practically no space and it’s the worst-I can’t wait to have a house with more space and for me to try to actually organize the chaos that is all my kitchen stuff!
I REALLY love this and NEED to organize my kitchen. I feel like it also makes cooking so much faster cuz everything is in the right place!
Oh my, you just don’t know how much women all over the world need this. I have struggled for years, often digging through haphazard piles of accumulated ingredients to the point that doing the actual baking/cooking was no longer a joy…I was totally tired out and depressed. Would so LOVE to find a tried and true system to organize all the foods, spices, cheeses and dairy in the fridge, …even my freezer!
Pingback: Currently Crushing On. | How Sweet It Is
Pingback: Saturday Sites: Week Four |
Vivian — Oh goodness, my freezer is a little house of horrors right now. Thanks for your comment! 🙂
Pingback: Building a Minimalist Pantry - The Fauxmartha
Thanks for sharing your idea. this very useful for everyone and I really like this! One more, your post inspires me to write my article tips about baking tools too. Kindly visit my profile.
I did this recently and moved almost all of it into clear tubs stored at the bottom of our basement stairs (which lead into the kitchen). A few items though I kept in the pantry/kitchen, because I use them for more than just baking or they have multiple purposes (e.g. baking soda, oats, etc.). Certain items have been moved to OXO containers, I poured salt into a small mason jar to keep on hand in the kitchen for cooking purposes because trying to pour salt into a measuring spoon is just asking for trouble.
Kristen, OK that sounds like my organizing HEAVEN.