no knead dutch oven bread
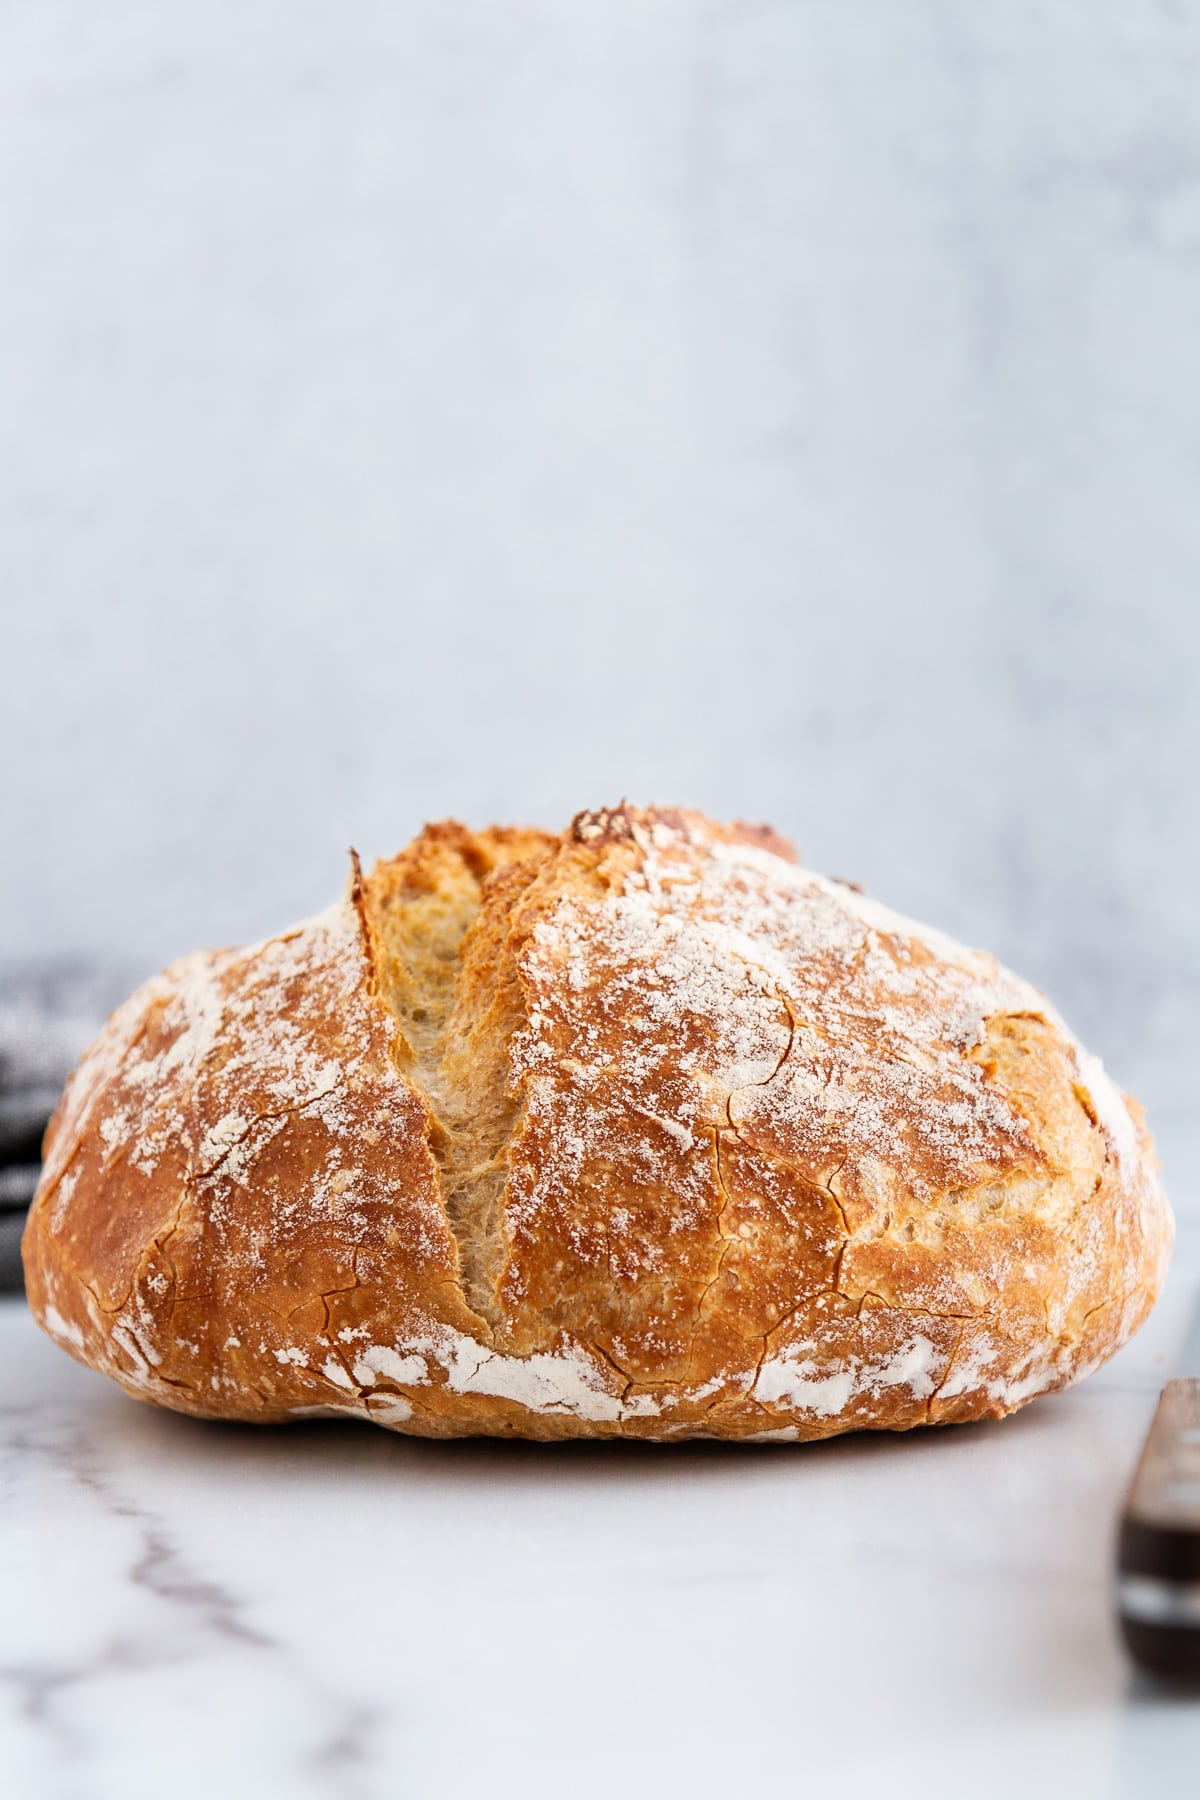
Ready to bake homemade bread in your own kitchen? This no knead Dutch oven bread is your BFF. You just need three ingredients to make this delicious recipe, and I’ll take you through it step by step. So, what are you waiting for? It’s time to get some delicious carbs in your life.
If you could see me right now, you’d know I am jumping for joy for this post.
Why?
Because this beautiful loaf — this glorious no knead Dutch oven bread — might just be the very best bread I’ve ever baked. Seriously. And it also happens to be one of the easiest ever, too. And I’m going to show you, step by step, just how to do it.
Like I said, so much jumping for joy. And for carbs.
First things first: The reason I believe this may be the very best bread I’ve ever baked (the method for which, by the way, originated from the great Jim Lahey of Sullivan Street Bakery) is three-fold. One, the taste. It’s just amazing. It’s slightly salty and not at all boring, like some basic breads tend to be. Two, the texture. It’s mega-soft on the inside but with a light, tender, almost flaky crust on the outside. And the air pockets in the bread slices just slay me. You’ll soon see what I mean. AND YOU WILL LOVE IT.
And three, the preparation. This recipe couldn’t be simpler: As in, you stir a few ingredients together, let them sit overnight, and the next morning, you bake a loaf of bread. DONE. No, I’m not joking. Yes, you need to drop everything and make this bread right now. So let’s get to it!
How to Make No Knead Dutch Oven Bread Dough
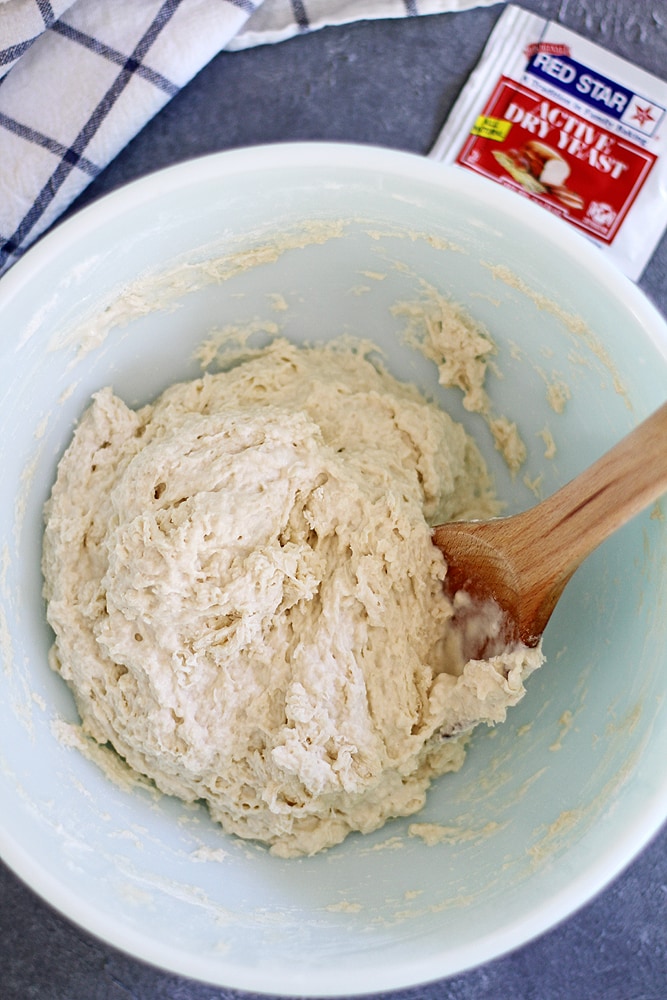
First, in a large bowl, whisk some flour, salt and yeast (I used my go-to Red Star active dry yeast) until well mixed. Pour in warm water (about 110 to 115 degrees F, or just slightly warmer than lukewarm) and use a wooden spoon to stir the mixture until it forms a wet, sticky and shaggy dough. That’s it! No kneading, no nothing. Just cover the bowl with plastic wrap and let the dough rise for at least 8 hours (but no more than around 18 hours).
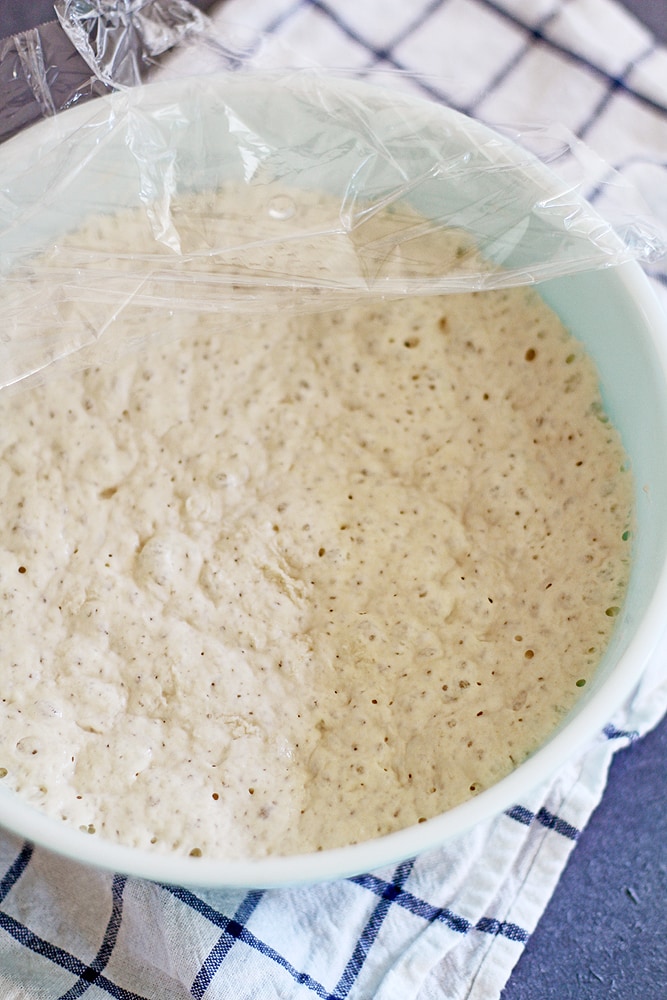
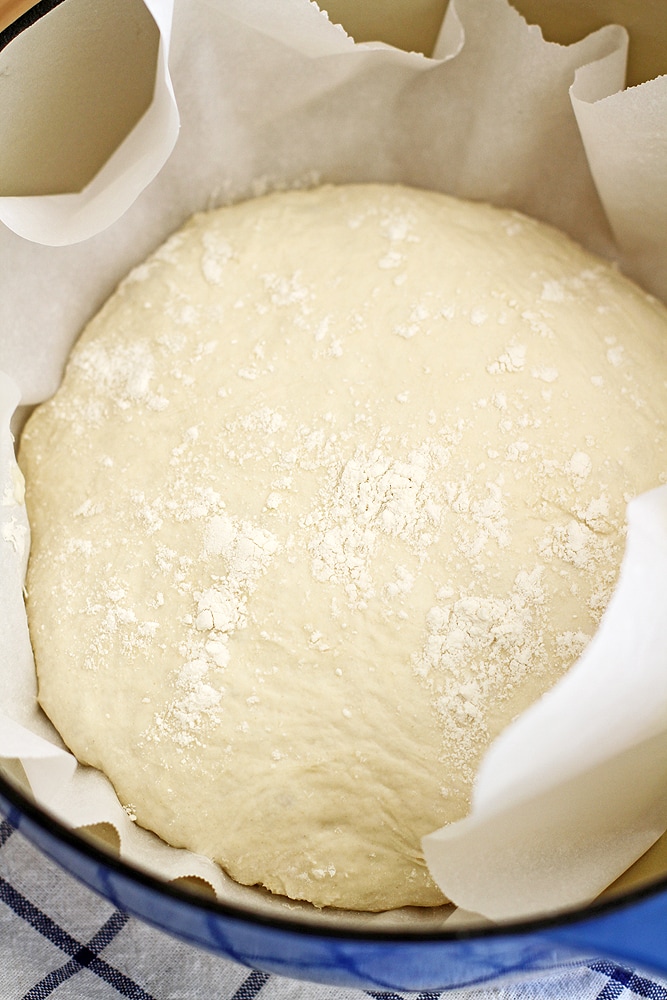
When the dough is fully risen, it should be more than doubled in size, bubbly and flattened on top. That means it’s ready for baking! Yes, already. No, it won’t be difficult.
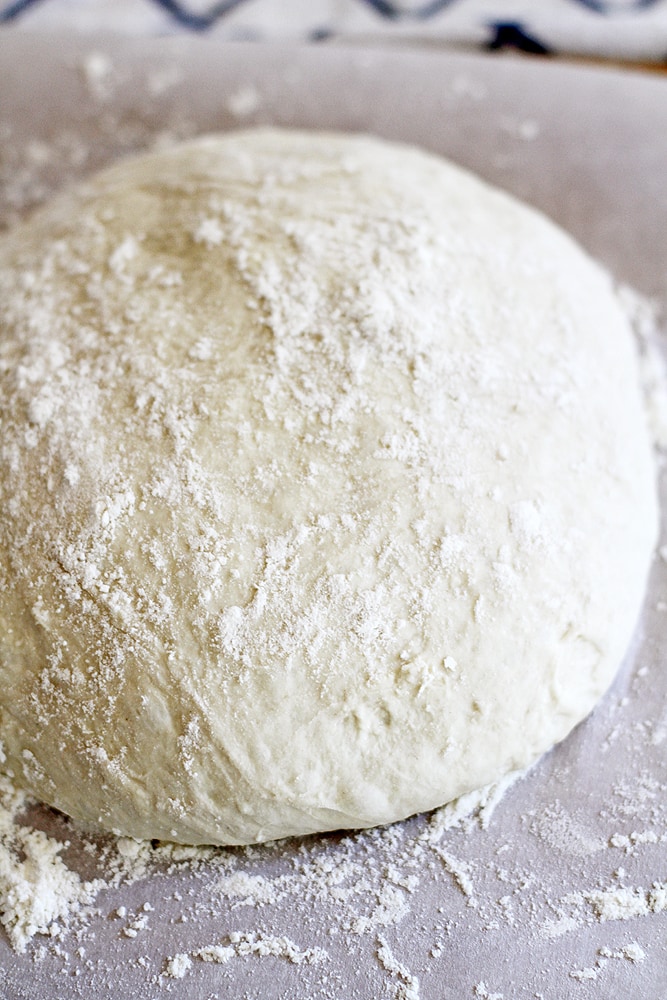
Heat your oven to 450 degrees F, and place a covered Dutch oven on the center rack to preheat for about 30 minutes (I used a 6-quart Dutch oven, but even a 4-quart or 8-quart Dutch oven would work). Meanwhile, punch down the dough and, using very well-floured hands (the dough is pretty sticky, remember!), transfer the dough to a well-floured sheet of parchment paper. Shape the dough into a ball and sprinkle the top lightly with more flour. Cover the dough with a sheet of plastic wrap and let it rest for 30 minutes.
Watch How to Make This Recipe
How to Bake No Knead Dutch Oven Bread
When the dough is fully rested, remove the Dutch oven from the oven (careful, it’s insanely hot!) and either transfer the dough alone directly to the Dutch oven, or place it in the Dutch oven with the parchment paper underneath. If the bottom of your Dutch oven isn’t enamel-coated, it’s best to use the parchment paper. Mine is enamel-coated, but I find it easier to keep the round shape of the dough if I just place it in the Dutch oven with the parchment paper. Whatever works fer ya!
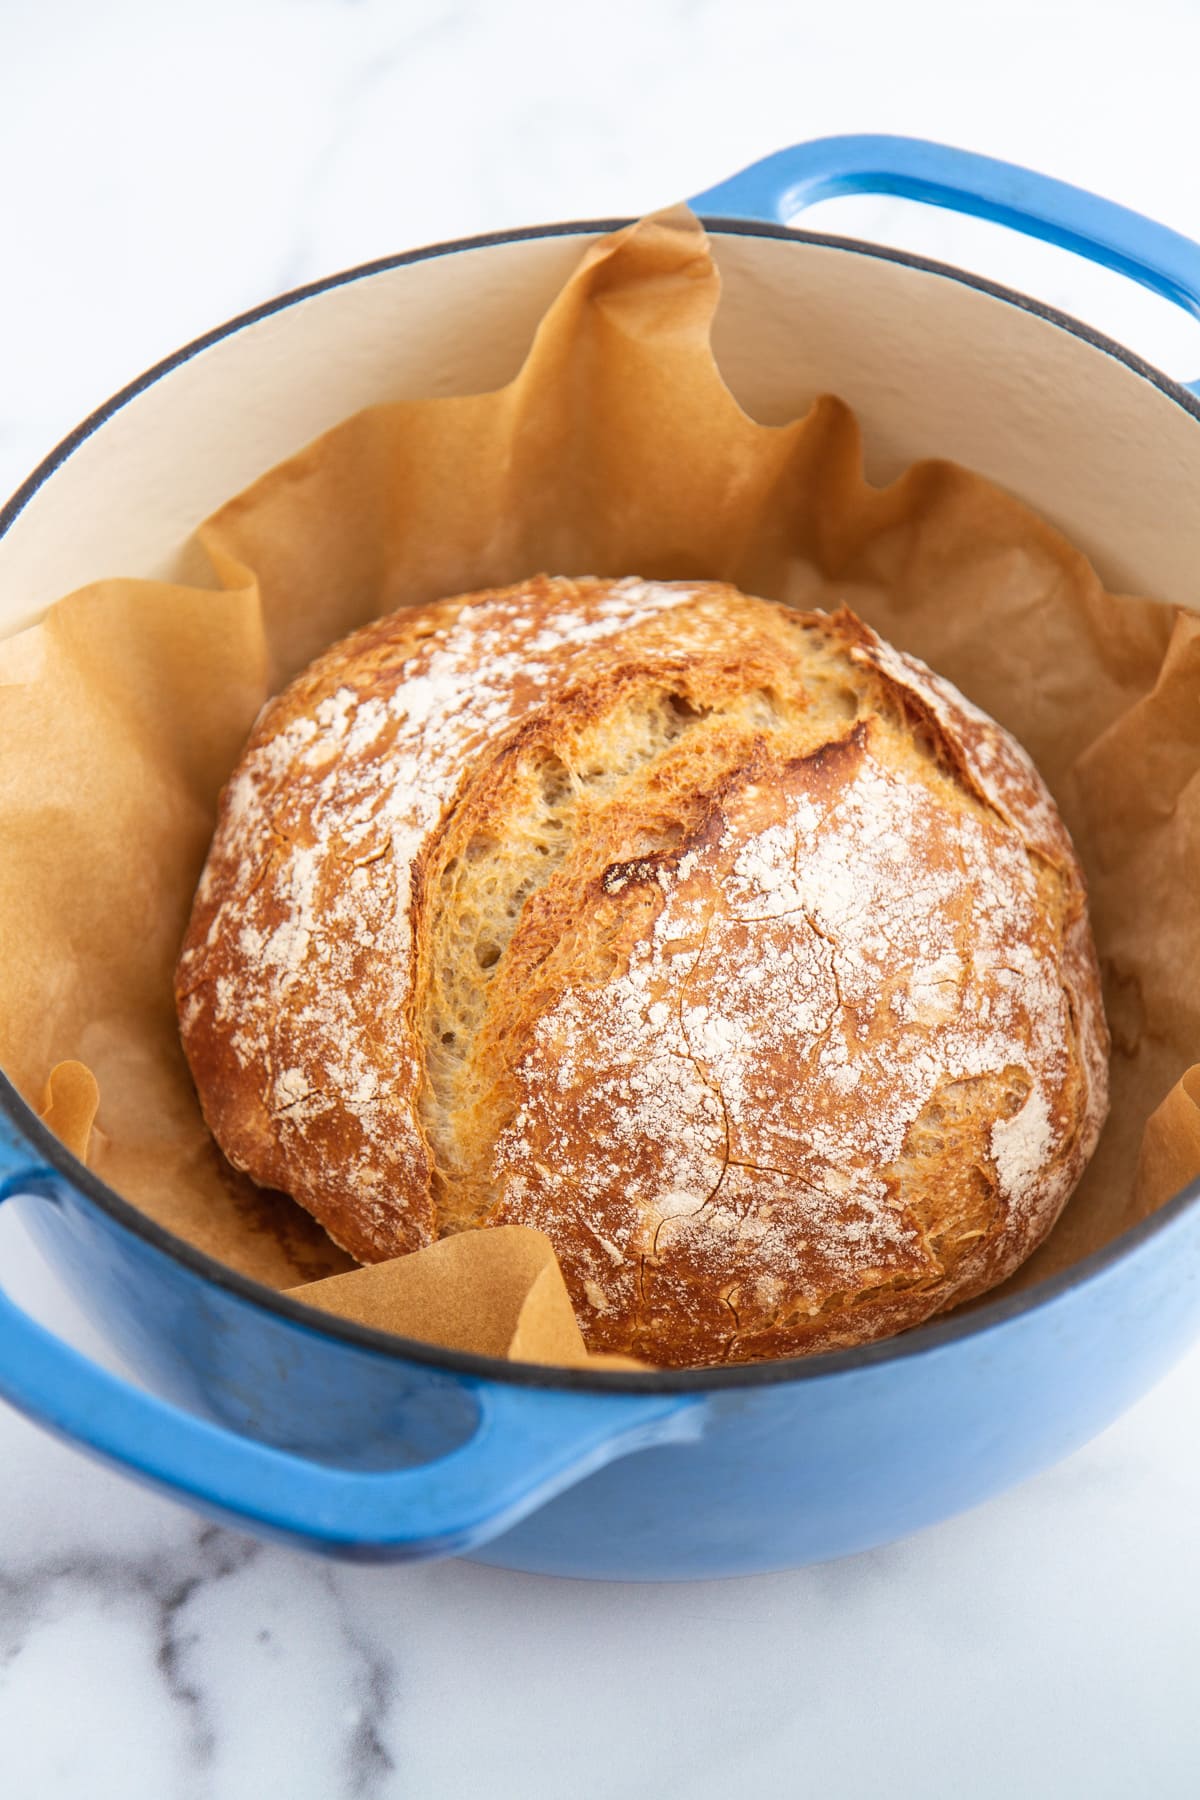
Cover the Dutch oven and return it to the oven (how many times can I type the word “oven”?). Bake the dough 45 minutes covered, then another 10 to 15 minutes uncovered until the top of the bread is a lovely golden brown. Can you believe it? YOU BAKED THAT. And you barely had to do anything.
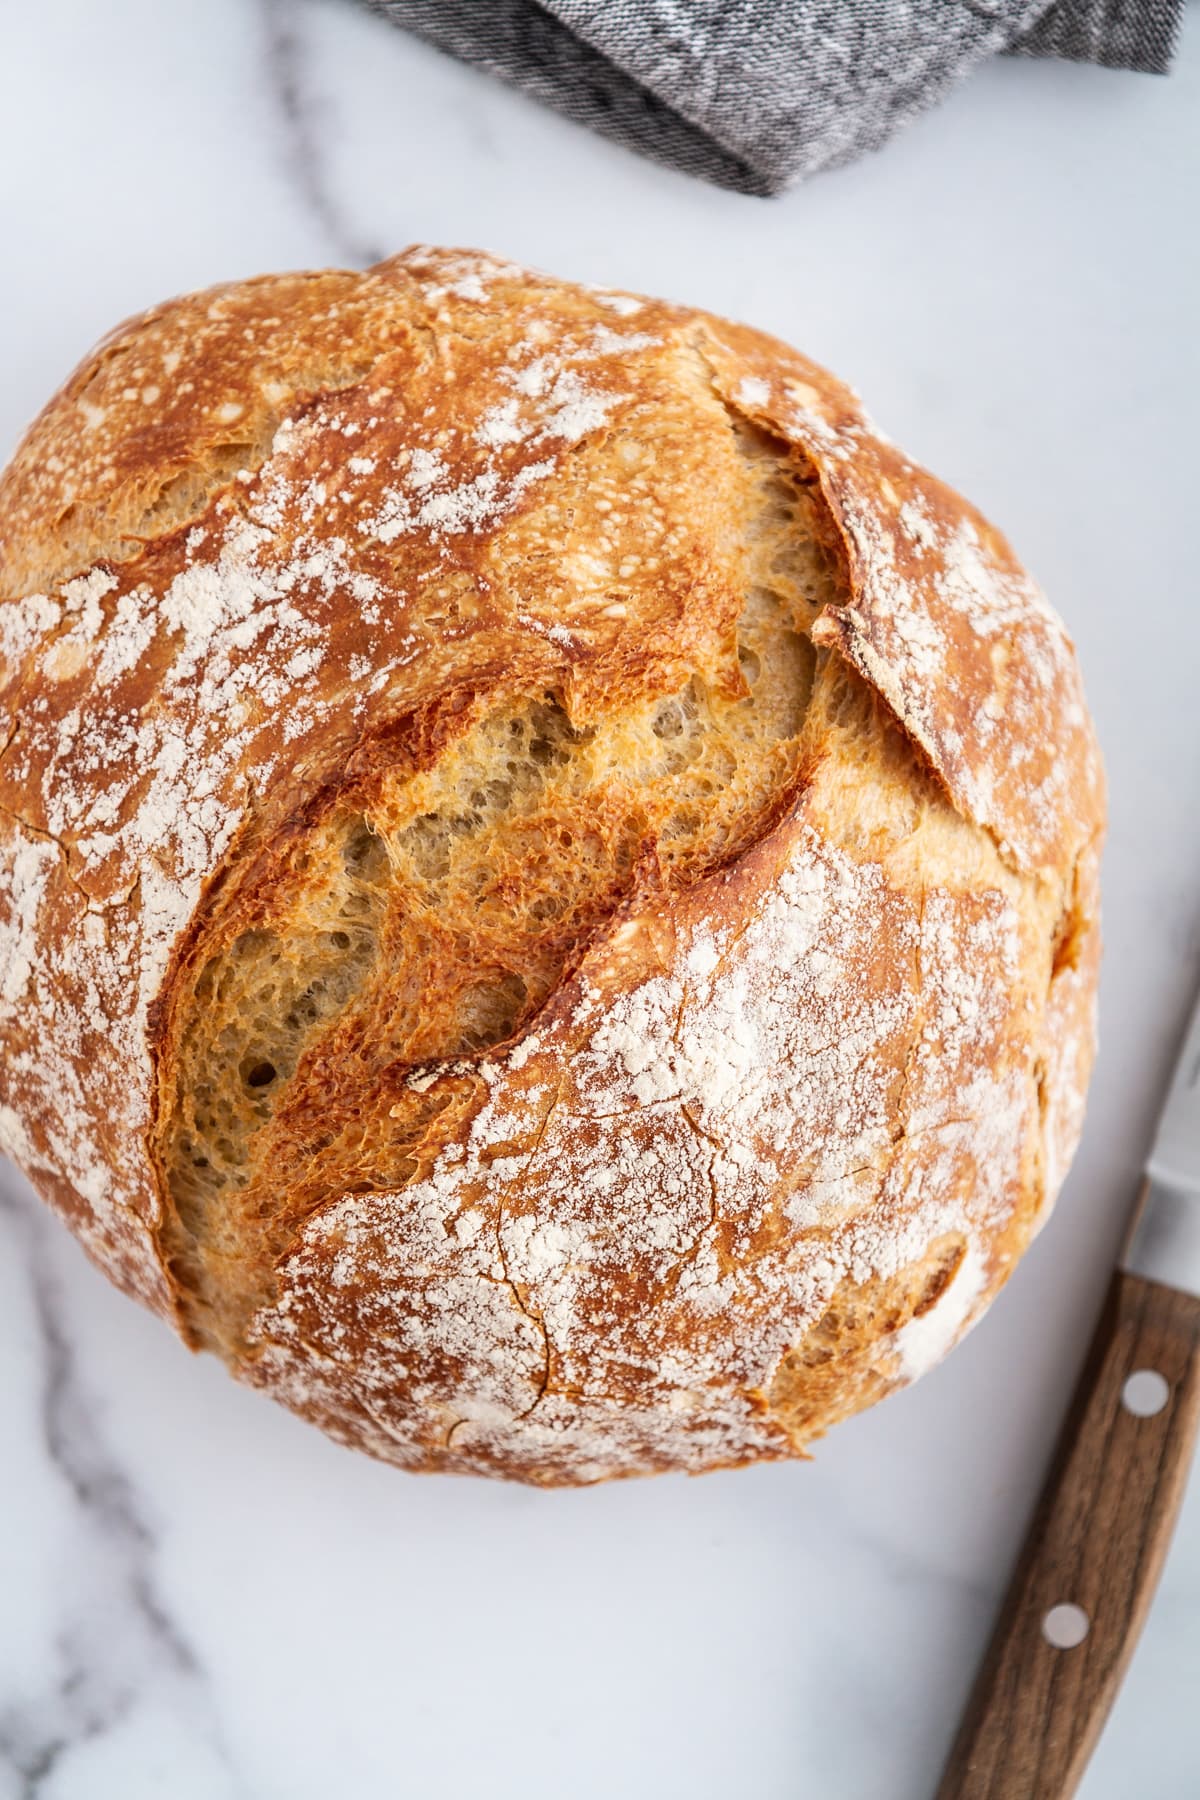
Let the bread cool for just a few minutes — basically until you can handle it without burning your fingerprints off — and then slice away.
How to Enjoy No-Knead Dutch Oven Bread
Suggestions: As grilled cheese, dipped in soup, as garlic bread, spread with peanut butter (and jelly!), cut up into croutons, ripped apart and shoved right into face, etc. etc. I have done/will do all of the above.
Of course, if you also need someone to come over and assist you in eating all of this gorgeous and delicious loaf of bread you just baked, I’m your leading lady. But if you’re anything like me, I have a feeling you won’t need any help.
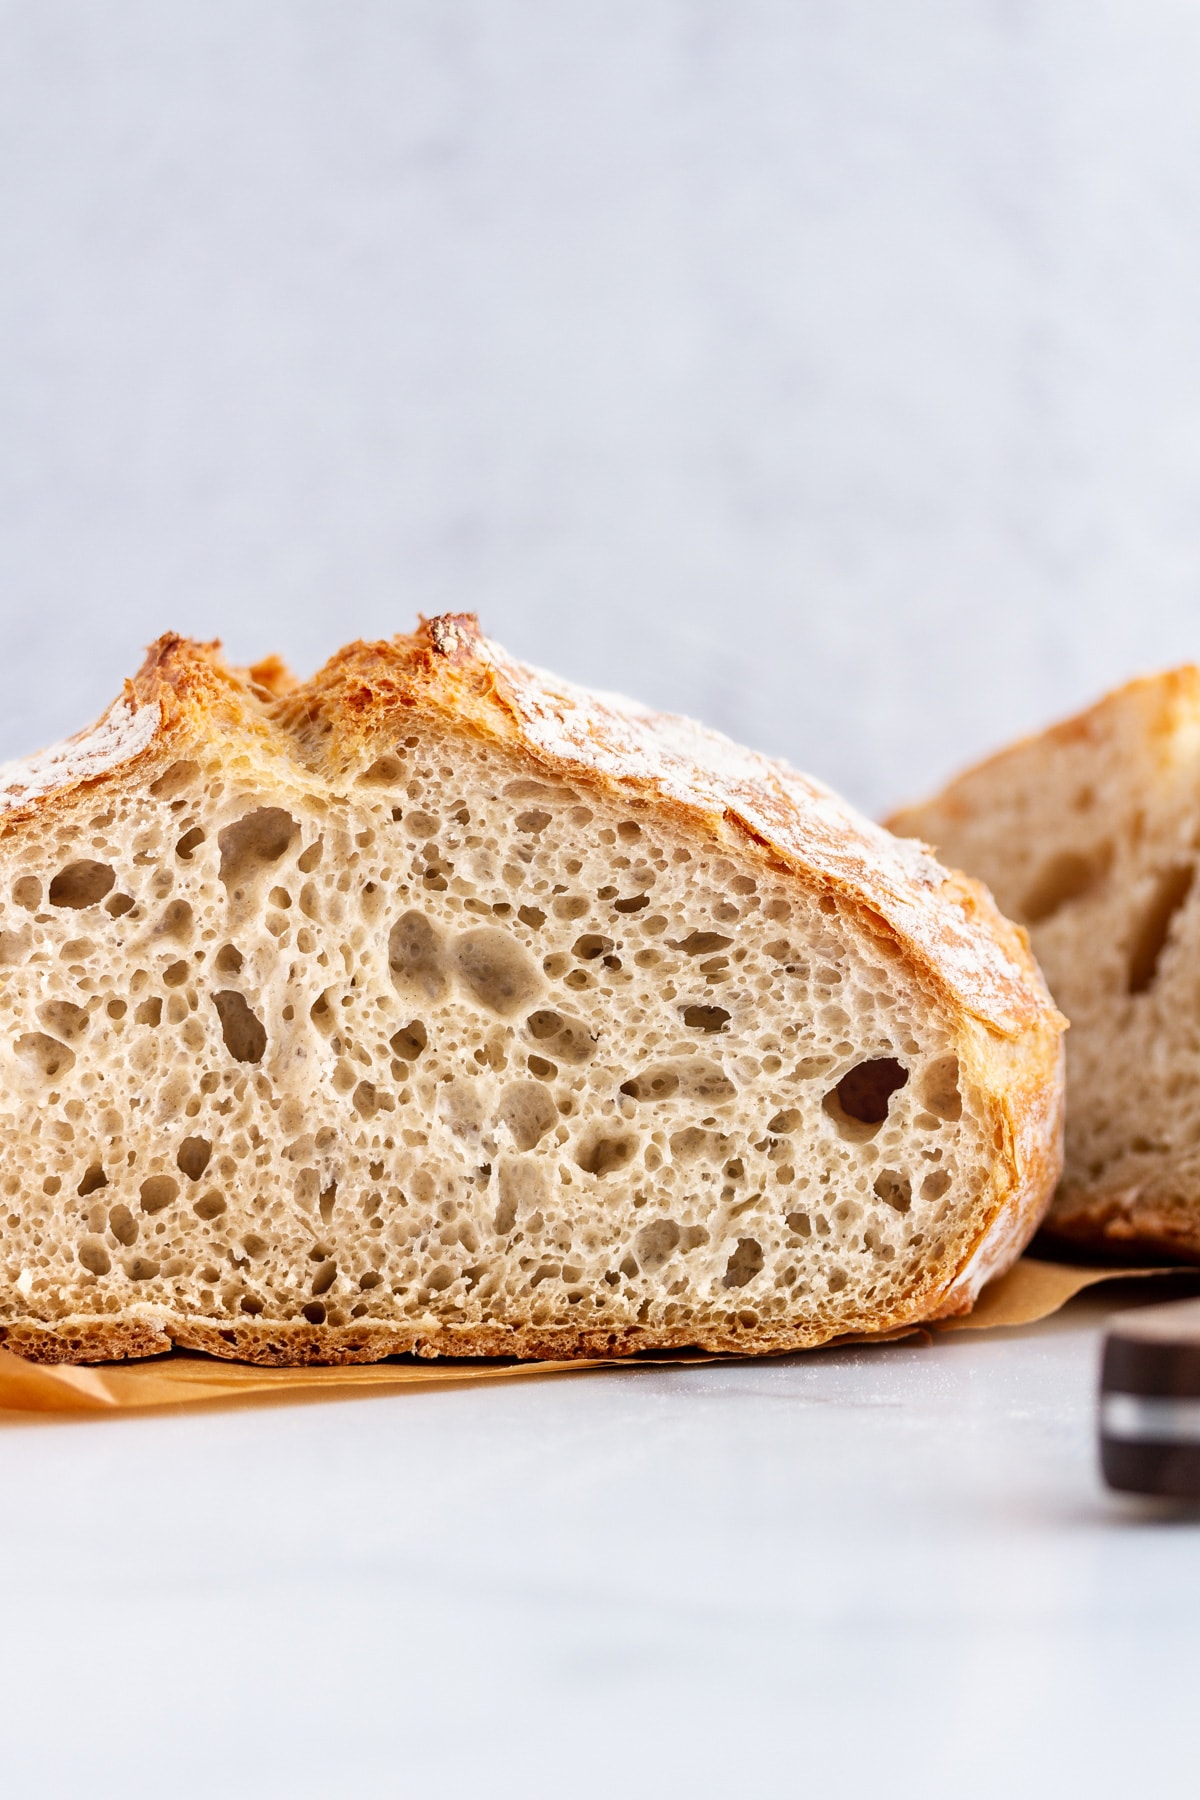
Uhhhhhhhhhh those air pockets, AMIRIGHT?
P.S. Ready for your next bread baking adventure? Try my Sourdough 101 series, which takes you step by step through the entire process of making homemade sourdough at home, from starter to loaf.
PrintNo-Knead Dutch Oven Bread
- Prep Time: 1 hour 10 mins (plus 8 hours rise time)
- Cook Time: 1 hour
- Total Time: 2 hours 10 minutes
- Yield: 1 loaf 1x
- Category: Bread
- Method: Bake
- Cuisine: American
Description
This is the easiest bread you’ll ever bake! No kneading, no fuss, just delicious carbs.
Ingredients
- 3 cups all-purpose flour, plus more for shaping
- 2 teaspoons sea salt
- 1 teaspoon Red Star active dry yeast OR 3/4 teaspoon instant yeast
- 1 1/2 cups warm water (about 110 to 115 degrees F)
Instructions
- In a large bowl, whisk flour, salt and yeast until well mixed. Pour in warm water and use a wooden spoon to stir until a shaggy dough forms. The mixture will be wet and very sticky to the touch.
- Cover bowl tightly with plastic wrap and set aside in a warm place 8 to 18 hours until dough rises, bubbles and flattens on top.
- Heat oven to 450 degrees F. Once oven is preheated, place a 6-quart Dutch oven (with cover) in oven 30 minutes before baking.
- Punch down dough. Generously flour a sheet of parchment paper; transfer dough to parchment and, with floured hands, quickly shape into a ball. Place dough on parchment paper and sprinkle top lightly with flour. Top with a sheet of plastic wrap and let rest 30 minutes.
- Remove Dutch oven from oven. Uncover dough and carefully transfer to Dutch oven, with or without parchment paper beneath (if bottom of Dutch oven is not coated with enamel, keep parchment paper beneath dough). Cover Dutch oven and return to oven.
- Bake bread 45 minutes covered, then another 10 to 15 minutes uncovered until dough is baked through and golden brown on top. Cool slightly before slicing.
Keywords: artisan bread, easy homemade bread, simple bread recipe
Disclosure: I received compensation from Red Star Yeast for recipe development purposes. All opinions are my own.
Yeah those pockets are perfection. Utter perfection. How on hearth do you come up with theses perfect bread recipes, lady? (see what I did there 🙂 ). Pinning this for this weekend!
THANK YOU for Pinning it!!!
I would never have found this INCREDIBLE recipe if you hadn’t!
When I told my wife what I was making & what it would take, she thought I was nutz!
When she tasted it… I was a HERO!!!
Wow, I have never made a loaf of bread look this good. I love the air pockets and that crust. oh that crust!
I want this bread so bad right now. No knead? Hella yes! Plus, the dutch oven adds such a nice crust to it…in love.
I miss the days of big ol’ sandwiches on dutch crunch rolls – I can see why you’d be jumping for joy over this loaf! I must break out my gf ap flour blend and whip this up in my own dutch oven! Those yeasty air pockets look faaaabulous!
Hi, I know this is a long time ago but did this work with your gf flour swap?
Giving credit where credit is due. This is Jim Lahey’s bread method and works very well indeed. For more similar recipe google him.
You are so right great recipe, she gave credit to him in her piece. 🙂
Not until it was brought to her attention. Look at the dates on the posts.
Actually David, this method of cooking goes back any hundreds, if not thousands of years. Lahey simply promoted an older style of cooking and no neophytes like you think it is his method. Please!
Who cares? Besides, when I was 5 or 6 years old my Hungarian Great Grandmother would make this bread in an old wood stove. I remember it so clearly because I would help her make the flour and she would tell me that I had to go to bed for two nights before I could eat the bread. Such a fond memory. Thank you for bringing that all back to me. I am making a loaf this evening and then I will go to bed for two nights before I eat it. Ha ha
This is a very old method of baking bread.
Oh, for heaven’s sake, what difference does it make??? Lighten up and eat bread, and stop your moaning, dude! Geesh.
And by dude, I mean David, not Jon. I agree with Jon.
Moi, get over yourself.
Humans have been making bread for a couple thousand years before “jim lahey” was born.
This method of baking bread has been around since mankind decided to use vessels to cook in. It is very unbecoming to behave in this manner, and only shows ignorance.
This, m’dear, is bread perfection. I want two thick slices with some gouda, mushrooms and onions in between. Pinning!
Moi — Yes! I completely forgot to mention him in the post. Editing that now. 🙂 Thanks for the reminder.
Sarah — Hearth, lololol… OH, YOU. 😉
Loving this easy bread recipe, definitely pinning this to make for a dinner party!
Can you replace the dry yeast with sourdough starter?
This bread recipe looks absolutely delicious and totally worth the calories! Can you tell me what size Dutch oven you used for the baking process? Thanks for all the great recipes! Keep them coming!
6 quarts Dutch oven…as specified in the recipe 🙂
Would a 3.5 quart work for this?
I have used 3 1/2 qt. Turned out great.
Ah! Those air pockets! That crust! It all looks amazing. I’m totally trying this this week!
I need to make this bread immediately, what a beauty!
yep yep yep yep yep
I’ve been wanting to try this kind of bread for so long! I can’t put it off any longer!
Just finished making my first loaf. It was very easy and quite yummy. Next time I will use less salt as it was a bit salty, even though I used unsalted butter. in the dough as the recipe called for. It is not a problem, though, if you use unsalted butter on your first warm slice, as I did. Or on the second slice. I had to have two slices because the first slice was the end. Nice and crusty, but not too crunchy. The second was an inside slice. The crust was firm and the bread was full of holes, light and airy. I have no excuse for the third slice, other than I needed to see how it tasted with apricot jam. I am currently trying to justify a fourth slice. Can’t wait to make this bread again. It was actually quite fun with all the gooey-ness of the dough. I do have a question, though. After pre-heating the dutch over for 30 minutes at 450 degrees, do you drop the temperature? It only took 30 minutes to bake at 450, and the recipe calls for 45 minutes covered, and then 10-15 uncovered. Thanks for the recipe. It is a keeper!
Unsalted butter? Did I miss something? I don’t see unsalted butter in the recipe.
she meant spreading on the bread afterwards, I think!!….lol!
Do not change oven temp. The high temp gives you the oven spring which produces the lofty airy loaf. Baking times vary between electric, gas and convection style ovens. I baked mine in a gas convection oven for 40 and 10 to get to 200 deg. in the center of the loaf. Perfection!
That bread is so pretty there’s no way it couldn’t taste good! What a great recipe for something notoriously tricky.
Schnackies — I mean, I would never judge if you went for that fourth slice. 😉 And no, I didn’t need to reduce the temp on my oven once it was preheated, but all ovens are calibrated differently so maybe yours just runs a little hotter than mine. I’m still so glad it turned out well for you!
Lori D — Hi! I used a 6-quart Dutch oven, but you could really use any size you have on hand. Happy baking!
I have been seeing this bread ALLLL over social media. (For good reason!) I need to make it, stat.
Pingback: no-knead dutch oven bread | My Berry Cake
This bread sounds amazing! No kneading and 4 ingredients! Sounds like a winner to me!
Stephanie!!!! Welcome back and ohhhhhhhmyyyyyygooooodnesssss what a beautiful loaf! I am picturing that warm slice with some soft butter on it and inhaling it…….sogoingtomakethistomorrow!!!!!!
I.CANNOT.BELIEVE. how easy this is! I mean – you could literally prep for this bread the night before and voila! Freshly baked bread for breakfast EVERY morning! Also, do I need to mention that heavenly aroma that’ll be floating around in the air when this beauty is getting baked? Pinning! 😀
Always love your bread recipes, and this one looks absolutely amazing! That crust… YES.
Hello is there any way to make this so its gluten free? My husband loves bread but has a gluten allergy. Can you tell me what kind of gluten free flour I could use instead of regular flour? Thank you for the help ????
Amzaing! The crust looks so crunchy, brown, and delicious!
Oh I love this!!! I am never one to bake my own bread due to the time it takes, but this looks so simple! I am definitely giving this a try. The final product looks bakery quality too. 🙂 Love this!
I have never made bread in a dutch oven but I love the idea that this bread is no knead!
Kelly — I hope you got my e-mail! I don’t know if this recipe can be made gluten free but I have had great results with Bob’s Red Mill’s 1-to-1 baking flour. Hope it works for you!
Pingback: Friday Link Love - Two Places at Once
Pingback: Friday Favorites | A Tasty Life
I am also currently jumping for joy. I’m going to make this tonight, no joke!
Amanda — Hooray! I hope you love it!
I’ve made D.O. bread very similar to this – technique, recipe, etc. I can attest that this is the best bread ever – and the easiest! I always go with the parchment paper part. Truly bakery quality; amazing as panini bread or as toast. Will be working in finely shredded smoked gouda to my next loaf. The overnight slow rise can develop almost a sourdough-like energy about it…absolutely love it! Too bad its still nearly 100 degrees outside… it has to cool down pretty soon, amiright???
BTW – has anyone tried using white whole-wheat flour with this? The outcome?
I just saw this in Lindsay’s dutch oven post, and I’m SO EXCITED to make a loaf this weekend. I have a dutch oven that sadly I currently only use for soup (shame), but this needs to happen. That crust!
Pingback: 10 Easy Recipes You Can Make in a Dutch Oven - Best Buzz Virals News
This is currently in my oven and the house smells amazing! Thank you for this recipe 🙂
Anetta — Oh yay! I hope you love it! 🙂
What a great recipe! As an experienced bread baker, I was tempted to alter the recipe slightly, but I’m glad I didn’t. My bread turned out fabulous!
What size dutch oven?
Ak — Pretty much any size will work, but I believe mine is a 6-quart.
I made the recipe exactly and it turned out great! Thank you 🙂
What size dutch oven, please? Thank you!!
Oops just saw another’s comment and your answer. Nevvahmind. 🙂
Joy — Ha! Glad I could help. 😉 Enjoy!
Hiya. I don’t have a Dutch oven . Can I bake it covered with foil instead? Thank you!
Tina — Any oven-safe pot or roasting pan with a cover will do. Enjoy!
Man. Oh, man. Hoe-lee-moly! Bread coma, right now. I’m making this every day, not even joking!
This is an old recipe and I really like it… But I don’t have any pot this Big… I have a 2 quart dutch oven… Can I make this it it? Or do I have to modify the recipe?
Mithila, I don’t think a 2-quart Dutch oven is big enough. You can use nearly any large pot with a lid, though, provided it’s relative to the size of a 6-quart Dutch oven!
Awesome Recipe! Just got a dutch oven today and immediately tried this recipe. I can’t stop eating the bread.
Alan — So glad you liked it! Thank you! 🙂
I just mixed this up and tastes it before letting it proof and it was very salty. Have I messed it up? I used sea salt but it was fine grain. It’s going to be so sad to wait 8 hours for too salty bread! Is it all going to be alright?!! 😛
Amazing. This was hands down the easiest and most gorgeous loaf of bread I’ve ever made! Thank you so much for sharing ????
Chelsey — I’m not sure — it should be fine (might just taste salty because it’s not baked?) so I’d just bake it and see what happens. I think it should be fine!
Robin — So glad you enjoyed it! Thank you!
This bread looks delicious! I was just wondering what size dutch oven you use? I have a small dutch oven and am not sure if it will be big enough.
Margaret — I used a 6-quart Dutch oven, but even a 4-quart would work just fine!
Pingback: Skinny Broccoli & Cheese Soup - flatland fresh food
I Googled dutch-oven recipes and I’m so glad this was on the list I looked at. This was an amazingly easy recipe. It was my first time making bread and second time using my dutch oven. I brought some to work and my coworkers loved it. I’ll be making it for a friend again this week.
Now I want to experiment with different combinations of flours, spices, and sizes. If I was to split the dough in twos, how long would you recommend to bake it for?
Sophie — That’s so great to hear; thank you! As for recommended bake time for half of this recipe, I’m not sure. I’d say start with half the original baking time and go from there (so, check it after about 20-25 minutes baked while covered).
I think I’ve finally found a bread recipe I can handle. Made it this morning and it was awesome. The only challenge now will be to avoid making/eating it every day.
The bread looks delicious!!!! Any tips/suggestions to adding herbs such as rosemary to this mastepiece?
Deb — Thanks! I don’t have a specific suggestion as to how much herbs to add, but I think fresh rosemary or dried Italian herbs would be a great addition!
At which point would you add fresh herbs? When mixing all other ingredients together? Or just sprinkle it on top?
I would definitely add them in when you mix all of the ingredients together so they’re speckled throughout the loaf!
I put cool water instead of warm , I totally blanked on it, did I ruin the recipe? It’s been sitting for 5 hours and does not look like it’s risen much. I’m wondering if I should start over.
Would you suggest any modifications for high altitude, 6500′? I’d really like to try this, looks delicious!
Snw_bne — I’m sorry but I don’t know anything about high altitude baking! 🙁 I would maybe search online for how to convert recipes for higher altitudes.
Pingback: 15 Dutch Oven Recipes - Simply Whisked
Can recipe be doubled or tripled. Good recipe I tried I liked its simple
I made this bread today for the first time and was so pleased with the results! When I first mixed it up I was afraid that the dough didn’t look “wet” enough, but as it rose it looked more like the photos. I plunked the whole thing (parchment paper and all) in the Dutch oven and virtually had nothing to clean up. We loved the dense, chewy texture and the whole loaf was finished by the end of supper. This is going to become a regular staple around here!
Ingrid — So glad you loved it!
Ingrid — So glad to hear that you loved it!
Linda — I’ve never tried to do that but I don’t see why not!
Just tried this for the first time, waiting to go in the oven right now. I carefully measured out the dough and water but after about 14-15 hours it was basically a puddle of dough that poured out onto the parchment. Way too wet. I did use the method of measuring flour where you spoon the flour into the measuring cup, maybe this should be packed? Managed to work enough flour into the dough to form a ball, but it was a pain in the rear. I didn’t measure the extra flour, but it might have been an entire cup just to get the dough firm enough to form a very soft ball. I notice that the king arthur flour recipe for no knead dough uses slightly more than a 2:1 ratio of flour to water.
Jeff — I’m sorry to hear you had some trouble with the dough! Did you scoop the flour and then level off the top with a knife, or did you spoon the flour into the measuring cup? I always use the first method because the act of scooping helps to “pack” in the flour. And as with any bread recipe, it’s more important to go by feel than by the exact measurement of flour called for in the recipe (which it sounds like you did). I hope it turned out well in the end!
I took a chance and made this in my 2 ½ qt heart cocotte from LC. It turned out great (the smaller size forced it into a taller loaf) and it was slightly heart shaped!
Heidi — A heart-shaped bread? I LOVE IT.
I just received a brand new enameled dutch oven (Tramontina brand) as a gift & found this recipe. I was so excited about it & told my friend. She warned me not to use it to bake bread, though, as cooking the dutch oven at such high temperatures will cause it to turn black. 🙁 Have you (or anyone else) experienced this?
It works! It’s great! The parchment paper for non-enamel, cast-iron Dutch oven is the trick. Many thanks. Posted pics to Facebook: https://www.facebook.com/DrBillSanders
I just made this yesterday – 1/30/16. I don’t have a cast iron dutch oven- so I made it in a metal pan with a lid. Even still, it was fantastic- but it only had about half the holes in the photo. I cooked it covered for 30 min and uncovered for 10 and I was really happy with the crust and final texture. I am going to go out and buy a dutch oven today and see how it looks! I love this recipe!!!
Pingback: Comfort Me - Parker House Rolls Recipe - Dine and Dish
I made this bread but the dough seems to dry and it won’t rise, I just bought the yeast… what am I doing wrong???
Was the flour amount correct? You should of had a pretty sticky semi wet dough after mixing all the ingredients, and don’t pack your flour in the measuring cup, spoon it in and level off with a knife.Sometimes if the water is too hot it will kill the yeast or if adding too much salt it inhibits the rising. Anyone else have any suggestions?
Must I use cast iron dutch oven? Or will thinner wall dutch oven work?
a cast iron skillet with a oven proof lid works just as good too!
Lisa — I haven’t made it in a non cast-iron Dutch oven but I think it would be fine.
My Dutch oven is like Calphalon cookware. It worked fine.
Pingback: Dutch Oven Chocolate Chip Bread
What constitutes a “warm place?”
I live in a drafty house with the heat set at 68 but it always feels colder to me. Will this be enough for my dough to rise?
Dan — You basically just want to make sure the dough rises in a place that’s about 70 degrees F. In the winter our house is drafty and 68 as well, so I’ll put it in the microwave (turned off, of course :)) or in the oven (also turned off) so it’s protected. Placing a heating pad on low, wrapped in a thin towel, underneath the dough bowl helps, too!
To make this bread recipe even easier, use a Danish dough whisk to stir the dough. I loved mine so much that I bought my baking friends and family one for Christmas.
Has your Dutch Oven bread been tried over an open fire yet? My scout troop would love it (and the adult patrol always needs new ideas to outperform the scouts!).
Rob — I haven’t tried that yet but I think it could work, provided you can approximate a similar baking temperature. I hope it works!
Pingback: Friends and Food | blickandbild
Pingback: No-Knead Dutch Oven Bread – A Dirty Dish
Well, I followed the recipe to the letter, waited all night thinking about baking that delicious bread, woke up to a picture perfect raised bowl of dough. Heavily floured my parchment paper, my hands and sprikjled some on top and YIKES, it kept sticking to the paper when I was trying to shape it into a ball!! Anyway, I did my best but it certainly wasn’t a ball, and the 30 minute wait time caused it to puff up a bit but spread also! I just plopped it, parchment paper and all in the screaming hot dutch oven and am now waiting to see if I have a disaster or a loaf of edible bread…lol! What did I do wrong??
ok, I give up! After 2 attempts, I’ve been unsuccessful and don’t know what I am doing wrong. Everything is fine until it comes to baking the blasted dough!! It keeps coming out heavy and semi-cooked. The outside looks fine and I’m doing everything you said. I can’t waste anymore ingredients until someone can help me figure out what I am doing wrong!!!! Thanks. : (
2 unsuccessful attempts!! : ( Beautiful on the outside semi-raw inside every time. Followed directions to the letter! What happened?
Do you have an oven thermometer? Your oven temp gauge could be off. I would just cook it longer with the lid on, though. Everyone’s ovens are different, and climate/location can often have an affect!
I don’t have a Dutch over. Will a stainless steel pot work?
Jean — Any oven-safe pot will work!
I added a head of garlic that I had poached in olive oil and two teaspoons of fresh chopped rosemary. Holy moly is it good!
This is my new favourite recipe. The crust and flavour are consistently awesome, and I can let it rise while I’m at work for the day. Also, if you don’t have time for an 8 hour + rise, you can halve the salt and do it in 4!
Pingback: 18 Wood Stove Recipes + How To Cook On A Wood Stove
Worked perfectly. I used a lodge enamel coated 6 quart dutch oven.
I actually roasted a whole head of garlic with some salt and pepper, and added 1/4 cup of grated Parmesan cheese. Bread turned out fantastic.
Pingback: How to Bake the Best Bread | Dustyhawk :: Broken Mirror
Stumbled upon this recipe and this bread was AMAZING!!!! I used Pink Himalayan salt instead of sea salt and it worked just as well!! I cannot believe how easy this was! Have you ever used wheat flour? Other variations of this recipe?????
Looks delicious – I can’t wait to try this!
When my dough was “ready to shape” the next morning, it was like a very thick batter, maybe too much water /too little flour? Should the ball somewhat keep its shape? Or should it immediately flatten out?
Chris — It’s a little bit looser than regular bread dough, but it shouldn’t flatten out immediately — it should hold its shape for the most part!
Thanks Stephanie, I thought so. I just kneaded some more flour into it and it came out tasty. Perhaps a bit denser than it would have, but still good 🙂
Next time I will be more careful measuring out the water!
This is absolutely fantastic! And so easy! Thank you, thank you, thank you!
Failed for some reason. After 13 hours of fermentation dough looked okay, but even by adding generous sprinkling of flour, it was too goopy to handle and try to shape. Have had some success with Leahy’s recipe, so do not know what went wrong…
Terry — I’m sorry to hear that! I wish I knew what went wrong, too. Hopefully next time’s the charm?
I tried this, but I made a few modifications. The bread was good — very sturdy, but not sweet enough for my taste. I really like sweeter bread doughs, but it was very easy and didn’t make much of a mess. I do like that part a lot!
Pingback: 12 Dutch Oven Recipes To Try - Four Generations One Roof
I baked mine last night and it turned out incredible! I cannot believe how easy it is. This is definitely going to become a weekly thing in my house. Thank you SO much for converting me from a girl who hates baking to always having fresh homemade bread in the house. PS I added chopped roasted garlic and fresh rosemary and it is absolutely to die for.
My crust could break a bank window. Any advice on why the crust shrugs off the knife?
Thanks!
Mine too! I’m going to check my oven temp before baking again.
Wade — Darn! I don’t know what may have happened to cause such a tough crust, unfortunately. 🙁 Did you use all-purpose flour, or bread flour? All-purpose flour would be the best option here because sometimes bread flour (and whole wheat flour) can absorb much of the liquid and cause a tough crust to form.
I substituted .75 cup of whole wheat flour for regular flour, added cracked pepper, rosemary and parmesan cheese and it has come out FANTASTIC both times ive made it. So delicious
Here are some successful hints that worked for me:
• Use convection bake at given temps for high altitude (or increase oven temp by 25° for regular bake)
• Increase water by 1-2 oz as needed for wet and sticky dough consistency
• Punch down dough in original bowl with wet wooden spoon, then transfer (with wet wooden spoon) into a smaller bowl pre-lined with parchment paper that you have lightly spray-misted with water (no need for flour)
• Lightly spray-mist top of dough with water before covering with plastic wrap (again no need for flour) and let rest for 30 minutes
• Use corners of parchment paper to lift dough and transfer into preheated Dutch Oven
Just made this for first time. IT WAS AWFUL! Followed the recipe with the exception of using a different yeast. Will not make again. I wanted others to be aware!
I need to know what I did wrong. I have been baking 51 yrs. mine turned out like a doughy slime after 12 hrs. I let it set another 3 hrs. still the same, mine did not look like your pictures before rolling it out so I just dumped it.
I did google the original recipe it called for less yeast then yours and also instant I did not see that in your recipe so I used regular yeast. Also the original recipe called for less salt won’t all that make a difference or not. Help please. Thanks!
Linda — I’m sorry to hear the recipe didn’t work out for you! I wish I knew what went wrong, but I can’t say for sure what happened. My best advice is to just go by the recipe exactly as written and it should work!
I am mid baking this on the grill outside. It’s at a constant 450 but at 35 minutes covered it looks fully done. I’m afraid it will burn with 20 more minutes. Was there suppose to be a temp drop?
Chris — There is no temp drop needed, but it might bake quicker with the direct heat of the grill. The inside temp of the bread should read about 200 degrees F when it’s done, so I would check that!
Pingback: Culinary Adventures Near and Far! – The Adventure Syndrome
Hi! I am not fortunate to own a Dutch oven ? Do you have any cooking modification suggestions? I have a regular pit with a lid I could try
Hannah — You can use pretty much any oven-safe pot with a lid!
This is THE best bread I’ve ever made! And easy? Soooooo easy!!! I’ve made it every day this past week. For gifts…and myself. I’ve tried three different flours, too: whole wheat, all purpose, and bread flour. All so good (although my personal “flavorite” is unbleached bread flour). I mix it up when I get home from work and bake it in the morning while I’m getting ready. You have made me (and my friends and coworkers) VERY VERY happy. Thank you.
Pingback: Miracle No-Knead Bread | Good Kitchen Blog
Pingback: Miracle No Knead Bread | My Blog
I have a question, if I want to make a bigger bread can I just double the quantity and what about the cooking time?
I made this last night and it turned out kind of doughy! What did I do wrong?? Maybe more flour? I definitely baked it long enough! Still delicious even though it’s a little doughy 🙂
Make it again and when it’s done turn the oven off, but try to leave the bread in the dutch oven with the lid off for another 15 minutes or so .. or longer. You can peek to make sure it’s not getting too dark or burned. Make sure you let it cool before you cut it with a knife.
Grace — I wouldn’t recommend doubling the recipe to make one loaf, as it could really affect the quality of the end product. You could make a double batch though and bake one loaf at a time!
Samantha — Was it underbaked? I’m sorry it didn’t work out for you! At least it still was tasty. 🙂
My dough seemed quite wet, even after the 8 plus hours of rising. The bread was tasty but not a round loaf. I’m thinking I should reduce the amount of water or possibly reduce the water temperature. Anyone else have this problem? I’d appreciate the feedback!
Love love love this bread ! Only issue I have is the bottom crust h gets so crusty can’t cut through with a knife. Any suggestions?
Try to brush the bread with a little melted butter when it’s done and that should soften it up.
Tried this recipe to day, so good! The family was estatic!
Next time I think I might mix in rosemary.
Thanks!
so i have a puny 2 1/4 quart dutch ove/cocotte. Can I cut this recipe in 1/2? Does making bread work like that?
You could also make the recipe as indicated, and just split the dough up to make more than one loaf of bread. 🙂
Eunice — You certainly can try it! Though there are no guarantees it will work. If it does, let me know!
Tried this twice but my dough seems to settle down to much. Gets to be 8″ in diameter and about 1 1/2 high at center. Finished loaf comes of about 3 inches high. Is this what I am looking for?
As mentioned earlier, everyone making bread without a mixing machine needs to get a Dutch dough whisk. Get a fat handle. Can find from $7 to $12 bucks, from WalMart, to Amazon , to King Aurthur. Makes making easy no knead bread about ten tines easier than using a wood spoon. I have a little arthritis in the thumbs which makes me appreciate this specially designed whisk even more. Bought a Dutch Oven folr use when the weather cools and this recipe was its first use. Awesome.
Looks wonderful! My Dutch oven is only 3 quarts – do you think I can make half a recipe?
Bill — I’ve never done that but it’s worth a try! If you do, let me know how it goes!
Can you post the weight measurement for the flour? My dough was too runny and I bet I didn’t use enough flour. Thanks!
Emily — Each cup of all-purpose flour is about 4 1/4 ounces, so in this case you’d need about 12 3/4 ounces of flour.
This bread is great, but my bottom crust is coming out really hard! Any suggestions?
Please use “C” not “F” for the temp, required, thankyou
I’ve been making this bread for a while and your site has such a great presentation of the recipe.
Mine just came out of the oven and it’s fantastic!
I’m totally in love with the dutchoven bread recipe. Thanks so much
I’d like to make this bread in my 10″ camp dutch oven dutch oven using charcoal briskets. Have you baked it that way and, if so, do you have some tips about how to do it?
Linda — Oh man, I have not baked it that way but I bet it would turn out amazing! I wish I could offer tips for baking over the fire but I know nothing about it. 🙁 Might be worth a quick Google search!
I followed the directions exactly, however, the bottom crust looks too dark. I have it as high as it can go in the oven (any higher and the dutch oven won’t fit – 6 quart size).
Any suggestions? Thank you!
Terry — I’m sorry to hear that! Did you put the parchment paper in the Dutch oven underneath the bread? That usually helps avoid extra browning/burning, especially for Dutch ovens where the bottom has gotten brown or lost its enamel coating over time. I hope that helps!
I’ve never made bread before, except in a bread machine. I tried this, but I’m sure I did something wrong. It didn’t make a nice dough ball, but I cooked it anyway. I think maybe I used too much liquid? But I will definitely give this another try, since I think I came pretty close even for my first try!
Hi, I’ve tried about a dozen “no-knead” recipes and yours is by far the easiest and best of the bunch. I would like to make a bigger loaf as they disappear, in my house, quickly.
Could you give me the proportions for a loaf of classic caraway rye using, say, 4 cups bread flour and 1 cup rye. I need amounts of instant yeast and water to go with that. How about pickle juice and molasses or brown sugar to make a traditional deli rye or am I pushing my luck. Thanks very much for any help you can provide.
Hi! This is a really delicious bread! I wonder could whole wheat flour be used at least partially? Thank you
Lena — I haven’t baked it with whole wheat flour yet, but you can certainly try it! I would recommend using 2 cups AP flour and 1 cup whole wheat, at least to start.
Thanks for the great recipe! Can this be done with sourdough?
Could you use this camping??how do you preheat cant wait to try camping dont have oven to preheat3
I just made this bread, and it came out so delicious!!! And that is despite letting it sit for 22 hours before I could get home and bake it (oops)! I will be making this again and again.
Can you use different flours with the same technique? ie rye flour?
Fiona — It’s worth a try but I wouldn’t do 100% rye flour — I would do a ratio of 3:1 all-purpose flour to another flour.
What is a dutch oven? What is so special about baking in a Dutch oven? Is that a pot? Can I use a stainless steel pot with cover in the oven- never did that before.Can a regular round stainless steel baking pan be used?
This bread is ah-mazing!!! I just bought a new dutch oven and christened it with this recipe. It could not have been any easier and absolutely delicious! Completely comparable with any high-end bakery crusty bread.
Pingback: Bread – The Homemaking Momma
Wondering if anyone has tried making this in a cast iron loaf pan?
My Dutch oven is supposed to go in an oven up to 400 degrees. The oven is supposed to be 450, what can I do?
Pingback: 3 Fun Hobby Ideas For This Winter - Mom in Music City
What is I use the fast rise yeast, how long does it need to rest? Thanks! 🙂
I don’t have a Dutch oven – they are not common in the UK. I don’t think my casserole dish would be big enough either.
Can I make this using a normal loaf tin in the oven?
Thanks in advance 🙂
I would love to try this recipe but the instructions that came with my dutch oven say not to heat it while it’s empty. Any guesses as to why that might be? Thank you!
What if you do not have a dutch oven? I really would like to try this, but do not have and am not close enough to stores to get one.
Pingback: Cozy chicken and wild rice soup – The Domesticated Runner
Pingback: No knead bread – Feeding my Herd
Hi!
This bread looks amazing! I have just one question: How can I best keep the bread after baking? I would like to bake it one day in advance for a wine & cheese party, but I don’t want a superdry or tough bread just because I stored it wrong.
Been making this recipe once a week for the past couple months. Since we’re getting a blizzard here in Connecticut today, decided to make it again and try something different. For fun, I decided to switch it up. I warmed 2 Tablespoons of olive oil with 2 garlic cloves to release some flavor and then added it to the warm water to equal 1 1/2 cups. Added some freshly chopped thyme, oregano, basil and rosemary to the flour with freshly grated 1/4 cup of Parmesan cheese. Then, mixed everything together in my kitchen aid. Amazing. It’s like a big herbed bread. Will go perfectly with my blizzard ham dinner and scalloped potatoes! Thanks for this fool proof recipe. The bread always comes out perfect!
Pingback: Startup Life on a Budget | Cassie Wallender
Pingback: February Meal Plan #2: Snow Days | Kate Diamond, Author
Pingback: No Knead Bread – Feeding my Herd
I love this bread. I was brave and tossed some cheese in the batch with a slight hint of herbs. It is so versatile
I agree that the bread is a bit salty, but I used table salt rather than sea salt. Could that be the reason why?
That is so great! Would you alter the recipe depending on the size of the dutch oven? Mine is 8oz.
Pingback: February Meal Plan #3: Twice the Pork | Kate Diamond, Author
Just made my first loaf, but had a few issues. First, I didn’t get much rise in the oven, so it’s a little short and dense. I let the first rise go 18-20 hours, so I’m guessing that’s why. Still have some nice air pockets, though. Secondly, my bread is completely stuck to the parchment paper I used. I had a nice layer of flour, but it still happened. Anyone else have this problem?
My dough isn’t rising! Made two batches, the first batch has been sitting for about 4.5 hours so far and. No change. What am I doing wrong?
Needing high altitude alterations… I am almost 7k feet and cooking has been a disaster. I NEED this bread, my mom used to make it and now I finally have the recipe.
I AM HIGH ALTITUDE HERE IN ALBERTA TOO AND HAVE NOT MODIFIED THE RECIPE AT ALL. IT WORKS EVERYTIME JUST THE WAY WRITTEN.
Any recommendations for higher altitude baking here in Denver? I followed the recipe but I don’t think I used enough water.
Pingback: Bread Recipes and Cookbooks to Get you Kneading - FamilyNano
WOW MY first time baking bread. Everything can out as expected.. what would cause the every center of the bread to be a little more moist? I used parchment paper even though I didn’t need it.
Magnificent! Super soft on the inside, crunchy and firm crust outside. Next time, I’d fold in herbs before I bake–probably garlic and rosemary. The texture and taste of the loaf would lend itself well to it. The baking times are spot on, and the high heat is necessary. I worried briefly as I baked it because my Dutch oven is a bright red, and the heat turns it a dark cherry red. (I’ve since learned this is normal.) That said, it came out deliciously. I look forward to experimenting with and making it many, many more times in the future.
Eureka!!! Eureka!!! …perfecto! perfecto! I tried this recipe and it was amazing. The smell, the look and the taste, oh, …a mind-blowing experience. I now count myself amongst all happy bakers. 😉
Just taken my first loaf out of the oven. Looks great, and smells delicious! Only one problem…. the greaseproof paper is stuck to the loaf, despite copious amounts of flour underneath! Can’t wait to taste it, spread with lots of my homemade butter!
Pingback: April Meal Plan #1: Soggy Spring Break! | Kate Diamond, Author
I have made this bread about a dozen times since i found the recipe. It takes me back to good German bread, a passion of mine.
Now my sisters are both making this bread. I give it away as gifts and they rave. THE BEST BREAD EVER and so, so easy. Thank You
I got called in to work and now consequently will need to let my bread rise for about 24 hours… it’s been 18 now. Will this ruin my bread??
First time trying this recipe and after 15 hours rising, the dough is still incredibly loose and sticky and I do not think it would hold any kind of shape as a ball. Did I do something wrong? Or does it just need to rise a little longer yet?
I got a Dutch oven as a wedding gift and this is my favorite recipe to make with it! I also add some rosemary and garlic powder to the dough and it turns out even better! Thanks for the easy to follow instructions and pictures!
Can I use gluten free flour?
I just ran across this one and baked it post haste. It was everything and more. So I baked it again a few days later. After several more days I tried it as a rye loaf adding caraway, rye chops, rye flour, etc. Wow! Next up was garlic and Italian herbs. Another wow! Then rolls, baked on a stone. Home run! This is a very versatile dough that can become about anything you crave.
I’m trying this on a camping trip in my Dutch oven using charcoal this weekend! Cannot wait! I plan to make the dough before I leave and cook the next morning for breakfast and use for sandwhiches the rest of the trip.
Hello!
I tried this bread and it came out delicious, but not so many holes as your example. Any suggestions?
Can you use bread flour instead?
This bread was delicious and a huge hit in my house. Will be making this way from here on out! Only thing I can say was I didn’t get as many holes as I would like. We call them “rip offs” but we LOVE them. I think I was just a little to “grabby” with the dough when I transferred onto the parchment paper…so I’m hoping the next batch has much more larger holes.
Can you use lukewarm tap water for this?
Pingback: June Meal Plan #1: Getting Back in the Swing of CSA | Kate Diamond, Author
You mentioned that a 4 or 8 qt Dutch oven could be used as well as a 6 so I’m confused about how to divide the recipe for my little 2 qt. It’s the only Dutch oven I have. Or alternatively, could I use an oven-safe stainless tri-clad stock pot? I really want to try this bread!
The use of parchment “tip” was best ever information.
Made loaf today……………..perfect, perfect,perfect.
Thank you
Pingback: Job Search, Bread & Butter … and PUZZLES! – Love In Autumn
Pingback: July Meal Plan #3: Fast, Fresh, and Filled with Veggies | Kate Diamond, Author
I’ve made this several times now, and it’s the most reliable bread recipe I’ve ever tried. Zero failures, and it makes a great tasting bread. This is what I’m recommending to people to try for their first time making bread.
If I want to herbs or cheese, at what point in the process do i do that?
To allow it more time to develope flavor you can store in the fridge over night then set it out the next day till it doubles in size. I find it easier to handle if I put the parchment paper inside a 10″ cast iron skill, form the load then sit it in the parchment paper to let it rise. then when you are ready to bake just lift it by the paper and set in the super hot dutch oven to bake.
I have made this bread and it is so easy and taste great. You have to try it . It really is that easy and good.
Thanks for this recipe. I am in UK . Just giving it a try this evening. Hope mine turns out as yummy as yours looks ?
Tried this, this evening. Came out as amazing as everyone has stated. Hubby who is very picky really liked it so will be making it again. Had some with butter almost straight out if oven and it smelled gorgeous whilst cooking.
Just wonder if anyone has added things to it like garlic and herbs, cheese, bacon bits etc. And has anyone frozen it and reheated? Was thinking of standby for when too busy. Have to admit I didn’t stand for eight hours but it still turned out wonderful. ?
I find the water ratio to be slightly off. 1 1/2 cups of water makes my dough very dry?
I followed your recipe exactly and ended up with a batter almost exactly 100% hydration (in baker’s percentages). I didn’t pack the flour in tight so maybe that’s what’s different. I prefer measurements by weight!
My oven stopped working a month ago. is it possable to bake bread in a dutch oven on top of the stove?
Pingback: Baking Bread for the First Time – It's A Binary World 2.0
Pingback: September Meal Plan #1: International Appreciation | Kate Diamond, Author
I made this tonight and the bottom was a little chewy (probably my fault), but other than that it was some of the best bread I have ever had!! However it didn’t really want to form into a ball when wet, it cooked up fine but as a dough it wouldn’t take any shape, just a mush. And I had a question about the yeast, doesn’t yeast need sugar to foam up? How does it work with just adding the yeast to the dough without mixing the yeast alone in water or with a sugar Like so many other recipes call for. It really shouldn’t matter because the bread came out fantastic but I’m just curious because I’ve always been told yeast needed sugar.
I was wondering the same thing. I thought that was what was happening. Yeast consumed the sugar and created carbon dioxide. I didn’t think they could do it with starch (flour.)
I have read at least 20 recipes for no-knead bread along with watching almost 3 hours of videos. I have followed the basic recipe precisely 3 times and all three times it came out runny. I bought active dry yeast, two times thinking the first packets of yeast were bad. I also switched my tap water to bottled water in case my tap water was too hard. Nothing I do helps. My dough still comes out runny. I also kept my room temperature at 68 to 70 for rising for 18 hours. I need help desperately. Anyone, please help.
Hi! I have a 7 1/4 Qt Dutch oven I believe it’s 11.5 inches in diameter. Would it be possible to double the recipe or make this recipe in that size oven? If I double the recipe how long should I let it sit out and cook it? Thanks!
If I double the recipe should I double the time? I’m using a large Dutch oven
Pingback: No Knead Dutch Oven Bread | Red Star Yeast
Can the recipe be doubled and baked in a 13.25 QT French Oven?
Pingback: Cable Bread (Ha ha ha) – Peace Love Sprinkles
Thanks for posting this recipe. I’ve tried it once, and still need to adjust it a little for my oven which is a little fussy and runs hot, but for the first try it was great.
I think maybe you’re missing the point of having a well seasoned, uncoated, cast iron Dutch oven. I didn’t find parchment paper necessary at all. I just wiped a thin layer of olive oil on the inside of the Dutch oven. The oil does burn off a bit and is a little smoky, but if you’re a fan of cast iron you’re probably already used to this, because this is how it’s seasoned.
I would think you would have problems with the enamel cracking in your pan with this recipe.
This was my first ever bread baking attempt. I added some fresh rosemary to the dough. The results were outstanding. Since it was my first bread baking experience, the picture were very helpful so I could compare mine to the pics.
Diane, what can I use if I havent got a dutch oven.?
Hi Dianne, can I double this recipe?
Can I divide the dough into smaller sizes and cook in smaller Dutch ovens or other covered pots? If so, will that change any proofing or cooking times?
I made this twice, first time as the recipe indicated, and second time a couple days later making a smaller loaf. The smaller loaf was 2 cups flour (approximately, since I went by weight, not volume ) with a 60% water content. Both were baked at 450 for 45 minutes covered and 10 minutes uncovered. The first loaf developed a nice chewy crust, but the smaller one came out with a thicker, dry crust. I attribute this to the lesser overall amount of water locked in the dough ball as the exterior seals. When I make a smaller loaf again, before putting the dough ball in the dutch oven, I will coat the exterior of the dough thoroughly with water (spray bottle). Hopefully this will produce a chewy crust with a smaller loaf.
i follow strictly the instructions. the bread comes out of the oven nice smelling and full of holes but the crust is so hard i am afraid to break my teeth. what am i doing wrong?
I thought Enameled Dutch Ovens were only heat rated to 400 F
I have such a difficult time of forming this dough into a ball after removing it from the first rise…even with floured hands. I lose nearly all of it’s volume, and my bread turns out flat, dense and unattractive after baking. Suggestions?
This! This is amazingly looking good. I’m definitely gonna try that this weekend. I’m sure it will be really delicious.
Do you need to activate the yeast before putting it into the dough or just put it in as is?
Has anyone doubled this recipe? I want a BIG gorgeous loaf. What changes did you make to cook time?
I followed the mixing directions exactly. After 10 hours, the dough was bubbly and big, but it was very wet — too wet to form into a ball. Did I do something wrong?
what if you do not have a dutch oven, what else could I use?
I made this and had friends over for dinner… they all said if they could just have this bread and some salad they didn’t need anything else! However they did do a job on the pasta and vodka sauce…
Can you add honey to this recipe?
I made this for a holiday gathering with my girlfriends and it was by far the most talked about food item there. The outside was browned and crusty while the inside was Nice and soft. I can’t believe how flavorful it was for having so few ingredients, and how simple the process was. This is going to be my new go-to recipe for!
What would you think of adding 2 tablespoons of olive oil to the dough?
I have tried this recipe a few times, both with and without parchment paper, but I always find the crust (bottom specifically) is almost impossible to cut through. Any tips?
So far so good, I think. But please remember, for new people like myself, the phrase “punch down the dough” is pretty ambiguous. I know it’s impossible to explain every single step in detail, but if this is important maybe you could provide a little info on what you mean, or a link to a reputable resource. It is sitting right now waiting for the oven; I’ll let you know!
It’s amazing, even without knowing how exactly to punch it down. I’ve since done a roasted garlic/rosemary, a cheddar jalapeño, and my favorite, chopped kalamatas. Thanks! My first bread, and my friends think I’m a baking genius.
Pingback: A Failed Life Path…Sort Of – Girl with a Tumbleweed Soul
Will this bread still be good if I cut the salt to 1 t. rather than 2? I have to watch sodium intake?
So impressed – extremely easy and so delicious. I over-floured underneath dough on parchment paper so cut back on second time. This was a great option to replace any other homemade rolls and store bought breads for our holiday dinners
I made this at my mother-in-laws. All she had was bread machine yeast (fast-acting) so I substituted that for the active dry yeast. Punched it down after 5 hours and baked it according to the usual directions. Turned out great.
hi! i made this dough a few hours ago and since there was no video, i had no idea what you meant by “wet and sticky” dough. i ended up adding too little flour (also because I prefer weight rather than measurements for accuracy). Can i save my dough after proofing by adding more flour and gently folding/kneading it in??
Can you use other kinds of flour with this recipe?
Can I use a 3.75 Dutch oven for the bread?
I’ve made this recipe a bunch and we LOVE it! Can I double the recipe? I need to make two loaves at a time (:
I think this can be done. I tried with other recipes and everything worked out.
Pingback: Get to Know the Dutch Oven - The Kitchen Witches
Pingback: Entry 1 – CS373 Spring 2018: Jeff Bell
Pingback: What to Cook in Your Lodge Dutch Oven - The Weary Chef
Two questions. The dough is extremely sticky. Do I just put it in that sticky or add flour until it is “unsticky?” Second question, how did you get the split on the top — when did you add the split and any other info.
This yields something more akin to pancake batter rather than a dough, is there something I’m missing?
I no longer have the lid to my inherited dutch oven. Will aluminum foil work to cover the dough while baking?
This is pretty amazing! I left it on the parchment as you suggested but havd trouble with it sticking to the bottom of the loaf. What did I do wrong? The inside also seems a little dense. If you could help me out I would appreciate it.
Thank you.
This was delicious but I had trouble with the parchment sticking and the rise wasn’t as high as I would have liked.
Any suggestions?
Pingback: Lodge Enameled Cast Iron Dutch Oven Review - The Kitchen Witches
Pingback: The 4 Kitchen Tools That Should be in Every Adult Kitchen - A Sweat Life
I prepared it last night and let it sit in my unheated oven from 8pm until 430pm, when i punched it down, made it into a ball on the floured parchment paper, covered with plastic while my cast iron skillet with a lid heated at 450 in the oven. Baked exactly as recipe baked for…..best bread ever! So Simple, so Easy. Thank you so much for sharing this recipe.
Pingback: FINEX Cast Iron Dutch Oven | Cool Material
This is the best bread recipe. I doubled the recipe because my Dutch oven is bigger. I increased the cooking time about 10 mind before I took the lid off.
Wooh! I am a freaking bread lover! Specially Dutch oven ones! Couldn’t stop my mouth from watering while reading this recipe! Can’t wait to grasp the taste of these yummy rounds of flours. They look delicious too in these images. I am a patient of Diabetics , I don’t care though, but still asking, will that be harmful for me by any means?
no-knead dutch oven bread recipe looks good I will try it.
Pingback: Clean Out Your Fridge By Baking Some Bread | Lifehacker Australia
What the hell! My wax paper cooked to the bottom of my bread and set off the smoke alarms. 3rd time doing this recipe, but 1st time with the paper. Do not use parchment paper!
Use parchment paper, NOT wax paper. They are 2 completely different things!!!
Okay, I know this wax paper thing is an old comment but I’m just reading through them now and, I laughed out loud at that one. Is it always guys who do these things? I feel like it’s always guys. I’m embarrassed.
I am a new baker and ordered a cast iron Dutch oven from Amazon on Monday after I saw this recipe. By Wednesday I had my 1st attempt completed. Even though my husband called it a $100 loaf of bread – he thinks it was well worth it. Turned out perfect, just like the pictures. Have a couple of hints though after reading some of the other comments.
1. Yes, the dough is sticky – I degassed in the original bowl, formed as good a round as I could and then transferred into a 2nd bowl lined with parchment paper and let it rest.
2. Mist a little before putting the Plastic wrap over the bowl.
3. Lift the dough in the parchment paper into the Dutch oven.
I had no issues with sticking and the rise was awesome. This is my favorite recipe so far.
I made this today and it is my first attempt at baking bread. It turned out great! So delicious. I will use this recipe over and over. Thanks!!
Love it! Thanks for sharing!
Pingback: Baking bread in my new Le Creuset Dutch oven
so we just found this recipe and omgerrd…….hubs and kids love the taste ( and so do I) but I love it more because hubs can also make it so I dont have to and can study more…..!! Good luck on the road look forward to reading about your travels and hope that you see this since the recipe is already 3 years old!! Ha Ha
Haha, I love it! So glad you like the recipe! xo
My Dutch oven is only oven safe to 400 degrees. Do you think this bread could be baked at 400 instead of 450?
That’s a really good question. I think it’s worth a try, though I do worry it won’t bake quite right. If anything, be sure to leave it baking for a little longer than the recipe calls for (maybe an extra 10-15 minutes). Let me know if you give it a try!
Oh my heavens!!! Unbelievably good. Love that crunchy crust and it couldn’t be easier. I made the dough last night (took about 2 minutes) , let it rise overnight and baked it this morning. My husband went nuts. I cooked it with Trader Joe’s “everything but the bagel” seasoning on top and that was a great little addition. Thanks so much for this great recipe. I can’t believe I have home made bread!!
Made this yesterday and baked this morning. Absolutely wonderful. I have a home baking biz and will add this to my offerings. Have you ever doubled (or tripled) the recipe? Thanks and when I posted a picture of it on FB, I credited your site.
Hi Todd — Thanks so much! I have never doubled/tripled the recipe.
I put a light coat of oil on the inside of the French/Dutch oven. Then on the bottom I added some dried corn meal “grits.” The bread slid around when it was done like it was on ball-bearings. This is what a lot of other bakers do and you will see/feel the grit at the bottom of many artisan loafs.
Can you use whole wheat flour with this recepies?
So I messed up and used 2 cups of water by mistake. It still came out fine, the dough was a little chewy but excellent non the less – some of the best bread I’ve ever tasted. I used an organic flour from Costco and we’re a mile high too and it still worked! Not sure what is the issue for those having problems. Bad flour, too small of an oven. I did leave the dough for at least 12 hours, some of it in the fridge (another mistake).
Pingback: no-knead bread – esther cooks
Thank you so much!! My family loved the bread!
I never knew I could bake! This recipe boosts my confidence in baking.
A q for you: Can you add thyme or rosemary? If so, how much should I put it in?
Hi Ellie, so glad you loved the bread! Yes, you certainly can add thyme or rosemary! It depends on personal preference, but if you’re using fresh herbs, I’d say add no more than 1/4 to 1/3 cup chopped fresh herbs.
I love to cook and bake, and I use lots of online recipes frequently. Not once, have I thought enough of one to reply or post a comment.
This, however, made a wonderful product. That bread was easy, and excellent. Truely excellent. I will be making this over and over. My children loved it, my wife loved it, and I’m a hero who bakes his own bread. Hard to beat that. can’t wait to tweak this.
Ben — That means so much to me! I’m so, so glad you and your family enjoyed the bread. You are a true hero!
I made this today and it is my first attempt at baking bread. It turned out great! So delicious. I will use this recipe over and over. Thanks!!
Any thoughts on what would happen if I added a tablespoon or two of honey to the dough?
Hi, I wouldn’t recommend it because it will add moisture to the dough that might affect the overall outcome, even with a small amount.
I’ve made this bread several times and I love it, but for some reason my bread is extremely burnt at the bottom every time. It’s so black and burnt that we have to cut off the bottom. I’m really not sure what to do. It’s a new oven, not sure if this has anything to do with it. I’ve made it with and without parchment paper. Any recommendations??
Becky, that is strange! My best guess is that it’s either the type of Dutch oven you’re using or the length of time you’re leaving it to bake in the oven. Do you use a ceramic Dutch oven or stainless steel? I would suggest a heavy-bottomed Dutch oven so there’s enough of a barrier to avoid the burning.
I had the same problem, Becky, so I put a round, stainless steel trivet (with parchment) under the dough, lifting it ’bout 1/2″ off the enamel — the crust on the bottom comes out perfect!
Can you double or triple the recipe? If so, how long is the baking time?
I would not recommend doubling or tripling the recipe in one Dutch oven. This recipe is ideal to fit in one Dutch oven, so if you increase the recipe yield, it’s best to bake one loaf at a time.
My Dutch oven has a temperature limit of 400 degrees. Can I do this recipe at that temp and just bake a little longer?
You could try, but you may not end up with the same results in terms of height and crust.
My Lodge brand Dutch oven says not to heat it empty. Any suggestions or comments?
Joseph, I’m not entirely sure why the Dutch oven has that recommendation, but I would say in the case of this recipe it should be fine to heat it empty for the amount of time that is called for in the recipe. Hope that helps!
I baked this with my 12 year old daughter. Not only a fun lesson in homemade bread but a successful one as well. I did the prep before bed and baked it the next morning. Fresh bread for lunch and a house that smelled yummy as well. The bread was fully cooked at the 45 minutes and came out picture perfect. Thanks for the recipe!
Have made this bread now 3 times, with overall success! However, some people might be put off by how wet this dough can seem to be when ready to form into a loaf. I sprinkled mine generously with flour after the 8+ hours rise and used a spatula plus added flour as I scraped and gathered it from the sides of the mixing bowl. I tried not to over handle the dough since the more you do, the messier it can get. Another reader commented on putting the parchment lined “loaf” into a large bowl as it rises the second time. I think that’s a good idea too because you won’t have a “spreading” issue. Whether it actually shapes into a ball-like loaf or not won’t affect the end result because it is put into the preheated dutch oven, (parchment paper and all) which will curve it into a loaf. As I read somewhere, even a not quite perfect loaf will taste deliciously better than none! Hope this helps others.
Great recipe, makes an impressive loaf even if you don’t have mad bread baking skills! Thank you, Stephanie for sharing this recipe. We had a need in my house recently for bread to use for dipping so I cut up this loaf and it was gone in a flash. Everyone was impressed that it was homemade. ??
Thanks for the recipe! Made it today, while on furlough from the federal govt. It is amazing and I cant believe I made bread!! #furloughbreadbaking
I’ve ever made bread. This will be my first try.
I came to the comments looking for info on adding herbs and found what I was looking for, but also wanted to let you know that I’ve been making this recipe for a few years and it’s always a hit! Thank you!!!
Theresa — So so glad to hear it! Thank you! 🙂
Everytime I cook this the bottom of the bread burns. I even put it on the top shelf and I’ve tried both with parchment paper and without. I use a 4qt cast iron Dutch oven. Any insight to help with the burning?? Otherwise it’s good.
I just got a 6 qt Lodge brand Dutch Oven for Christmas (mostly so I can bake this bread!) I am looking at the ‘owners manual’ for the Dutch oven and it states: “Do not heat an empty Dutch oven or covered casserole” Since heating the empty Dutch oven in the hot oven is part of this recipe and you use the Lodge brand, I assume that this “rule” can be ignored? Thanks for your advice!
Teresa — Yes, I just ignore this “rule.” 🙂
Hi Teresa… I use the same Dutch Oven as you and never have had a problem. Enjoy!
2 teaspoons of salt seem like alot. I am trying it with one teaspoon. Have you tried adding additional ingredients? Malt powder? Molasses? Milk? Just wondering if the recipe is elastic enough for minor changes.
Kathi, The salt might seem like a lot but it doesn’t come through as too salty, but feel free to try with less! I have not added the ingredients you mention here before, but experimenting is worth a try. I would not recommend adding milk, however, as sometimes the added fat/moisture from milk can negatively affect a recipe that doesn’t usually call for it.
My dough is a completely wet, swampy disaster after 8-18 hours. It has grown and it’s bubbly, but in no way it resembles a bread. It’s a swamp, period.
Can I use bread flour instead of all-purpose flour?
Katherine, you certainly can, however, there is a chance the bread will not have the same end results with bread flour as it would with all-purpose flour — it might be a little chewier. Worth a try, though!
Pingback: 10 moments in January | Fay's Notebook
Hi..made this and it turned out just like your picture. In case anyone wants to speed up the proofing step, I borrowed a step from another instant pot recipe. Instead of the 8-12 hour rise….you can put the dough into your instant pot (I put it in, parchment paper and all)…select the yogurt function and select 4 /12 hours. This skips the 8-12 hour rise. Otherwise followed your instructions exactly as written. And baked up a beautiful loaf in just an afternoon. Thanks for a great recipe!
Has you tried this recipe with Gluten Free baking flour?
Thanks for giving me the courage to try this! My loaf turned out flatter than yours. A friend of mine who lives nearby says he does 2 hours on his second proof so I may try that (as I know there are variables to proofing that can be unique to environment). Otherwise, this was easy-peasy! I haven’t sliced it yet. (It’s so cute I don’t want to cut it!) But it looks just delightful. Thank you for the inspiration!
Well photographed and full of details. Piece of cake…sorry pieces of bread to make at home! Thanks Stephanie
I have been making this no-knead bread for a while now and extremely pleased and pass it on too many friends who made the investment in the Dutch oven pot.
The only complaint I have is that my bottom crust is very dark and thick, unlike the rest of the bread.
Can anyone explain why that happens or is there another option to avoid that dark thick crust at the bottom.
Thank you!
I, too, have been making this bread for a long time … along with Jim Lahey, Mark Bittman, the NYTimes food editor, also makes this bread and he’s shortened the recipe … sometimes i haven’t got *overnight* … Deb Pearlman of smittenkitchen.com
contact any one of these above to figure out why your crust is brown/black … maybe the heat is too high — get a new oven thermometer and try that and see is both, thermometer and oven temp match …
Do you know if I can use bread flour? Thanks!
Heather — You can use bread flour, but the result might be a little “gummier” than it would be with all-purpose flour. It will certainly still taste good, just with a slightly denser texture!
You should always preheat the oven with your Dutch oven and leave it in until your oven cools so that it does not crack from the quick temperature change. Cast iron probably can withstand this a few times before it cracks, but this is probably why people are having issues with their ceramic Crocks breaking.
Beyond delish !!! Although 45 min then 10 was plenty , mine was actually done n golden at 45 !!! But I didnt get any air pockets !!! When transferring from bowl to floured surface , I take it you dont need to work it at all , just form into a ball?? I will make this again !!
Just made it and it’s perfect! I feel like a culinary rockstar! Can’t wait to experiment with herbs. Thanks for the easy peasy recipe.
I don’t have dutch oven, so I cover a round pan with parchment paper, spray some olive oil and sprinkle some flour. On the bottom of the oven I place a glass bowl with water to make the steam and the bread bakes perfectly with a delicious crust!
I just made this bread last night, it was the easiest and tastiest bread i’ve ever made. thanks so much for sharing xoxo
Thank you for the amazing recipe. I can’t believe I’ve been baking all this bread before using so much yeast and sugar not to mention how texture becomes crumbly in a few hours.
I was wondering if you have a similar recipe using rye or wheat flour.
Thanks again. You’re one hell of a pro.
NG
Thanks so much, Nujoud! I don’t have a recipe using rye or wheat flour (yet ;)) but I’ll add it to my to-bake list!
I tried this recipe finally, and idk what I messed up. It didn’t seem to double in size when I let it rise in a warm spot for 10 hours, and then when I moved the dough to parchment paper, it was so sticky and wet I couldn’t shape it into a ball at all….
And when I cooked it in my 8qt Dutch oven, it was very flat when done and hard to cut thru, some of the parchment paper actually stuck to the bread. The inside was airy though after finally being able to cut through the hard crust. Any tips or pointers? I followed the direction to a t
Making this at 4am. 11 hours in. So easy and so yummy.
I have same day surgery this morning with early check in. I’m always so hungry when I get home. So I am making this bread (for the third time) – because it will be an amazing treat. Life is bread and bread is life!
What if you don’t have a dutch oven?
Best bread ever!!!
I’ve made this recipe countless times with great success, thanks!!
But, I’ve been trying to bake a sourdough loaf, and am having HORRIBLE luck! after six attempts at mixes, I found one that sorta works…. but I’m open to assistance.
Here’s where I am:
2-3/4c AP unbleached flour
1/4c rye flour
1t yeast
1t salt
1/4c starter, dissolved into warm water
(a total of 1-1/2c)
The dough rises, but not as high, even after 16hrs.
I’ve tried a quick rise in warm oven, no better.
I’ve tried bleached, unbleached and adding in rye and whole wheat.
The dough wont hold form; it wants to ‘run’.
I’ve gone to a smaller Dutch and that helped some.
Help me ObiWanBakers, you’re my only hope.
Larry, have you checked out my new sourdough series? Click the “Sourdough 101” link in the top menu for all the details! 🙂
Throughout this long list of posts I note some are having difficulty getting the dough to rise properly. I know two possible culprits: too much chlorine and not enough oxygen in the water. Each will limit yeast activity. To solve both problems, put the water for the dough in a bowl and aerate it with an aquarium or bait bubbler for an hour at room temperature. This will drive out chlorine and add oxygen to the water. Happy baking!
Your a keeper Stephanie. I decided to run out and get a dutch over as it was on sale after reading your post. Not ever having played with yeast I was a little nervous . Fortified with wine I followed directions step by step. I was having company the same night for a home made Fettuccine Alfredo. I never mentioned the bread I made and served them to get a reaction. Damm didn’t they go through half the loaf . I made toast the following morning and it was to die for . My neighbors now have your recipe. Thanks again
I had to half the recipe. I was wondering about how to adjust the cook time appropriately?
Natasha, I can’t say for sure since I’ve never done that but it will certainly bake much quicker than it would with a full loaf. Check about halfway through the normal baking time to see if it’s baked through.
I will be trying to make your dutch oven bread but before i do i would like to know if line 3 and 4 is a typo am i suppose to transfer it to a second sheet of parchment paper or am i reading it wrong.
Thank You,
Joseph
Joseph — Great question! You keep it on the same floured sheet of parchment paper. I know that reads a little confusing but in short, just one sheet of parchment is needed. Happy baking!
What brand of parchment paper do you use for the no knead bread?
What brand of parchment paper do you use? Some have better temperature ratings than others.
Mike — I use Reynolds or the If You Care brand (the brown parchment paper). Both work well for me in this recipe!
this recipe is to die for…. Do you have a gluten free bread recipe???
Thanks,
Daniela, Thank you so much! I have a few gluten free recipes on the site. Just search “gluten free” and they’ll pop up! 🙂
I have to say this was soooooooo good!! I wish I had more freezer space so I could stock up on this!
★★★★★
I made my first loaf yesterday. It was insanely easy. I did remove the top rack of my oven, to make it easier to move my Dutch Oven without being burned, ( I have the scars to prove it. I could just pick it up rather than slide the pot.
The bread was beautiful when done. The hard part waiting for it to cool. It is delicious with butter. My aunt made it her dinner. I had added rosemary and time in the begining to the flour, salt and yeast dry ingredients.
★★★★★
how much Rosemary and Thyme please? Sounds wonderful!
This is my go to bread now! I love adding fresh herbs or roasted garlic during the last shaping.
★★★★★
Do you reduce the temperature when you bake it?
Trying to make recipe using Spelt flour however dough not raising to high. Yeast is new. Is there a need to add sugar to help yeast .
Mark, I’ve never made it with spelt flour so I can’t say for sure what the issue is. Sometimes different flours behave differently and require alterations to the other ingredients added (water, yeast, etc.) for best results.
Great recipe! I followed the recipe as-written and my dough was a little on the wet side- it didn’t hold its shape as well as in your photos when I formed it into a circle and let it rest, however it still baked up beautifully and turned out looking just like in your photos. The bread has excellent flavour and a nice thick crisp crust. I’ll definitely make this again!
★★★★★
Sooooo easy and soooooooooo delicious. Thank you for making me feel like a great chef when I am kitchen challenged?
★★★★★
The care instructions that came with my Lodge Enamel Dutch Oven say “Do not heat an empty Dutch oven or covered casserole.” And at the Lodge website under use and care, it says “Do not heat an empty Dutch oven or covered casserole. Add water or oil when heating.” Do you have any experience with that ?
Maryann — I have heated my Dutch oven countless times without anything in it and it’s been OK. Of course, if you’d like, you can add water to the Dutch oven when preheating, and then dump it before adding the bread. I have no experience with this so I can’t say for certain how it will turn out.
Can I substitute instant yeast with the other yeast?
Anne, yes! If you use instant yeast, use 3/4 teaspoon instant yeast instead of the 1 teaspoon active dry yeast. In general, you can use 25% less instant yeast in a recipe that calls for active dry yeast. Hope that helps!
Followed recipe exactly and bottom turned black, burnt.
I’ve seen the exact same recipe on the Internet, and they say 30 minutes instead of 45 minutes of baking. And some recipes use temperatures of 400 or 425 not 450.
★
Brad, so sorry to hear that! I’ve not had that same issue even with the baking temp/time I have listed, but I know oven temperatures can vary greatly from oven to oven. I love using an oven thermometer to adjust my oven’s baking temperature to make it as accurate as possible.
Using this recipe, I made bread for the first time in my brand new dutch (to me) dutch oven! I’m completely hooked! Instead of using plastic wrap as the recipe calls for, I used beeswax wrap to be more earth friendly.
★★★★★
McKenzie — I’m so glad! Love the use of beeswax wrap. 🙂
Stephanie, can you please please post the weight of the flour in this recipe? I’m dying to make it, but measuring flour by cup doesn’t work for me, i end up with either too little or too much. Thank you!
Sue, 3 cups all-purpose flour = 360 grams or 12.75 ounces in weight. I hope that helps!
Very easy to make and delishis to eat with family or friends. Also make a nice gift any time
★★★★★
Made this bread with bread flour, added 1 tsp Dry Malt Diastatic Powder, and cut the salt to 1 tsp, also used instant yeast instead, and it came out not so salty, with a more french bread taste because of the Dry Malt Diastatic Powder. Cooked in 8 cup dutch oven as well and the rise was just the same. Could try a little bit of wheat flour (say 1/4 cup) next time, as it would give a more nutty taste. Probably when this bread was originally made they used a higher protein flour as they milled on the farm so their flour was not so processed. The Dry Malt Diasatic Powder gives the yeast something more to eat when it runs out of sugars in the dough so can survive and produce rise after a long time of sitting out.
I made this recipe today and I used unbleached bread flour instead of all purpose flour. What I found in the oven was the tour hundred and fifty degrees in a cast iron pot made the bottom a little too dark but it is fairly decent and it made a cute little round Loaf and a 5-quart pan. I think a 4-quart would be better to make the bread a little taller. I did feel there was too much salt in this recipe though and I would cut that back by a half a teaspoon I think. It’s going to make a good base drizzled with olive oil and pan toasted again with brie and olives and of course I’m wine. I am going to try it again with all-purpose flour and see if there’s a bit of a difference.
★★★★
I am a failure at cooking, baking…life in general. This bread has given me a new lease on life. My granddaughter still doesn’t believe I made this bread. YOU CAN DO IT!
★★★★★
I am a bread making newbie so I am amazed and really encouraged to think bread can look as beautiful as this with no kneading. I am pinning this dutch oven bread recipe to try soon!
Must I use plastic wrap? I have only ever used a cloth with previous breads.
Kristine, Yes a cloth is just fine!
Do you spray the bowl with cooking spray when you put the dough in to rise for 12-18 hours? Thank you
Johna, Nope, no need to grease the bowl!
Hello, I just read most of the reviews for this bread. So strange some had such good results and some were utter failures. I am wondering if the failed ones used an instant yeast???? just wondering.
Thanks Kathy
This was so easy to make! HOWEVER…. I’m not sure what I did but my bread was so DENSE… please help.
★★★★
I’ve tried making this loaf twice and both times it has failed to rise even with allowing time overnight. Each time it comes out dense with no air pockets and the crust is rock hard. I’m following the recipe itself to a T. I’m using a lodge Dutch oven and baking at the recommended 450. What am I doing wrong? I enjoy baking so much but this is discouraging!
I feel the same! I’ve noticed there are a lot of comments about this issue of not rising correctly and staying very sticky but haven’t been able to find a proposed a solution or really even some tips (besides something I don’t understand about the amount chlorine and oxygen in the air). I’m bummed too!
I have been making this bread for over four years. It is ‘super easy’ and the results are amazing. Nice big holes inside! Try this recipe !!
★★★★★
Kathy, Thank you so much!!
I would like to try this bread for Thanksgiving this year. We have been doing rosemary bread for the last few years. Any idea how much rosemary I should add to this recipe so as not to overkill? Thanks!
Leslie, Great question! My guess is about 1 tablespoon finely chopped FRESH rosemary would be enough for this loaf.
Thank you so much for this wonderful recipe. I just made it and we ate already half of it. It is so good. And so easy to make. I’m from Germany and I just love bread. This is a keeper for sure.
★★★★★
Toni, Thank you so much! I always love hearing that my recipes reach all over the world (my family’s home country, too!). 🙂 Happy baking!
Thank you, I should have mentioned that I live now in the us for over 16 years and just missed real bread ?
★★★★★
Made it. Love it!! Forever making bread this way! No more kneading! Yay!! Wish I could post a photo! Thank you!
Peggy, That is so so great! Thank you!
Has anyone added parmesan cheese or green olives to this bread recipe? If you have let me know if it turned out ok.
I’ve made bread for about 15 years. Never in a ditch oven until now. I keep coming back to this wonderful recipe. I’ve done garlic herb, sun-dried tomato, sour dough and even some as written. They have all been excellent. Thank you!
★★★★★
Made it on a Braai. Took some tries to get the brass ‘settings’ right but oh. My. God. Was it worth it. This. Mother trucking. Bread. So good. DO IT. AND THE BRAAI JUST MAKES IT BETTER MY SOUTH AFRICANS.
★★★★★
So simple and absolutely delicious!!! Can I double the recipe? (Rookie here) and if so, what adjustments need to be made in baking time etc?
★★★★★
Hi James, I wouldn’t recommend doubling the recipe unless you have two ovens and two Dutch ovens to use so you can bake two loaves simultaneously. When it comes to bread, timing is key, so that would be the only scenario that could yield the best results here!
This was my first time EVER making bread. I’m a very confident baker, but for some reason, bread has always intimidated me!! After getting a Dutch oven for Christmas, I was excited to give this recipe a try….. it’s super easy!
It turned out great despite discovering my oven is having huge temp issues (+or- 100 degrees whenever it feels like it).
Only question I have with it is: the crust on my loaf was super thick. Is that from the oven being too hot possibly?
★★★★
Nichole, Great question! A thick crust is usually the result of bread baking at a too-high temperature for too long. Knowing that your oven has temp issues, this might be why the crust was so thick. I’d suggest getting an oven thermometer to accurately gauge your oven temp (they’re like $10 on Amazon!) and also possibly remove the cover of the Dutch oven from the bread a little sooner than the recipe indicates, so it can lower the temperature inside the oven naturally. Hope that helps!
This bread is the best I’ve ever had. Hands down. I dont make my own bread but I’ve made it twice now…once as a spinach dip bowl and today just to eat..I have one question, how do I keep the bottom of the loaf from getting so hard? I bake it in the Dutch oven at the bottom of the oven. Should I move it up a rack? Thanks!
It was super easy to follow. Tasted great. Made it for a pasta dinner. Nice little extra. Kids loved it.
★★★★★
Do you preheat your Dutch Oven empty? I bought one specifically to
make bread like this and the instructions say you can’t preheat enameled cast iron.
Karla, Yes I do preheat my Dutch oven empty. I’ve done it for years and have never had any issues!
I sent my youngest a picture of the completed product. Her comment was, “How do you go from barely cooking to making your own bread? So pretty!” And at 4 ingredients, super simple.
I walked around all day saying, ” I made bread!”
Simple and delicious. Looks like it came from a bakery. Thanks so much!
★★★★★
Sharon, That’s amazing! You should be proud! 🙂
If I were to use a whole grain flour (like Bob’s Red Mill) would anything change with this recipe?
So I tried it with whole grain flour, left it overnight and it didn’t rise.
Don, I’m sorry to read that. I have not tried this recipe with these measurements with any other type of flour yet, so I can’t speak to what might need to change to allow the bread to rise. If you follow the recipe as written, you’ll definitely get better results!
I used a cup of whole wheat flour instead of all white,and the cooking water from the potatoes I had boiled for dinner. I followed the directions exactly, and the bread turned out beautifully! This is amazingly quick to mix up as well!
If making whole wheat bread, would you just substitute the flour amount with whole wheat flour?
Hi Marcey, Great question! Whole wheat flour absorbs more liquid than all-purpose flour does, so if you do a 1:1 swap here, your loaf will end up dry and tough. I haven’t experimented yet with using any whole wheat flour in this recipe, but I’d recommend starting with 2 cups all-purpose, 1 cup whole wheat, and seeing how that works. If you feel like experimenting yourself, you can keep baking the bread with increasing the ratio of whole wheat flour to AP flour and see what works best. Hope that helps!
I make a loaf every week – love it – and so easy to make
★★★★★
WOW! Loving this easy bread recipe, definitely pinning this to make for a dinner party!
★★★★★
I baked this today and its OK but a little doughy in the middle, I guess a bit undercooked. However the crust is rock hard. A little salty so maybe next time I’ll only add one teaspoon on salt. I followed the recipe exactly and used all purpose flour.
I think it may have something to do with my oven, as I used a counter top electric oven. Maybe it struggled to get hot enough, I’m not sure.
Also, I’m from the UK and have no idea about ‘cups’. It would be useful to have the metric measurements on the recipe as well.
I will try it again sometime. Thanks!
★★★★
Gemma, thanks for the feedback! At this time I am unable to provide metric measurements on all recipes; however, if you sign up for my email list, you’ll receive a free baking conversions chart which does the heavy-lifting of converting measurements for you!
are you ciding me the print is sow small I have to use a magnifing glass , come on most of your readers are older at least put your recipies in 14 or lager print.
You can make the font on your device bigger. Check those settings before blaming the author.
Do you think this would work with gluten free flour?
Terrie, I haven’t tried it yet with GF flour but it’s worth a try! I’d recommend a 1:1 flour, like Bob’s Red Mill’s GF 1-to-1 Baking Flour.
Can’t wait for this- just made the dough and letting rise overnight… but I used two teaspoons regular fine iodized salt… not sea salt. Will that make it too salty? The dough tasted pretty salty to me:/. Really hope I didn’t screw it up already.
Angie, It might be too salty! Sea salt has larger pieces of salt so 2 tsp of sea salt vs regular salt ends up being less. If you only have regular salt, use only 1 tsp.
Turned out beautiful. Very easy to follow, wouldn’t change a thing. My family loved it. Thank you for recipe.
★★★★★
My son and I had so much fun making this bread. He is 5 and was amazed at how the dough rose. I can’t wait to taste it.
Simple..tasty (especially when toasted). Excellent with butter and orange marmalade. A loaf of this bread will be by on my table every weekend.
Thanks!
★★★★★
Any idea if I can freeze this? It’s freakin’ DELICIOUS eating it straight out of the oven, just looking for a convenient way to have it around faster for sandwiches/etc.
Thank you!
This Coronavirus has brought back the baker in me. This recipe is delicious and so easy to make. Thank you so much. Now the big problem is you can’t get flour or yeast!! By the way, I’m making another loaf right now!! Everyone be safe out there.
★★★★★
I have the yeast that doesn’t need proofing can I use that instead? Also can I make this with whole wheat flour?
Covid brought me here!
Will make a brave trip to grocery to get some yeast for this! Wish me luck!
*Anyone know what I can add to this bread? Seasoning, nuts, and or dried cranberries or olives? 🙂
I don’t have a Dutch oven, what could I use?
Hi Cindy, If you have two cast-iron skillets (same size) to stack on each other (top-to-top) or any large, deep, oven-safe round vessel with a cover, you can use those! Otherwise, my friend Jessie has a lot of suggestions for alternatives: https://www.lifeasastrawberry.com/crusty-bread-without-dutch-oven/
So easy! And so good! Perfect crusty crust and soft on the inside! Mmmmm! I can’t believe I did it!
★★★★★
Can I make this with bread flour? I’m having problems finding all purpose flour.
Tara, Yes, you can! The results might be a little tougher or more dense, but nothing too noticeable. Happy baking!
If I need to let it rise for about 24 hrs, should I leave it out or put it in the fridge?
Alice, let it rise on your counter! No need to refrigerate.
I have made my own sourdough starter and I would like to use it in replace if active dry yeast. Is this possible and how much? Thank you.
Leah, Great question! I would recommend reading this article from King Arthur Flour on how to make that adjustment: https://www.kingarthurflour.com/blog/2015/10/29/adding-sourdough-recipe
I made this bread yesterday and it was gone within seconds! I have a double batch rising right now and I can’t wait until its done!
Hi. Just wondering if you need to dissolve the active dry yeast in the water first before adding it to the water. Thanks!
Olivia, No need to dissolve it ahead of time for this recipe!
Loved it! Followed directions to a T and it turned out perfect. Looking forward to checking out your sourdough recipe. Thank you!
★★★★★
I forgot to ask, I want to make a double batch now, but I only have one dutch oven. Do you bake it it in another container or do you bake the second loaf later on that day?
Lucie, Yes, I would bake them one at a time in your Dutch oven. Leave the second loaf out to rise while the first one bakes, and you should be good!
In your recipe if I want to double or triple it the recipe says to double or triple all of the ingredients but it says to cook it at the same time and it also says to double or triple the temperature of the water for the yeast. It doesn’t seem like that last part would be correct. How do I do this? Thanks!
★★★★★
Ellis, Don’t double the temperature of the water! The algorithm for the recipe box alters the temperature when you scale up the recipe, but the temperature should stay the same no matter how much you’re scaling up the other ingredients!