Make this airy ciabatta bread recipe from scratch with zero kneading and minimal effort. Start this homemade ciabatta bread now for the perfect soup companion tomorrow!

A Quick Look At The Recipe
This is a brief summary of the recipe. Jump to the recipe to get the full details.
Prep Time
12 hours 30 minutes
Cook Time
30 minutes
Total Time
13 hours
Servings
24 Slices
Difficulty
Easy/Medium. While the steps are simple, the long, slow process requires patience and attention to the dough’s texture.
Calories *
88 kcal per serving
Technique
A two-stage dough (pre-ferment + final mix) uses a long, slow rise to develop flavor and structure, followed by a gentle fold process and baking in a preheated oven.
Flavor Profile
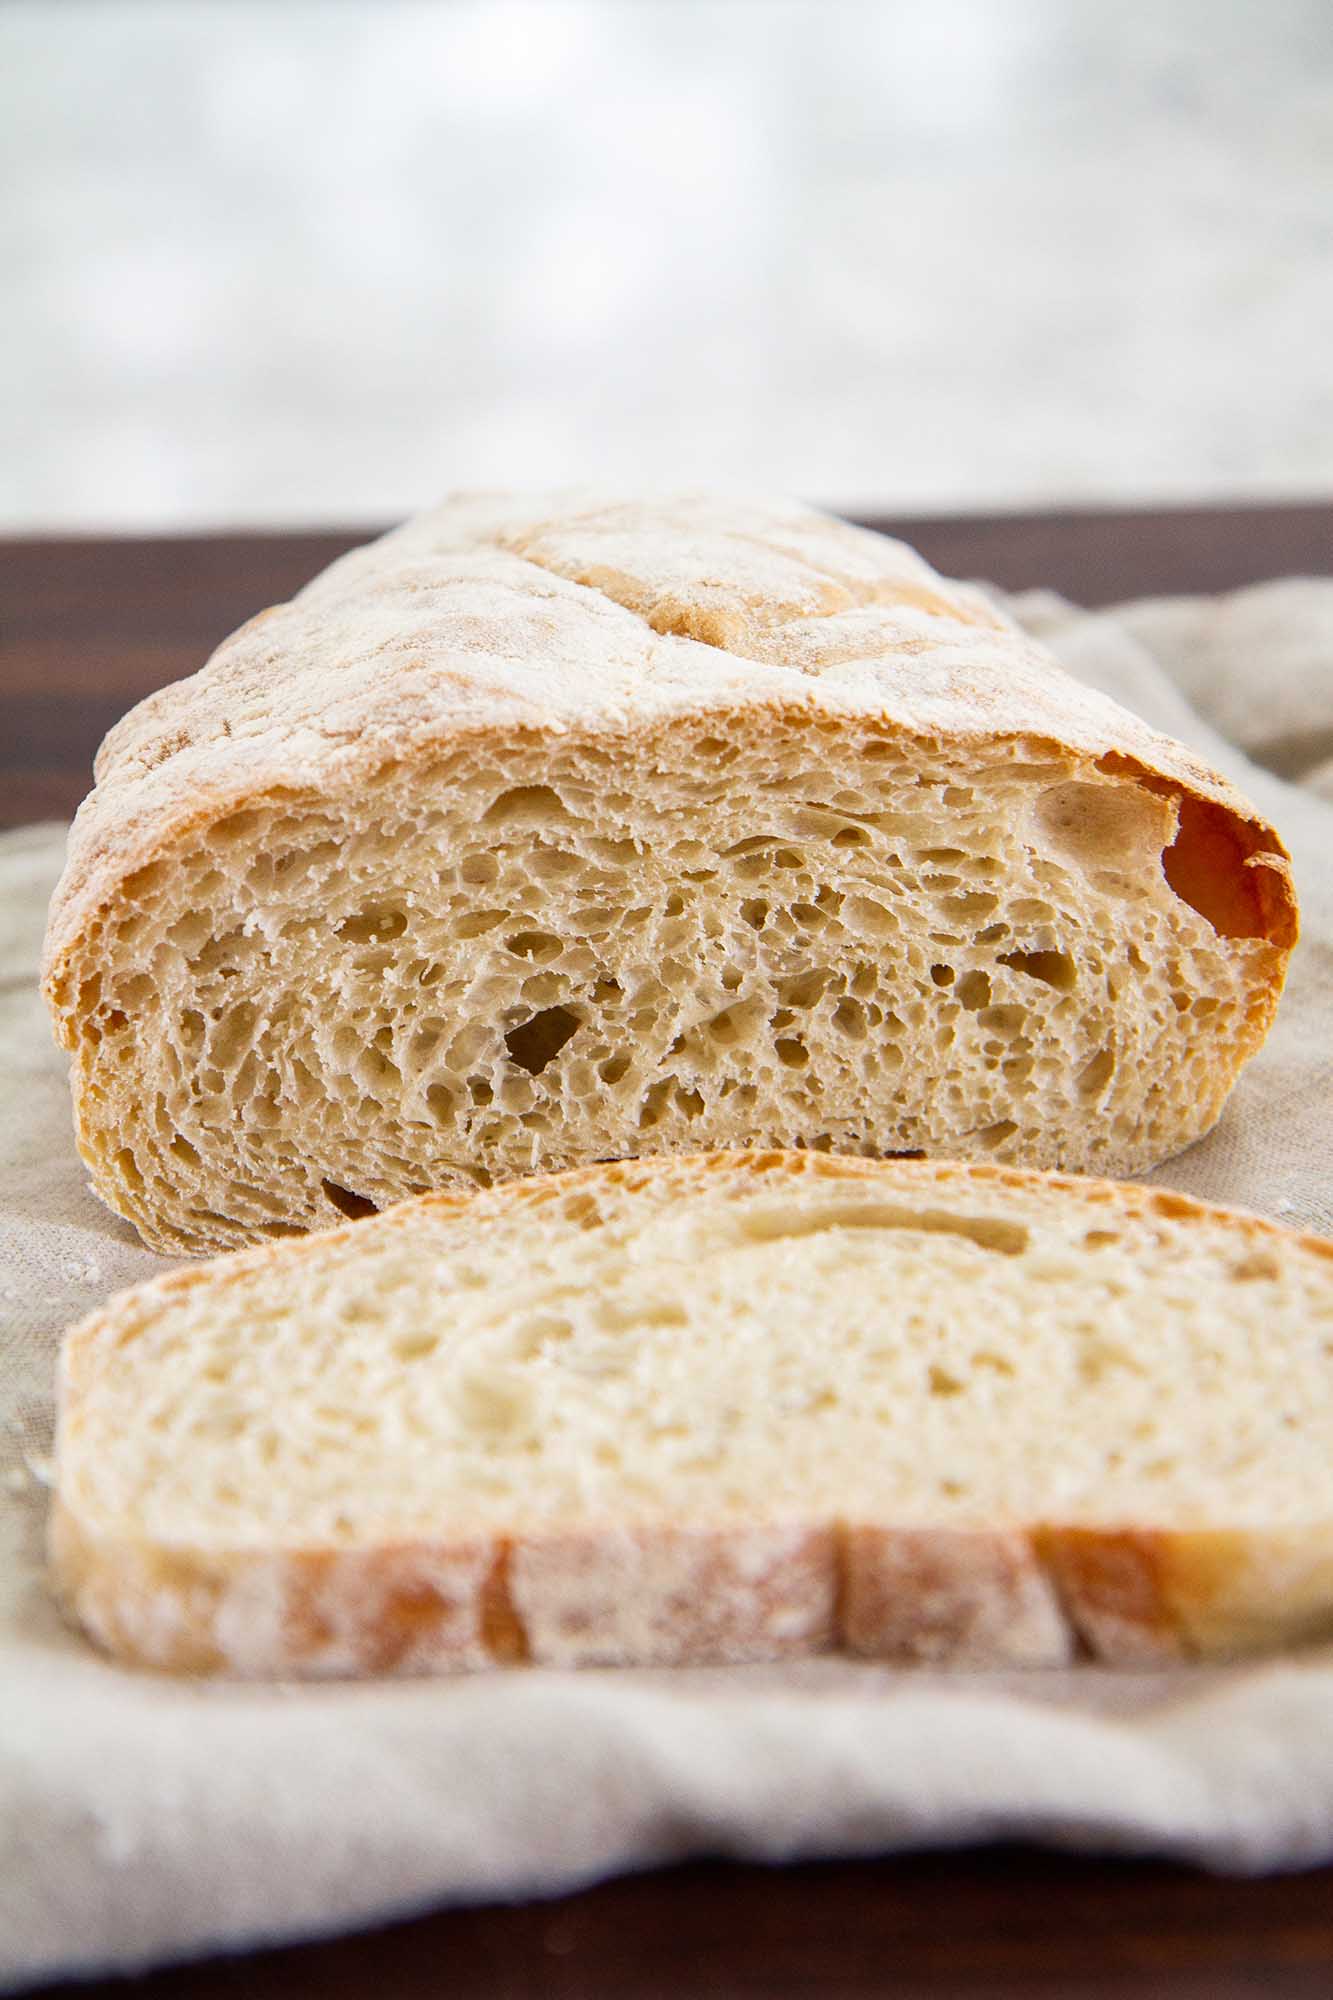
A light nutty flavor with a crisp, crackly crust and an open, airy interior.
* Based on nutrition panel
I was a little nervous transferring the dough to the pan since the dough is so soft, but using the bench scraper made it manageable. Baked up beautifully with those huge air bubbles I’ve never been able to get before. My family finished the first loaf by dipping it into olive oil while it was still warm! ⭐⭐⭐⭐⭐
Lauren
Why You’ll Love This Recipe
- Zero kneading required: We use a gentle “stretch and fold” technique that builds structure easily, preserving the delicate air bubbles instead of crushing them. If you love this low-effort method but want that distinct tang, try my No Knead Sourdough Bread or No Knead Naan next.
- Versatile baking: Whether you want two rustic loaves for dinner or smaller squares for the ultimate panini or sandwich rolls, this dough is adaptable to your needs.
Table of Contents
Authentic ciabatta often relies on bassinage, a professional method of adding extra water to developed dough that is difficult to master at home. Instead, these instructions utilize a simple overnight rest to do the heavy lifting, delivering the impeccable texture of good bread with zero stress.
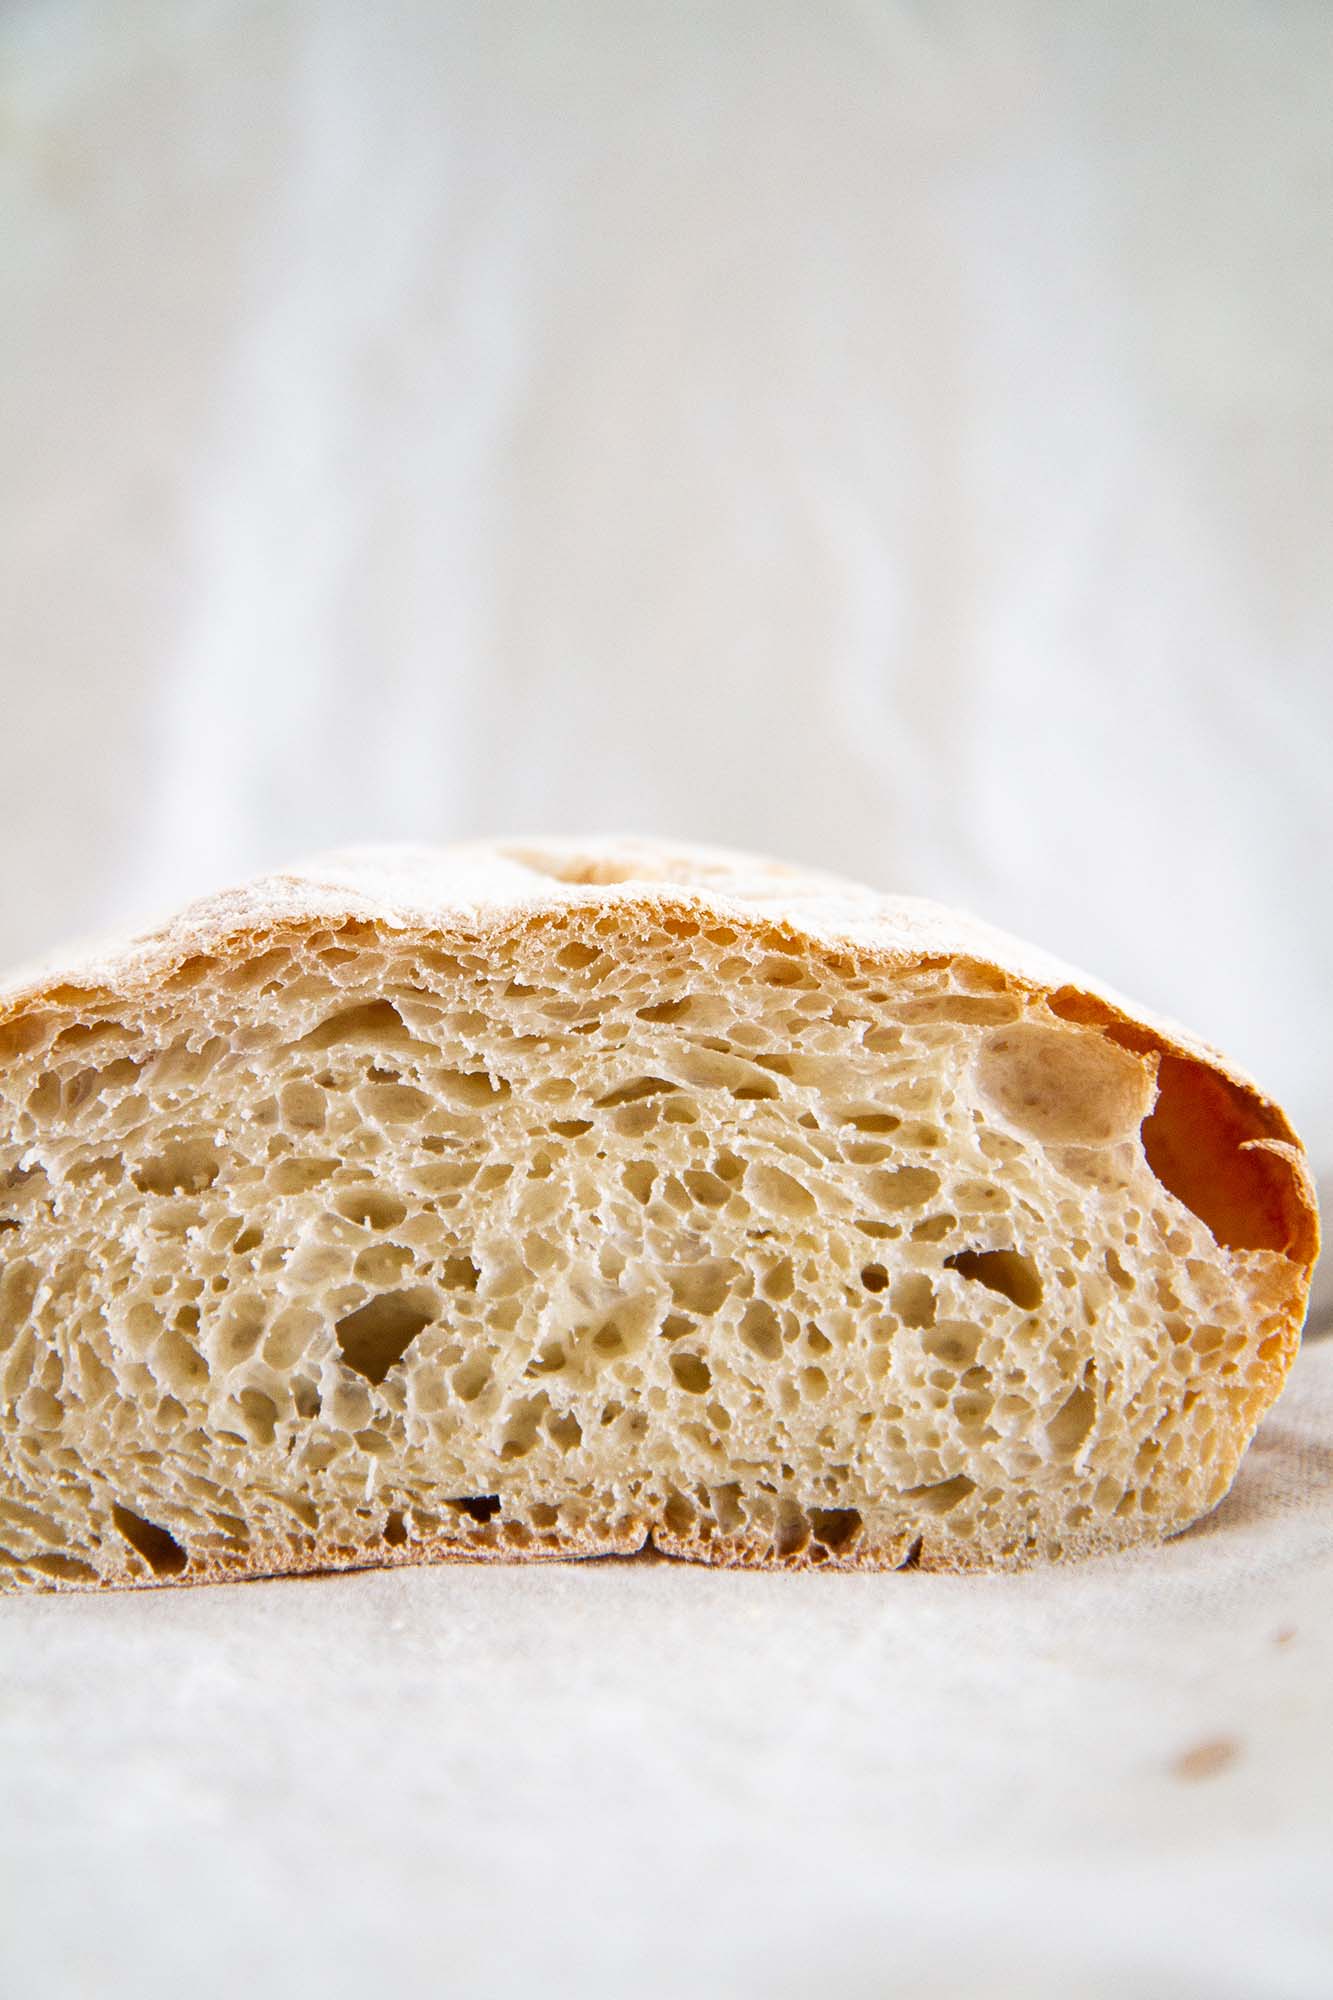
By using a pre-ferment, we create a depth of flavor and the signature open crumb filled with large, irregular air pockets known as alveoli. This distinct structure is what separates ciabatta from standard white bread like my Classic Italian Bread, which has a much tighter, softer crumb.
Ingredients & Substitutions
- All-Purpose Flour creates a loaf with a tender, airy crumb. While you can substitute bread flour, its higher protein content absorbs more liquid.
- Warm Water (105°–115°F): Temperature is key. You want the water warm enough to wake up the yeast but not so hot that it kills it.
- Instant yeast: It dissolves easily and provides a reliable, steady rise. Active dry yeast can be used as a substitute.
- Olive oil: A touch of extra virgin olive oil in the dough adds a subtle richness and helps create that distinctively crisp, golden crust, similar to the finish on my easy sourdough focaccia.
- Salt: Essential for controlling the fermentation rate and bringing out the wheaty flavor of the bread.
Variations:
- Olive and herb: During the folding stage (Step 4), gently fold in ½ cup of pitted, halved Kalamata olives and 1 tablespoon of fresh chopped rosemary. This savory twist is perfect for dipping in oil.
- Sandwich rolls: Instead of two large loaves, cut the dough into 4 to 6 smaller rectangles. These make exceptional buns for burgers or deli sandwiches. Just reduce the baking time by about 4–5 minutes.
Professional Tips
- Use the oven light trick: If your kitchen is cool or drafty, use your oven as a proofing box. Cover the dough and place it in the oven rack with only the oven light on. The heat generated by the light is enough to create a perfect, consistent warm environment for the dough.
- Wait for the cool-down: Even the most patient baker can rush this, but you must let the bread cool completely on a wire rack before slicing.
- Embrace the stickiness: This is a high-hydration dough, meaning it will be very wet and sticky dough, this is completely normal.
How to Make Ciabatta Bread
Step 1: Prepare the pre-ferment (biga) and let it rise. In a medium bowl, whisk together 1 cup of warm water (105°F to 115°F) and 1/16 teaspoon of instant yeast. Stir in 2 ½ cups of flour with a wooden spoon until a thick dough forms. Cover it tightly and let it sit at room temperature for 8 to 12 hours.
Step 2: Dissolve and mix. Combine the remaining 1 cup of warm water and ½ teaspoon of yeast in your large mixing bowl. Transfer the preferment (biga) into this water and use your fingers or a whisk to break it up slightly. Add the olive oil, salt, and the remaining 2 cups of flour.

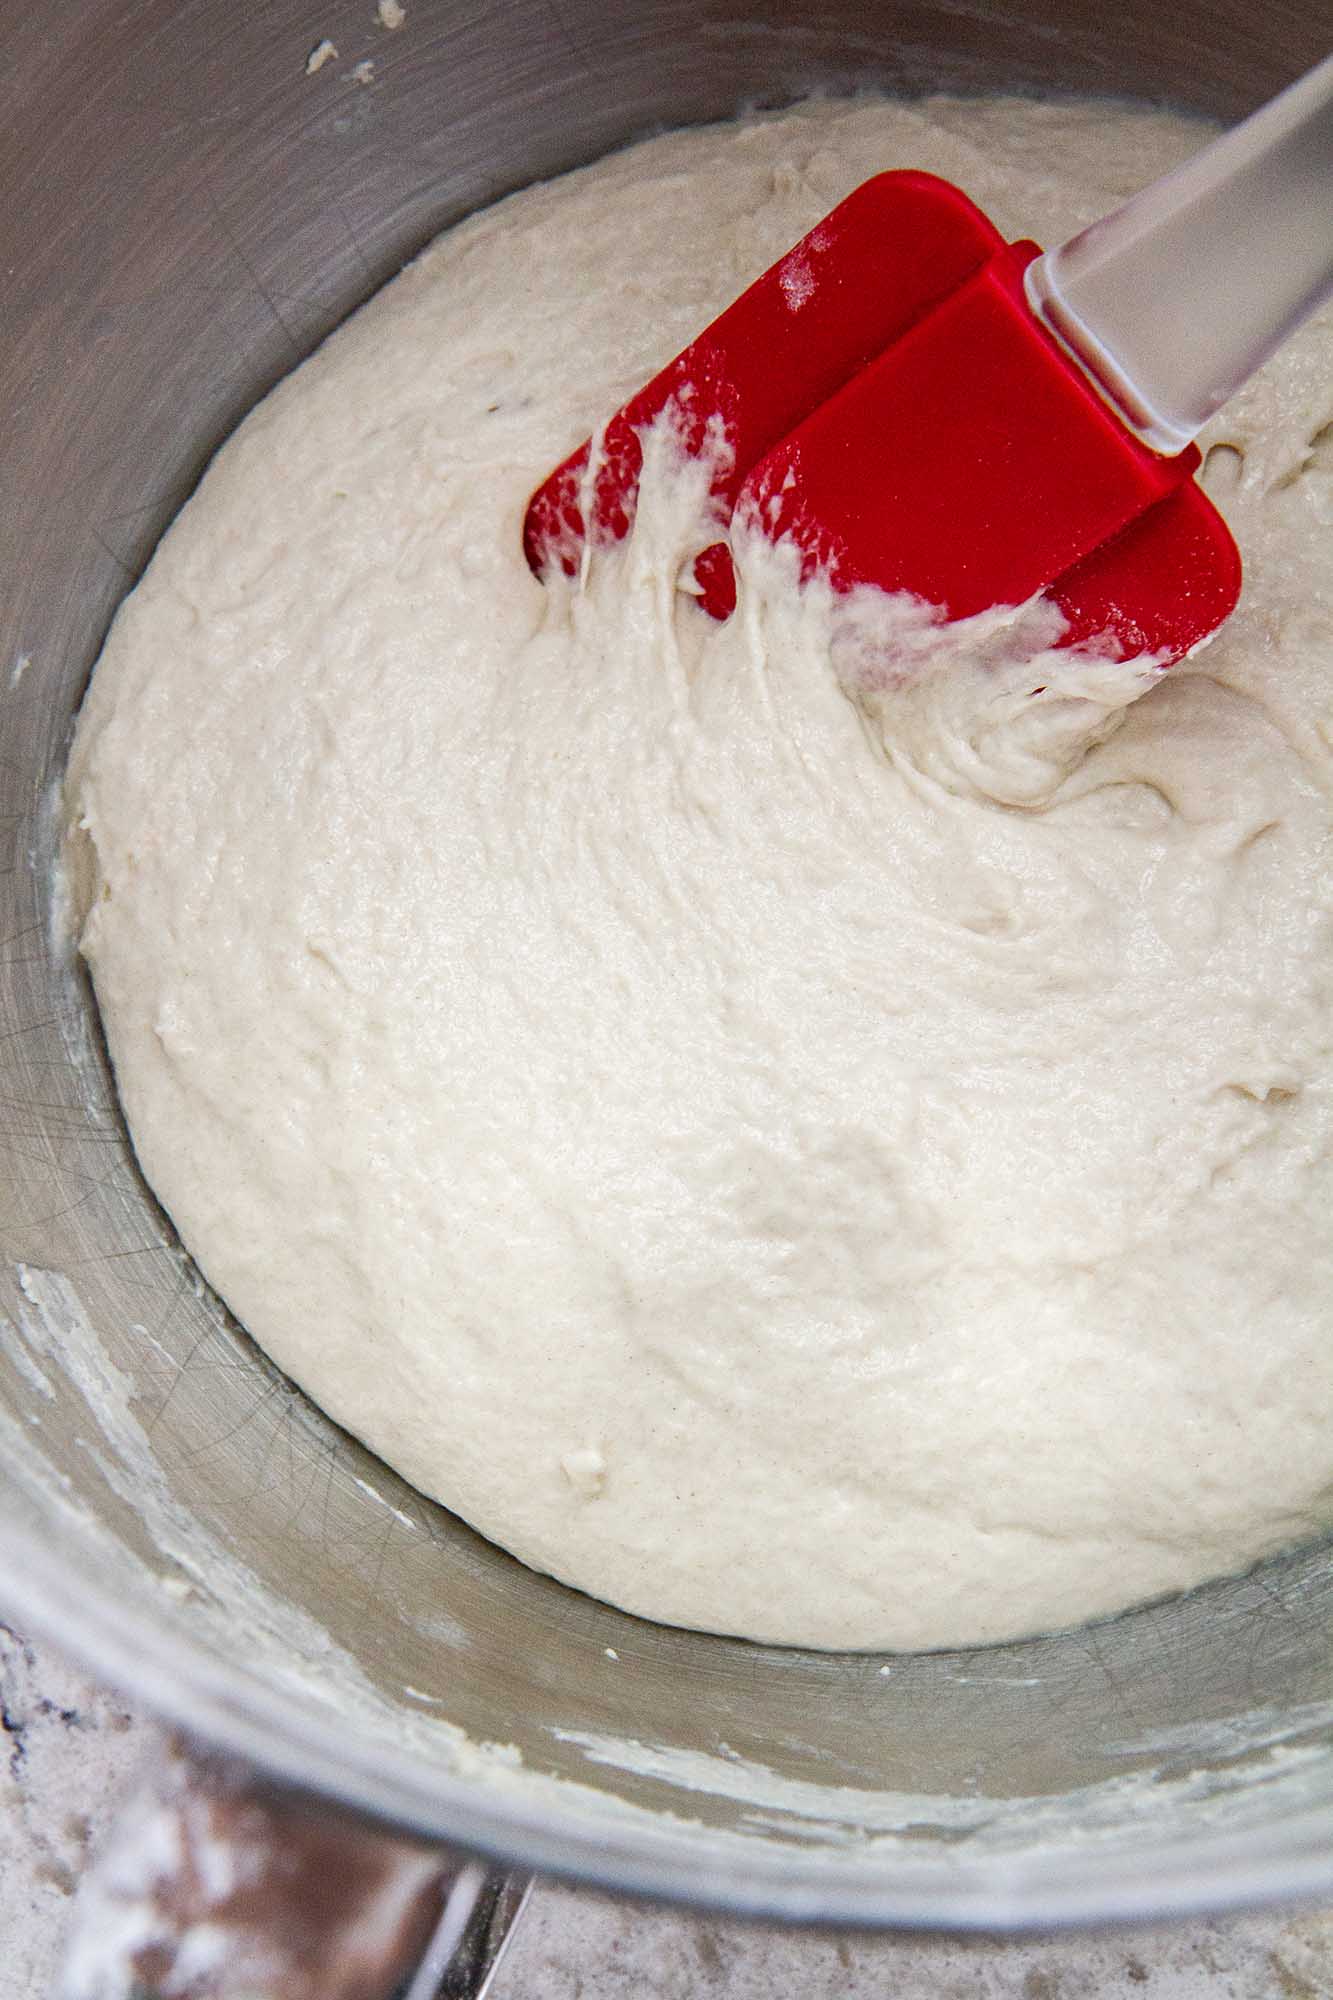
Step 3: The “no-knead” mix. Stir the mixture with a sturdy wooden spoon. The dough will look shaggy, wet, and undeniably messy, resist the urge to knead it until smooth. As long as there are no dry patches of flour, it is ready.
Step 4: Rise and fold. Transfer the dough to a clean, oiled bowl. Cover and let rise for 2 to 3 hours. During the rising, perform two sets of “stretch and folds”: wet your hand, grab the side of the dough, pull it up, and fold it over the center. Turn the bowl and repeat 2–3 times.
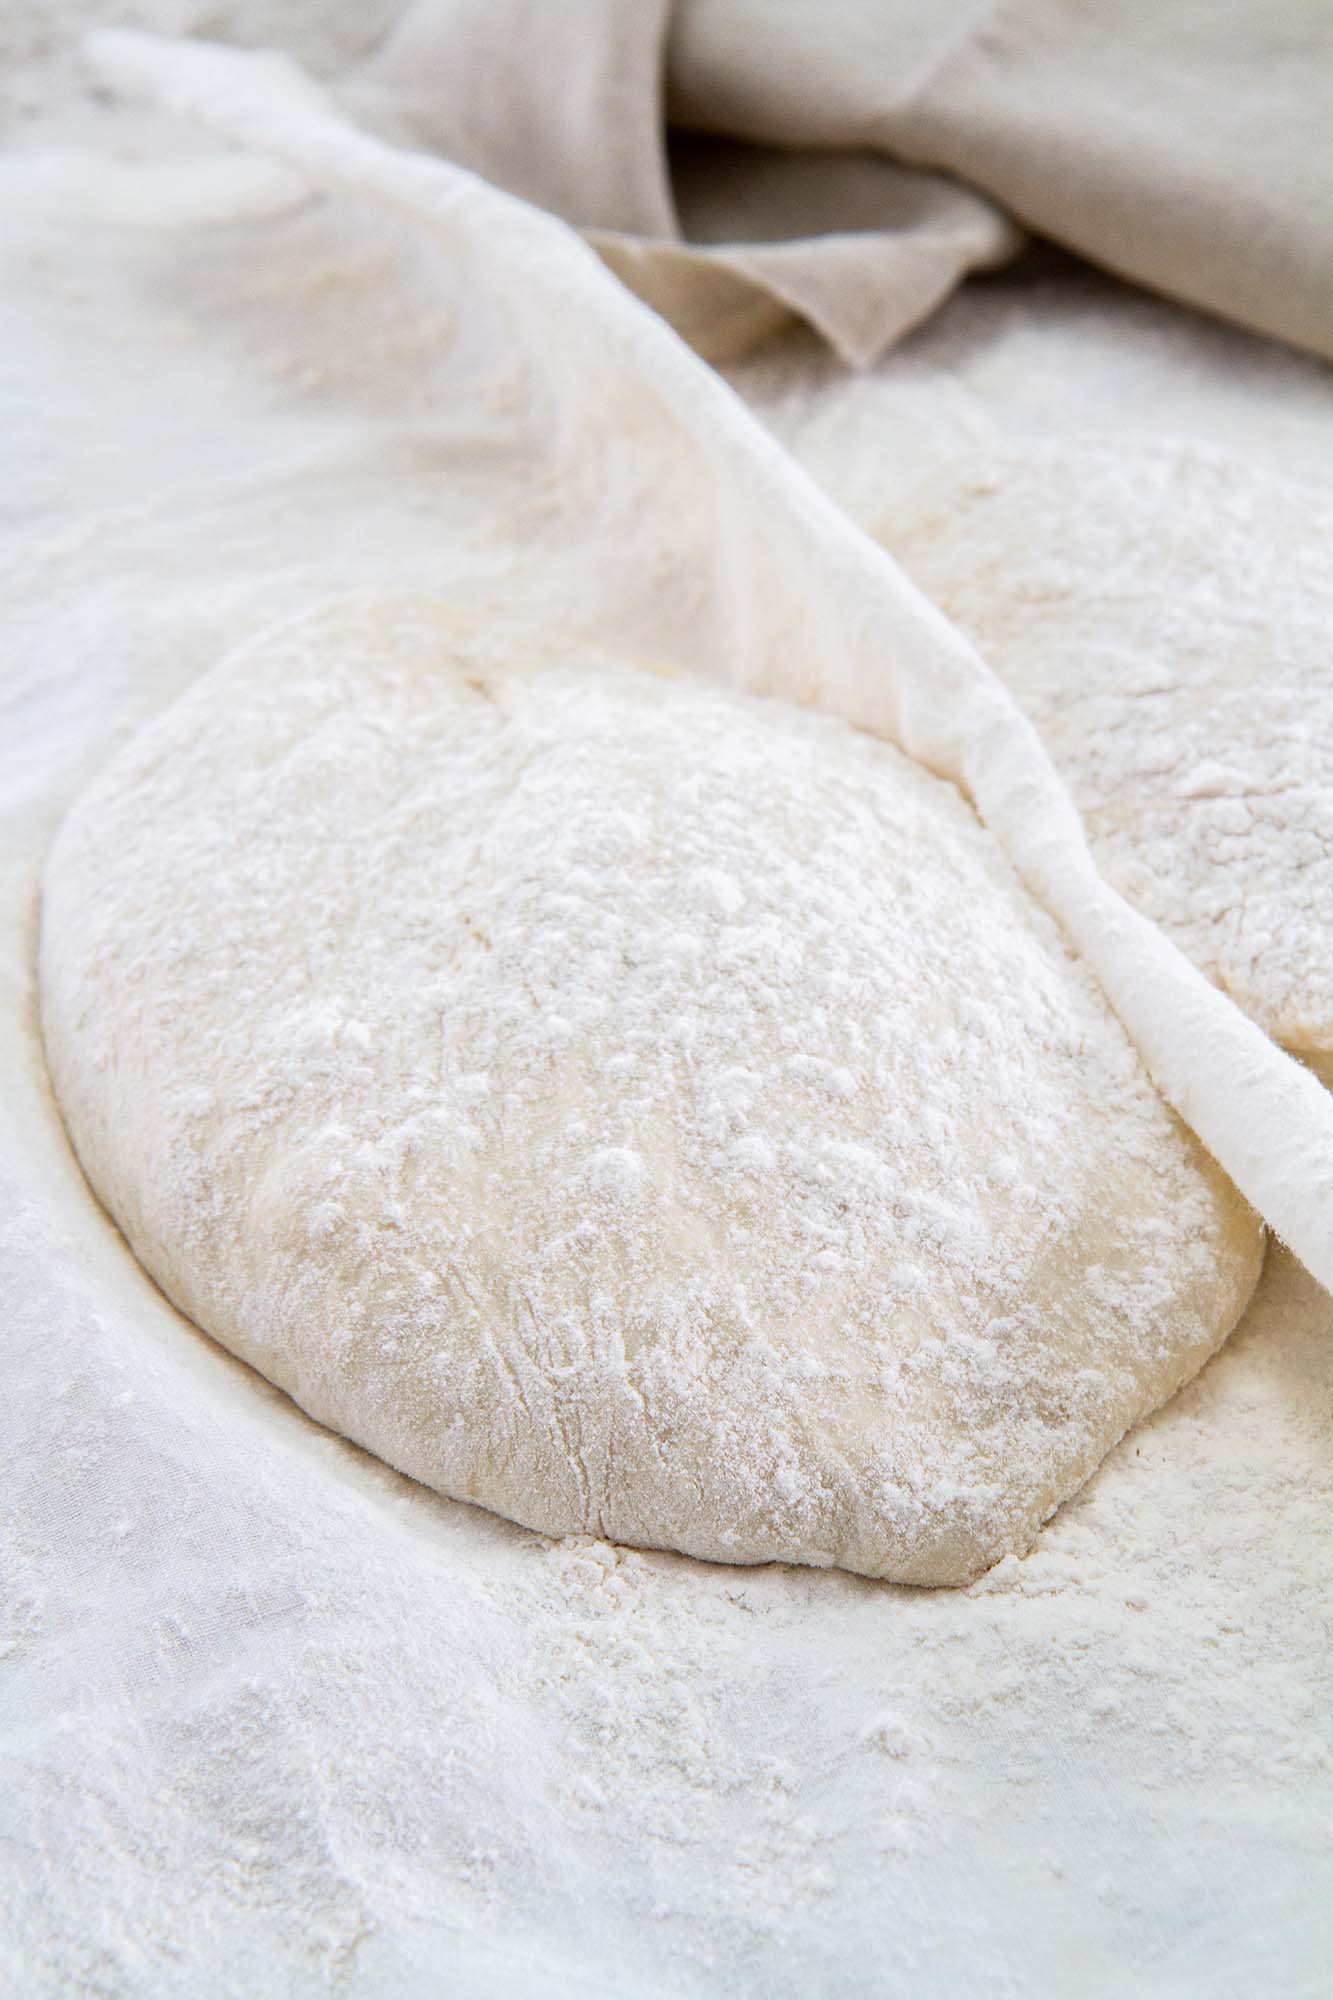
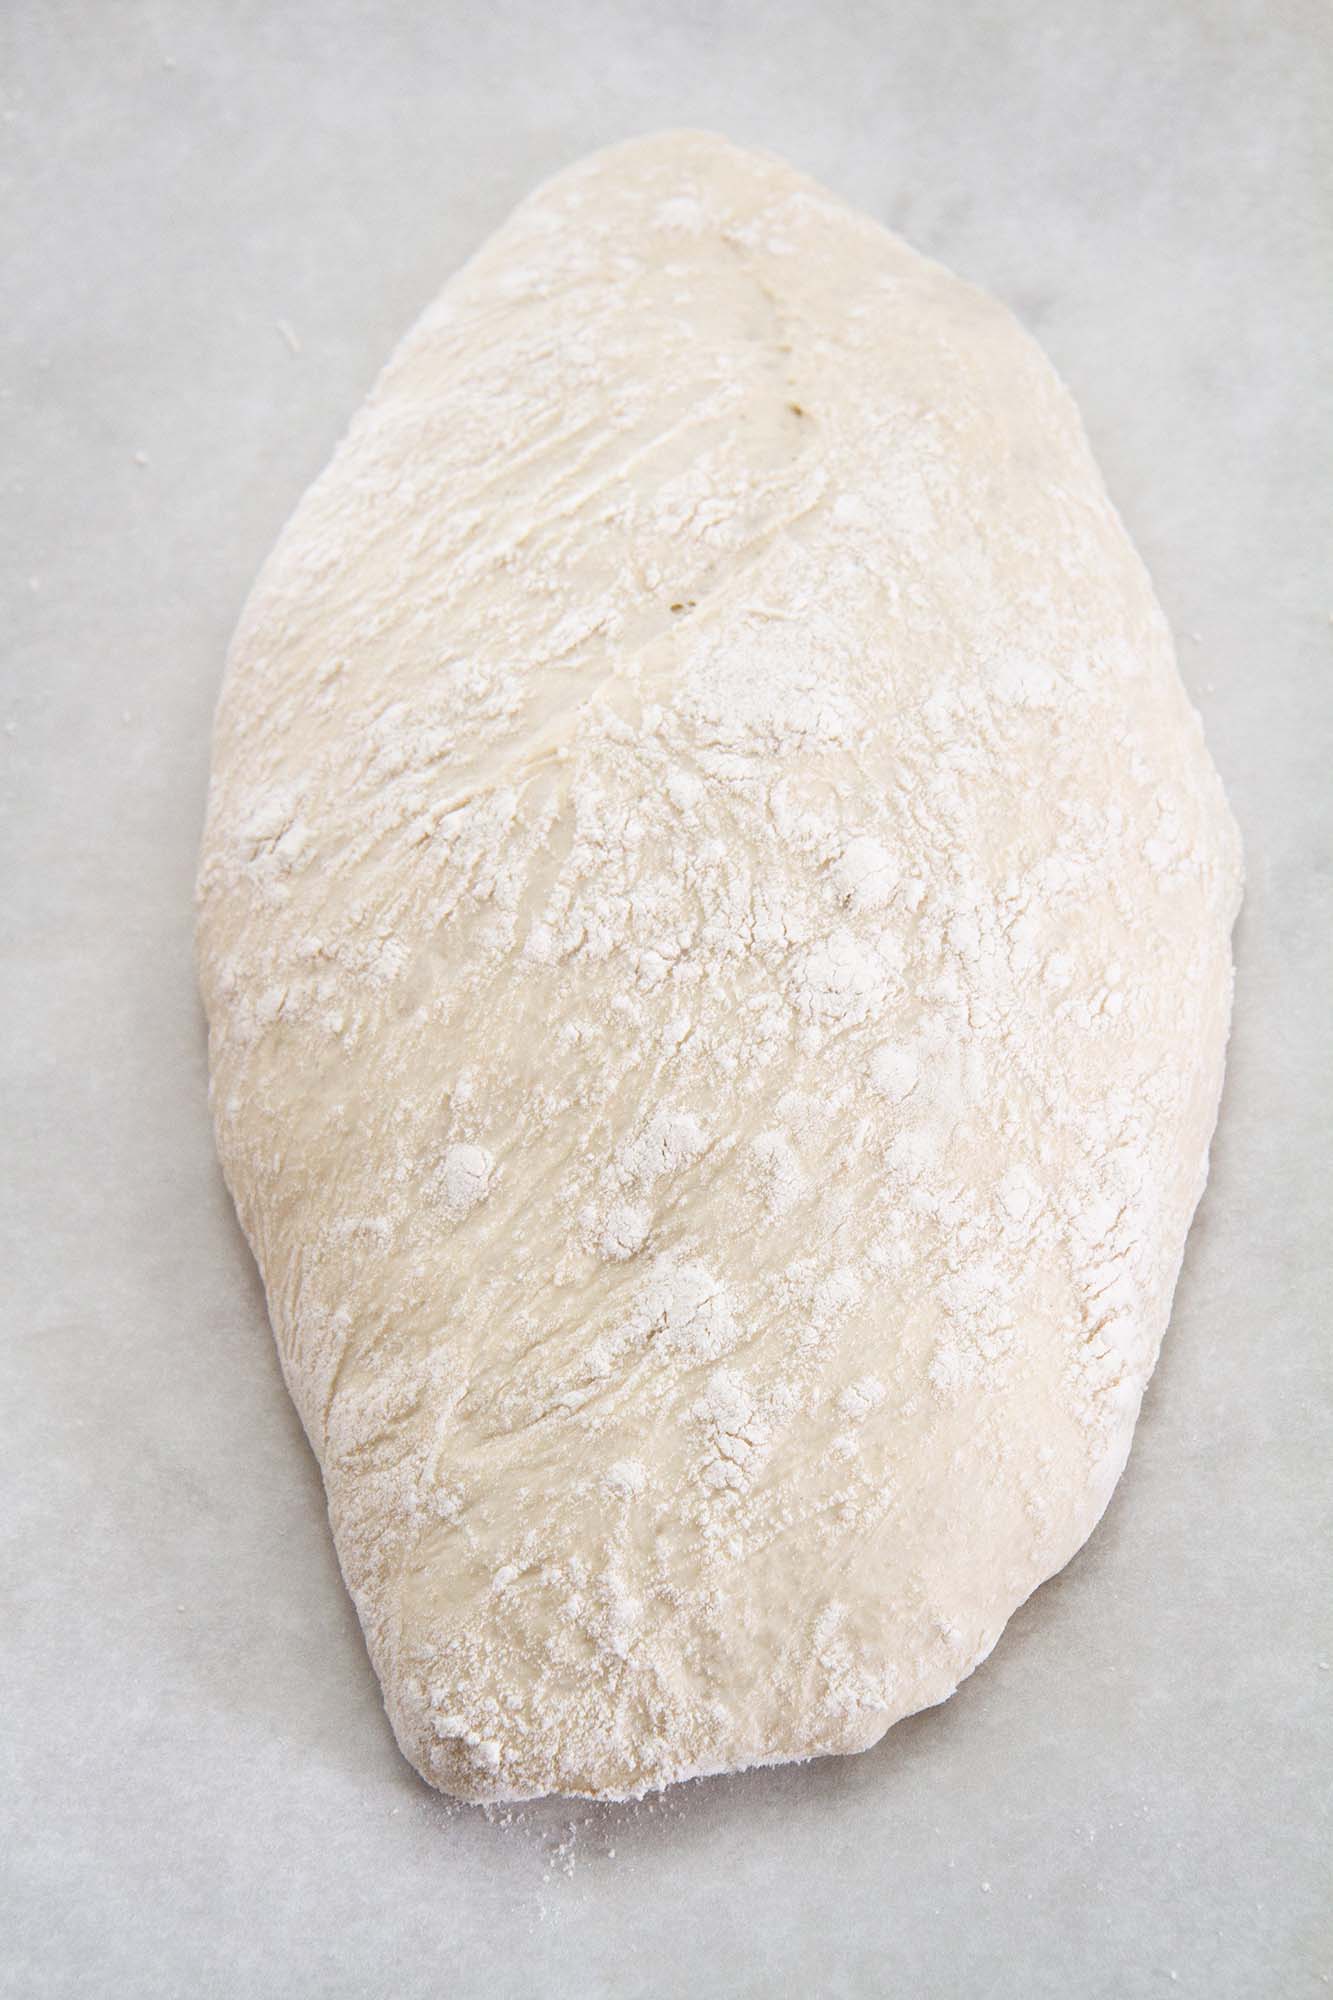
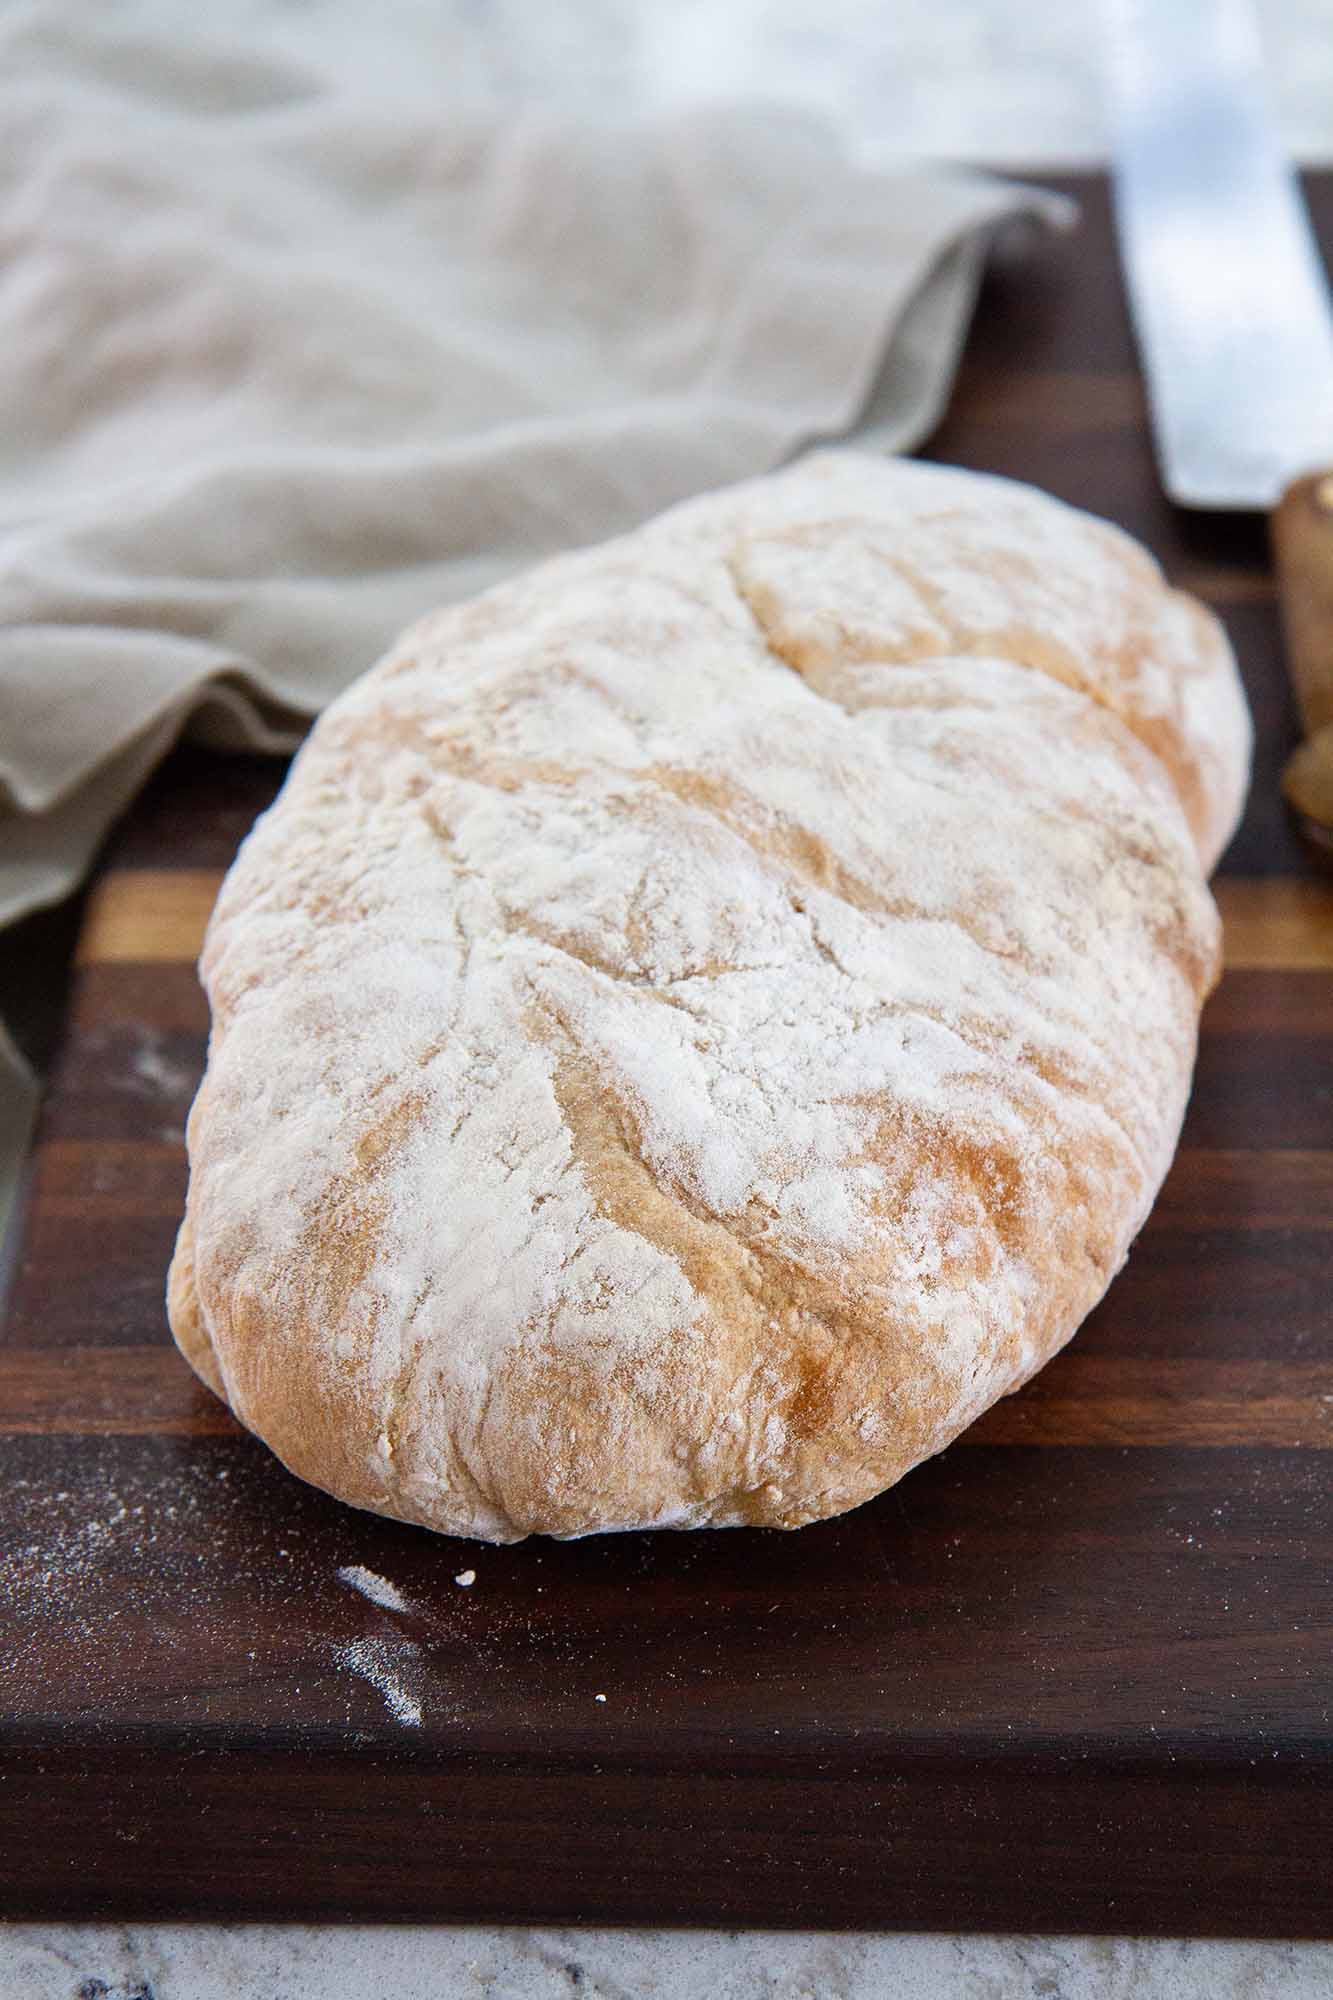
Step 5: Cut, transfer, sprinkle flour. Turn the dough onto a very generously floured surface. Dust the top liberally with flour. Do not punch it down! Using a bench scraper, cut the dough down the center to make two loaves. Gently nudge the cut sides with your fingertips, but do not roll them. Immediately lift the loaves onto parchment-lined baking sheet.
Because this dough is so delicate and relies on captured gases for its trademark air pockets, treat it like a cloud. Always use a rubber spatula or bench scraper to move or manipulate it, and reserve your hands only for the final, necessary transfer of the shaped loaves. Minimizing touch is the secret to a magnificent, open crumb.
Step 6: Final rise and bake. Cover the loaves with a dry towel and let rise for 45 minutes. Preheat your oven to 450°F. Bake for 25 to 30 minutes until golden brown and hollow sounding. Transfer the loaves immediately to a wire rack to cool completely.
Recipe FAQs
You likely over-handled the ciabatta dough during the final transfer. If you squeeze or drop the loaves onto the pan, they will deflate. Be incredibly gentle! It could also be expired yeast or water that was too hot.
Yes! For sandwich buns, cut the dough into 4 to 6 smaller rectangles instead of two loaves in Step 5. Check them early, as they will bake about 4–5 minutes faster.
Ciabatta is unique because of its exceptionally high hydration, which forces bakers to rely on a gentle “stretch and fold” technique to develop the gluten network rather than traditional kneading.
Absolutely. Wrap the cooled bread tightly in plastic wrap or aluminum foil. Freeze for up to 3 months. Reheat directly from frozen in a 350 degrees F oven for 10–15 minutes. Have leftover ciabatta that’s gone a little stale? It is the absolute best bread base for this breakfast casserole with bread.
The word ciabatta literally translates to “slipper” in Italian, a name likely chosen to describe the loaf’s short, wide, and somewhat flat silhouette. Unlike the precise shape of a baguette, a traditional ciabatta looks rustic and slightly collapsed.
Recommended Rustic Bread Recipes

Yeast Breads

Yeast Breads

No-Knead Breads

Sourdough
If you enjoyed this recipe, please leave a star rating and let me know how it goes in the comments below! I love hearing from you and your comments make my day!
Ciabatta Bread

Ingredients
- 1 ½ teaspoons instant yeast
- 3 ¼ cups warm water, 105°F to 115°F
- 4 ½ cups all-purpose flour, plus more for dusting and shaping
- 2 teaspoons salt
- ½ teaspoon olive oil
Instructions
- In a medium bowl, whisk 1 cup water and 1/16 tsp yeast. Stir in 2 ½ cups of flour until a thick dough forms. Cover with plastic wrap and rest at room temperature 8-12 hours.
- In a large bowl, mix remaining 1 cup water and 1 tsp yeast. Add the pre-ferment and gently break it up into the water with your fingers or a whisk. Add the remaining 2 cups of flour, salt, and olive oil. Stir with a wooden spoon or using your hands, until a wet, uniform dough forms. The dough will look shaggy, wet, and messy. If you prefer, you can mix the final dough with a stand mixer fitted with the paddle or dough hook attachment just until there are no dry patches of flour. Don't overwork it; just mix until the flour is fully incorporated and the dough pulls away slightly from the sides of the bowl.
- Transfer to a well-oiled bowl. Cover with plastic wrap and rise for 2-3 hours. During the rising, wet your hands and perform two sets of “stretch and folds” (pull the dough up from the side and fold over the center) to build structure.
- Turn the dough onto a generously floured surface. Dust the top with flour. Cut the dough in half, or into 4-6 pieces for sandwich rolls. Gently nudge the cut sides to tidy the shape (do not knead or roll). Carefully lift the shaped dough onto parchment paper-lined baking sheets.
- Cover with a dry towel and let rise for 45 minutes.
- Preheat the oven to 450°F. Bake for 25-30 minutes until the crust is deep golden brown. Cool completely on a wire rack before slicing.
Notes
- Storage: Store cooled ciabatta loosely wrapped at room temperature for up to 2 days, or freeze tightly wrapped loaves for up to 3 months.
- Technique: Handle the high-hydration dough as little as possible—gentle folding and careful transfers preserve the signature open crumb.
- Variation: Shape the dough into 4–6 smaller rectangles for ciabatta sandwich rolls, reducing bake time by about 4–5 minutes.
Nutrition
Nutrition information is automatically calculated, so should only be used as an approximation.
 Like this recipe? Rate & comment below!
Before You Go
I hope you enjoy this recipe, and when you are ready for your next baking project, be sure to try my no knead dutch oven bread or my soft, bakery-style french bread.


I was a little nervous transferring the dough to the pan since the dough is so soft, but using the bench scraper made it manageable. Baked up beautifully with those huge air bubbles I’ve never been able to get before. My family finished the first loaf by dipping it into olive oil while it was still warm!
I love a no knead bread recipe and this ciabatta is perfect for sandwiches! I have made this twice and each time the bread was full of flavor! I do want to see if I can replace the biga with a sourdough starter??
I have a few questions regarding Step 1 the Biga.. I understand the instructions, and let mine sit for 9 hours.
However during Step 2, the Biga didn’t want to mix in easily into the flour mixture.
My next question is the initial recipe is for 3 1/4 cups of warm water at. 105-110. I assume I’m reheating to 105 degrees, for the next step which is 8-12 hours later.
The only mistake I think I made was I didnt use the paddle when I mixed, I used the dough hook.
Will do this again!
Thanks
Connie, If I’m understanding you correctly, the initial flour mixture from Step 1 did not mix well into the flour mixture from Step 2? This is normal — the first mixture is quite stiff and needs some work to get it to mix into the second mixture, which is why the stand mixer is so helpful! Regarding your second question, yes, both times you add water the water should be around 105-115 degrees F. I hope that makes sense. Keep at it, and thanks for your feedback!