brown butter sweet potato buttermilk rolls
‘Tis the season for friends and family. ‘Tis the season for turkey and stuffing. ‘Tis the season to give thanks. I’m giving thanks, in particular, for carbs and brown butter.
Thanksgiving has always been one of my favorite holidays. While every year for the past decade or so it has looked a little different in terms of company and location — sometimes it’s been with my family at my parents’ house; a few times, it was with our entire families, both sides, in our tiny 800-square-foot apartment in Iowa; a time or two, we had it at my husband’s parents’ place; and this year for the first time ever, we are having Thanksgiving at our home, just the three of us — the food remains a constant, and I love that about it.
There is always the turkey, obviously. There is always a can-shaped tower of cranberry sauce. There is always green bean casserole. And there are always rolls.
They’re not always these brown butter sweet potato buttermilk rolls, however, though I think they should be. And since I get to create my own traditions with our wee family unit this year, these rolls are becoming our permanent Thanksgiving fixture.
As you may have gathered from the note above, these rolls have been on the blog for a few years now, and since they always seem to get more attention around this time of year from you lovely readers, I thought it was time to replace those seriously sad photos. Want to know a secret? That first photo of the rolls was taken in the aforementioned 800-square-foot Iowa apartment, on a cutting board, on our bedroom floor. These were my realities.
The recipe itself, though delicious at its core (you can’t go wrong with bread, sweet potatoes and butter), needed a little love, as well. So I tweaked a few measurements and methods for taste, texture and efficiency, and here we are. Brown buttery bread bliss.
I feel like a broken record when I say that potato-based breads are my favorite because of how well they perform, but I mean it. The dough itself is always smooth and satiny; it rises incredibly well even under not-so-bread-friendly circumstances, like cold kitchens and such; and the end result is perfectly soft, pillowy and flavorful.
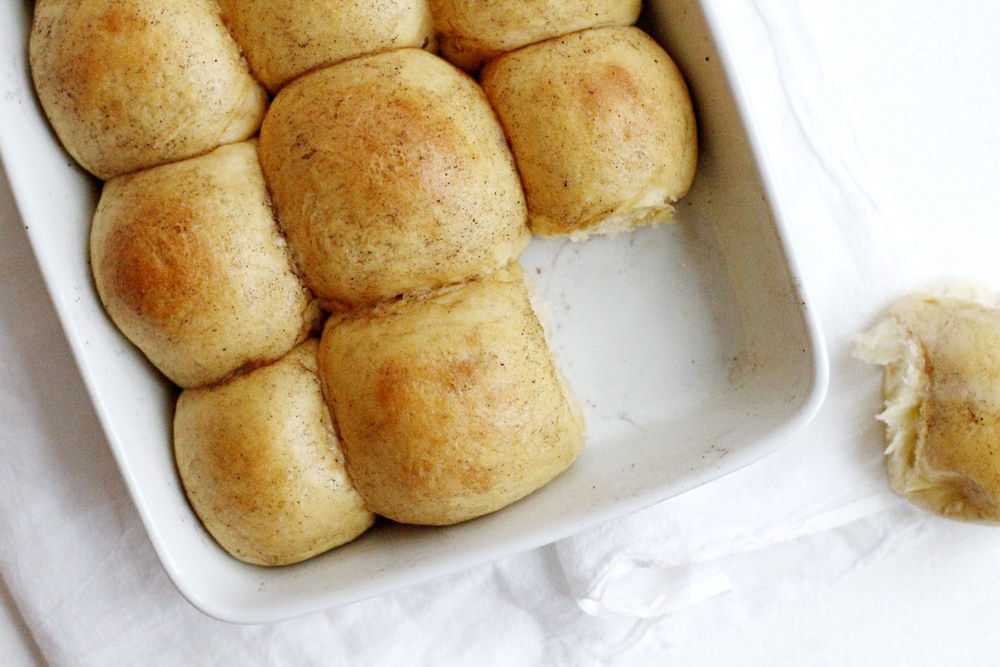
While I’m planning to freeze the remainder of these rolls for our Thanksgiving dinner, I snuck a bite from just one of them, still warm from the oven and just-brushed with nutty brown butter, for taste-testing purposes. And then I had to take another bite. And another. And maybe another after that. And suddenly, I’d eaten an entire roll. And then I took half of another one and gave the other half to my daughter to save myself.
Except, that sort of backfired. Because she soon devoured her portion and quickly began begging for more. Ahem.
So what’s left of these rolls will certainly make it to our Thanksgiving table. And if you haven’t decided on the bread/rolls portion of your own holiday menu, I highly suggest you give these a try. You can even make them this weekend and freeze them**, as I did. And if you plan to do a quick taste test, as I did, I might also suggest you double the batch just to be safe.
However you holiday, I hope you are thankful for carbs and brown butter, too.
**If you decide to freeze the rolls, place them in sealable storage containers, or wrap them tightly with plastic wrap, then foil. The day of serving, remove the rolls from the freezer and their containers, place them on a baking sheet, let them thaw to room temperature, then bake them at 350 degrees F until warmed through. Feel free to brush more butter on top just before serving.
Print
Brown Butter Sweet Potato Buttermilk Rolls
- Prep Time: 35 mins
- Cook Time: 30 mins
- Total Time: 1 hour 5 mins
- Yield: 12 rolls 1x
- Category: Bread
- Cuisine: American
Ingredients
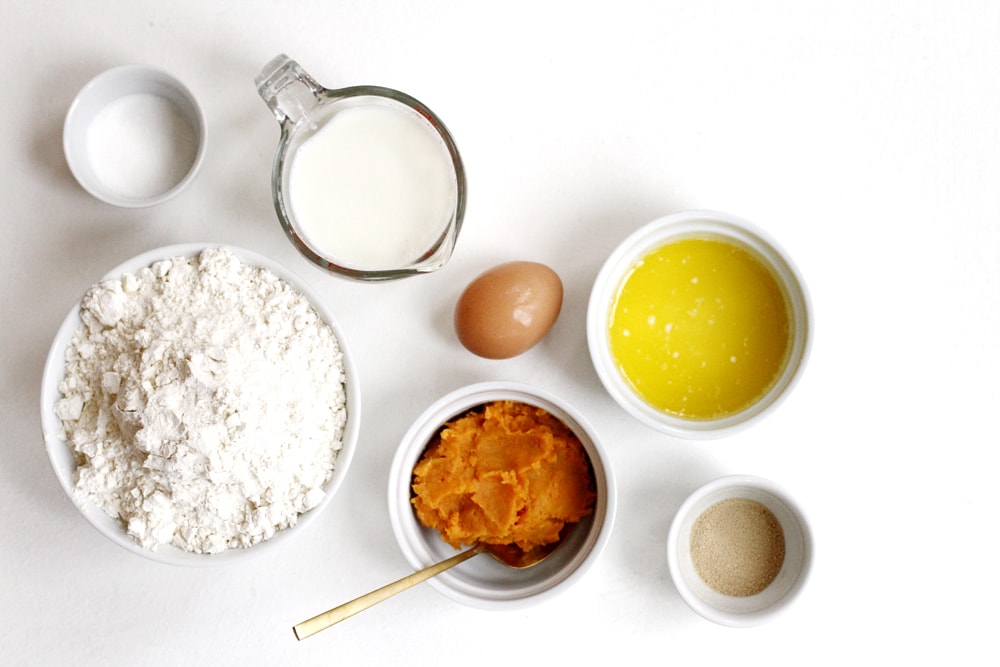
- 2 1/4 teaspoons (1 packet) active dry yeast
- 1 cup warm buttermilk (about 110 to 115 degrees F)
- 3 to 4 cups all-purpose flour
- 1/2 cup mashed cooked sweet potato
- 1/4 cup (1/2 stick) unsalted butter, melted and slightly cooled, plus 2 tablespoons for brown butter
- 2 tablespoons granulated sugar
- 1 1/4 teaspoons salt
- 1 egg
Instructions
- In large bowl or bowl of stand mixer, dissolve yeast in buttermilk. Let sit 5 minutes.
- Add 3 cups flour, sweet potato, butter, sugar, salt and egg. Stir just until dough forms.
- On lightly floured surface, knead dough by hand 10 minutes, adding just enough remaining flour until smooth, soft and elastic dough forms; OR, knead dough with dough hook in stand mixer on medium speed 5 minutes, adding just enough remaining flour until smooth, soft and elastic dough forms.
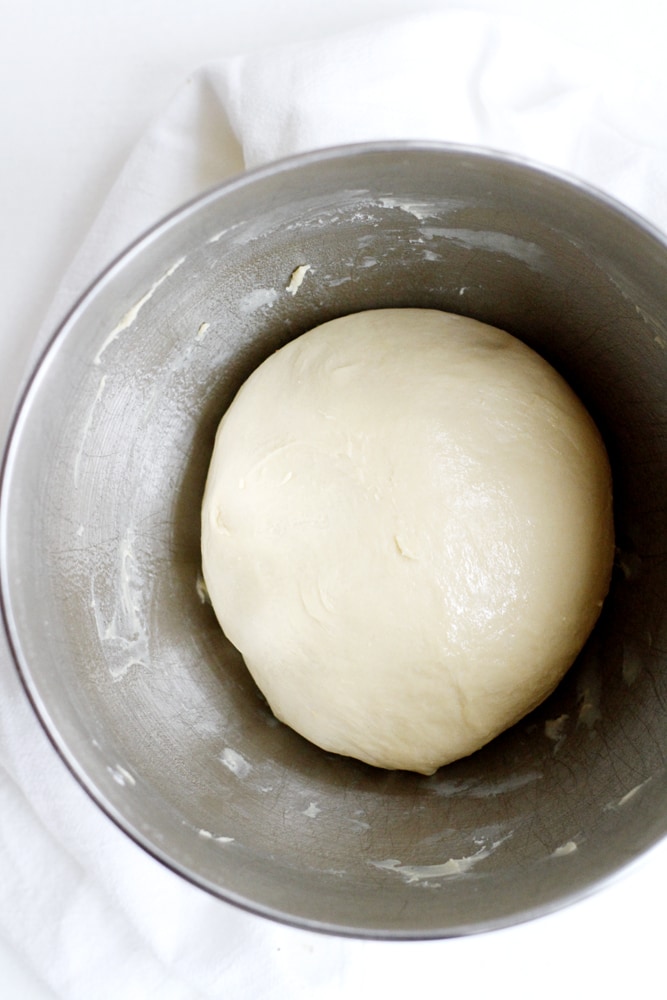
- Shape dough into ball; place in lightly greased bowl, turning once to coat. Cover bowl with plastic wrap and let dough rise in warm place 1 hour until doubled.
- Meanwhile, heat oven to 375 degrees F. Lightly grease 13-by-9-inch pan with cooking spray or butter.
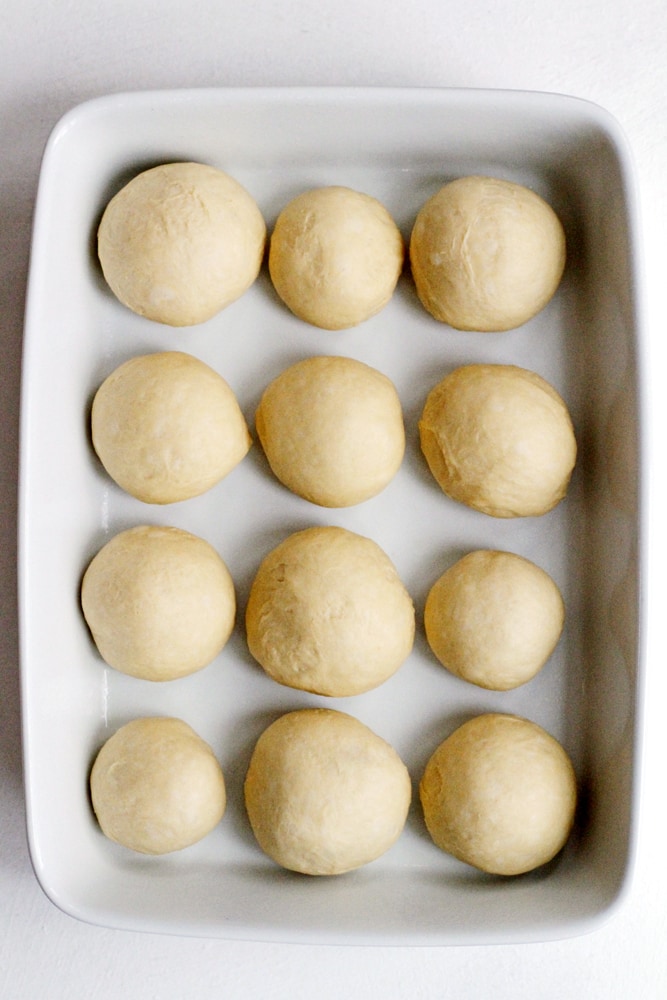
- Punch down risen dough. Divide dough into 12 pieces. Shape each piece into ball. Space rolls evenly apart in prepared pan. Cover pan with plastic wrap and let rolls rise 20 minutes.
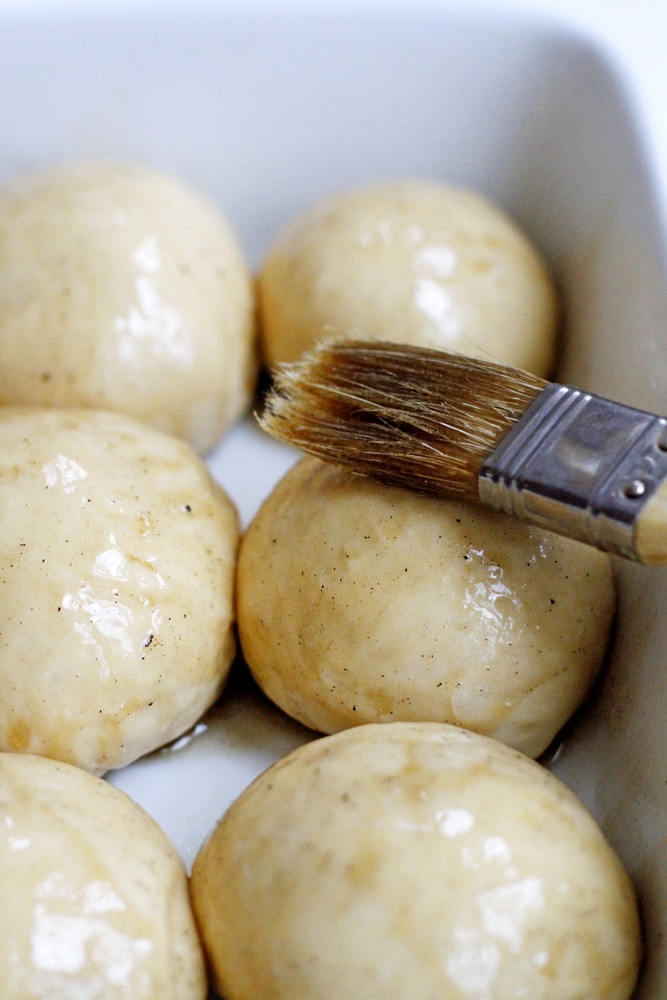
- Meanwhile, in small saucepan over medium heat, melt remaining 2 tablespoons butter. Continue to stir over heat until butter foams, then begins to turn brown. Once golden brown, remove from heat.
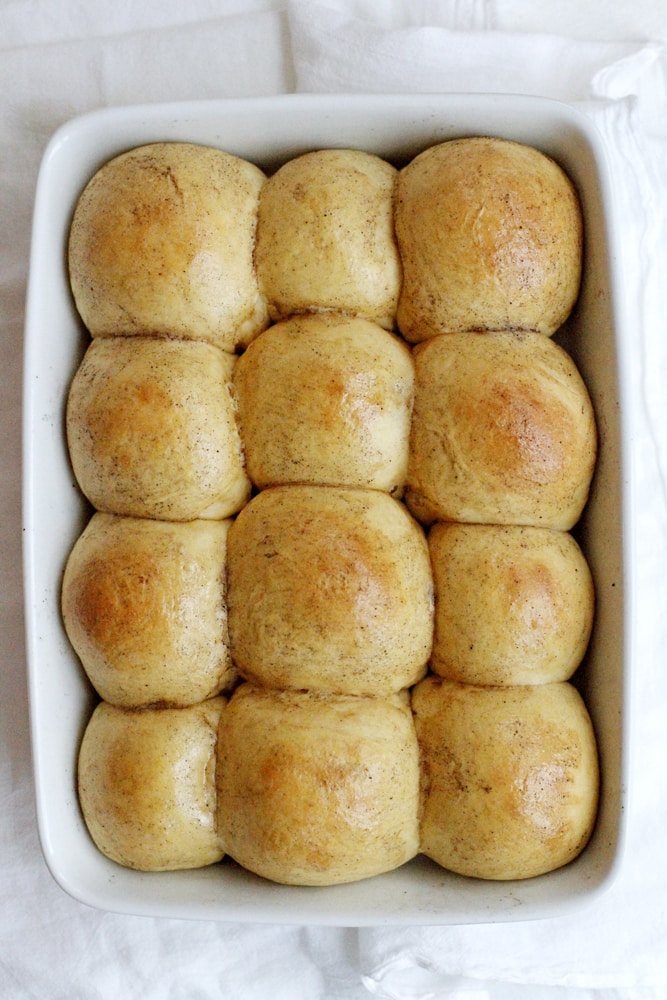
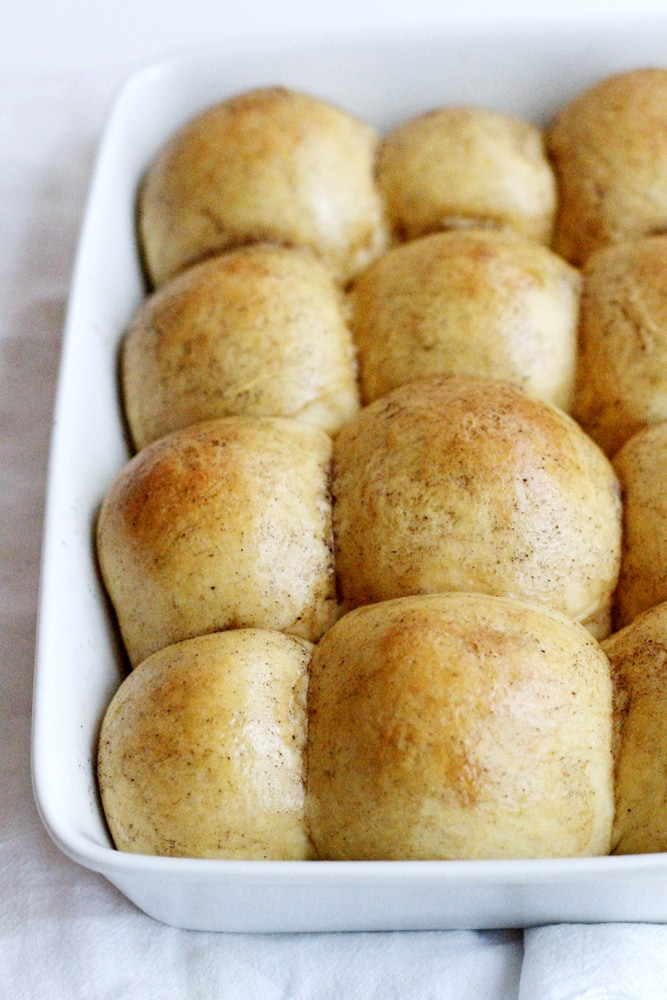
- Brush tops of rolls with butter. Bake 20 to 25 minutes until rolls are golden and baked through. Brush tops with any remaining melted brown butter, if desired.
I love the buttermilk in these rolls!! Such a great idea!
These look delicious! I love a nice soft fluffy roll.
Kari
http://www.sweetteasweetie.com
I am going to try potato rolls this year for Thanksgiving!! And a sweet potato sounds so so good. You have such a gift with bread baking Stephanie!! Total admiration over here.
I love making rolls with root vegetables like butternut squash and sweet potato! Yours look beautiful!
As always SUCH great ideas from you! I have my grandmother’s recipe for potato rolls that is a family tradition but these look wonderful! <3
These rolls are stunning! With brown butter and sweet potato, they’re absolutely perfect for Thanksgiving.
I’ve been on the hunt for the perfect roll recipe for Thanksgiving….I think I’ve found it!!!
I was just searching for a dinner roll recipe that I could make ahead of time to take to my parents for Thanksgiving! These are going to happen!
Be still my heart, I need these rolls in my life! 🙂
I wish I could make these rolls like you do. There’s nothing better than home-made bread. Only for the smell I’ll adopt you into my home 😛 Love the recipes on your blog.
These rolls look so tasty! I wish I could bake bread like this… sigh! 🙂
What a great combination Butter – Sweet Potato and Buttermilk – this has to taste amazing 🙂 xoxo http://www.whatskatieupto.com
I’m drooling. Can’t wait to try this recipe!
Pingback: Creamy Lemon and Leftover Turkey Tagliatelle - Cooking for Keeps
Having rolls on Thanksgiving is always a must and its always my favorite thing to munch on. But brown butter!! That’s brilliant! I am addicted to brown butter and think its like the best thing that ever happened to the baking universe. I gotta give these potato rolls a try! It’s a must.