
These peanut butter and jelly bars come together in one bowl with no chilling required and bake up golden, chewy, and loaded with jammy raspberry filling. They make 24 bars, which means there’s plenty to share — or not.
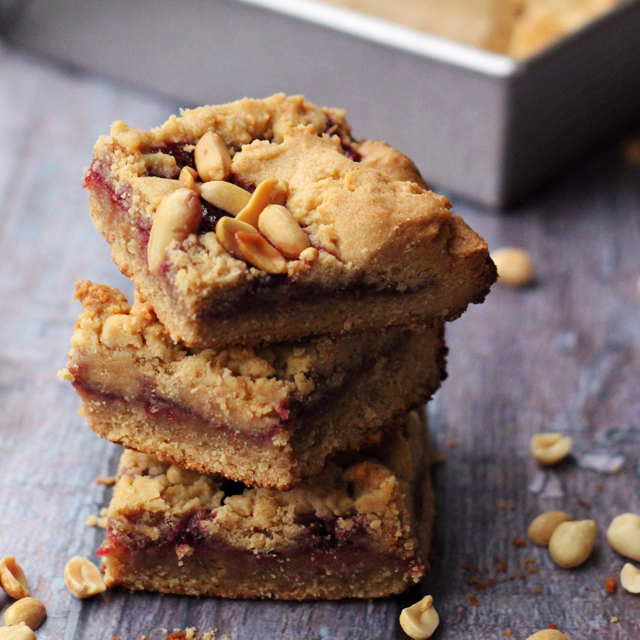

A Quick Look At The Recipe
This is a brief summary of the recipe. Jump to the recipe to get the full details.
Prep Time
10 minutes
Cook Time
45 minutes
Total Time
55 minutes
Servings
24 bars
Difficulty
Easy
Calories *
387 kcal per serving
Technique
Baked, one-bowl
Flavor Profile
Rich, nutty, sweet, fruity
* Based on nutrition panel
“I made these when I had a hankering for a PB&J but better and these hit the spot. The jam layer stays so distinct and the peanut butter dough on top gets this perfect slightly crisp edge while staying chewy underneath.”
⭐⭐⭐⭐⭐
Rita
Why You Will Love This Recipe
- One bowl, 10 minutes of prep. These bars come together faster than almost any baked dessert. You mix the dough in a stand mixer, layer everything in the pan, and the oven does the rest.
- Chewy, not cakey. The dough uses creamy peanut butter as a main ingredient, which keeps the bars dense and chewy rather than light and fluffy. That texture holds up for days after baking, which is rare for a bar this simple.
- The jam layer stays intact. Because two-thirds of the dough goes down first as a base and the remaining dough is dropped in small pieces on top, the raspberry jam sits in a distinct layer rather than mixing into the batter. If you love this style of bar, my carmelita bars are a great next bake!
Peanut butter and jelly is one of those combinations that never needs an occasion. I’ve made these bars for school events, weekend baking projects, and honestly just for a weeknight treat when I wanted something easy that I knew everyone would eat.
They’re the kind of recipe you can bring to nearly any gathering and come home with an empty pan, which is always a good sign. If you’re a fan of peanut butter baked goods, my revel bar recipe or these chewy peanut butter cookies are another crowd-pleaser worth keeping in your back pocket.
Ingredients & Substitutions
- Unsalted Butter: It creams with the sugar to build the soft, rich base of the dough. Use room temperature butter so it incorporates evenly and doesn’t leave chunks in the batter.
- Granulated Sugar: It sweetens the dough and helps it bake up with a lightly golden, set crust. Regular white granulated sugar is what you want here — don’t swap in powdered sugar or the texture will change.
- Vanilla
- Eggs
- Creamy Peanut butter: This is the primary flavor in the dough and also adds fat that keeps the bars tender. Use your favorite brand or variety. The most common mistake here is using natural peanut butter with separated oil, which can make the dough greasy and uneven. Stick with a standard no-stir creamy peanut butter for consistent results. If you love peanut butter in bar form, my peanut butter blondies are another easy option worth bookmarking.
- All-Purpose Flour: It gives the dough its primary structure and keeps the texture soft rather than crumbly. Don’t pack it into the measuring cup or the bars can turn out dense.
- Whole Wheat Flour: It adds a subtle nutty depth that pairs naturally with the peanut butter. The combination of all-purpose and whole wheat keeps the bars tender while adding a little more substance than a straight all-purpose dough would.
- Baking Powder: It gives the dough a slight lift so the bars bake up with a soft, cakey texture rather than sitting flat and heavy.
- Kosher Salt
- Raspberry Jam: It spreads over the bottom layer of dough and bakes into a sticky, jammy center layer just like in these raspberry crumble bars. The instructions note you can use any brand or variety, so grape, strawberry, or apricot all work here depending on what you have on hand.
- Salted Peanuts: Scattered over the top before baking, they add crunch and a little extra saltiness to balance the sweet jam layer. Don’t substitute unsalted — the salt on these is part of what makes the top layer so good.
Variations for Peanut Butter Jelly Bars
- Swap the Jam. Any flavor of jam or preserves works in place of raspberry. Grape, strawberry, and apricot all hold up well during baking and each brings a slightly different sweetness to the center layer.
- Make it chocolate! Swap the jam for chocolate sauce or chocolate chips for a delicious peanut butter chocolate bar. You could also keep the jam and just sprinkle chocolate chips ontop for extra decadence.
- Thicker Bars. Bake the recipe in two 8×8-inch pans instead of one 9×13-inch pan for smaller, thicker squares. Reduce the bake time by about 5 minutes and watch for the same golden brown color as your doneness cue.
Professional Tips for Perfect Peanut Butter Jelly Bars
- Grease the pan twice, and use parchment. The instructions call for greasing the pan, lining it with parchment, then greasing again, and that sequence is worth following exactly. The jam layer gets sticky and clingy as it bakes, and without that double-greased parchment you risk tearing the bars when you try to lift them out.
- Press the bottom layer flat and even. Spreading two-thirds of the dough across a 9×13-inch pan takes a little patience. Use lightly dampened fingertips or the back of a spoon to push it into the corners and edges so the jam layer sits evenly on a consistent base.
- Drop the top layer in small globs, not large chunks. The remaining dough goes over the jam in small scattered pieces, not one big sheet. Those irregular patches are intentional — they let the jam peek through during baking and keep the top layer from turning into a solid crust that traps steam.
- Let the bars cool fully before cutting. The jam layer needs time to set back up after it comes out of the oven, which is completely normal! Cutting too soon will give you ragged edges and a filling that slides out of place — about an hour at room temperature is the minimum before you slice them into squares.
How to Make Peanut Butter Jelly Bars
Use these step-by-step instructions to make chewy, golden bars with a distinct jammy center and a crunchy peanut-topped crust. Further details and measurements can be found in the recipe card below.
Step 1: Prep the pan. Preheat your oven to 350°F. Grease a 9×13-inch cake pan, line it with parchment paper, then grease the parchment as well. It sounds like extra work, but that double layer of grease keeps the sticky jam center from bonding to the pan and tearing the bars when you lift them out.
Leave a little parchment overhang on the long sides of the pan so you have handles to lift the whole slab out cleanly once it’s cooled.
Make the Dough
Step 2: Cream the butter and sugar.Add the room temperature butter and granulated sugar to the bowl of a stand mixer with the paddle attachment and beat on medium speed for about 2 minutes. If it still looks dense and greasy after a minute, your butter may be too cold — give it a few more minutes and it will come together.
Step 3: Add the wet ingredients. With the mixer on low, add the vanilla, eggs, and creamy peanut butter and mix until everything is fully combined. The batter will look smooth and thick, almost like a soft cookie dough at this stage. Don’t worry if it looks slightly loose before the flour goes in — that’s completely normal!
Step 4: Mix in the dry ingredients. In a small bowl, sift together the all-purpose flour, whole wheat flour, baking powder, and salt. With the mixer still on low speed, slowly add the flour mixture to the peanut butter batter and mix just until combined. The dough will be thick and a little sticky, which is exactly what you want. Stop mixing as soon as you no longer see dry streaks of flour — overmixing at this stage can make the bars tough.
Assemble
Step 5: Spread the base layer. Add about two-thirds of the dough into the prepared pan and press it out with your hands or the back of a greased spatula until it covers the entire surface in an even layer.
The dough is sticky, so don’t be surprised if it clings to your fingers — lightly greasing your hands helps here! Work slowly from the center outward to avoid thin spots at the edges, which can overbrown before the center is done.
Step 6: Add the jam layer. Spoon the raspberry jam over the dough base and spread it into an even layer, leaving just a small border around the edges. The jam will look glossy and bright at this stage, and that’s exactly right. Don’t push it all the way to the very edge of the pan — it will spread slightly as it bakes and you don’t want it bubbling against the sides and sticking.
Step 7: Add the topping. Drop small globs of the remaining dough across the surface of the jam, distributing them as evenly as you can. They won’t fully cover the jam, and that’s completely intentional — those open patches of jam will turn jammy and slightly caramelized as the bars bake. Scatter the salted peanuts over everything to finish.
Bake
Step 8: Slide the pan into the preheated oven and bake for 45 minutes, until the top is deep golden brown and the edges are set and pulling slightly away from the sides of the pan. The kitchen will smell incredible long before they’re done, but resist pulling them early — they need the full bake time to firm up so they cut cleanly.
If the peanuts on top look like they’re darkening too quickly after 30 minutes, tent the pan loosely with foil for the remainder of the bake.
Step 9: Cool and cut. Let the bars cool completely in the pan before cutting — this is non-negotiable if you want clean squares rather than a crumbly, jammy mess. Once cooled, use the parchment handles to lift the whole slab out onto a cutting board and cut into squares with a sharp knife.
Recipe FAQs
Store the bars in an airtight container at room temperature for up to 3 days. For longer storage, they freeze beautifully — just wrap individual bars in plastic wrap, place them in a zip-top bag, and freeze for up to 2 months. Thaw at room temperature or warm them briefly in the microwave.
Yes, and they’re actually great for making ahead. Bake the full batch, let them cool completely, then store them in an airtight container. They hold up well at room temperature for a couple of days, so you can bake them the day before serving without any loss in texture or flavor.
Absolutely — any jam or jelly you love will work here. Grape jelly is a classic PB&J choice, strawberry jam is always a crowd-pleaser, and even apricot or peach preserves add a nice brightness. Just use the same amount called for in the recipe and spread it in an even layer so every bar gets a good ratio of jam to dough.
Recommeneded Peanut Butter Recipes

Cookie Recipes

Christmas Recipes

No-Bake Treats

Summer
Peanut Butter and Jelly Bars
Ingredients
- 1 cup unsalted butter, room temperature
- 1 ½ cups granulated sugar
- 1 teaspoon vanilla
- 2 extra-large eggs, room temperature
- 18 ounces creamy peanut butter
- 1 ½ cups all-purpose flour
- 1 ½ cups whole wheat flour
- 1 teaspoon baking powder
- 1 ½ teaspoons kosher salt
- 18 ounces raspberry jam
- ⅔ cup salted peanuts
Instructions
- Preheat the oven to 350°F. Grease a 9×13-inch cake pan, line it with parchment paper, then grease the parchment.
- In the bowl of an electric mixer fitted with the paddle attachment, cream the butter and sugar on medium speed until light yellow, about 2 minutes. With the mixer on low, add the vanilla, eggs, and peanut butter and mix until combined.
- Sift together the all-purpose flour, whole wheat flour, baking powder, and salt in a small bowl. With the mixer on low, slowly add the flour mixture to the peanut butter mixture and mix until just combined.
- Spread two-thirds of the dough into the prepared pan, covering the surface evenly. Spread the jam evenly over the dough. Drop small globs of the remaining dough over the jam, then sprinkle with the salted peanuts.
- Bake for 45 minutes, until golden brown. Let cool completely in the pan before cutting into squares.
Notes
Technique: Spread the bottom layer of dough all the way to the edges before adding the jam — any gaps will cause the jam to seep under the dough layer and make the bars harder to cut cleanly.
Measuring: Measure the peanut butter by weight rather than volume for the most consistent dough texture, since peanut butter can pack unevenly in a cup measure.
Storage: Store bars in an airtight container at room temperature for up to 3 days. To freeze, wrap individual bars in plastic wrap, place them in a zip-top bag, and freeze for up to 2 months. Thaw at room temperature or warm briefly in the microwave.
Nutrition
Nutrition information is automatically calculated, so should only be used as an approximation.
 Like this recipe? Rate & comment below!
Before You Go
I hope these peanut butter and jelly bars earn a permanent spot in your baking rotation. Browse our Dessert Recipes or try this peanut butter and jelly milkshake next!




One of the best combos known in the world. So yummy! Joanne, how do I get to meet you at a summer potluck? 😉 Sounds fun.
Hope you’re having a sweet time with that precious baby, Stephanie. 🙂
Wow! These look absolutely AMAZING! I might even add chocolate chips in there 🙂
Ha! I was going to make a version of these last week, these look delicious. I hope mama-hood is going well for you 🙂