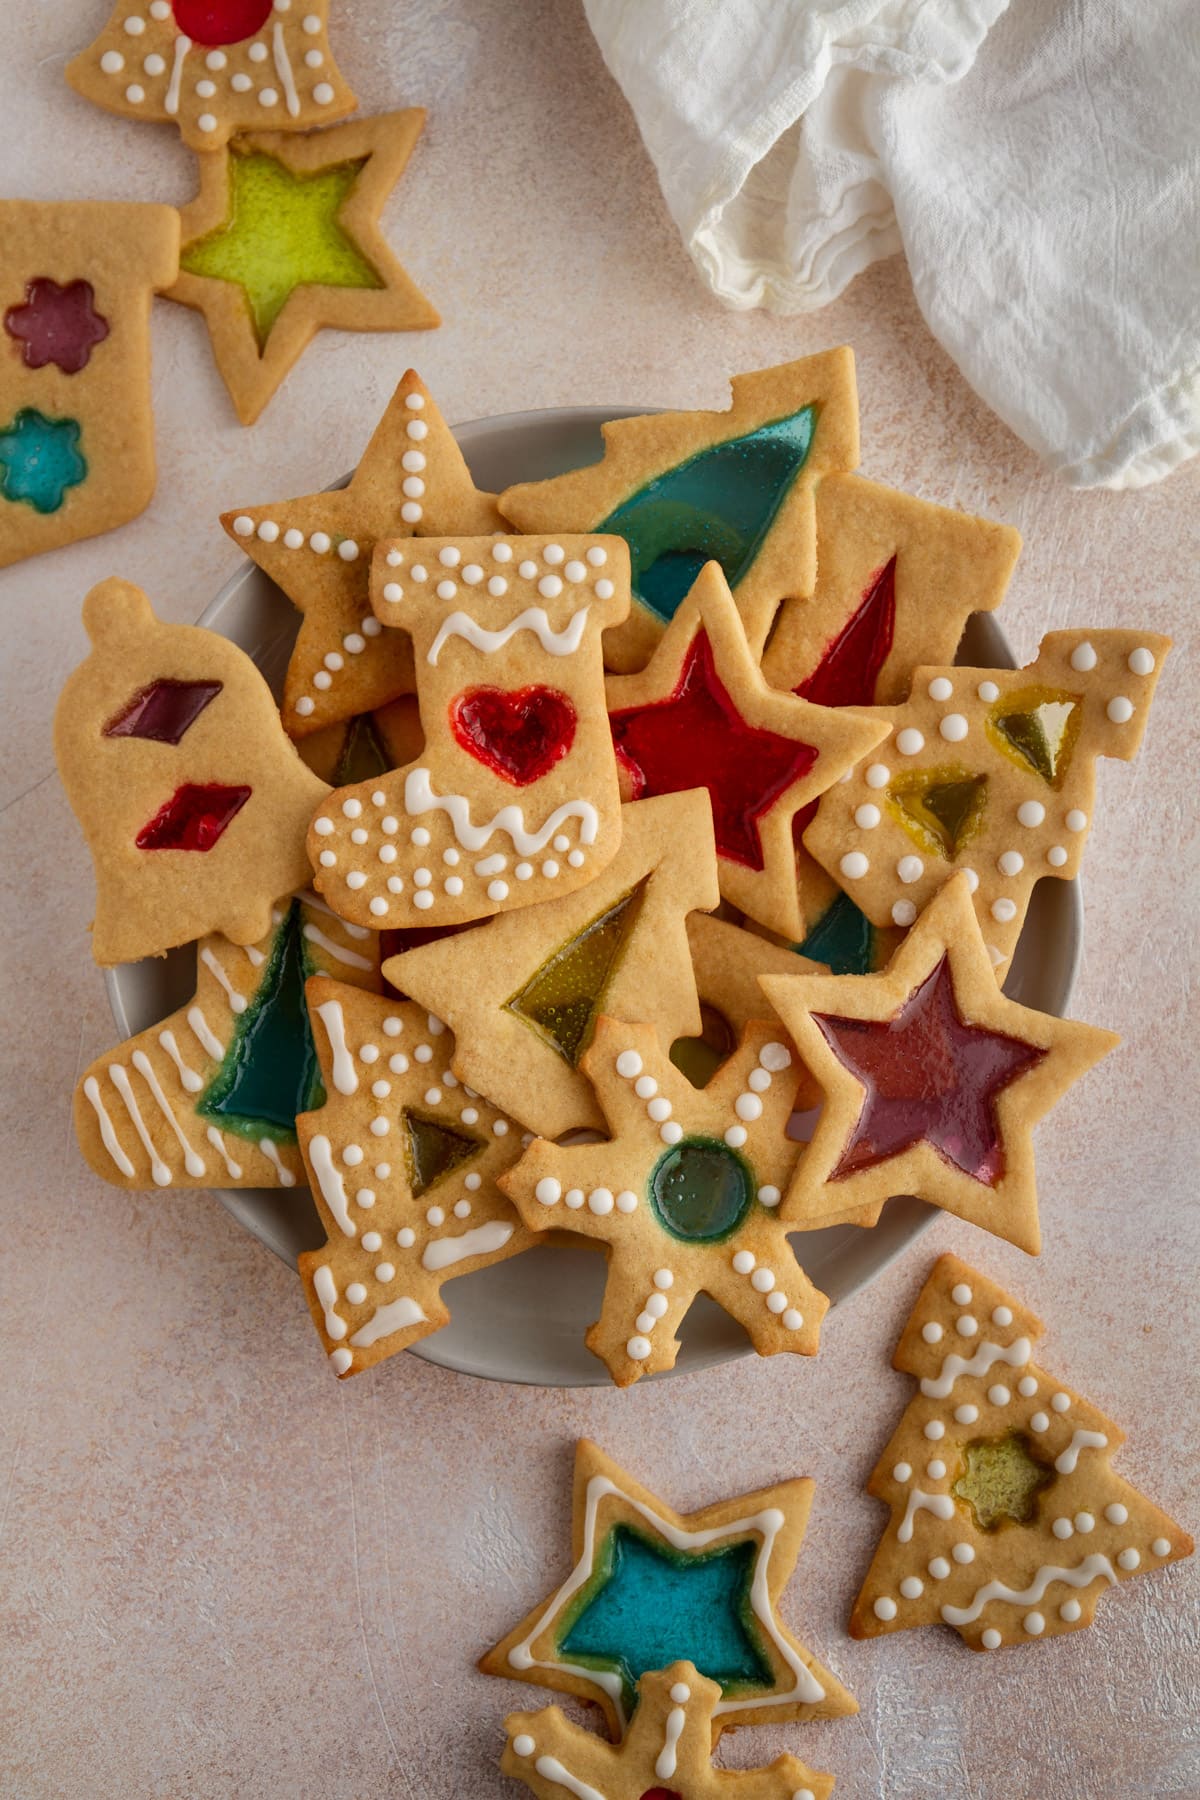
These gorgeous stained glass window cookies feature a sugar cookie dough with a see-through, colorful candy center and easy icing decor.

A Quick Look At The Recipe
This is a brief summary of the recipe. Jump to the recipe to get the full details.
Prep Time
1 hour
Cook Time
10 minutes
1 hour
Total Time
2 hours 10 minutes
Servings
48 Cookies
Difficulty
Moderate—simple dough, careful assembly, family-friendly.
Calories *
71 kcal per serving
Technique
Make dough, chill, roll, cut shapes, add crushed candy, bake, and cool.
Flavor Profile
Soft sugar cookies with warm molasses notes and crisp, jewel-like candy centers.
* Based on nutrition panel
absolutely delicious cookies ⭐⭐⭐⭐⭐
Lainey
Table of Contents
Ready to bake the prettiest cookies for Christmas? ME TOO. These Stained Glass Window Cookies are both stunning and simple: the perfect combination. A super-forgiving sugar cookie dough with a kiss of molasses is baked with centers of crushed candies and decorated with icing for a fun, festive and straightforward cookie recipe you’ll want to bake year after year.
Stained Glass Window Cookies Recipe
Have you ever heard of stained glass window cookies, aka windowpane cookies? They’re the most beautiful Christmas cookies in all the land, and they’re surprisingly easy to make! Here is what you can expect from this gorgeous dessert:
- A soft and sweet sugar cookie dough with a hint of molasses for color and depth of flavor
- A pretty-as-a-picture melted candy center made from crushed clear candies (see Recipe Notes for all candy options!)
- The perfect canvas for decorating with icing
- An extremely easy-to-work-with, forgiving cookie dough you can reroll again and again (i.e., maximum cookie output!)
- A great recipe to make with kids and/or for cookie exchanges or holiday parties
Ingredients You’ll Need
These, of my favorite Christmas cookie recipes, are not only impressive, but their ingredient list is far from fussy. Here is what you’ll need to accomplish these treats:
- Unsalted butter
- Granulated sugar and brown sugar, for sweetness and flavor
- Molasses, for a hint of color and depth of flavor
- Vanilla extract
- Egg, for binding and texture
- All-purpose flour
- Salt, for flavor
- Baking powder, for a little lift and tenderness
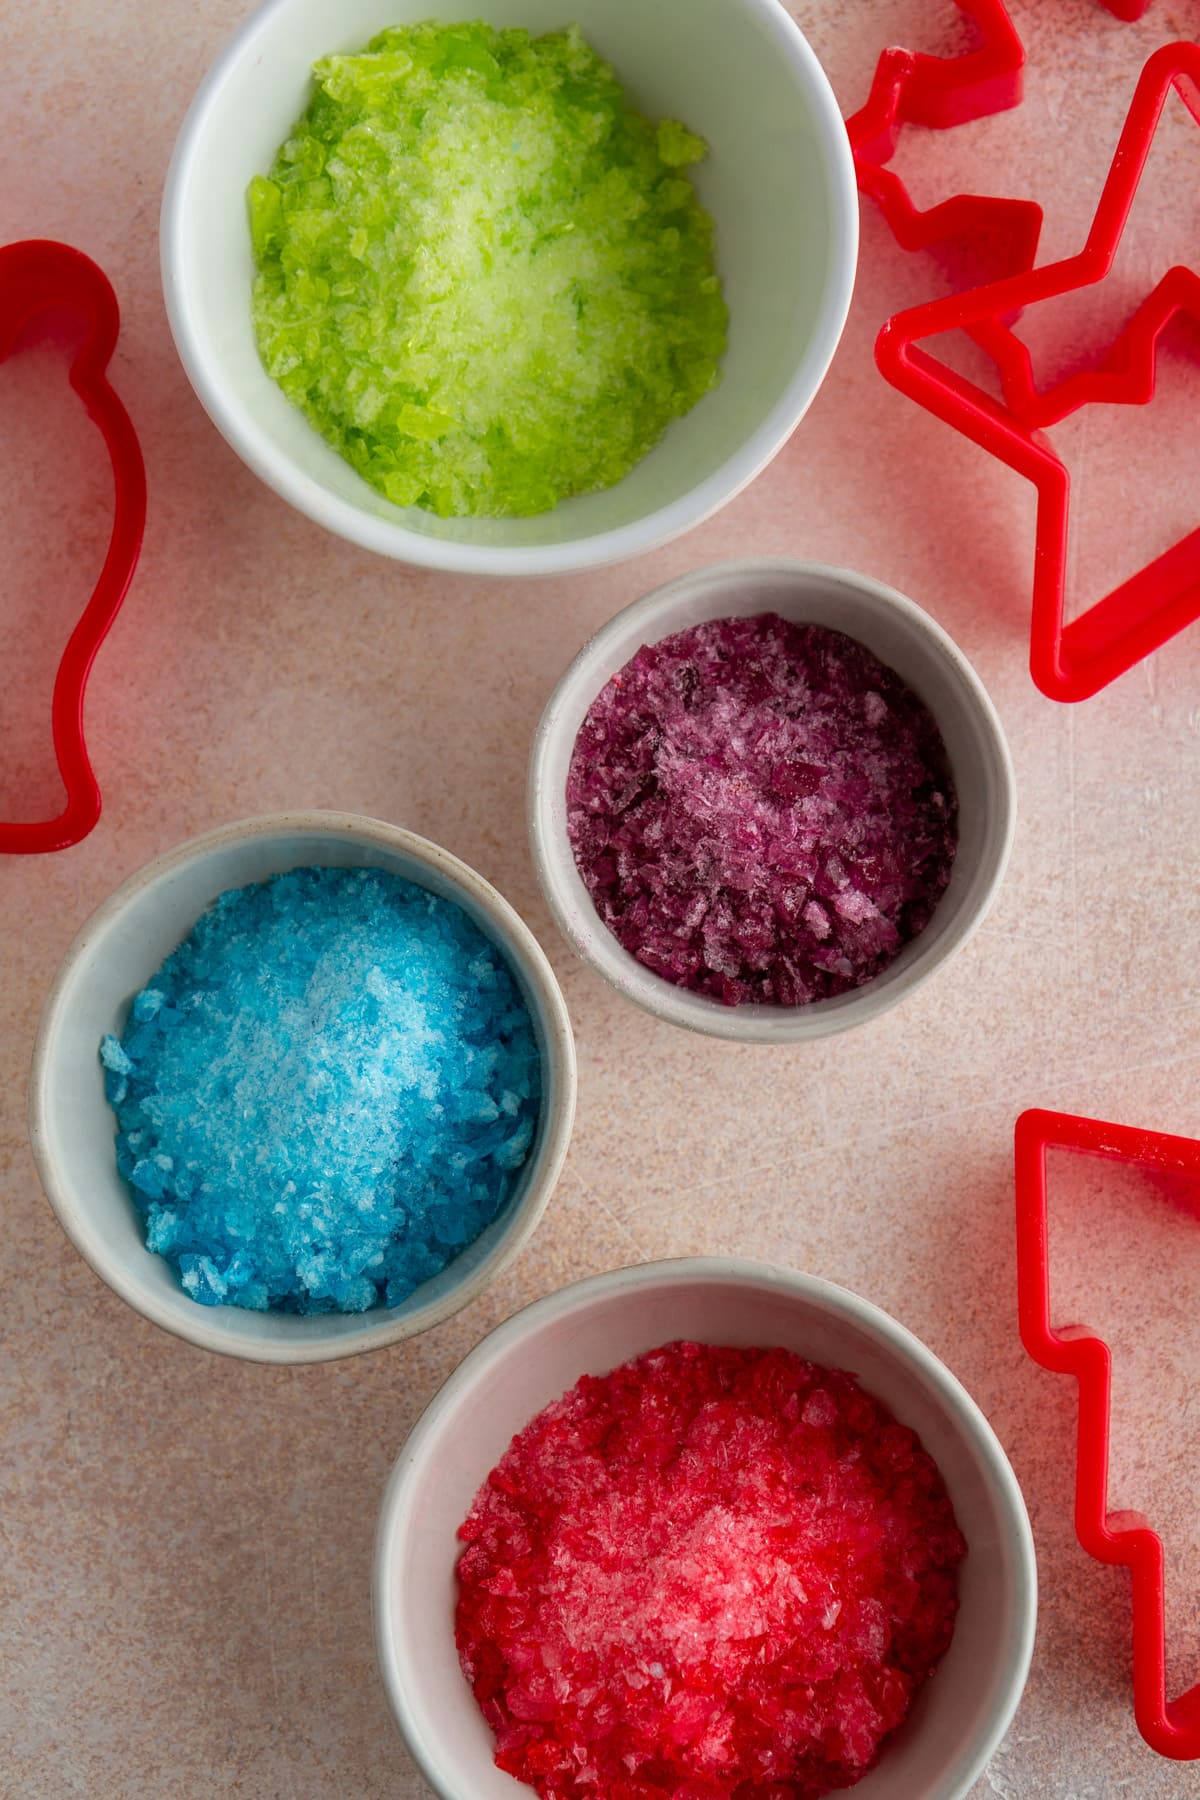
- Clear hard candies, such as Jolly Ranchers or Life Savers
- Powdered sugar, corn syrup, vanilla extract and milk, for an optional decorating icing
How to Make Stained Glass Window Cookies
While the actual process of making these cookies is simple, you will need to set aside some decent time to make them, since you’ll be doing a lot of rolling out dough, cutting dough into shapes, adding candies, decorating, etc. Here is the basic overview of how to make these cookies (please scroll down to the bottom of this post for the FULL recipe!):
- Step One: Make the cookie dough. Beat the butter and sugars until light and fluffy, then add the molasses, vanilla extract and egg. In a separate bowl, whisk together the dry ingredients, then add them to the wet ingredients in three additions just until a soft dough forms.
- Step Two: Chill the dough. Divide the dough into two disks. Cover tightly with plastic wrap and chill the dough in the refrigerator for at least 1 hour, or up to 2 days.
- Step Three: Assemble the cookies. Divide the candies by color into plastic bags, seal, then use a meat tenderizer or rolling pin to crush the candies. Remove one dough disk from the fridge, unwrap and roll out with a rolling pin. Use cookie cutters to cut the dough into shapes, then use smaller cookie cutters or a paring knife to cut out shapes inside each cookie cutout. Transfer the cookies to a lined baking sheet.
- Step Four: Bake the cookies. Spoon or sprinkles crushed candies in the small cutouts of each cookie. Bake for 7 to 9 minutes or until the cookie dough is just set and the candy centers are fully melted (but not bubbling over). Allow the cookies to cool for at least 10 to 15 minutes on the cookie sheet so the candy has time to cool and set.
- Step Five: Decorate! If desired, prepare a simple decorating icing (recipe below). Transfer the icing to a piping bag or plastic bag and snip off a small piece of the tip. Pipe icing onto fully cooled cookies as desired. Allow icing to set completely before serving or storing.

Can I Make These Ahead of Time?
You can make the cookie dough and refrigerate it for up to 2 days before rolling/shaping/baking. You can also freeze the dough: Place the wrapped disks of dough in a resealable plastic bag, then freeze for up to 3 months. Transfer the dough to the refrigerator to soften overnight before rolling/shaping/baking.
Best Way to Store Stained Glass Window Cookies
You can store these cookies stacked in an airtight container at room temperature for up to 7 days. For longer storage, you can store them in the fridge in an airtight container for up to 10 days. You can also freeze these cookies fully baked in a resealable plastic bag or airtight container for up to 2 months; thaw at room temperature or in the refrigerator before serving. If freezing, I recommend you leave off the decorating icing and decorate after thawing.
For another classic Christmas recipe, make these Soft Snickerdoodle Cookies or my candy cane cookies next!

More Christmas Cookie Recipes!
- hot toddy molasses cookies
- chocolate-nutella linzer cookies
- cheesecake-stuffed red velvet crinkle cookies
- chai-spiced crescent cookies
- peanut butter brownie swirl cookies
Recommended Christmas Cookie Recipes

Cookie Recipes

Cookie Recipes

Cookie Recipes

Cookie Recipes
If you enjoyed this recipe, please leave a star rating and let me know how it goes in the comments below! I love hearing from you and your comments make my day!
Stained Glass Window Cookies

Ingredients
For the cookie dough:
- ½ cup unsalted butter, softened
- ½ cup granulated sugar
- ¼ cup light brown sugar
- 1 tablespoon molasses
- ½ teaspoon vanilla extract
- 1 large egg
- 2 cups all-purpose flour
- ¼ teaspoon salt
- ¾ teaspoon baking powder
- 20 hard candies, such as Jolly Ranchers*
For the icing (optional):
- 1 cup powdered sugar
- 1 tablespoon light corn syrup
- ½ teaspoon vanilla extract
- 1 tablespoon milk
Instructions
Make the cookie dough
- In the bowl of a stand mixer using the paddle attachment or in a large bowl using an electric hand mixer, beat butter, granulated sugar and brown sugar together on medium-high speed until light and fluffy, about 2 minutes. Scrape down the sides of the bowl, then beat in molasses, 1/2 teaspoon vanilla extract and egg until well-combined.
- In a separate medium bowl, whisk together flour, salt and baking powder. Add to butter-sugar mixture in three additions, stirring after each to fully incorporate dry ingredients.
- Divide dough into two pieces. Press each piece into a 1-inch-thick disk, then wrap tightly in plastic wrap. Chill in the refrigerator for at least 1 hour, or up to 2 days.
Assemble the cookies
- Divide candies by color into several resealable plastic bags. Use a meat tenderizer, hammer or rolling pin to crush candies into small pieces. Set aside. Meanwhile, preheat your oven to 375°F and line two baking sheets with silicone mats or parchment paper.
- Remove and unwrap one disk of chilled dough from the fridge. You have two options here: Either roll out the dough between two large sheets of parchment paper, or roll out on a well-floured surface (sprinkle some flour on top of the dough before rolling out, too). Roll out the dough to 1/4-inch-thick, then use cookie cutters to cut out shapes. Use smaller cookie cutters or a sharp paring knife to cut out smaller shapes in the centers of each cookie. Transfer the cookie cut-outs to the prepared baking sheets, spaced at least 1 inch apart.
- Spoon or sprinkle crushed candies into the small cut-outs in each cookie. You’ll want to completely fill the holes, but not overfill. Be sure to remove any candy bits that are stuck to the tops of the cookies, or they will dye the cookie.
- Bake the cookies for 7 to 9 minutes, or until the edges of the cookies are just set and lightly golden and the candy centers have completely melted. Cool cookies at least 10 to 15 minutes on the cookie sheets so the candy cools enough to remove easily from the sheets. Transfer to a cooling rack to cool completely.
- Repeat Steps 5-7 with remaining cookie dough (you can reroll the scraps at least 2x, so use as much dough as you can!).
- Once cookies are fully cooled, decorate with icing (optional): In a medium bowl, whisk together powdered sugar, corn syrup, 1/2 teaspoon vanilla extract and milk until a smooth, thick icing forms (it should have the consistency of thick honey). Transfer icing to a piping bag or resealable plastic bag; snip off a small tip (you'll want it really small for precise decorating).
- Pipe icing onto cookies as desired. Allow icing to set completely before stacking, about 30 minutes.
- Store finished cookies in an airtight container at room temperature for up to 1 week, or in the refrigerator for up to 10 days.
Notes
- *You can use any clear/see-through candy for this recipe, such as Jolly Ranchers, Life Savers, transparent lollipops, etc.
- I highly recommend using silicone baking mats to bake these cookies so the candy won’t stick. Parchment paper works well, too, but may give you just a little more trouble.
- Recipe adapted from Simply Recipes.
Nutrition
Nutrition information is automatically calculated, so should only be used as an approximation.
 Like this recipe? Rate & comment below!
Before You Go
I hope you enjoyed this classic cookie recipe. Check out our other delicious cookie recipes like my chewy sugar cookie recipe next!


I love cookies that feel nostalgic, and this recipe gave me that vibe. The instructions were clear, especially about not overfilling the candy centers! They came out so pretty, honestly one of the most eye-catching cookies I’ve ever made, AND they were delicious!
These stained glass window cookies are absolutely stunning! I can’t wait to try making them for the holidays. Such a fun and creative way to add some color to my cookie platter! Thank you for the clear instructions!
Hi there! So happy to hear you loved these! ~gvd team
These stained glass window cookies are absolutely stunning! I love how creative and festive they are. Can’t wait to try this recipe for my next holiday gathering! Thanks for sharing!
Hi there! So glad you are going to try these, please report back and happy baking! ~gvd team
These stained glass window cookies are absolutely stunning! I love how creative and festive they look. I can’t wait to try making them for my family this holiday season. Thank you for sharing such a delightful recipe!
Hi there! Thanks so much, I hope your family enjoys them as much as we do! ~gvd team
absolutely delicious cookies
Wonderful, Lainey! Thank you for stopping back by to comment & rate!