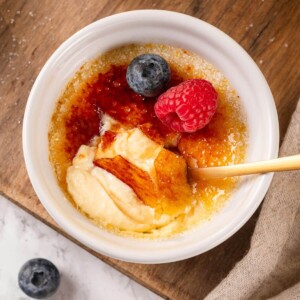
Making restaurant-quality crème brûlée at home is easier than you think! With just 6 ingredients, you’ll achieve a creamy, silky custard topped with a satisfying crack of brûléed sugar.
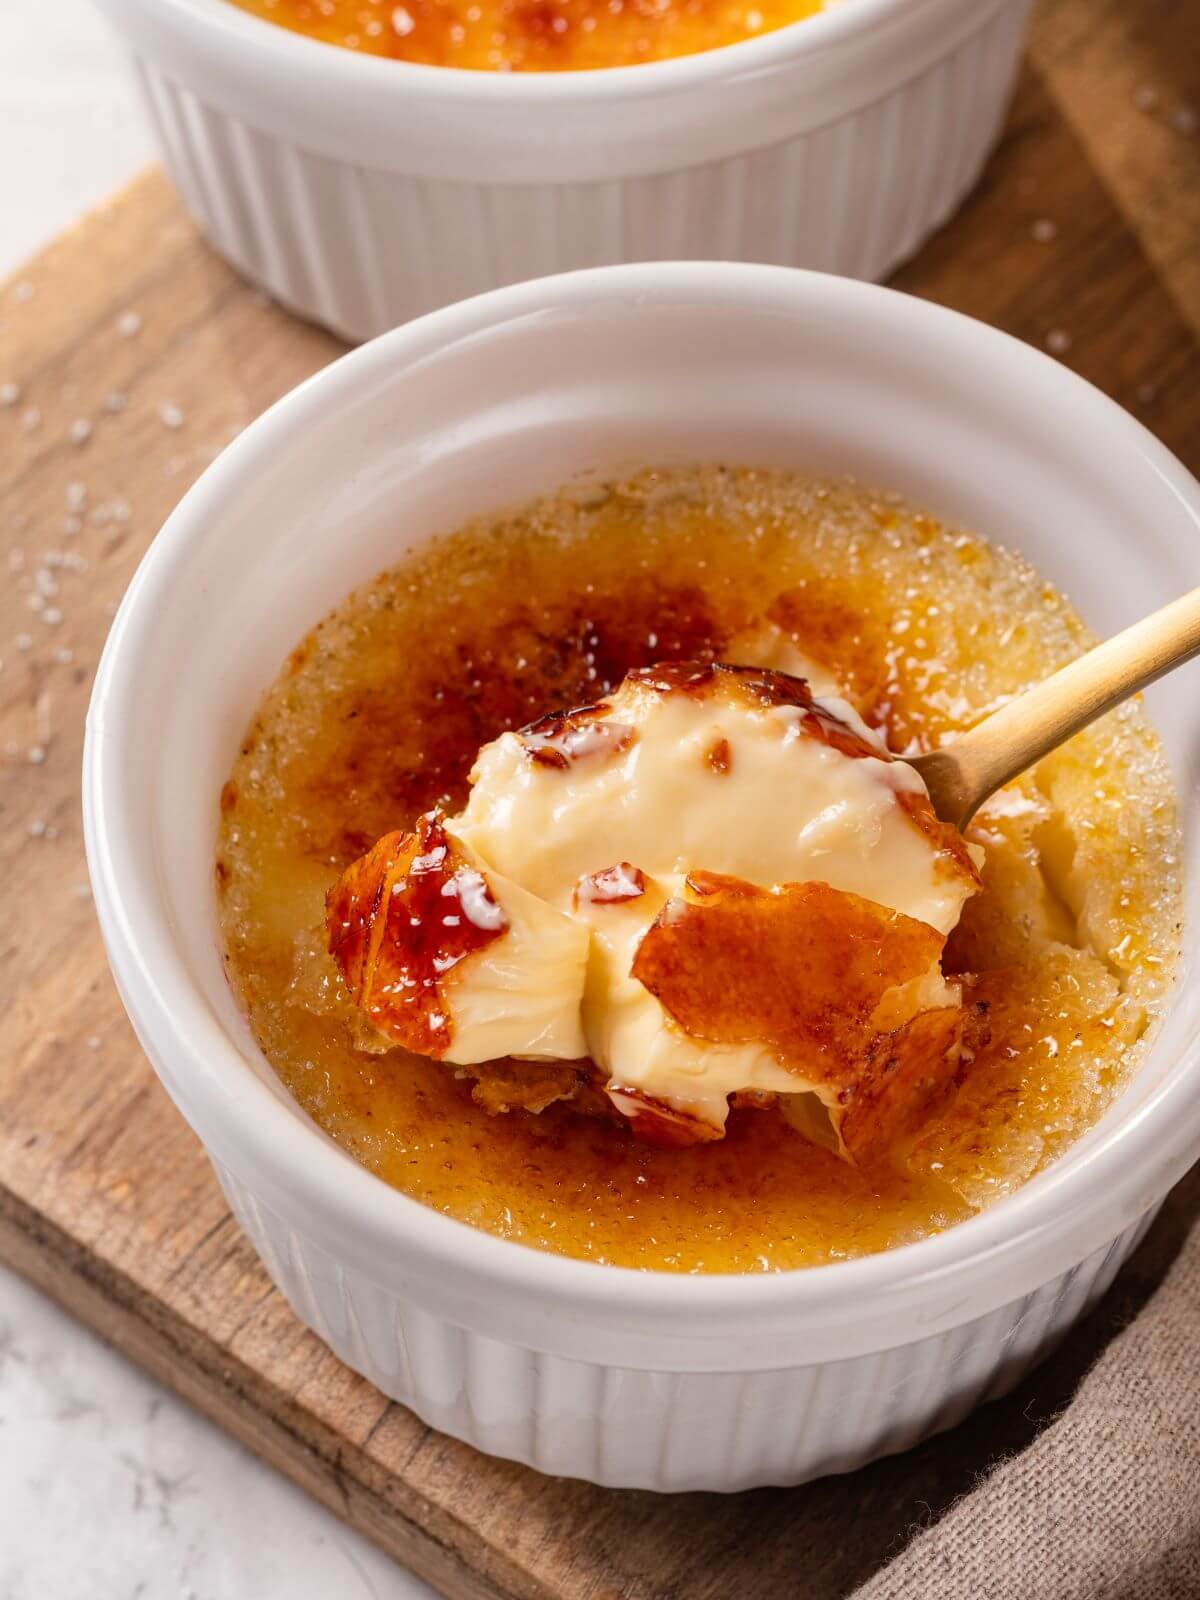
Crème brûlée is one of those desserts you know will never disappoint. This French baked custard dessert is sweet, creamy, and perfectly sweet. The silky vanilla custard is topped with crispy, crackly brûléed sugar. I mean, what could go wrong?! Not only is it easy to personalize, but it’s also simple to make. Crème Brûlée is perfect for a date night, a dinner party, or an excellent replacement for a vanilla bean birthday cake. It’s also one of my favorite Valentine’s Day Desserts!
Vanilla beans have the most fantastic flavor, and I love to add them to anything I can. But that gets a little expensive, so we use vanilla bean paste or vanilla extract to get the delicious flavor. If you are a vanilla fan, check out my vanilla pudding, vanilla almond biscotti, or vanilla cupcakes next!
Table of contents
Why You Will Love This Crème Brûlée
- A surprisingly easy, elegant dessert. Crème brûlée is one of those desserts that you think you can’t make at home. But I am here to tell you that you can! Easy custard base baked in the oven and then torched sugar. You got this!
- Creamy, silky and rich. Using both whole egg, egg yolk, and full-fat heavy cream gives this baked custard a truly silky texture that is also light and rich at the same time.
- The perfect make-ahead dessert. The wonderful thing about crème brûlées is that they last up to a week in the refrigerator. So you can make them days in advance!

Professional Tips for Crème Brûlée Recipes:
- Be cognizant of air bubbles. When tempering the cream into the eggs, use a piano whisk to prevent too many air bubbles from being added. Once you’re done whisking, use plastic wrap or a spoon to skim off any air bubbles. They won’t go away on their own and will cause a skin or an off texture to the baked custard.
- Don’t get water in the ramekins. When adding the water to the pan in the oven, gently pour it using the side of the dish as a guide. Slow and steady wins the race. If water gets inside the custard, they won’t bake properly.
- Baking is the most important part of a crème brûlée. You don’t want soupy crème brûlée from underbaking or if overbaked, the crème brûlée will turn into a set sweetened egg dessert. You will know the crème brûlée is done when it jiggles cohesively like jello. And if you really aren’t sure, you can use the spoon test: If the custard holds the weight of a small spoon, it is done!
- A tight seal on the foil is a must. The seal on the aluminum foil when baking is essential, especially if you have a convection oven at home. Even if a little bit of air gets through the foil, it can cause bubbling or a skin on the crème brûlée. If your foil rips when checking the doneness of the custards, be sure to replace it.
Ingredients & Substitution
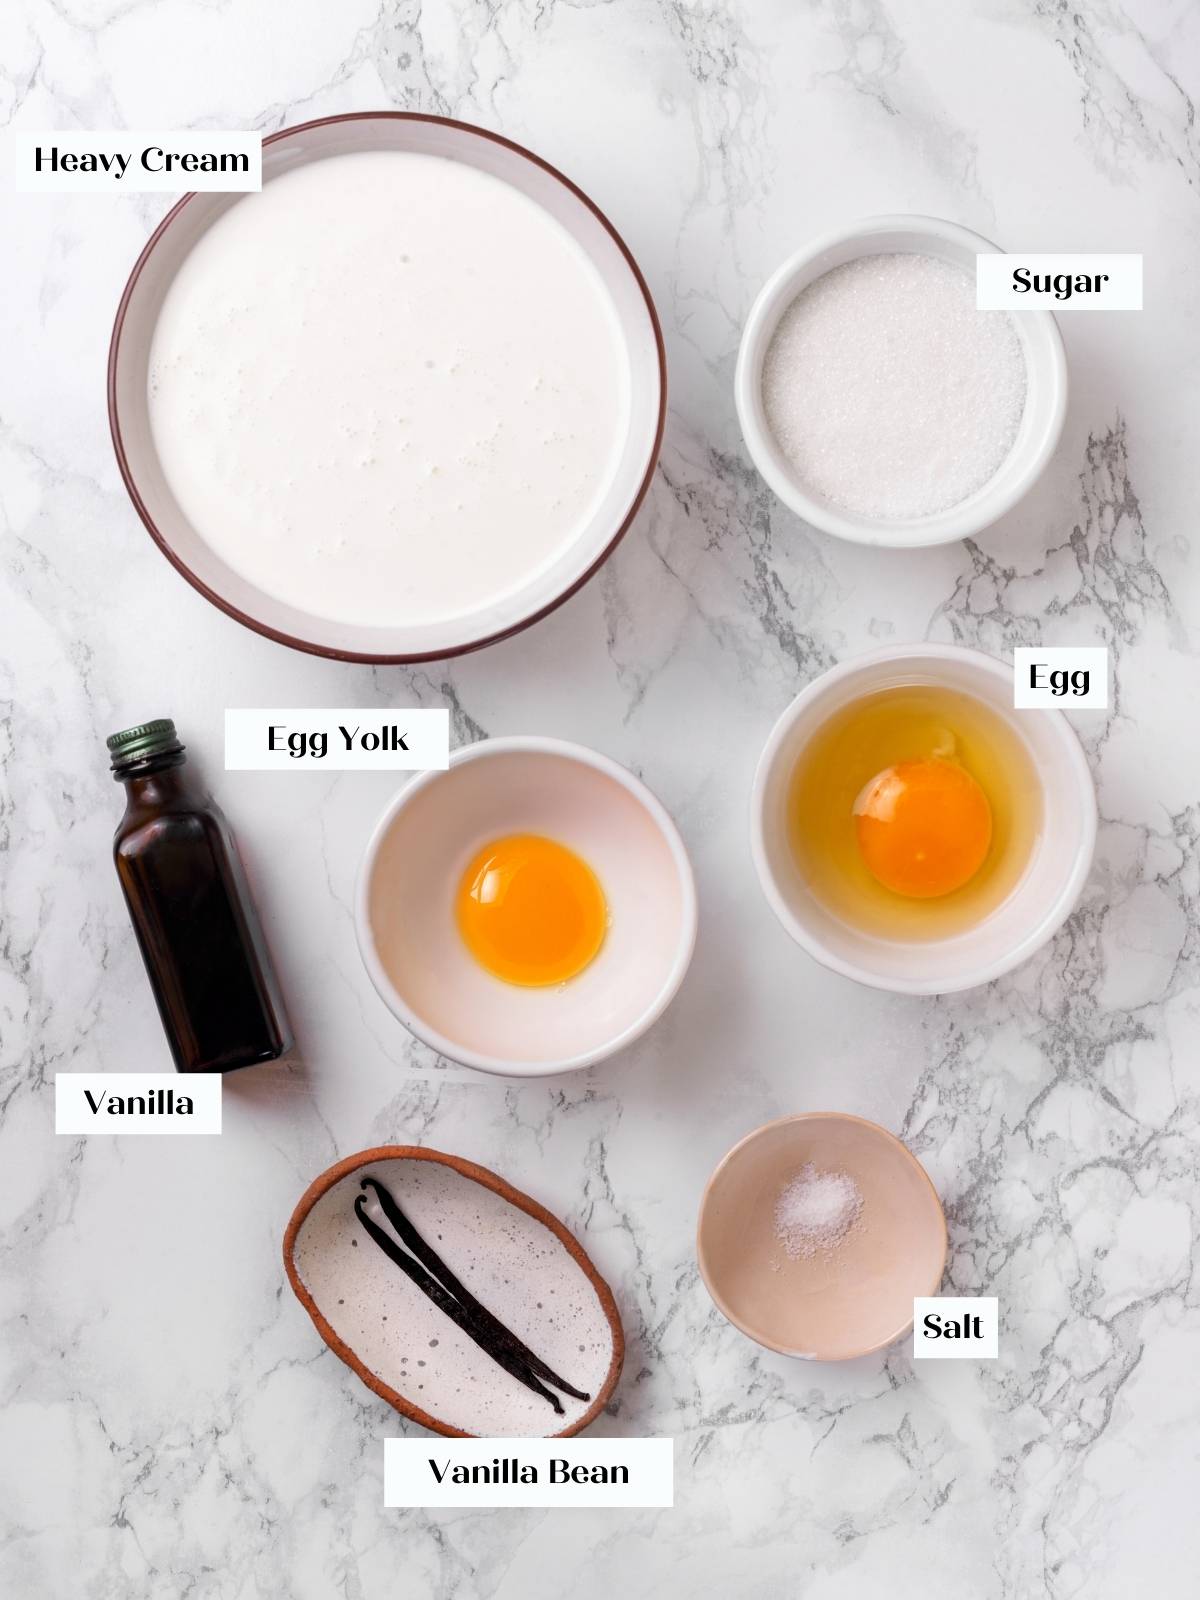
- Heavy Cream: Heavy cream adds richness and a little natural sweetness to the crème brûlée. The fat in it makes for a thicker custard with a smooth texture. If you substitute for low-fat cream or milk, you will find that it won’t set properly.
- Granulated Sugar: White sugar helps protect the egg and egg yolk from the cooking process. It also helps with thickening and stability.
- Kosher Salt: Kosher salt helps enhance the custard’s flavors without adding more sweetness.
- Vanilla Bean & Extract: Using both vanilla bean and vanilla extract gives this crème brûlée a well-rounded vanilla flavor. While the bean needs to be heated to infuse, the vanilla extract must be added after heating. Otherwise, the heat will mute its flavor.
- Whole Egg & Egg Yolk: Whole egg in a baked custard is integral to thickening the custard. Whisking it first with the sugar helps add a layer of protection from the heat in the oven. The egg yolk is an additional thickener like the whole eggs, but it adds more fat than the whole egg without the added moisture from the whites. Add too many large egg yolks and the custard can taste “eggy.”
See the recipe card for full information on ingredients and quantities.
Variations
- Add some delicious flavors through toppings. Top or serve the crème brûlée with easy apple pie filling, cinnamon streusel, spiced nuts, or even sprinkle with cookie crumbles. When serving with a “wet” topping, place it in a bowl on the side to keep the caramel topping from liquifying.
- Change the size or shape of the crème brûlée. You can make them smaller or larger. Just be aware the bake times will vary. Because they will stay in their baking dish, you can use any shape you want. Maybe a pumpkin for fall or a heart for Valentine’s Day.
- Infuse the custard. Add spices, bananas, or Earl Grey tea when heating the heavy cream. Allow to sit for an hour or two before straining. Then proceed to heat the cream with the sugar and salt.
- Add additional flavor. Add flavors like Nutella, caramel sauce, chocolate, or peanut butter. Immersion blend or whisk in additional flavorings after tempering in the eggs! As with most additions, start small and add slowly. Things like Nutella will add sweetness, so keep that in mind when sweetening your custard base.
How to Make Homemade Crème Brûlée
Use these instructions to make perfectly creamy and rich crème brûlée every time! Further details and measurements can be found in the recipe card below.
Prepare and bake the custard:
Step 1: Preheat the oven to 325°F.
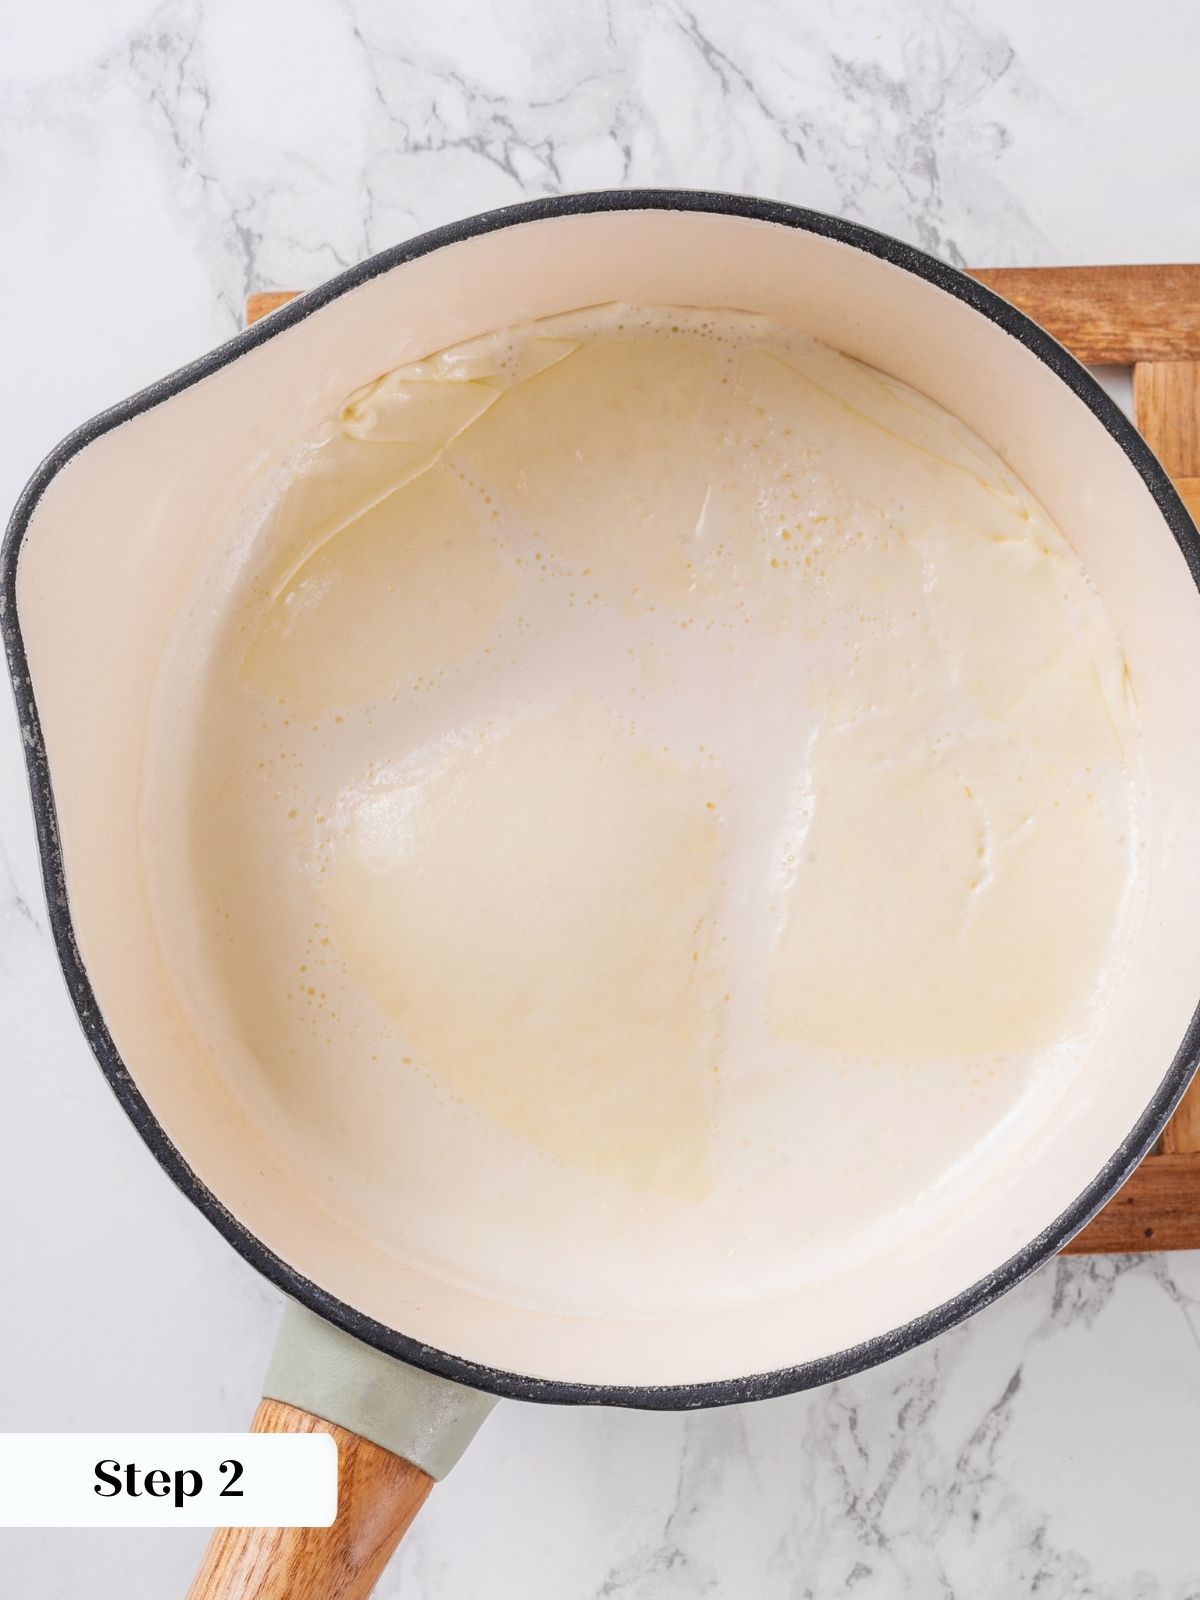
Step 2: In a small saucepan, combine cream, approximately half of the sugar, salt, and the split and scraped vanilla bean. Bring just to a boil.
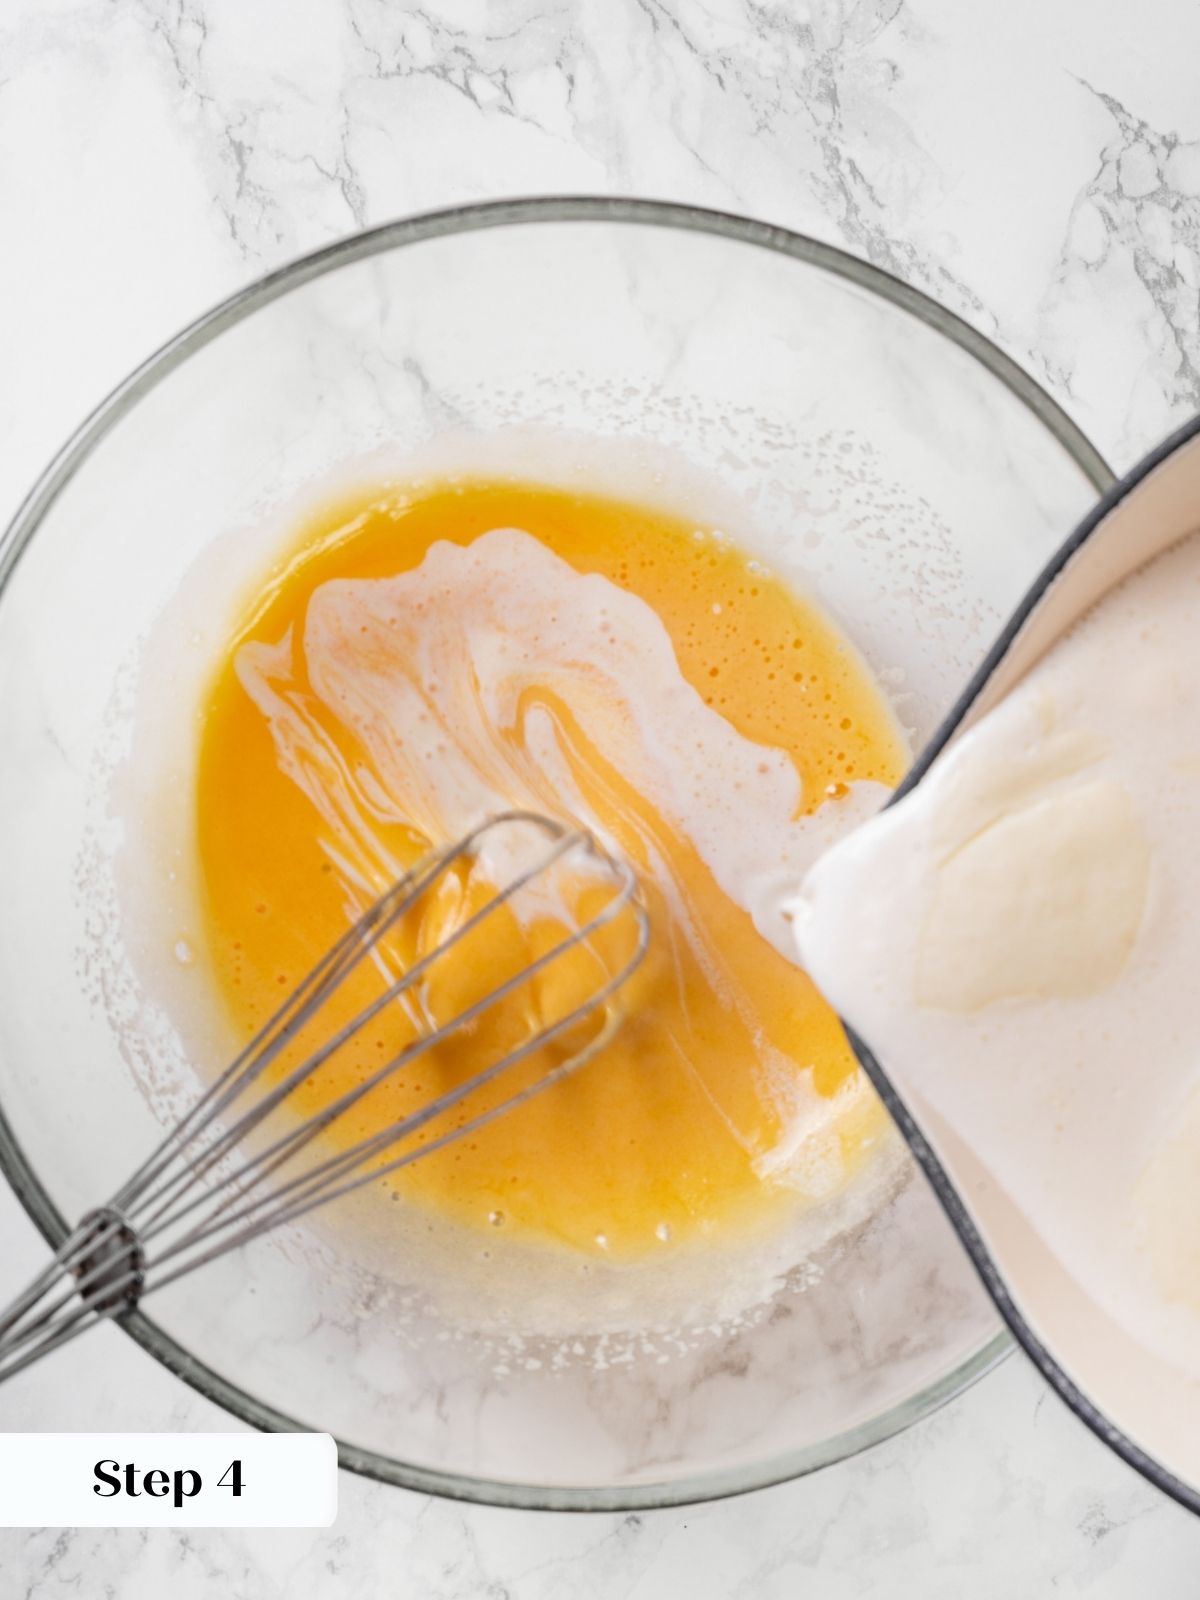
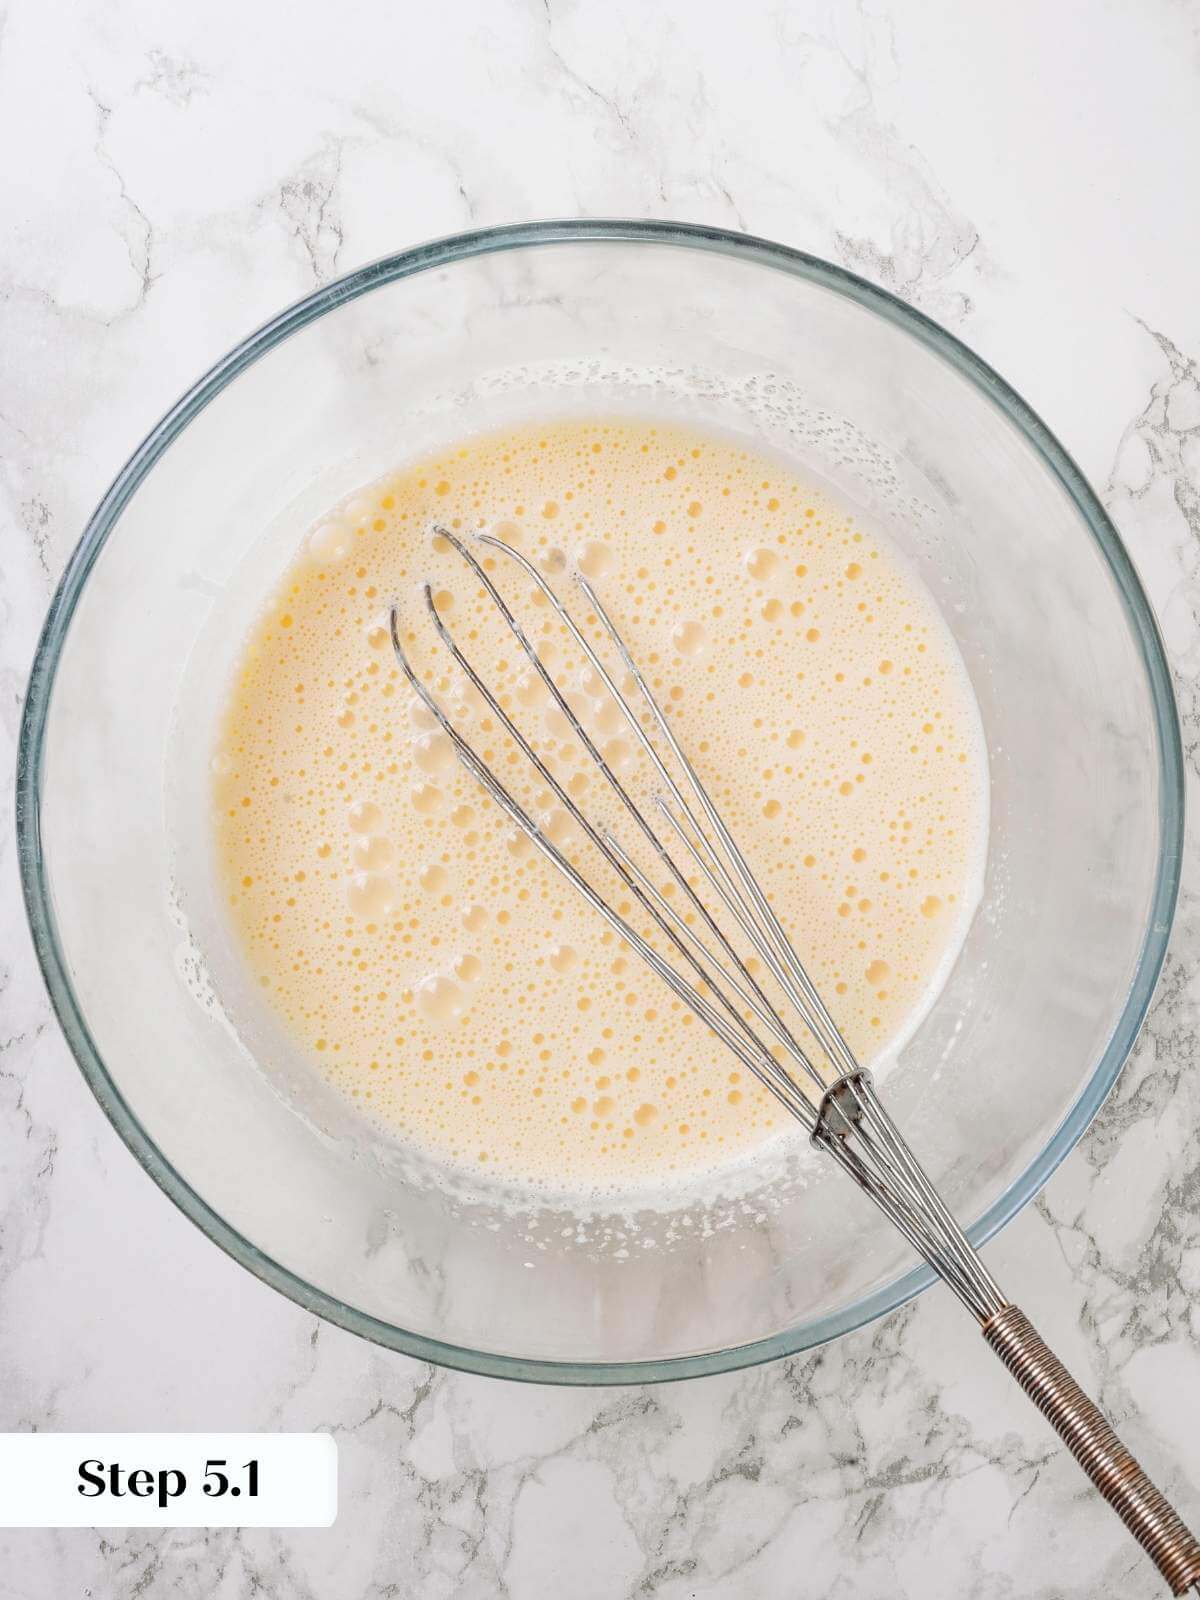
Step 3: When the hot cream mixture comes to a simmer, whisk together vigorously the egg and egg yolk, then whisk in the sugar until it lightens slightly. This technique is called blanchir for my fellow cooking and Francophile nerds out there!
Step 4: When the cream comes just to a boil, slowly add a little hot cream to the eggs, whisking constantly. Continue adding slowly until all the cream has been added. I like to put a kitchen towel under my bowl to keep it from moving during this process.
This is called tempering. If you accidentally add a bit too much hot cream or add it a little too fast and you get those coagulated (cooked!) bits of egg, then just strain it through a fine mesh sieve before adding it to your ramekins.

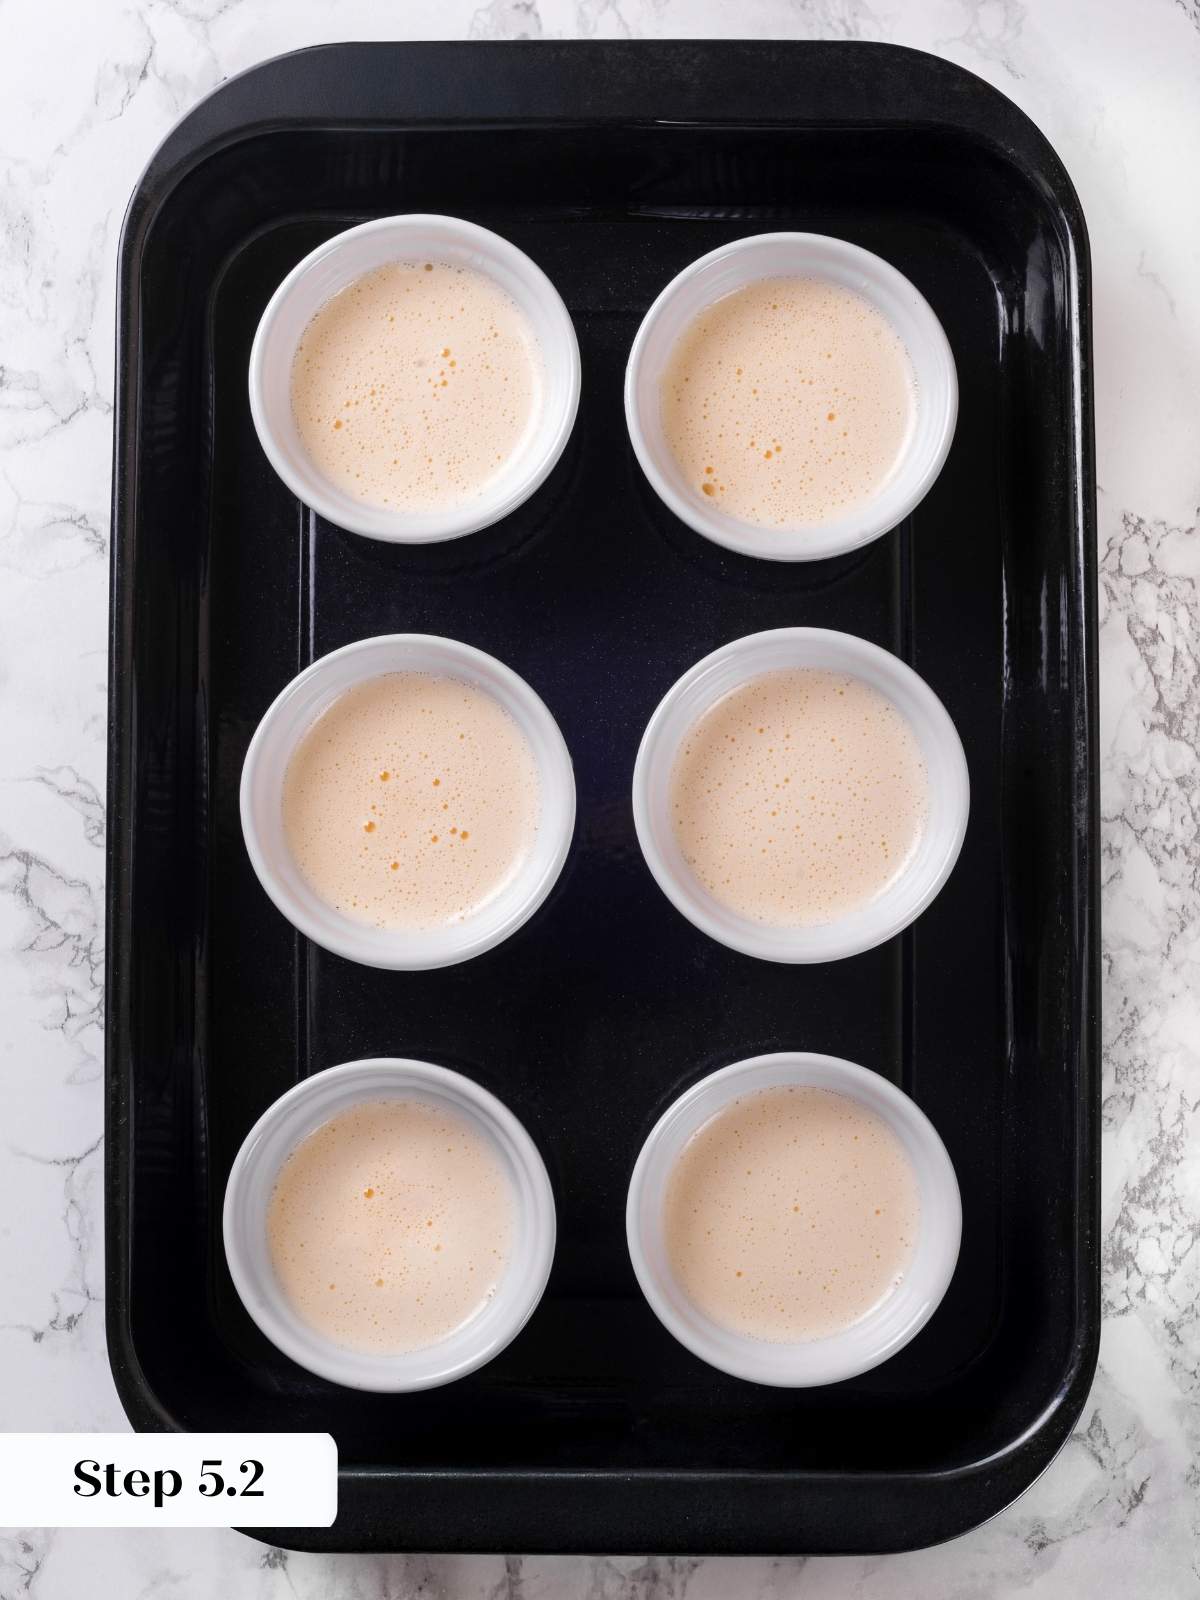
Step 5: Skim off the foam. Then divide the custard between ramekins and set them in a large deep dish or roasting pan. For consistent baking, use a scale to divide the custard evenly. You can also use a measuring cup to scoop the custard base.
Pass a kitchen torch over the top to get the last little bubbles off the surface. This will pop them instantly. As long as you keep it moving, it won’t cook the custard.
Step 6: Cover the top of the entire larger dish with foil, then pull back a corner so you can see. Transfer to the middle rack in the preheated oven.
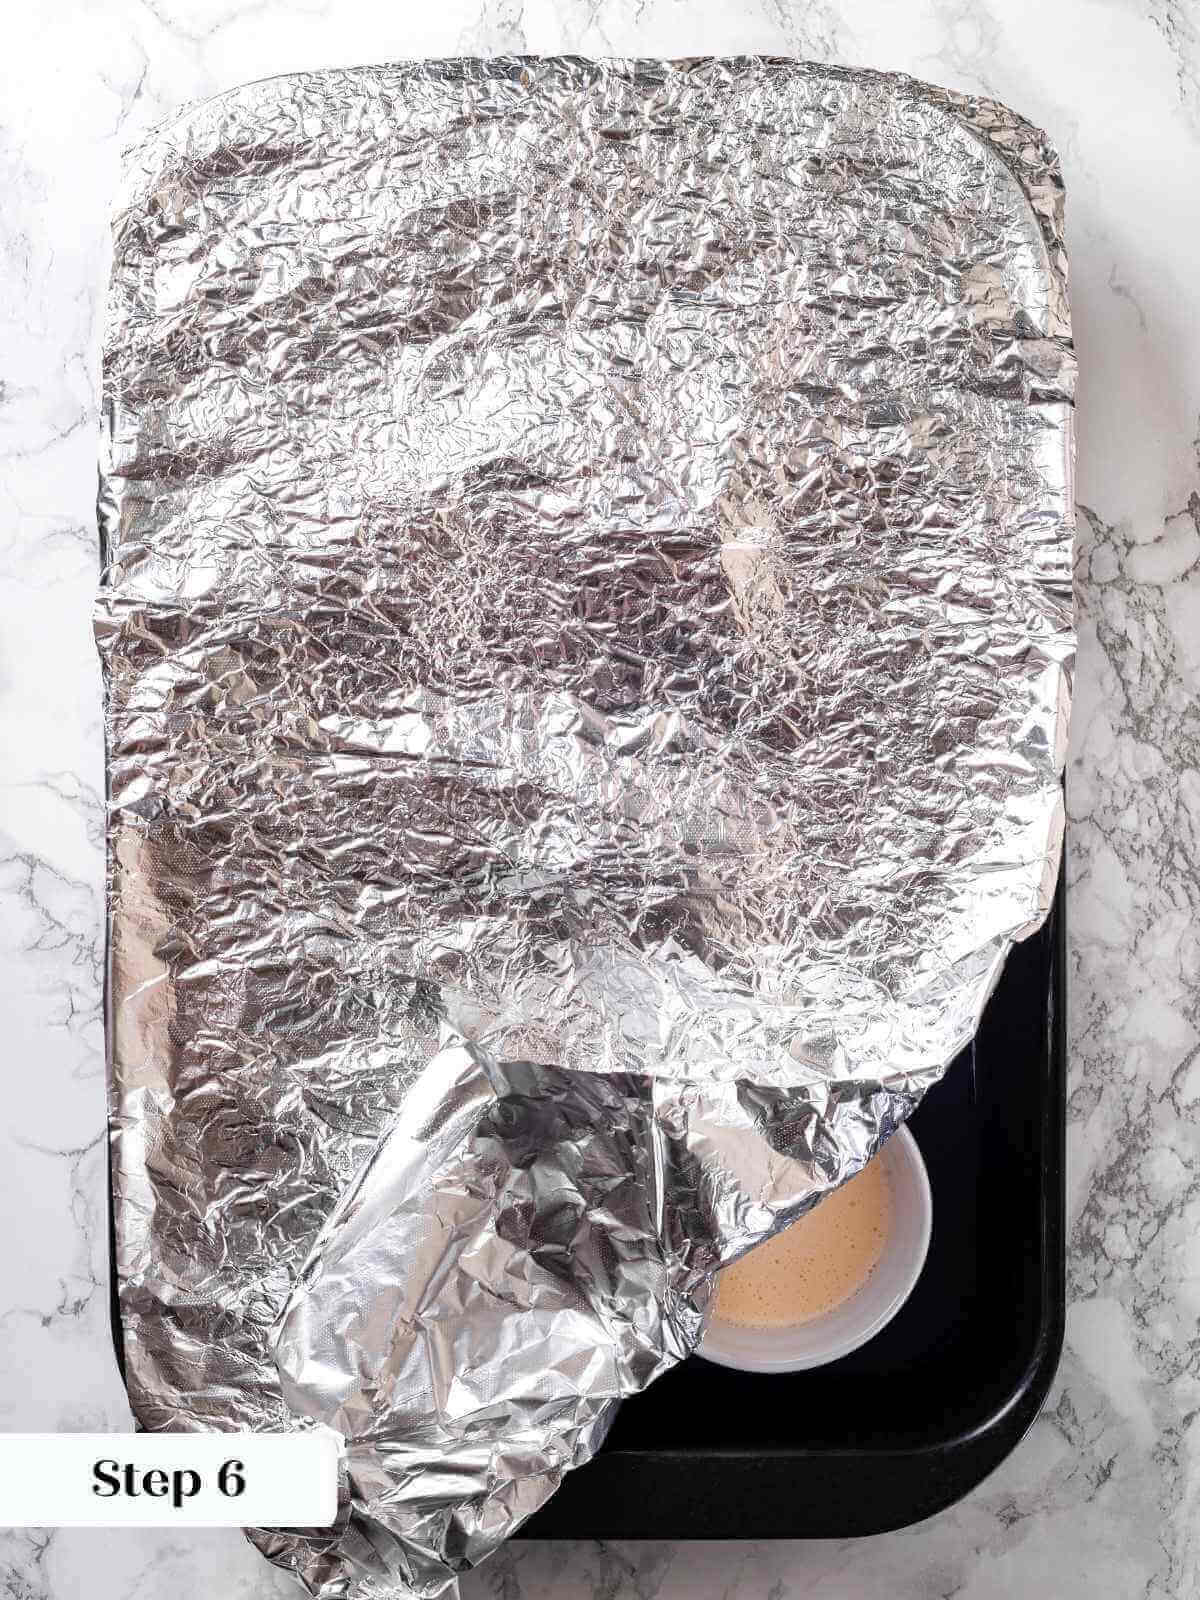
Step 7: Carefully pour hot water from the kettle into the large baking dish until it comes halfway up the sides of the ramekins. Be careful not to splash water from the water bath into the custards. Replace the foil over the corner and close the oven.
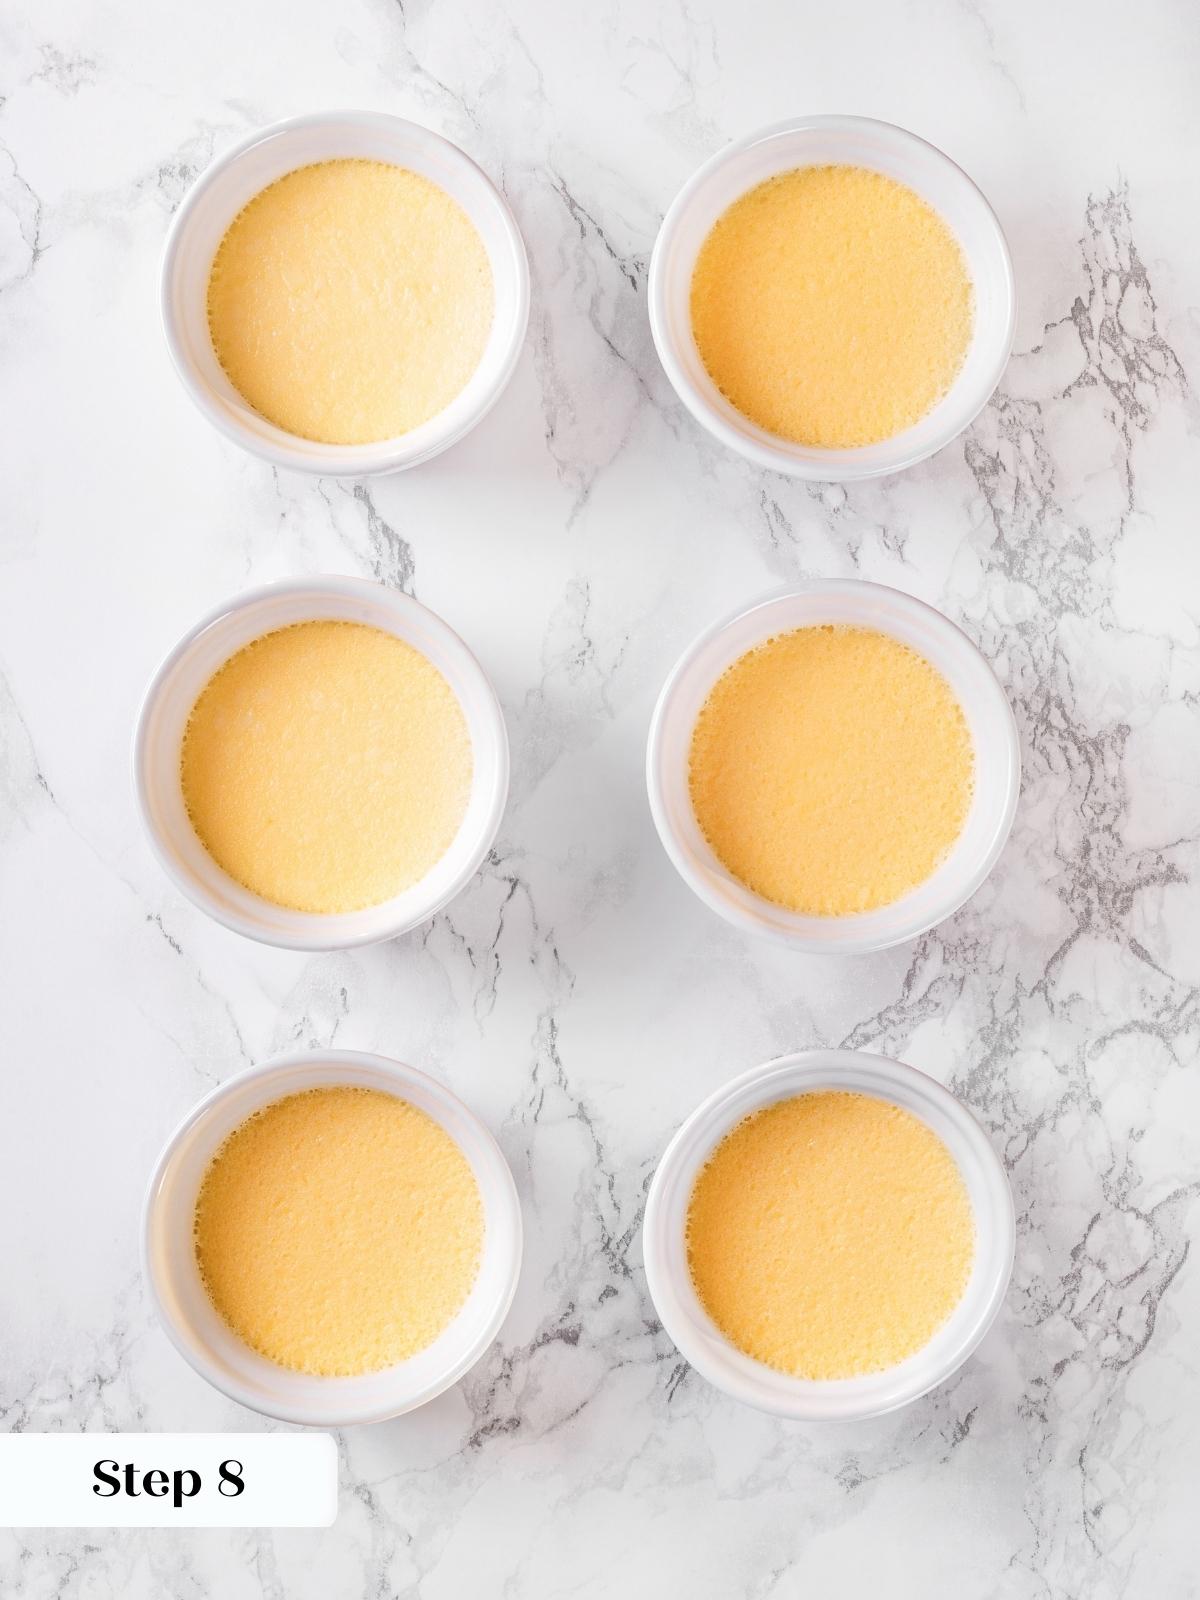
Step 8: Bake for about 20-30 minutes until the centers jiggle like jello and are no longer liquid. You can place a small spoon on the surface, and it will hold the weight, though I prefer to rely on the jiggle test.
The bake time will vary VASTLY by the actual heat of your oven and the size/shape of the ramekin you chose. A larger flat ramekin will bake much faster. Just keep checking. If you are a nervous nelly or you know your oven runs hot, you can bake them at 300°F.
Step 9: Remove ramekins carefully using some combination of kitchen tongs, a spatula, and a towel.
Step 10: Allow to cool to room temperature, then cover with plastic wrap and chill for at least 2 hours, but ideally overnight. The colder they are, the longer you will have to torch the top and get a nice thick crust!
Time to Brûlée:
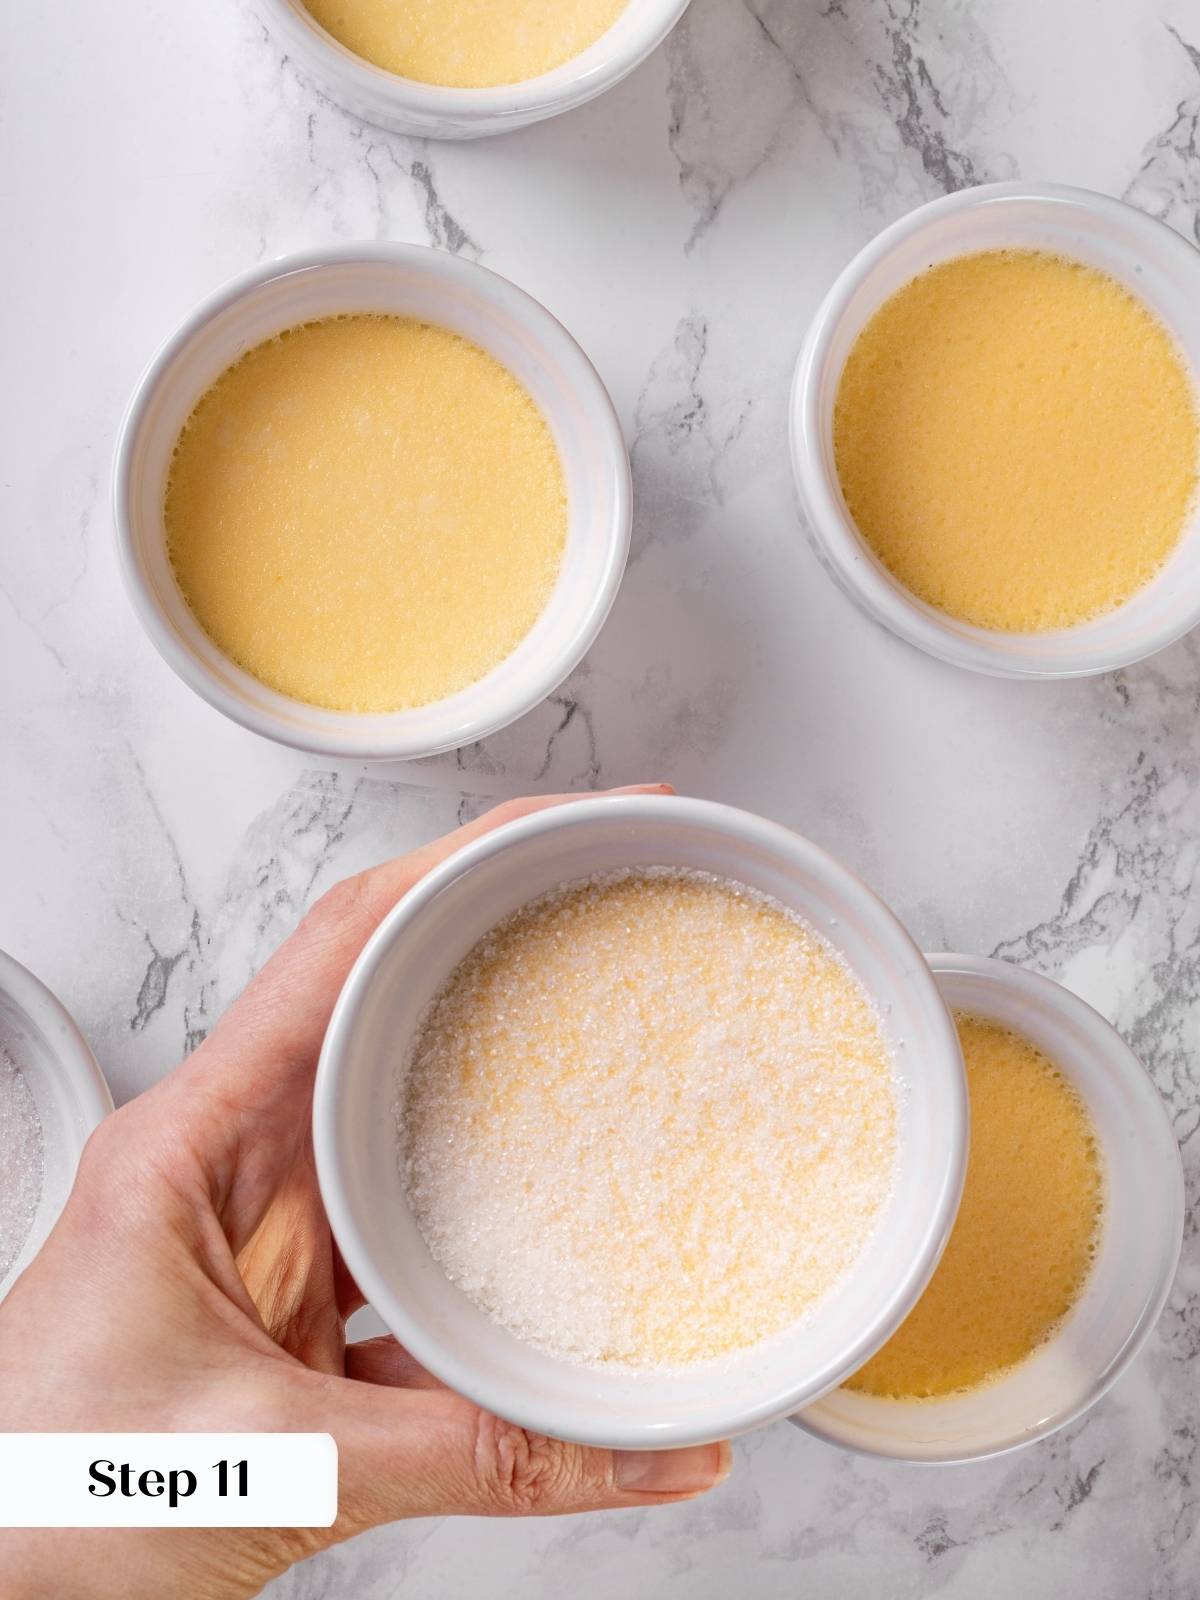
Step 11: When you are ready to serve, place about half a tablespoon of the sugar topping on the top (again, this will depend on the surface area of the ramekin you choose) and then tilt the ramekin to coat the top in an even layer. You want a coating that is thick enough to see the sugar but not so thick that you can’t see any of the creamy custard.
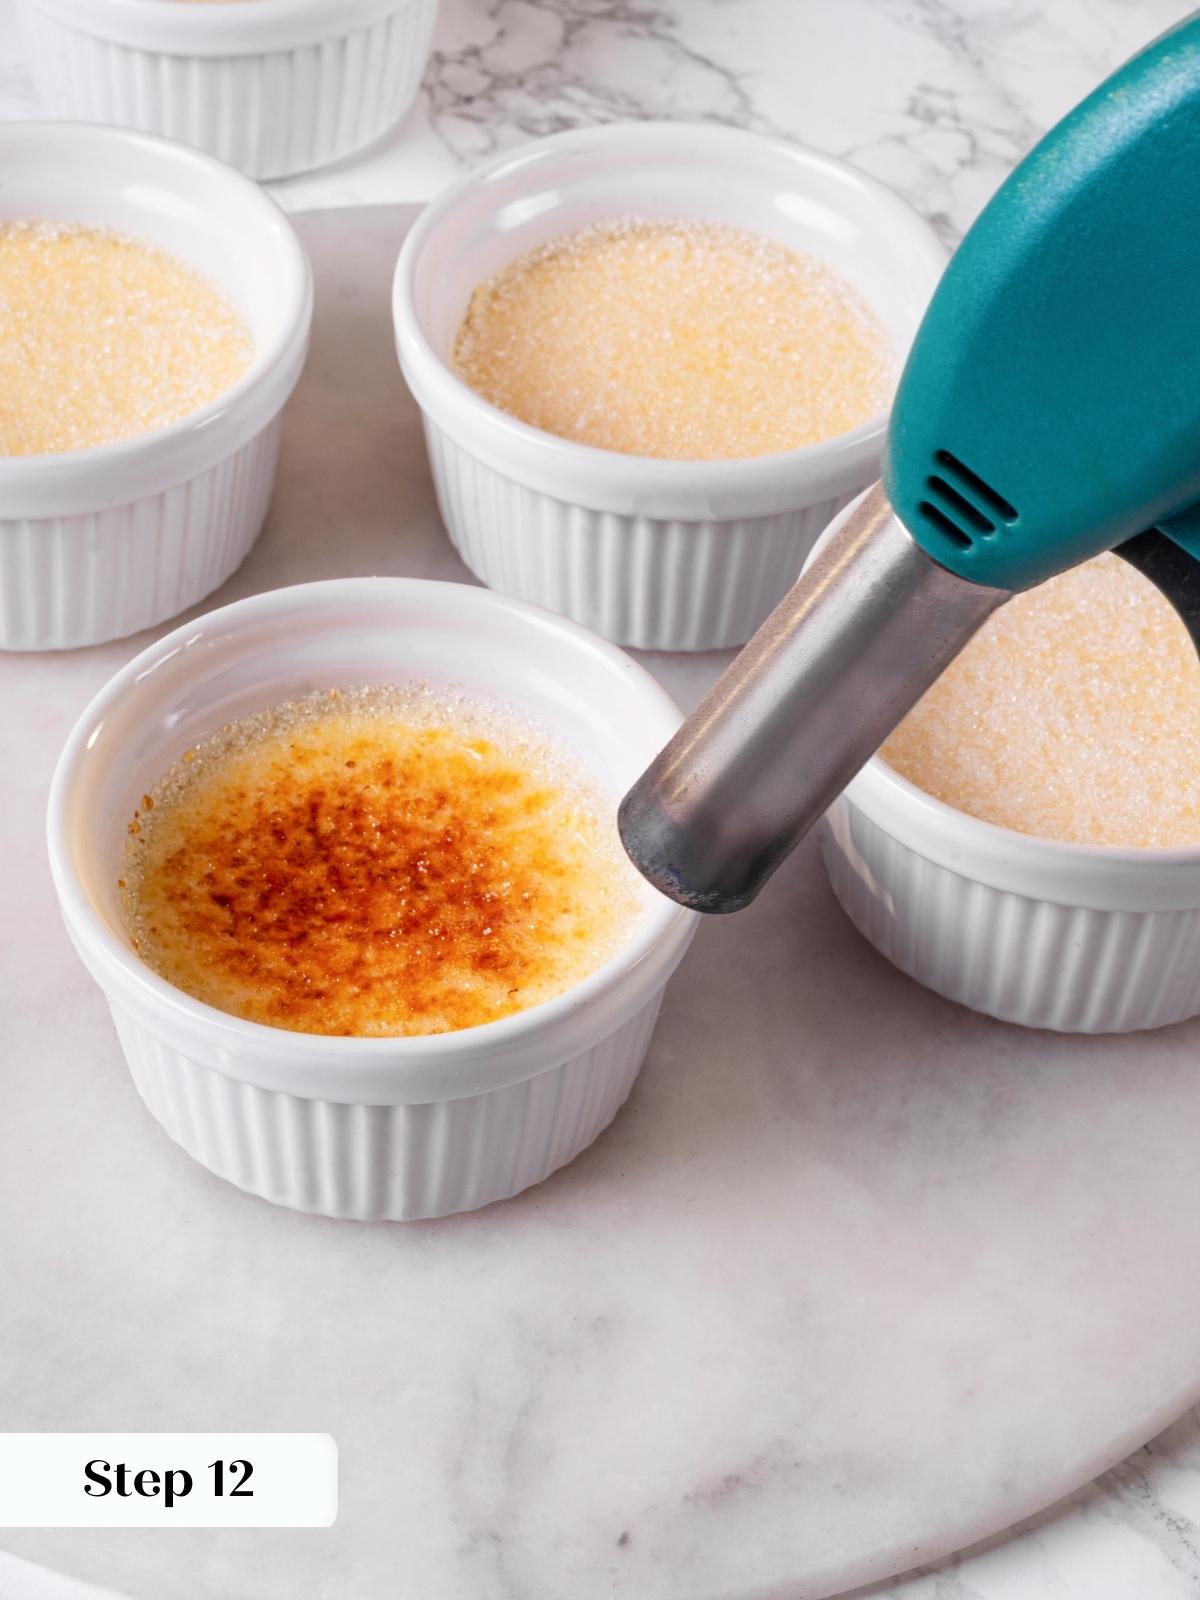
Step 12: Starting a little further away or with a lower flame, begin melting the sugar with a kitchen torch. Gradually increase the speed and torch until a nice dark caramel is formed on the surface.
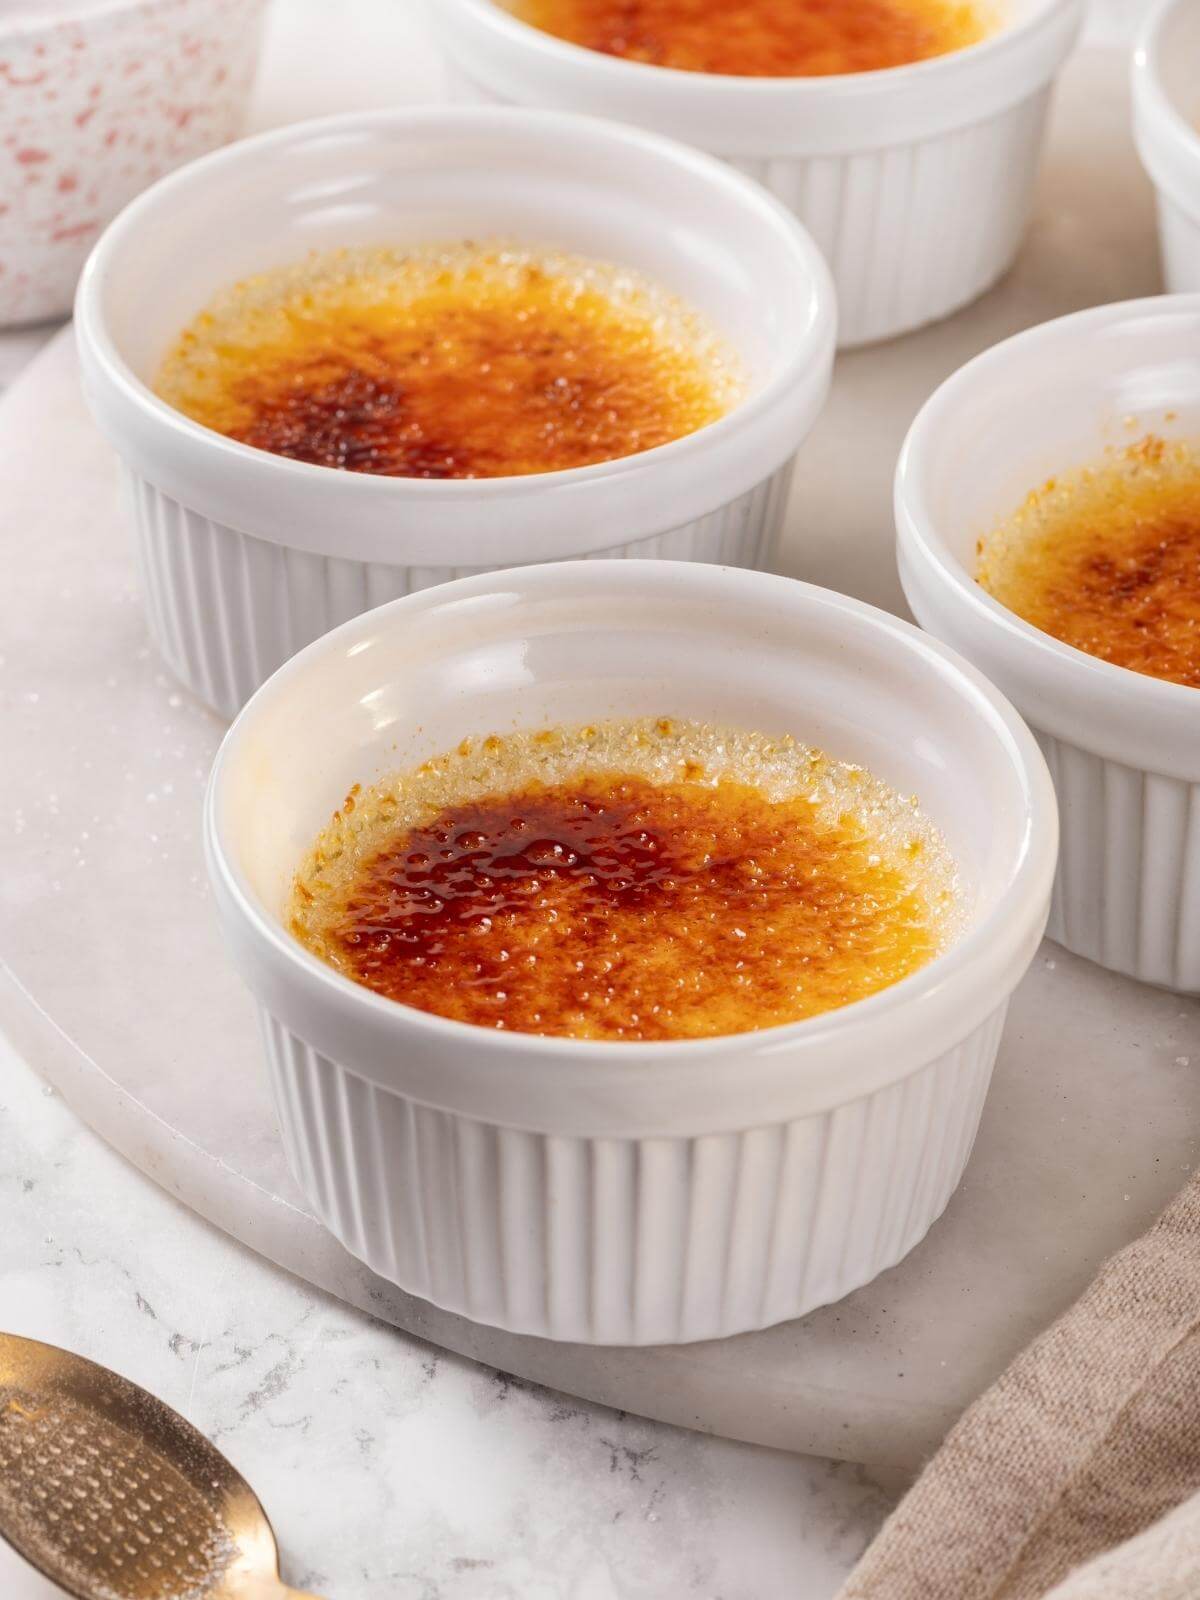
Step 13: Allow the caramelized sugar to set. This only takes about 3 minutes. Serve immediately!
No kitchen torch? Follow the steps below:
Step 1: If you do not have a kitchen torch, no fear! Make dry caramel in a pot. Put about 1 cup of sugar in a pot and heat over medium-high heat until it starts to melt.
Step 2: You can gently stir it with a spoon to make sure it melts evenly. Take the caramel to a medium amber, remove it from the heat, then pour carefully over the top of the set, cold custards.
Step 3: This will be a thicker top because the caramel will begin to cool as you pour, and the custard will be cold. It will be a challenge to get a nice thin layer. You can always reheat the caramel as needed. Just be careful, and always remember that nothing burns quite so fiercely as a caramel burn. Trust. I have my own experiences coupled with HORROR stories from the kitchen.
Frequently Asked Questions
Baked crème brûlées can be stored wrapped in the refrigerator for up to 7 days. Once the caramel has been added, serve within 10-15 minutes. The sugar will absorb moisture from the custard below and liquefy and soften. I do not recommend freezing crème brûlée, as the custard will separate during the defrosting process.
You can pour a dry caramel you made in a pot on top to get almost the same effect! Put about 1 cup of sugar in a pot and heat over medium-high heat until it starts to melt. You can gently stir it with a spoon to ensure it melts evenly. Take the caramel to a medium amber, remove it from the heat, and then pour it carefully over the top of the set cold custards. This will be a thicker top because the caramel will begin to set as you pour, as the custard is cold.
The most common vanilla beans in the store are Madagascar vanilla beans. The next common one is the Tahitian vanilla bean. They have a slightly more floral taste.
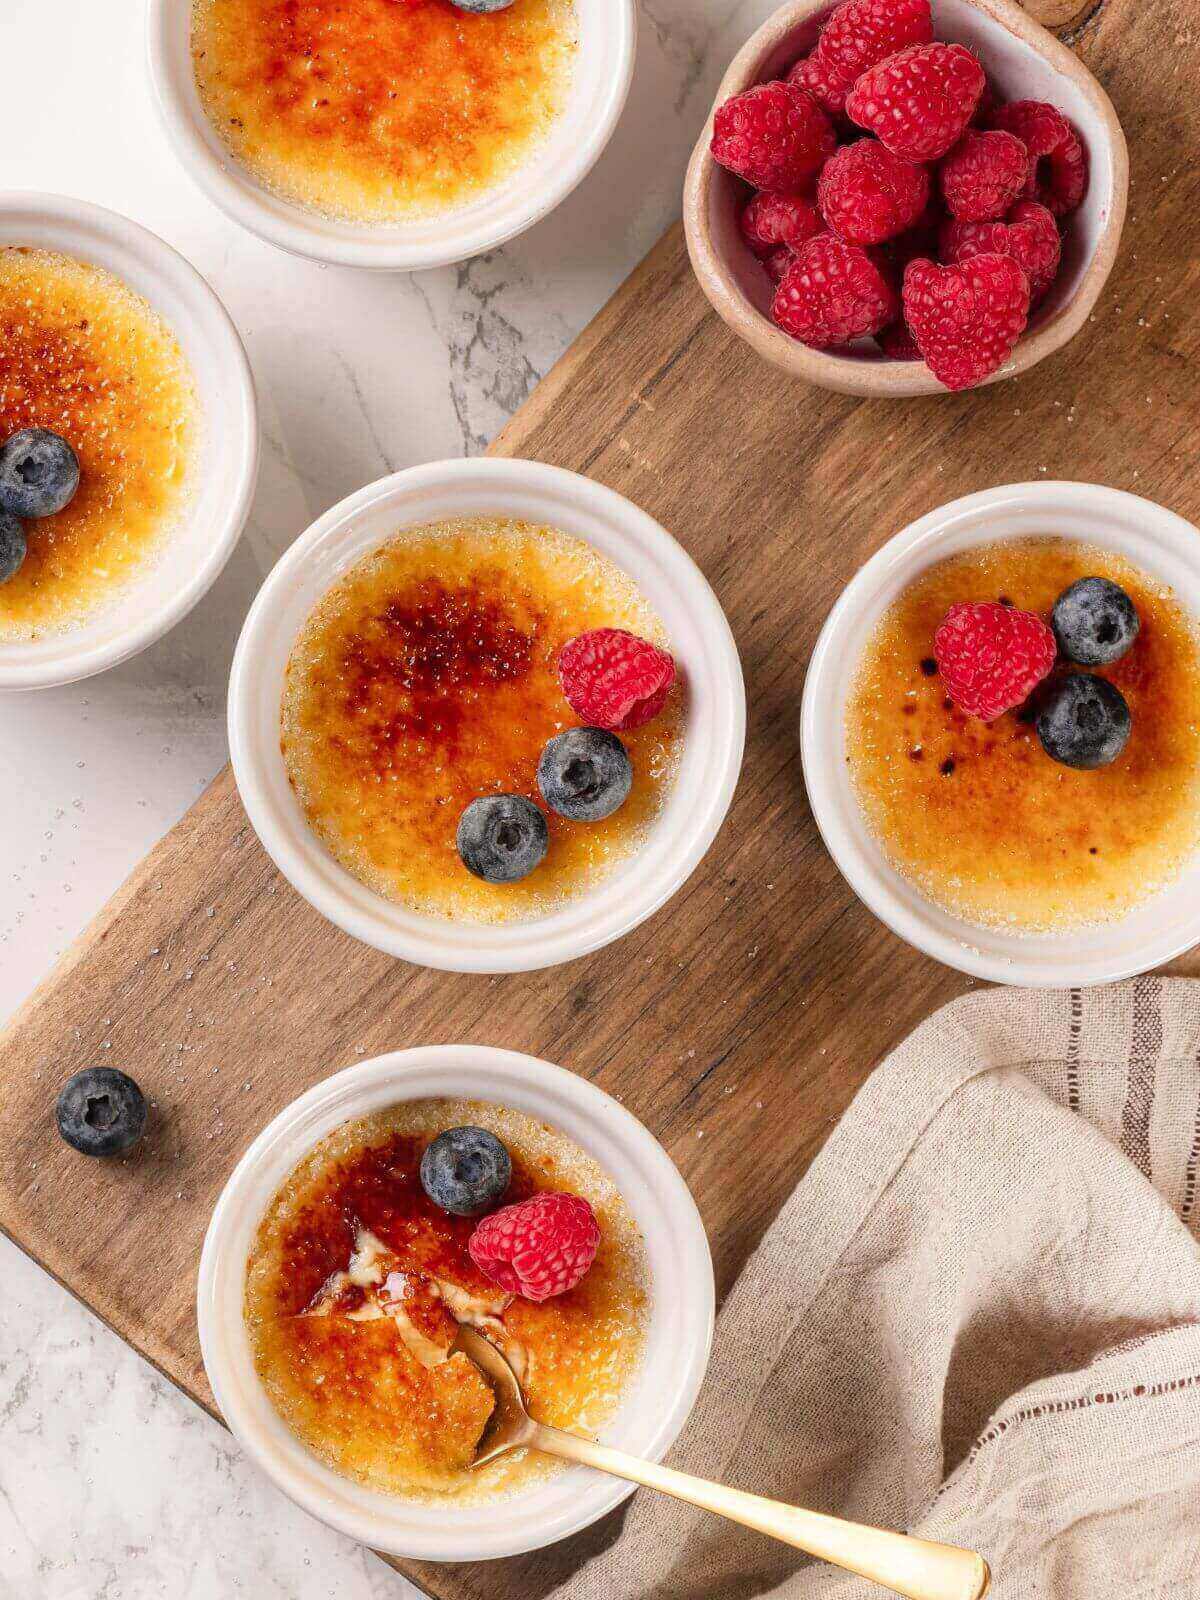
Classic crème brûlées are a perfect dessert all on their own. To add more flavor, serve with roasted stone fruit, caramel sauce, or the blueberry sauce from my lemon ginger panna cotta cheesecake.
If you enjoyed this recipe, please leave a star rating and let me know how it goes in the comments below! I love hearing from you and your comments make my day!
Crème Brûlée
Ingredients
- 2 cups heavy cream
- ⅓ cup granulated sugar, divided
- ¼ teaspoon kosher salt
- ½ vanilla bean, scraped
- 1 egg yolk
- 1 large egg
- 1 teaspoon vanilla extract
- ¼ cup granulated sugar, for brûlée
Instructions
- Prepare and bake the custard:
- Preheat the oven to 325°F.
- In a small saucepan, combine cream, approximately half of the sugar, salt, and the split and scraped vanilla bean. Bring just to a boil.
- When the hot cream mixture comes to a simmer, whisk together vigorously the egg and egg yolk, then whisk in the sugar until it lightens slightly. This technique is called blanchir for my fellow cooking and Francophile nerds out there!
- When the cream comes just to a boil, slowly add a little hot cream to the eggs, whisking constantly. Continue adding slowly until all the cream has been added. I like to put a kitchen towel under my bowl to keep it from moving during this process.
- Skim off the foam. Then divide the custard between ramekins and set them in a large deep dish or roasting pan. For consistent baking, use a scale to divide the custard evenly. You can also use a measuring cup to scoop the custard base.
- Cover the top of the entire larger dish with foil, then pull back a corner so you can see. Transfer to the middle rack in the preheated oven.
- Carefully pour hot water from the kettle into the large baking dish until it comes halfway up the sides of the ramekins. Be careful not to splash water from the water bath into the custards. Replace the foil over the corner and close the oven.
- Bake for about 20-30 minutes until the centers jiggle like jello and are no longer liquid. You can place a small spoon on the surface, and it will hold the weight, though I prefer to rely on the jiggle test.
- Remove ramekins carefully using some combination of kitchen tongs, a spatula, and a towel.
- Allow to cool to room temperature, then cover with plastic wrap and chill for at least 2 hours, but ideally overnight. The colder they are, the longer you will have to torch the top and get a nice thick crust!
Time to Brûlée:
- When you are ready to serve, place about half a tablespoon of the sugar topping on the top (again, this will depend on the surface area of the ramekin you choose) and then tilt the ramekin to coat the top in an even layer. You want a coating that is thick enough to see the sugar but not so thick that you can’t see any of the creamy custard.
- Starting a little further away or with a lower flame, begin melting the sugar with a kitchen torch. Gradually increase the speed and torch until a nice dark caramel is formed on the surface.
- Allow the caramelized sugar to set. This only takes about 3 minutes. Serve immediately!
Notes
- Yield – 6, 3 oz ramekins
- Presentation – For the best crackle top, you want to brûlée the custard right before serving.
- Variations – Flavor with extracts. You can swap out the vanilla bean for almond, coffee, or peppermint. Every extract varies in strength, so add with caution.
- Storage –Store the crème brûlée in the refrigerator for up to 1 week. Allow the crème brûlée to cool to room temperature, wrap it in plastic wrap, and place it in the fridge.
Nutrition
Nutrition information is automatically calculated, so should only be used as an approximation.
 Like this recipe? Rate & comment below!
Before You Go
I hope you enjoyed this professional chef-tested recipe. Check out our other delicious, chef-developed dessert recipes, including this strawberry custard tart, peach ice cream, and lemon curd!


This is amazing! I wanted to surprise my husband with a steakhouse dinner at home, and it wouldn’t be complete without a crème brûlée. I was shocked at how accessible the dessert was at home, thanks to all your tips. Thank you for the wonderful recipe.