summer panzanella salad & an epic baking fail

So.
The next time I decide I’m going to tackle The Perfect Whole Wheat Sandwich Bread the WEEK we’re moving (ergo, our apartment looks like the morning after a tornado/hurricane/thundersnow storm/war battle of the century), please tell me not to do it. Please tell me that’s the dumbest thing you’ve ever heard. Please tell me to instead bake something fun and easy and reliable, like muffins or pancakes or s’mores. Whatever you do, don’t tell me this is a good idea.
Why?

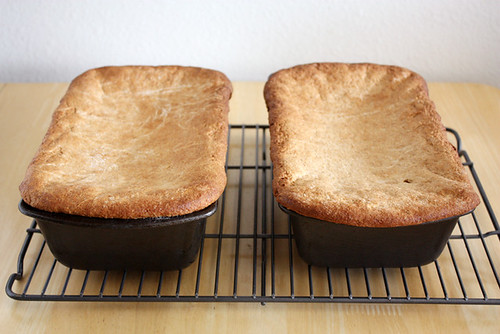
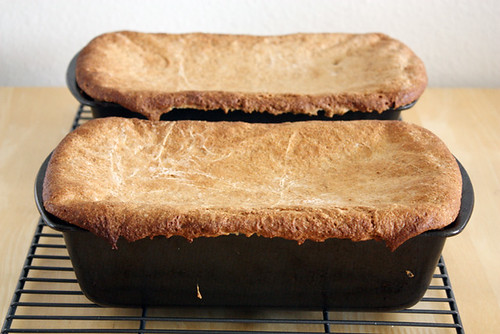
This. Is. Why. (enter a serious Debbie Downer face here.) I can’t… I just can’t look anymore.

OK one more time. Goodness, it’s like a train wreck.
I wish I could tell you this was the first batch of loaves I’d made that turned out this way. But no. Oh no. This would be the second (the first, if you can believe it, looked even worse because I neglected to spray the plastic wrap that rested atop the loaves with cooking spray, so I had to pry it off the risen loaves like gum stuck to the bottom of a shoe, resulting in a very odd paint swirl effect on the top of the loaves. And then I went and slashed them down the middle, PER THE RECIPE, and the whole loaf went tumbling down like a deflated bouncy house. Sniffle.). This second attempt was the result of painstaking precautions to make sure I didn’t repeat the first failure, and yet, I couldn’t avoid it. This bread and I just can never be friends. This is why, sometimes, my blog’s name is so apropos. I really do have a love/hate relationship with bread. Harrrrumph.

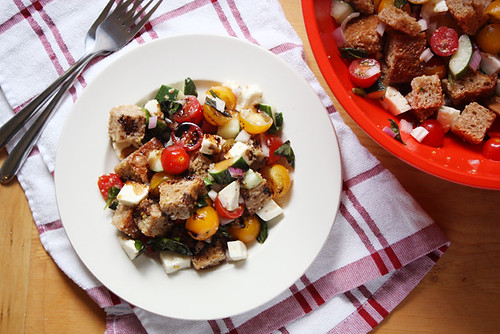
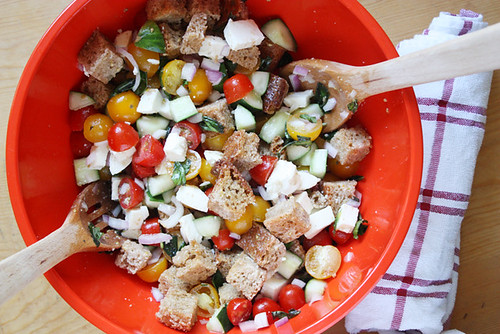
BUT — when life gives you a crappy whole wheat sandwich bread, what do you do? You make peanut butter and jelly sandwiches. Or croutons. Or this outstanding summer panzanella salad, chock-full of fresh seasonal ingredients like crunchy cucumber, sweet cherry tomatoes, aromatic basil and bits of fresh mozzarella. This, of course, was my revelation only after I crumbled into a tiny ball of sadness on my kitchen floor (amidst half-packed boxes, of course) and sobbed like a silly for a solid 10 minutes because I — she who blogs about bread — couldn’t make this recipe work.
I’m just going to come right out and say it — I suck at failure. When something doesn’t go my way, or it doesn’t turn out well (a.k.a. EXACTLY the way I want it to), I kind of freak out. I kind of go all bat-you-know-what crazy and have a moment or two (or three) of serious meltdown-age, especially when it comes to epic baking failures. I’m not proud of it. I can’t sit here and tell you that it makes me feel like a grownup — in fact, I sometimes wonder why I’m 25 years old and cannot seriously handle making an enormous flop in the kitchen. What the hey-hoo is up with that? I may never know. So it was really tough for me to even post this recipe in the first place, because I don’t want to show my mistakes, my scars, my shortcomings. I kind of just want to show you what works.

But that’s not what this blog is about. It’s about the adventures, bruises and all. And it’s about taking one failure and turning it into a refreshing dinner salad. Accompanied by some wine, of course. Because it’s been a long day.
I’m posting the original recipe for this bread with my adaptations in parentheses — if you have any idea why my version failed, TWICE, please let me know (right now I’m guessing it has something to do with using all-purpose flour instead of bread flour; the fact that my kitchen hovers around 80 degrees at all times in the summer; that my oven can’t keep the same temperature for longer than 10 minutes; or that this is just a super finicky recipe, and therefore not very user-friendly)! Or, give this recipe a shot yourself and tell me how it turns out… I highly doubt you can do worse than me.
Whole Wheat Sandwich Bread
Courtesy of Cook’s Illustrated
Yields: Two 9-by-5-inch loaves
Ingredients:
For the biga —
2 cups (11 ounces) bread flour (I used unbleached all-purpose flour)
1 cup (8 ounces) warm water, about 100-110 degrees F
1/2 teaspoon instant or rapid-rise yeast (I used 1.25 times that amount, or just over 1/2 teaspoon, of active dry yeast)
For the soaker —
3 cups (16 1/2 ounces) whole wheat flour, plus more for kneading
1/2 cup wheat germ
2 cups (16 ounces) whole milk (I used 1 percent)
For the dough —
1/4 cup honey
4 teaspoons table salt
2 tablespoons instant or rapid-rise yeast (I used 1.25 times that amount, or 2 1/2 tablespoons, of active dry yeast)
6 tablespoons unsalted butter, softened
2 tablespoons vegetable oil
bread flour for work surface (I used unbleached all-purpose flour)
Directions:
To make the biga: In a large bowl, combine bread flour, warm water and yeast. Stir with wooden spoon until no dry flour remains, about 1 minute. Cover tightly with plastic wrap and set out overnight (8 to 24 hours) at room temperature.
To make the soaker: In a large bowl, combine whole wheat flour, wheat germ and milk. Stir with wooden spoon until shaggy mass forms, about 1 minute. Turn dough onto lightly floured surface and knead until smooth, about 2 to 3 minutes. Return to bowl, cover tightly with plastic wrap and refrigerate overnight (8 to 24 hours).
To make the dough: Remove soaker from fridge and break up into 1-inch pieces. Place pieces in the bowl of a stand mixer fixed with dough hook. Add biga, honey, salt, yeast, butter and oil. Stir with dough hook until just combined, about 2 minutes, then increase speed to medium and knead until smooth and elastic, about 8 to 10 minutes. Remove dough from bowl and knead on a lightly floured surface for 1 minute. Shape dough into a ball and place in a large clean, lightly greased bowl. Cover tightly with plastic wrap and let rise 45 minutes.
Uncover bowl and punch down dough. Fold half of partially risen dough over itself toward the middle, then rotate bowl 90 degrees and repeat. Do this for a total of 8 times. Re-cover bowl and let dough rise until doubled, about 45 minutes.
Arrange two racks in the oven to middle and lowest positions and place a baking stone on middle rack. Preheat oven to 400 degrees F. Lightly grease two 8 1/2-by-4 1/2-inch loaf pans and set aside. Punch down dough and divide in half. On a well-floured surface using fingers, press one dough half into a 8-by-17-inch rectangle. With the short side facing you, carefully roll up dough into a log, keeping log taut by tucking it under itself as you roll up. Carefully place log seam-side down in prepared loaf pan. Repeat with remaining dough half. Lightly grease the tops of the loaves and cover with lightly greased plastic wrap. Let rise until doubled, about 1 hour.
When dough is fully risen, place a heatproof bowl or pan on the bottom oven rack. Bring 2 cups water to a boil on the stovetop; pour boiling water into heatproof bowl. Uncover risen loaves and place on baking stone. Reduce oven temperature to 350 degrees F and bake loaves until dark brown and a thermometer inserted in the bottom of the loaf reads 200 degrees F, about 40-45 minutes. Remove loaves from oven and place on cooling rack. Cool 5 minutes; remove loaves from loaf pans and return to cooling rack to cool completely, about 2 hours.
Summer Panzanella Salad
Adapted from recipes by Simply Recipes and How Sweet Eats
Yields: About 4 servings
Ingredients:
4 cups cubed day-old bread or fresh bread, toasted*
4 cups cherry tomatoes, halved
1 large cucumber, seeded and cut into large chunks
1/2 large red onion or 1 small red onion, chopped
1 bunch fresh basil, torn into pieces
1/4 cup quality olive oil
salt and pepper to taste
1/2 cup balsamic vinegar
8 ounces fresh mozzarella, cut into cubes, or mozzarella pearls
Directions:
*To toast fresh bread: Preheat oven to 350 degrees F. Place cubed bread on a large rimmed baking sheet. Toast bread in oven 5 to 10 minutes or until just barely toasted and no longer soft. Remove from oven and allow to cool before tossing with remaining ingredients.
In a large bowl, toss bread, tomatoes, cucumber, onion, basil, olive oil, salt and pepper until just combined. Let sit 4 hours at room temperature to marinate.
In a small saucepan over high heat, bring balsamic vinegar to a boil. Reduce heat to a very low simmer and cook vinegar for 10 to 15 minutes until the liquid reduces by half and is syrupy. Remove from heat and set aside.
Toss mozzarella cubes with salad; serve immediately drizzled with balsamic reduction after a long, hard day.

Love panzanella salad! I love that you posted your bread failure. We all have bad days in the kitchen but your good days far outweigh the bad, and thats the main thing 🙂
Nic — Thank you for the sweet comment! I’m glad to know I’m in good company, baking failures and all 🙂
Thank you for posting your bread “failure” – it makes me feel better about my past “learning opportunities” (as I like to call them). My first attempt at a bread recipe resulted in a hard baked dough. Not a pretty sight! But we live, learn, and march on 🙂
Good luck with the move!
Pam — Thank you for the kind words. You’re right — live, learn and march on. 🙂
This post made me cry. Seriously. I am the same way when it comes to failing. Thanks for sharing.
Wooly — Hopefully you and I both can find the good in our failures, right? 🙂 Thanks for your comment!
Just because the bread didn’t rise doesn’t mean it tasted bad, right? Do you remember the cherry cake I baked? No one is perfect and I’m glad that you showed your so called “failure”. It makes you human. Haven’t you ever watched the cooking shows? They have “failures” all the time. Makes it real. 🙂 you are real and honest and I’m impressed. Happy moving.
Ms. Steph, this salad looks scrumptious. I’m giving this a try but I want to add some fresh garden yellow squash and zucchini. Love ya girl.
Aunt Lynn — Thank you!! Squash and zucchini would be great additions. Love ya too 😉
Good save Stephanie, you found a great way to use up the imperfect bread. Now, about the bread: I think the AP flour is the problem. Bread flour, with it’s higher percentage of gluten, will provide more structure to the loaf. Once you get settled into your new kitchen, give the recipe another try with bread flour. If you’re still having problems, call the nice folks at the King Arthur Baking Hotline:1-800-827-6836 and they can troubleshoot.
Lori — I think you’re right! It might be a while before I try this recipe again :), but when I do, I’ll definitely keep your suggestion in mind. Thanks!
Now I’m not sure if I want to make it, hahaha. Very funny post, but obviously I can imagine it wasn’t that funny while you’re making it. But you did it! Congrats!
Marta — Thanks for the comment! You’re right: It’s a funny story now, not so funny when I was making it though 🙂 But I’ll definitely give it a shot again when I have more patience.
Are you sure the recipe called for two tablespoons of additional yeast, not two teaspoons? Two plus tablespoons of yeast is a lot for this amount of flour. I suspect your bread proofed too high and too fast, then collapsed on itself. (Good luck with your move…)
RAS — I am sure it calls for 2 tablespoons, not teaspoons (which I agree is weird). My best guess right now is that I should have used bread flour, as the recipe instructs, instead of all-purpose flour. Thanks for the comment!
Thank you! I love that you posted this – I can’t tell you how many times I’ve stood in the kitcken and cursed myself, shaking my fist, and asking, “why why why?” mostly to my half-amused, half-exasperated husband (he would say it’s because I can’t follow a recipe without making little (tiny! wee!) adjustments – I call them personal touches…). Thank you thank you thank you. I can relate!!
Linda
p.s. I’ve been searching for a whole wheat sandwich bread, too. But the temperature in my kitchen scares me. I haven’t tried baking bread since May…
Linda — Thanks for the comment! I’m so glad I’m not the only one who has these, ahem, “moments” in the kitchen. 🙂
This was a hard recipe for you to tackle…and good on you for posting the failure. As someone who has baked quite a lot of bread, using different methods, I noticed a few things that I think were part of the problem you encountered.
I went to Cook’s Illustrated and looked at the recipe, as well as the video detailing how to make this bread.
The first thing I noticed is this they folded the dough in one of the steps. That usually means the dough is quite “wet”. Wet doughs are usually always folded because they are too sticky to knead traditionally. These types of doughs can be even more difficult to make if you live where there is a lot of humidity. The more humid it is where you live, the wetter the dough is, and then one quite often has to use more flour until the right texture is achieved. Now I don’t know where you live but that could have been part of the problem.
Then I looked at your final product.
1. This might have been a problem with too much yeast as one other poster has mentioned, but I don’t think that in itself would cause your bread to turn out like this. More yeast will make the bread rise faster though so then the final proofing time can be shorter. Did your loaf, just before it went in the oven, look the same as in the video at the Cook’s Illustrated site?
2. I do agree with the previous poster that you might have had more success with bread flour rather than with the all-purpose flour that you used. Bread flour has more gluten in it and that is what ultimately hold your final strands of dough together as it rises and bakes. You could add gluten to your dough. I use about one good tablespoon for every 4 cups of all-purpose flour.
3. The recipe at Cook’s Illustrated called for slashing the loaf just prior to putting it in the oven to bake. You said you slashed your loaf (although it is impossible to see your slash marks) and then the dough went tumbling down. That is almost certainly the result of one of three things. You might have slashed to loaves too deeply. You might have overproofed your dough prior to slashing. Your dough itself might not have had enough strength to support itself because of a lack of gluten.
4. Bread dough can also collapse when baking in the oven. That is almost certainly a sign of overproofing the dough or again, having made a dough that was not strong enough to support itself, in other words, not enough gluten in the flour that you used. Yeast produces gas as it works. When you put your loaf in the oven, the yeast will have one final burst (oven spring) where it produces even more gas. If there is too much gas to dough ratio, the dough simply can not support itself any longer and it collapses.
Personally, if you make this bread another time, for sure watch the video first and try to have your dough look like theirs does every step of the way. If you live in a humid area, add a bit more flour to your dough. I would add also some gluten to the dough, and I would be very careful proofing the final shaped loaves. I think I would also bake the loaves without slashing to see how things turn out and if you have success, try slashing in the future.