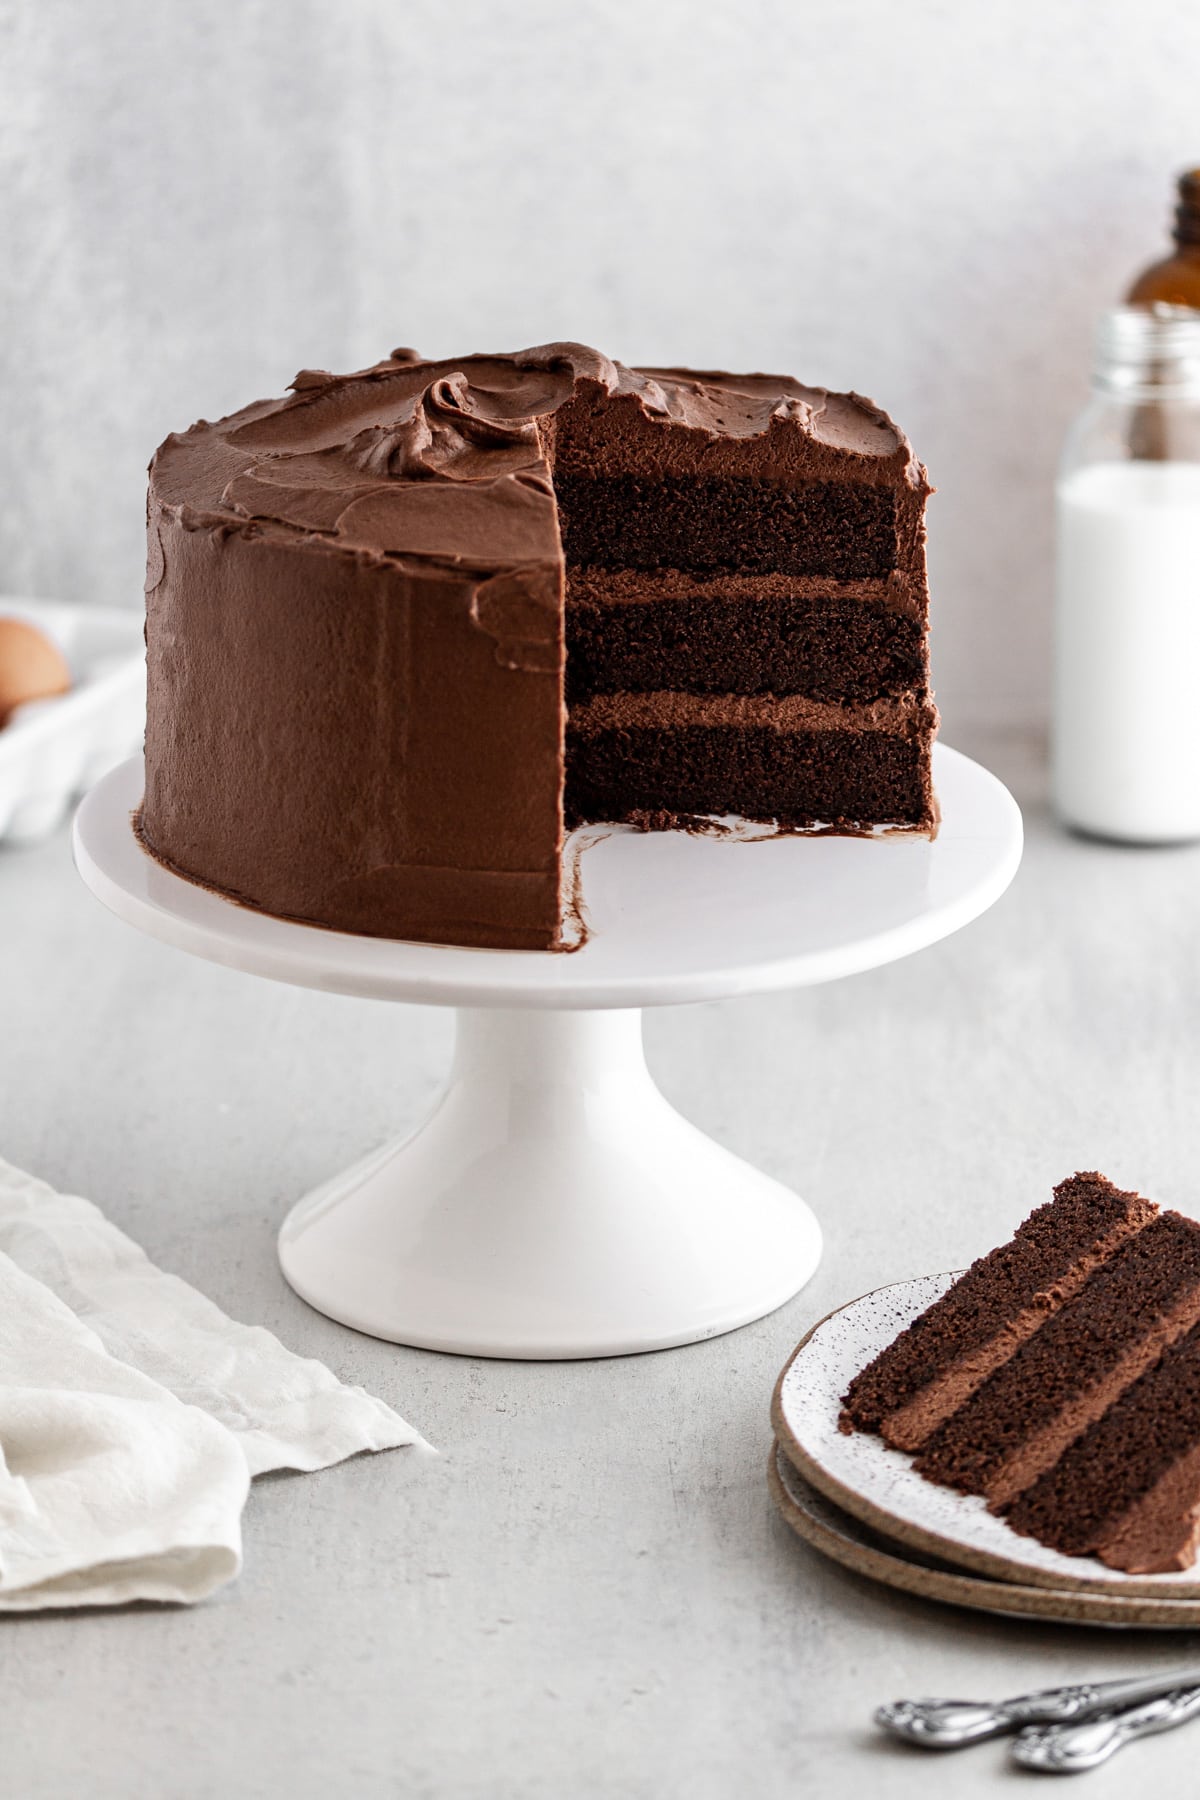
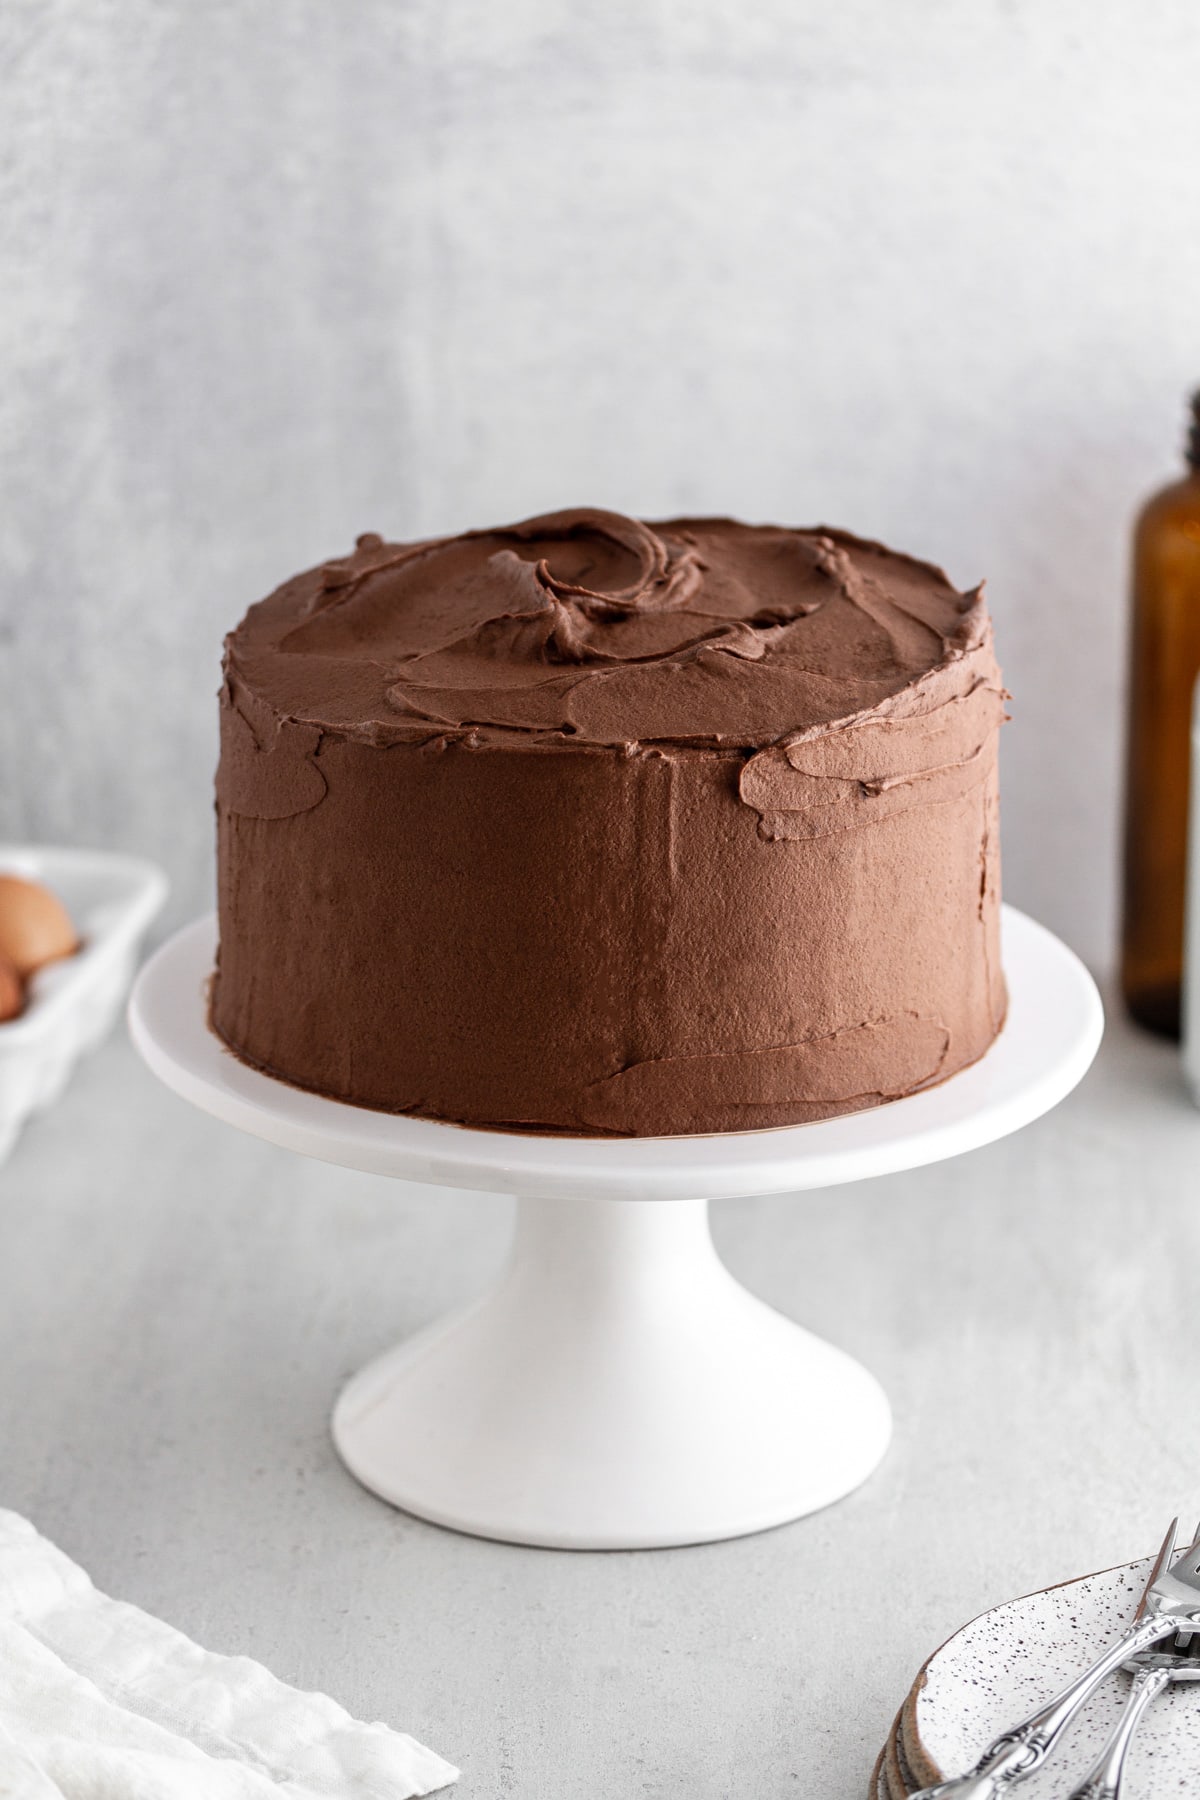
A decadently fudgy devil’s food cake frosted with a smooth, rich chocolate buttercream. Every bite of this moist chocolate cake is sinfully delicious!

A Quick Look At The Recipe
This is a brief summary of the recipe. Jump to the recipe to get the full details.
Prep Time
40 minutes
Cook Time
30 minutes
Cooling Time
1 hour
Total Time
2 hours 10 minutes
Servings
16 Slices
Difficulty
Moderate
Calories *
506 kcal per serving
Technique
Make the cake, bake, cool, make buttercream, assemble!
Flavor Profile
Deep, rich dark chocolate cake and a fudgy chocolate buttercream.
* Based on nutrition panel
I love how rich this cake is! I made it into cupcakes and topped the frosting with half an Oreo, and it was so good. The frosting was very easy to make and wasn’t too sweet. ⭐⭐⭐⭐⭐
Mara
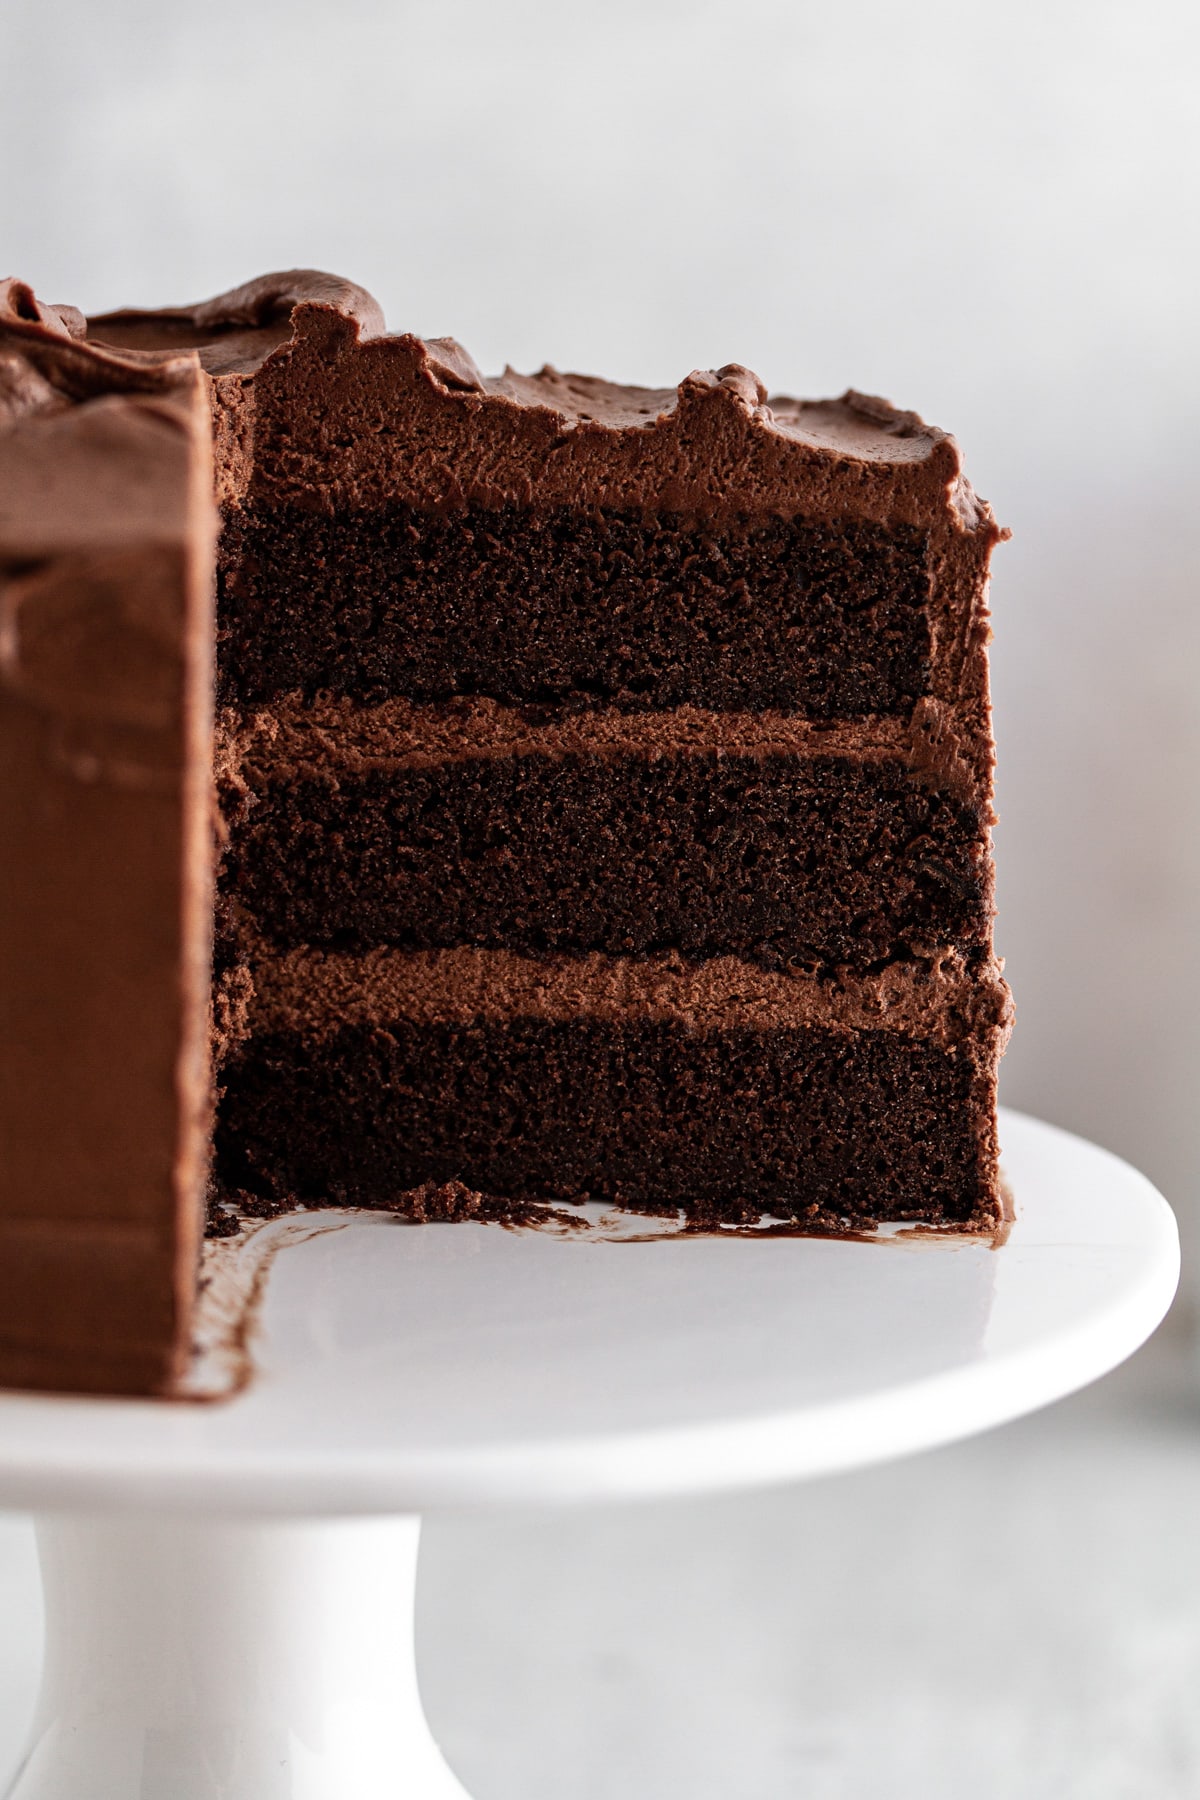
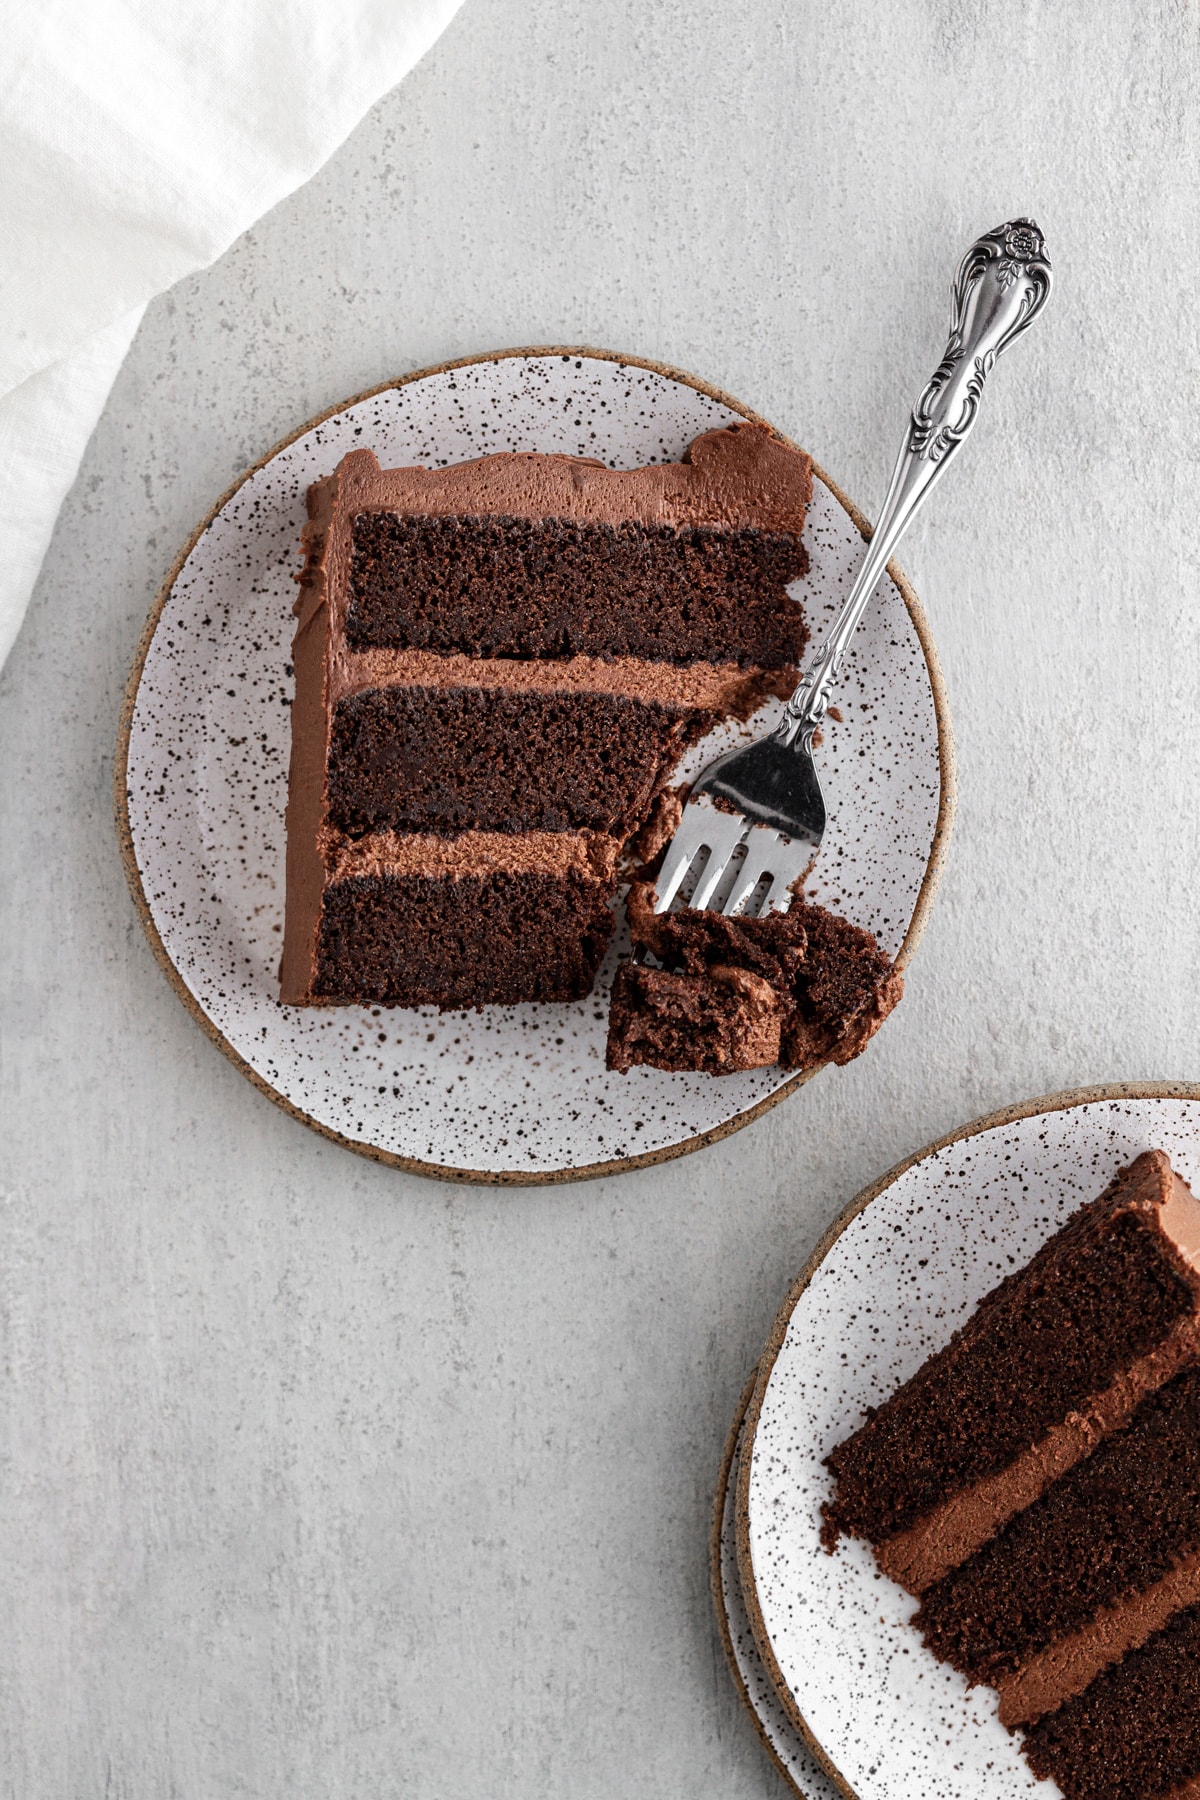
Every bite of this devils food cake is deeply chocolaty, dense and moist with a creamy chocolate buttercream that almost melts into the cake layers like chocolate mousse. This cake is a chocolate lover’s dream and worthy of any occasion (even if that occasion is staying at home watching Netflix in your sweatpants).
I personally love serving this rich chocolate cake for Valentine’s Day (possibly layered with red velvet cake!) or as part of a birthday party spread with funfetti cookies and funfetti cupcakes with funfetti frosting!
Table of contents
Why is it called Devil’s Food Cake?
Devil’s food cake was originally created as a pairing for angel food cake to use the leftover egg yolks after separating for angel food! Modern recipes for devil’s food cake have evolved to use whole eggs rather than just egg yolks, but the resulting cake is still a sinfully decadent and delicious chocolate cake.
What is the difference between chocolate cake and devil’s food cake?
Devil’s food cake is essentially the same thing as a classic chocolate cake but with a deeper chocolate flavor and darker color. Dutch-process cocoa powder gives the cake a richer, deeper chocolate flavor and color. Devil’s food cake from scratch is made with butter and uses the creaming method of mixing, whereas many chocolate cakes, including my moist chocolate cake, use vegetable oil for an easy liquid-fat mixing method. For this reason, it’s likely to be denser than a classic chocolate cake especially when cold.
Pro Tips for Making Devil’s Food Cake from Scratch
- Use room temperature ingredients where noted. This helps all the ingredients incorporate and the batter emulsify. This is especially important with a butter-based cake using the creaming method.
- Use those trusty bake-even strips for even cake layers! They help the cakes bake up without a domed top, so you can skip the whole leveling step. If you do choose to level, let the cakes cool to room temperature before leveling then use the scraps to make chocolate cake pops! I do find a serrated knife useful for this task.
- A large offset spatula makes spreading the frosting on the cake very easy. For clean, smooth sides, I used a bench scraper and gently rotated the cake stand while holding the bench scraper at a 90° angle to the cake stand.
Ingredients & Substitutions
- Unsalted Butter
- Granulated Sugar
- Salt
- All-purpose flour
- Dutch-processed cocoa powder: The rich chocolate flavor of this cake comes from using Dutch processed cocoa powder such as Droste. There are two main reasons this makes huge impact. The first is because the acidity has been neutralized so the rich, dark chocolate flavor of the cocoa beans comes forward, and the second is that Dutch-processed cocoa powder has at least double the fat of natural cocoa powder. If you only have natural unsweetened cocoa powder, then I recommend making chocolate cupcakes or red velvet chocolate chip cookies instead.
- Baking Powder: The acidity in the cocoa powder has been removed, so you must use baking powder, which contains the acid required for the leavening reaction to occur. Baking soda requires another acidic ingredient to have a strong reaction.
- Large Eggs: This modern recipe uses whole eggs and no additional egg yolks. I find that the added fat from egg yolks makes a more dense and extra rich cake.
- Milk: I use whole milk for baking because it adds richness to the texture and flavor. The additional fat also helps keep the cake moist longer. You could substitute up to half of the milk for sour cream for an extra rich cake.
- Vanilla: Vanilla extract enhances the chocolate flavor, so choose one you enjoy. I love Nielson-Massey for this and for my funfetti cake!
- Powdered Sugar (frosting)
See the recipe card for full information on ingredients and quantities.
Possible Variations
- Change the frosting: This recipe uses a chocolate American-style buttercream, but it would be equally delicious with my rich chocolate fudge frosting or chocolate Italian meringue buttercream! You could also deviate from the norm and use a silky cream cheese frosting, vanilla American buttercream recipe, or even a less-sweet, but equally easy, ermine frosting!
- Add a filling between the layers: Pipe a ring of frosting around the edge of the middle cake layers (called a dam) and then fill with salted caramel sauce, cherry preserves, any thick, spreadable jam, or even this dark chocolate ganache recipe. You could use a different flavored buttercream in between the layers than on the outside. Try this caramel Swiss meringue buttercream, or add a 1/3 -1/2 cup fruit jam to make a fruit flavored Swiss meringue buttercream or to any of the buttercreams listed above!
- Bake it in different pans or make it into cupcakes! You can bake this cake in three 8-inch round pans, 36 cupcakes, two 9-inch round pans (like I did for my moist chocolate cake) or in a 13×9-inch pan, but if you bake it in the latter two options, know that you might end up with extra frosting (not necessarily a bad situation to be in, more just an FYI). You can also use this rich cake to make a from scratch version of my heart shaped cake!
How to Make this Devil’s Food Cake Recipe
Use these instructions to make rich, moist devils food cake! Further details and measurements can be found in the recipe card below.
Make the cake
Step 1: Heat oven to 350°F. Grease and flour (or spray with baking spray) bottom and sides of three 8-inch round cake pans. You can also follow my tutorial on how to line cake pans with parchment paper for easy release.
Step 2: In a medium bowl, whisk together Dutch-process cocoa powder and baking powder until very well mixed and no lumps remain. In a separate large mixing bowl using an electric hand mixer, or in the bowl of a stand mixer fitted with the paddle attachment, beat butter, sugar and salt a good 5 minutes on medium speed until very fluffy and light.
Step 3: Beat eggs (on medium speed) one at a time into butter mixture, beating well after each addition.
Step 4: Switch to a rubber or silicone spatulaand add one-third of flour mixture to batter, then add milk, stirring to combine and scraping sides and bottom of bowl occasionally with a spatula. Repeat with another third of the flour mixture and the remaining milk along with the vanilla, mix just to incorporate and then fold in the remaining flour mixture. Divide batter evenly between prepared pans.
Step 5: Bake cakes in preheated oven for 30 to 35 minutes or until a toothpick inserted in the center comes out with a few clinging crumbs. Cool cakes in pans on a wire rack 10 minutes, then remove from cake pans and cool completely on wire cooling racks.
Prepare the frosting:
Step 6: In a large mixing bowl using an electric hand mixer or in the bowl of a stand mixer with the paddle attachment, beat butter on high speed for 4 full minutes until pale, smooth and very creamy.
Step 7: Whisk or sift together powdered sugar and cocoa powder (for the frosting) until very well mixed. On low speed, gradually beat in sugar-cocoa mixture, followed by milk, vanilla and pinch of salt. Beat on low speed 1 minute, then increase to medium-high speed and beat for a full 3 to 4 minutes until frosting is smooth, light, fluffy and creamy. Add more milk or powdered sugar to thin or thicken frosting as desired.
Assemble the cake:
Step 8: Place one fully cooled cake layer on a cake stand or serving plate. Top with approximately 1 cup of frosting, in dollops; gently spread to cover entire top of cake layer. Top with second cake layer. Repeat process, topping and spreading with another approximately 1 cup frosting. Top with third cake layer. Frost top and sides of cake with remaining frosting. Cover with a cake dome or upside-down plate until ready to serve.
Frequently Asked Questions
Store leftover cake or fully assembled layer cakes in an airtight container or well wrapped in the refrigerator for up to a week. This cake can be stored at room temperature for up to 24 hours. To keep the cake moist for more than 5 days, wrap well or place slices in airtight, freezer-safe containers and freeze for 3 months. If kept in the fridge or freezer, bring the cake to room temperature before serving for optimal flavor and texture.
If you would like to prepare the cake in advance, I recommend baking and cooling the layers, then wrapping well in plastic wrap. Freeze for up to a month and then assemble as directed above. You can also prepare the frosting in advance but I don’t find that saves much time with a simple American buttercream such as this one.
You can freeze the individual layers prior to assembling, the fully assembled and unsliced cake, or freeze individual slices for up to 3 months.
If you enjoyed this recipe, please leave a star rating and let me know how it goes in the comments below! I love hearing from you and your comments make my day!
Devil’s Food Cake
Ingredients
For the cake:
- ¾ cup unsalted butter, room temperature
- 1 ¾ cups granulated sugar
- ½ teaspoon kosher salt
- 2 cups all-purpose flour
- ¾ cup Dutch-process cocoa powder
- 2 teaspoons baking powder
- 4 eggs, room temperature
- 1 ½ cups milk, room temperature
- 2 teaspoons vanilla extract
For the chocolate buttercream frosting:
- 1 cup unsalted butter, room temperature
- 4 ½ cups powdered sugar
- ¾ cup unsweetened cocoa powder, natural or Dutch-processed
- ½ cup milk
- 2 teaspoons vanilla extract
- pinch kosher salt
Instructions
- Heat oven to 350°F. Grease and flour (or spray with baking spray) bottom and sides of three 8-inch round cake pans.
- First, make the cake: In a large mixing bowl using an electric hand mixer, beat butter, sugar and salt a good 5 minutes on medium speed until very fluffy and light.
- In a separate bowl, whisk or sift together flour, Dutch-process cocoa powder and baking powder until very well mixed and no lumps remain.
- Beat eggs (on medium speed) one at a time into butter mixture, beating well after each addition. Add one-third of flour mixture to batter, then add half the milk, another third of the flour mixture, the remaining milk and the 2 teaspoons vanilla, and the remaining flour mixture, stirring to combine after each addition and scraping sides and bottom of bowl occasionally with a spatula. Divide batter evenly between prepared pans.
- Bake cakes 30 to 35 minutes or until a toothpick inserted in the center comes out with a few clinging crumbs. Cool cakes in pans on a cooling rack 10 minutes, then remove from cake pans and cool completely on cooling racks.
- Meanwhile, make the frosting: In a large mixing bowl using an electric hand mixer or in the bowl of a stand mixer with the paddle attachment, beat 1 cup butter on high speed 4 full minutes until pale, smooth and very creamy. Whisk or sift together powdered sugar and cocoa powder until very well mixed. On low speed, gradually beat in sugar-cocoa mixture, then milk, vanilla and pinch of salt. Beat on low speed 1 minute, then increase to medium-high speed and beat for a full 3 to 4 minutes until frosting is smooth, light, fluffy and creamy. Add more milk or powdered sugar to thin or thicken frosting as desired.
- Place one fully cooled cake layer on a cake stand or serving plate. Top with approximately 1 cup of frosting, in dollops; gently spread to cover entire top of cake layer. Top with second cake layer. Repeat process, topping and spreading with another approximately 1 cup frosting. Top with third cake layer. Frost top and sides of cake with remaining frosting. Cover with a cake dome or upside-down plate until ready to serve.
Notes
- It’s important to use Dutch-process cocoa powder in the cake.
- You can also bake this cake in two 9-inch round cake pans or in a 13×9-inch pan. Note that you might not end up using all of the frosting if you make this adjustment.
- If the tops of your cakes are domed, use a sharp serrated knife to cut off the domes before stacking in layers. OR, use bake-even strips.
- For best results, use a large offset spatula to frost cake. For clean, smooth sides, I used a bench scraper and gently rotated the cake stand while holding the bench scraper along the sides.
Nutrition
Nutrition information is automatically calculated, so should only be used as an approximation.
 Like this recipe? Rate & comment below!
Before You Go
I hope you enjoyed this delightful chocolate recipe. Check out all our cake and cupcake recipes or if are searching for more Valentine’s Day inspiration, peruse my list of easy Valentine’s Day Desserts!


I love how rich this cake is! I made it into cupcakes and topped the frosting with half an Oreo, and it was so good. The frosting was very easy to make and wasn’t too sweet.
This Devil’s Food Cake recipe looks absolutely decadent! I love how rich and chocolaty it seems. Can’t wait to give it a try and impress my friends at the next gathering! Thank you for sharing!
Hi there! This one is super chocolatey! Happy baking!
I’m in the process of making this right now. It smells wonderful! I didn’t even know that bake-even strips were a thing and I ordered some as soon as I learned, so thank you! I baked 2, 9″ rounds, and just took it out of the oven, but the centers fell on both of them. Do you happen to have any idea what I did wrong? It’s not the end of the world, as it was just for the family, but I haven’t had this problem before so I was hoping you may have a suggestion so I don’t do it again…?
Thanks for the recipe and I’m saving your site to my home screen!
Hi Jennifer! I’m so glad to hear the cake smells amazing—and yay for discovering bake-even strips! They’re such a great tool! As for the centers falling, a couple things could be at play here. One common culprit is underbaking just slightly—sometimes the edges can look done while the center needs a few more minutes. Another possibility could be overmixing after the flour is added. So happy to hear this recipe will be enjoyed by your family! Thanks for coming back to comment! ~gvd team
can you use regular butter instead of unsalted?