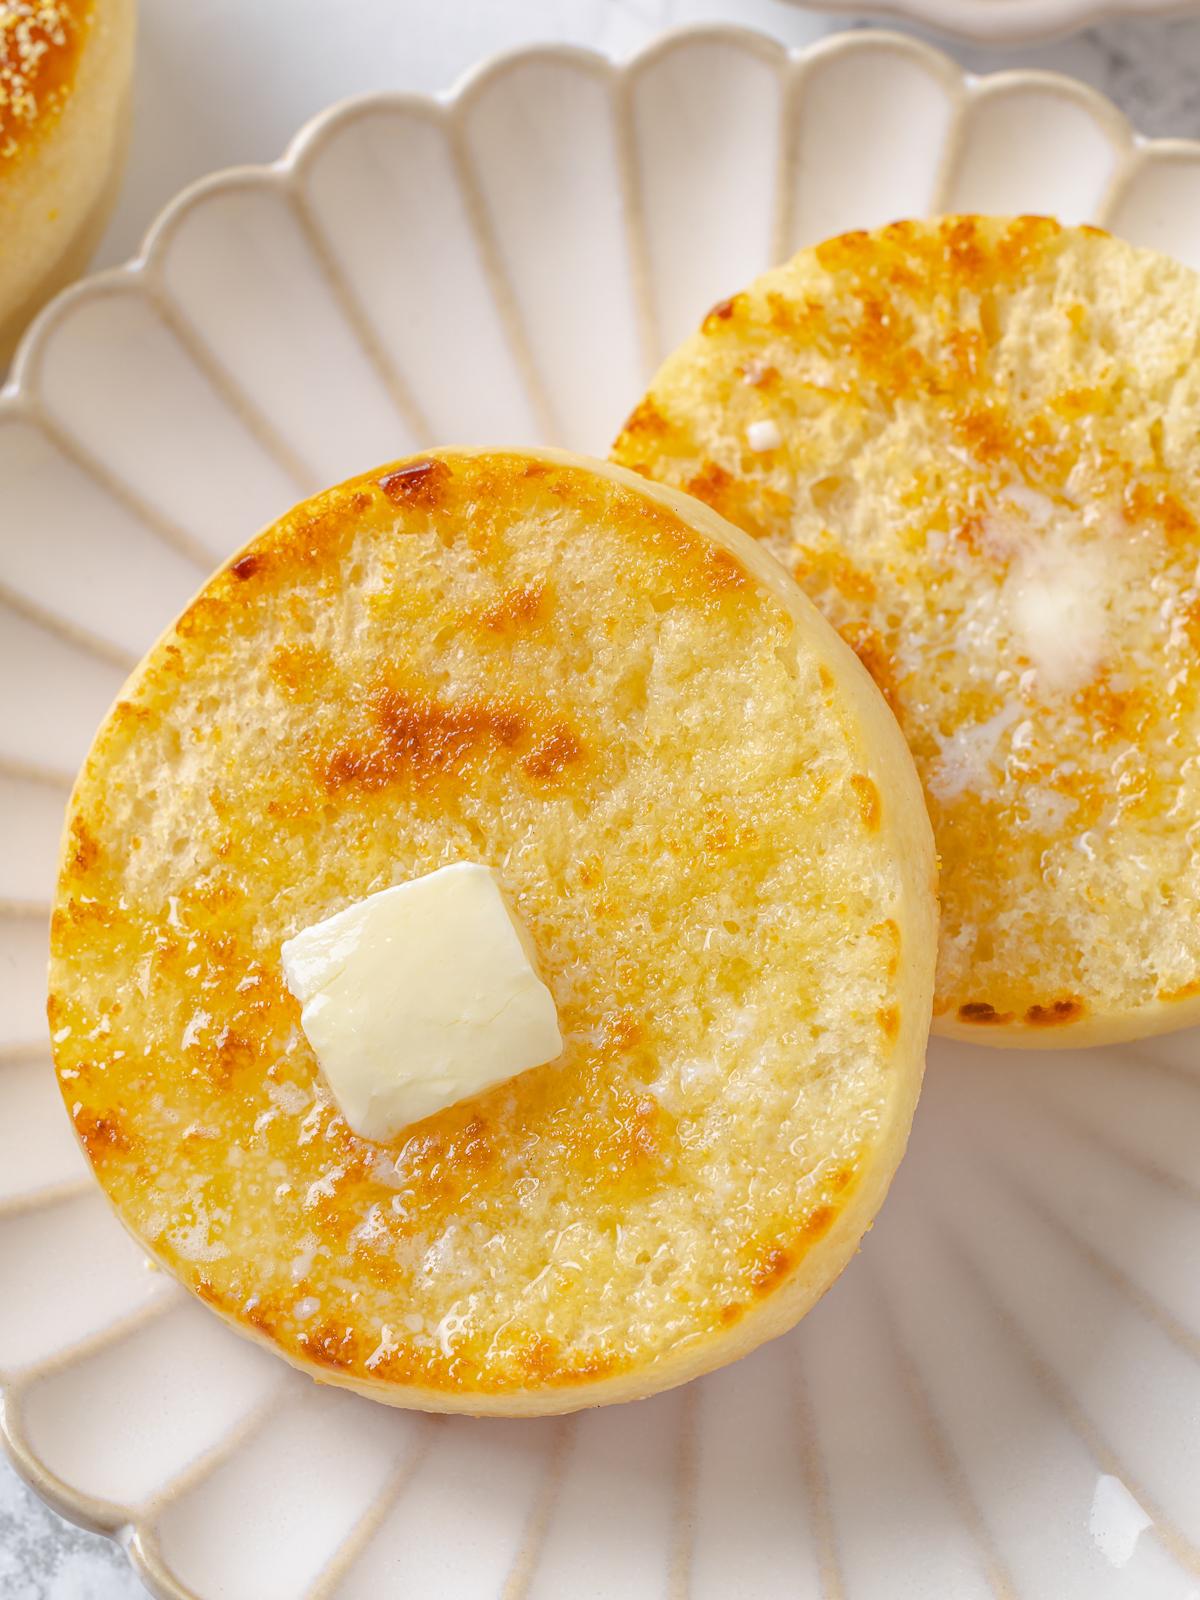
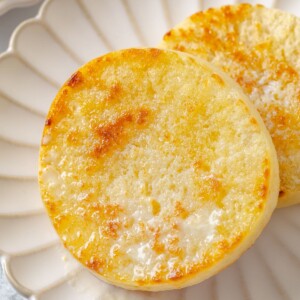
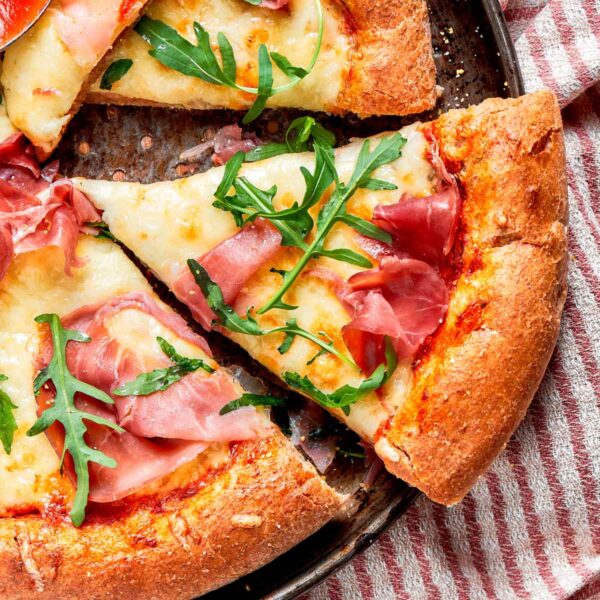
This English muffin recipe yields a crunchy cornmeal crust, a soft airy crumb, and those deep nooks and crannies that hold butter the way they are supposed to. They’re exactly what you need for breakfast sandwiches or toasted with butter and jam!
A Quick Look At The Recipe
This is a brief summary of the recipe. Jump to the recipe to get the full details.
Prep Time
30 minutes
Cook Time
30 minutes
Proof/Rest Time
2 hours
Total Time
2 hours 15 minutes
Servings
12 muffins
Difficulty
Intermediate
Calories *
177 kcal per serving
Technique
Traditional method with pan frying
Flavor Profile
Buttery, slightly tangy, savory
* Based on nutrition panel
I was nervous about the pan frying step but it turned out to be the easiest part. The dough held its shape perfectly and the bottoms got that beautiful golden crust I was hoping for. These are absolutely worth the three hours. ⭐⭐⭐⭐⭐
Lauren
Why You Will Love This Recipe
- Classic nooks and crannies, every time. Pan-fry first, then bake—that’s what creates the craggy interior you cannot get from an oven alone. That combo gives you a classic English muffin texture.
- The final proof makes all the difference. Give the rounds 45–60 minutes to proof so they bake up light and airy. Skip it and they’ll come out dense.
- Dry active yeast keeps this approachable. No sourdough starter, no discard, no long fermentation schedule required. If you already bake my garlic butter breadsticks, you’ll feel right at home.
- The scrap dough is not wasted. Rest the scraps 30 minutes, then cut again—they bake just like the first batch. Nothing gets wasted.
Table of Contents
There is something truly satisfying about splitting open a homemade English muffin and seeing the interior you worked for staring back at you. The stovetop-then-oven method is key—and worth every step.
These are a perfect weekend breakfast project and hold up beautifully under butter, jam, or a fried egg, and honestly easier than they look. If you love enriched yeasted dough, my whole wheat dinner rolls and whole wheat sourdough rolls (coming soon!) use a similar process and are a great place to build confidence alongside this recipe.
Ingredients & Substitutions
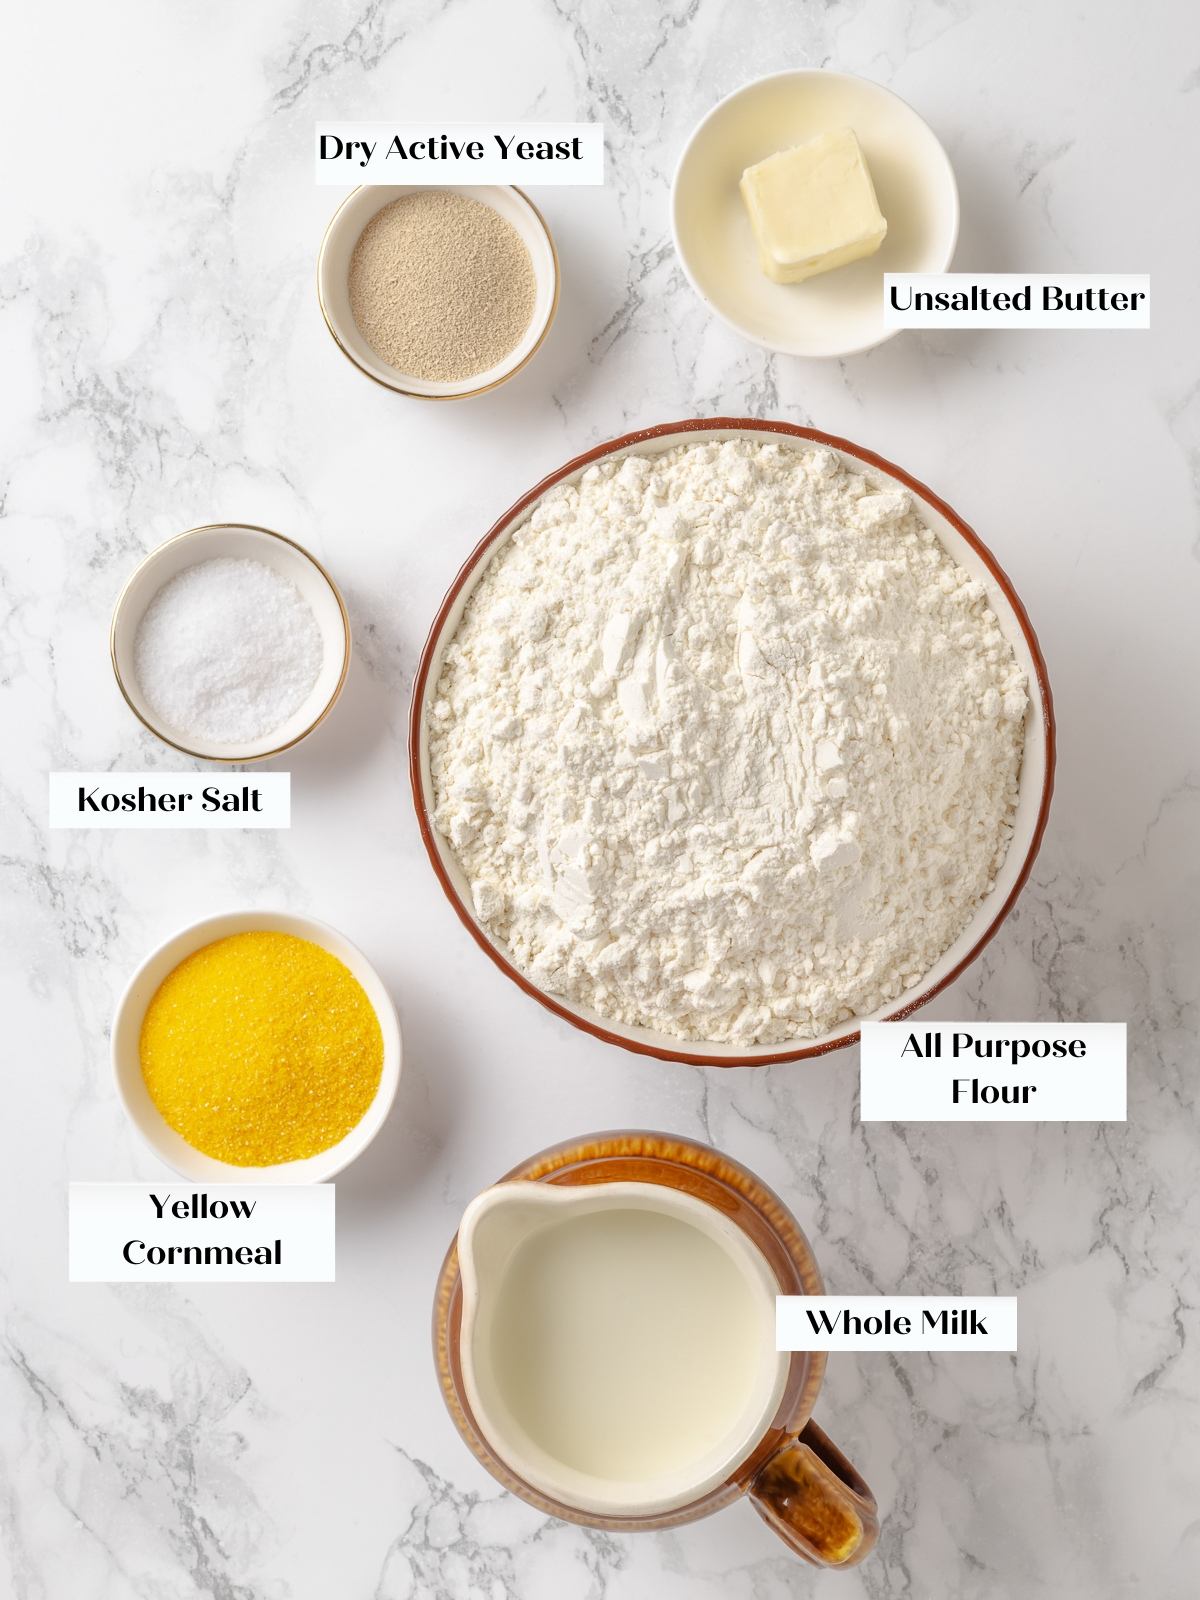
- Dry Active Yeast: This helps the muffins rise and keeps them light. Bloom it in warm milk until bubbly. If the milk is too hot (above 110°F), it will kill the yeast and the dough will not rise. If you see no activity after 10 minutes, start over with fresh yeast.
- Whole Milk: Provides the moisture and fat that keep the crumb tender and the flavor slightly rich. Lower-fat milk can be used but the crumb may be slightly less tender.
- Unsalted Butter: Adds flavor to the dough and is also used in the pan during cooking.
- All-Purpose Flour: The structural base of the muffins. Bread flour will produce a chewier texture; cake flour will produce a softer one.
- Kosher Salt: Enhances flavor and regulates yeast activity. Delay adding the salt until after the initial mix. Give the dough time to hydrate first. Adding everything at once makes the dough look dry and take longer to come together.
- Yellow Cornmeal: Prevents the cut rounds from sticking to the pan during the final proof and adds the classic slight crunch to the crust. It sticks to the bottom of each muffin and cooks in the pan, contributing directly to that familiar English muffin flavor and texture. If you enjoy baking with cornmeal, my cornbread loaf uses it in a completely different but equally satisfying way.
Variations for English Muffins
- Overnight cold proof: After cutting the rounds and placing them on the cornmeal-dusted pan, wrap the sheet tightly and refrigerate overnight instead of doing the final proof at room temperature. The next morning, pull the tray and let it sit in a warm spot for at least 30 minutes before cooking, the same approach I use for my brown butter pumpkin cinnamon rolls. The flavor deepens and you skip the long morning prep.
- Herb and cheese: Press finely chopped rosemary or thyme and a handful of shredded sharp cheddar into the dough during the final minute of mixing. The cheese melts into the crumb during baking and the herbs come through in every bite.
Professional Tips for Perfect English Muffins
- Do not skip the final proof after cutting. Let them proof 45–60 minutes until puffed. Muffins cooked straight from cutting will be dense and tight inside, which is the most common complaint about homemade English muffins.
- Keep the pan at medium heat, not higher. The butter and oil mixture should shimmer but never smoke. Too hot and the outside browns before the inside cooks. The same principle applies when cooking my fluffy coconut flour pancakes: patience with the heat produces an even, deep golden color rather than a dark, uneven crust.
- Wipe the pan between batches. Burnt cornmeal and butter residue left in the pan will darken and turn bitter on subsequent rounds. A quick wipe with a folded paper towel between batches keeps the color consistent from the first muffin to the last.
- Press the dough out on an unfloured surface. A bare counter helps the dough stay flat. If you flour the surface, the dough will spring back as you press and your muffins will bake up uneven.
How to Make English Muffins
Use these instructions to make light, nook-filled English muffins with a golden, slightly crunchy exterior. Further details and measurements can be found in the recipe card below.
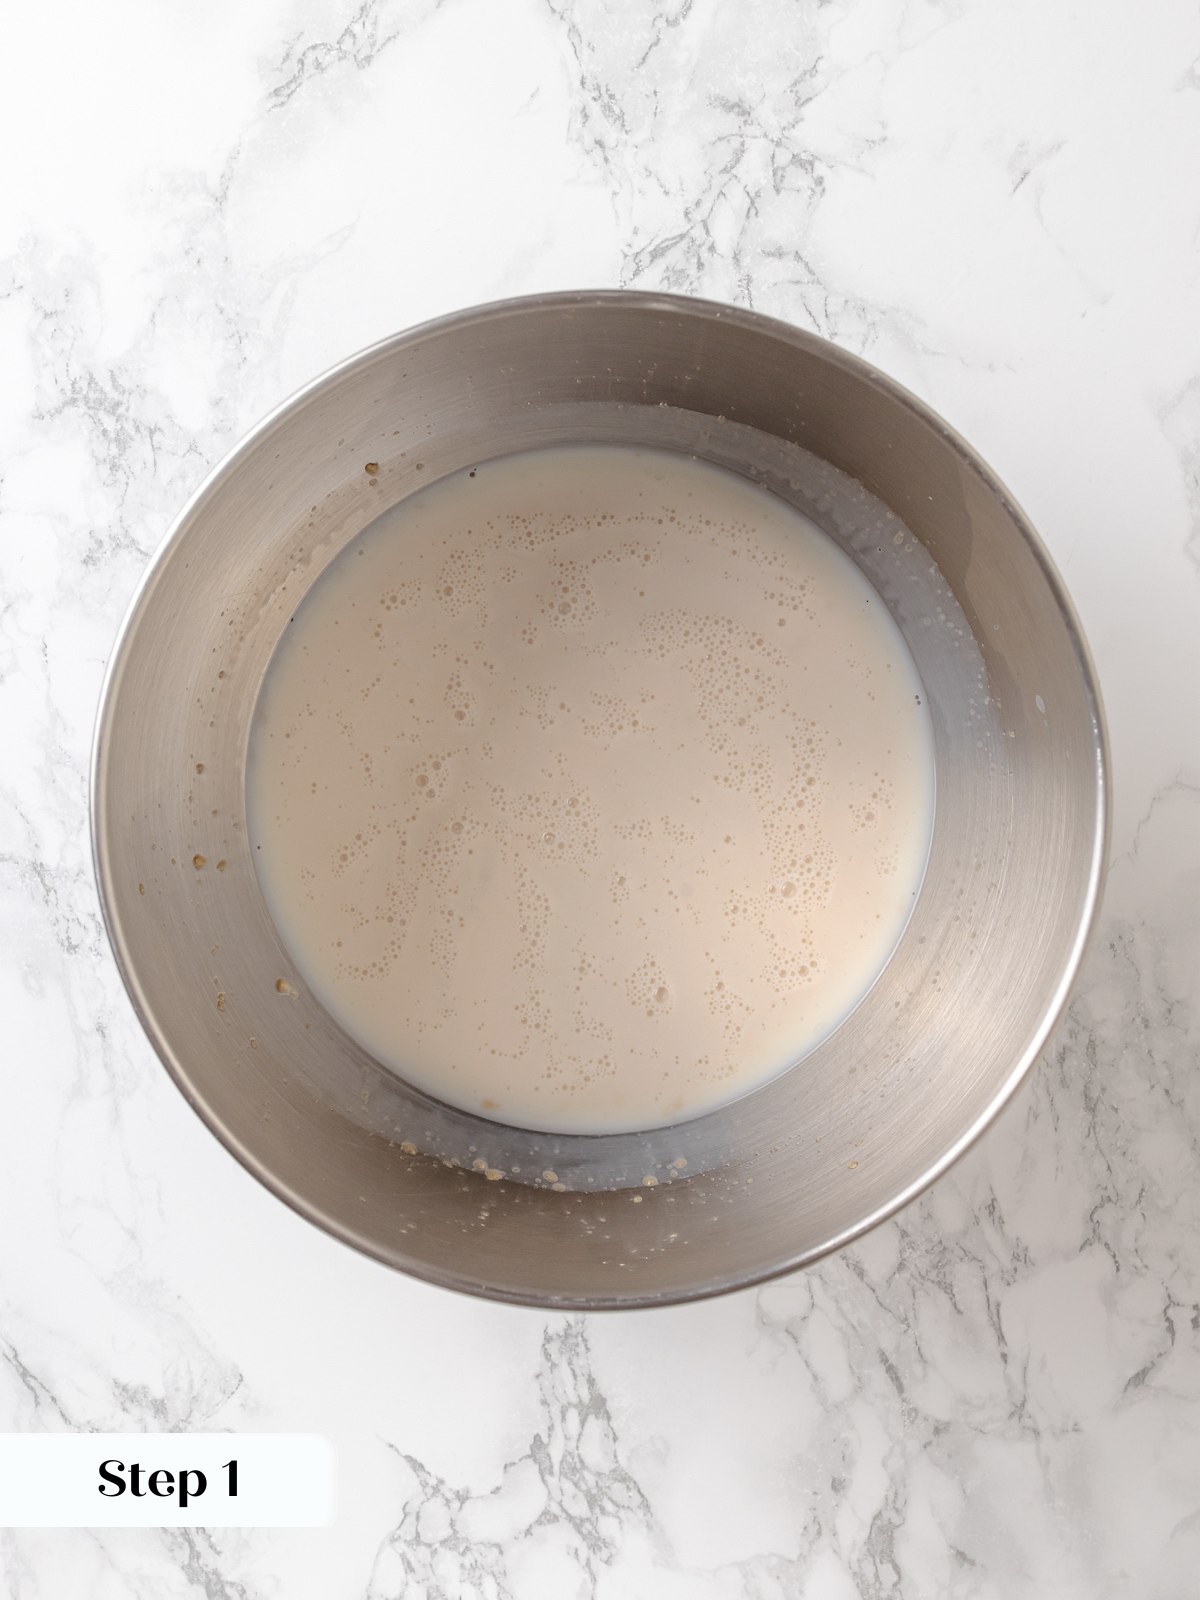

Step 1: Bloom the yeast. Whisk the dry active yeast into the warm whole milk in the bowl of a stand mixer fitted with the dough hook. Let the mixture sit undisturbed for about 10 minutes. Look for bubbles and a light foam. (photo 1) If nothing is happening after 10 minutes, your milk may have been too hot or too cold, and it is worth starting over with fresh yeast.
Delaying the salt helps the milk hydrate the flour and begin developing gluten rather than the salt competing with the flour for hydration. You can add everything together but it is going to look like an impossibly dry dough, and you’ll need to incorporate it for about twice as long.
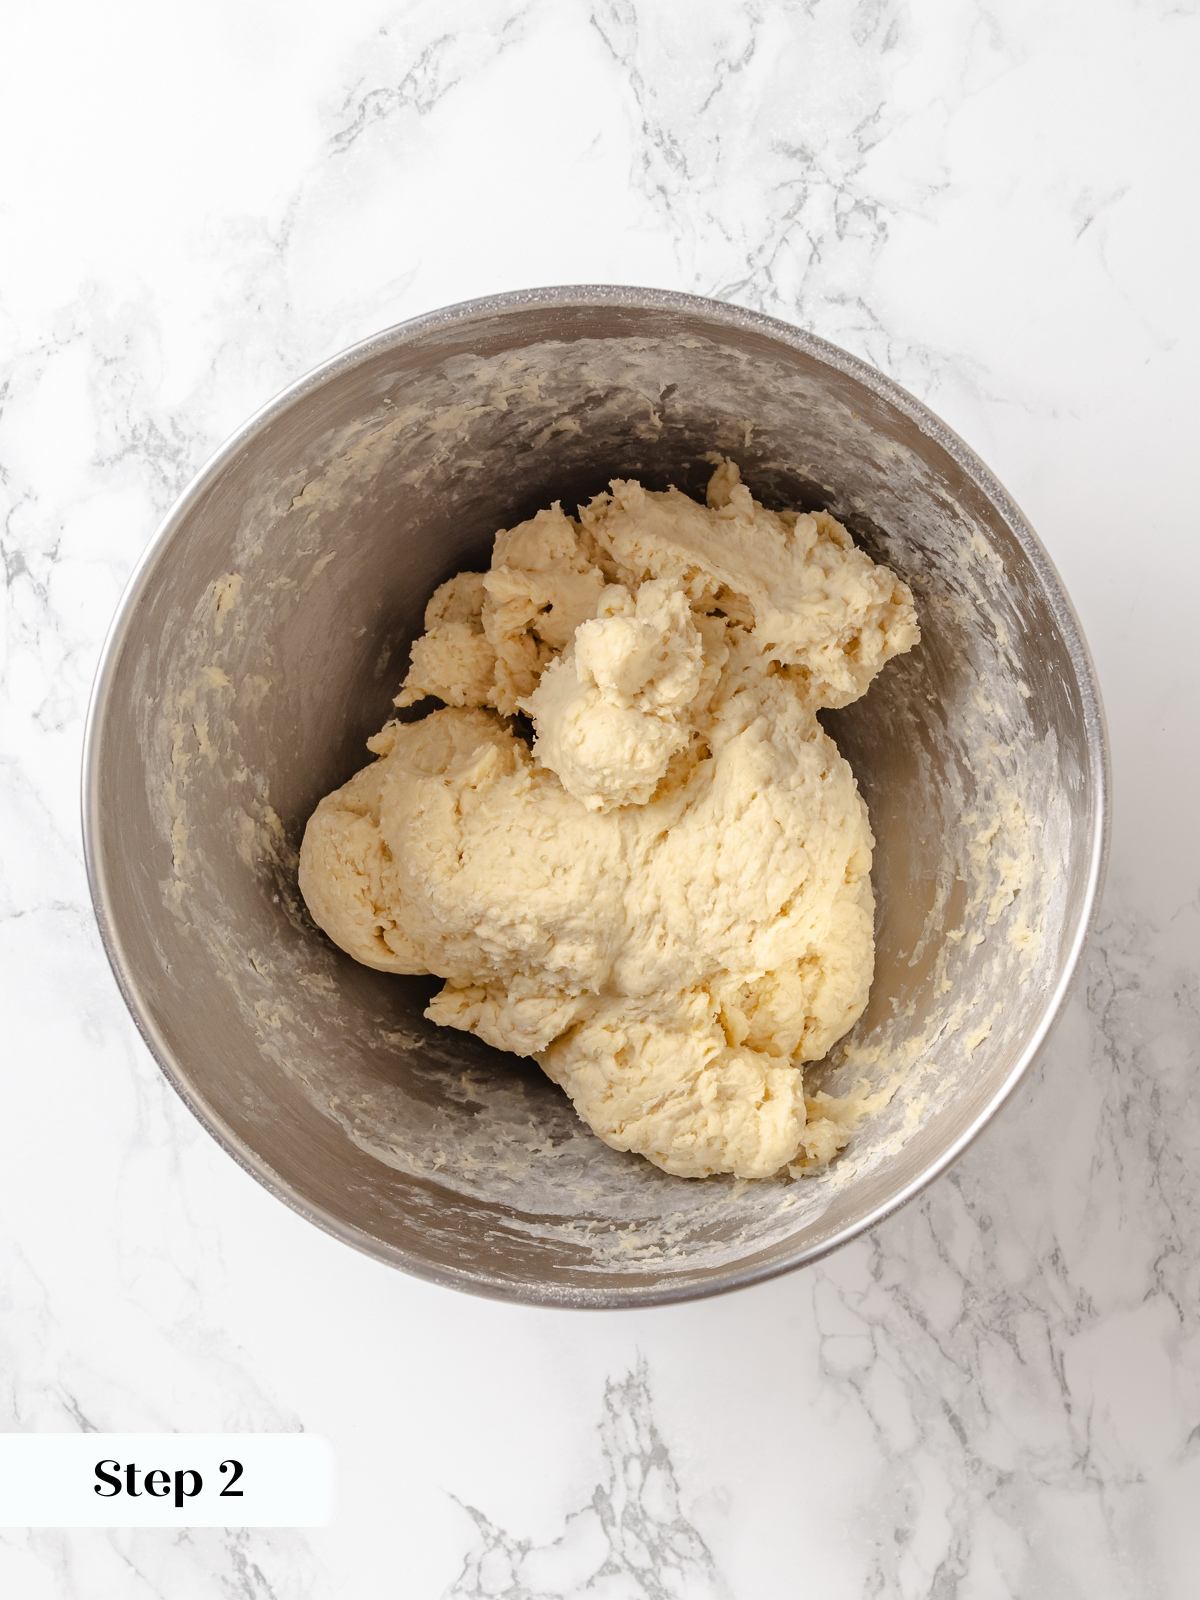
Step 2: Mix and develop the dough. Add the flour and butter to the bloomed yeast mixture. Mix on low speed until a rough, shaggy dough forms. It will look a little ragged and uneven at this stage, which is completely normal. (photo 2)
Step 3: Add the salt and increase the speed to medium-high. Mix until the dough is smooth and clears the sides of the bowl. Test by stretching a small piece. You are looking for the windowpane test: the dough should stretch thin enough to see light through without tearing. (photo 3) If it tears immediately, mix for another 2 to 3 minutes and test again.
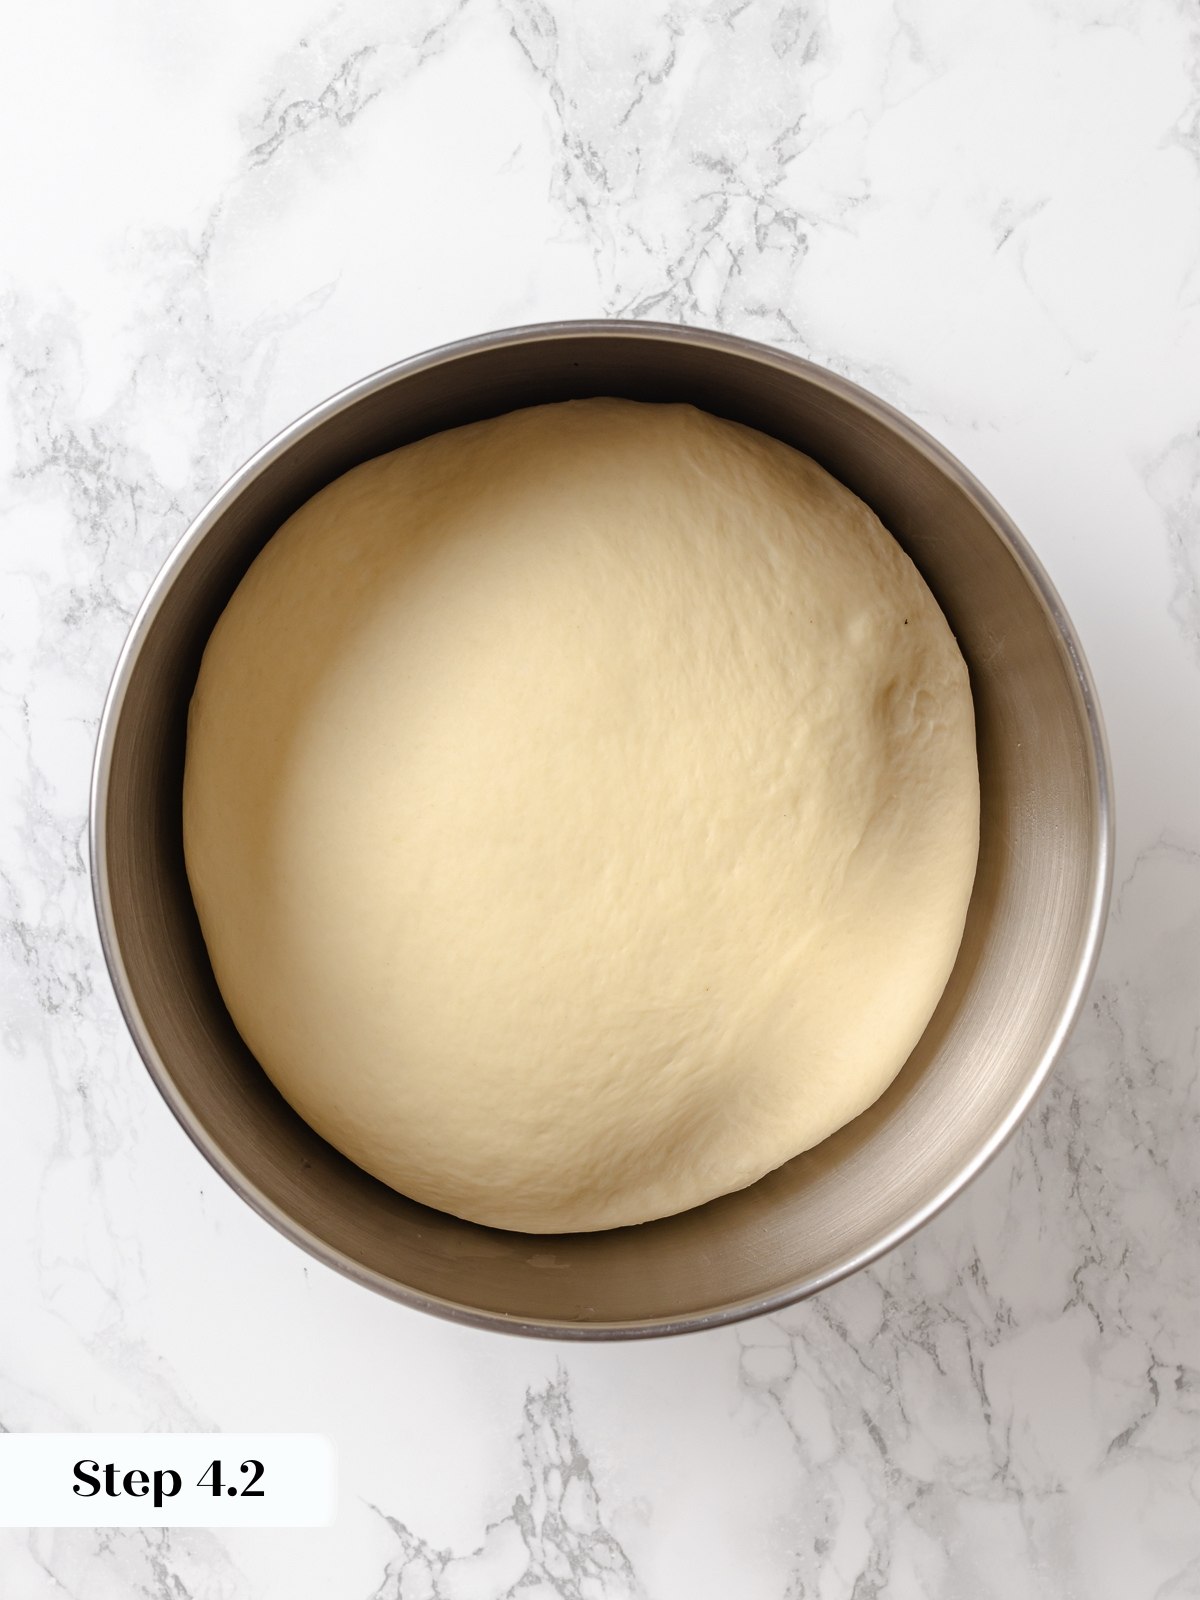
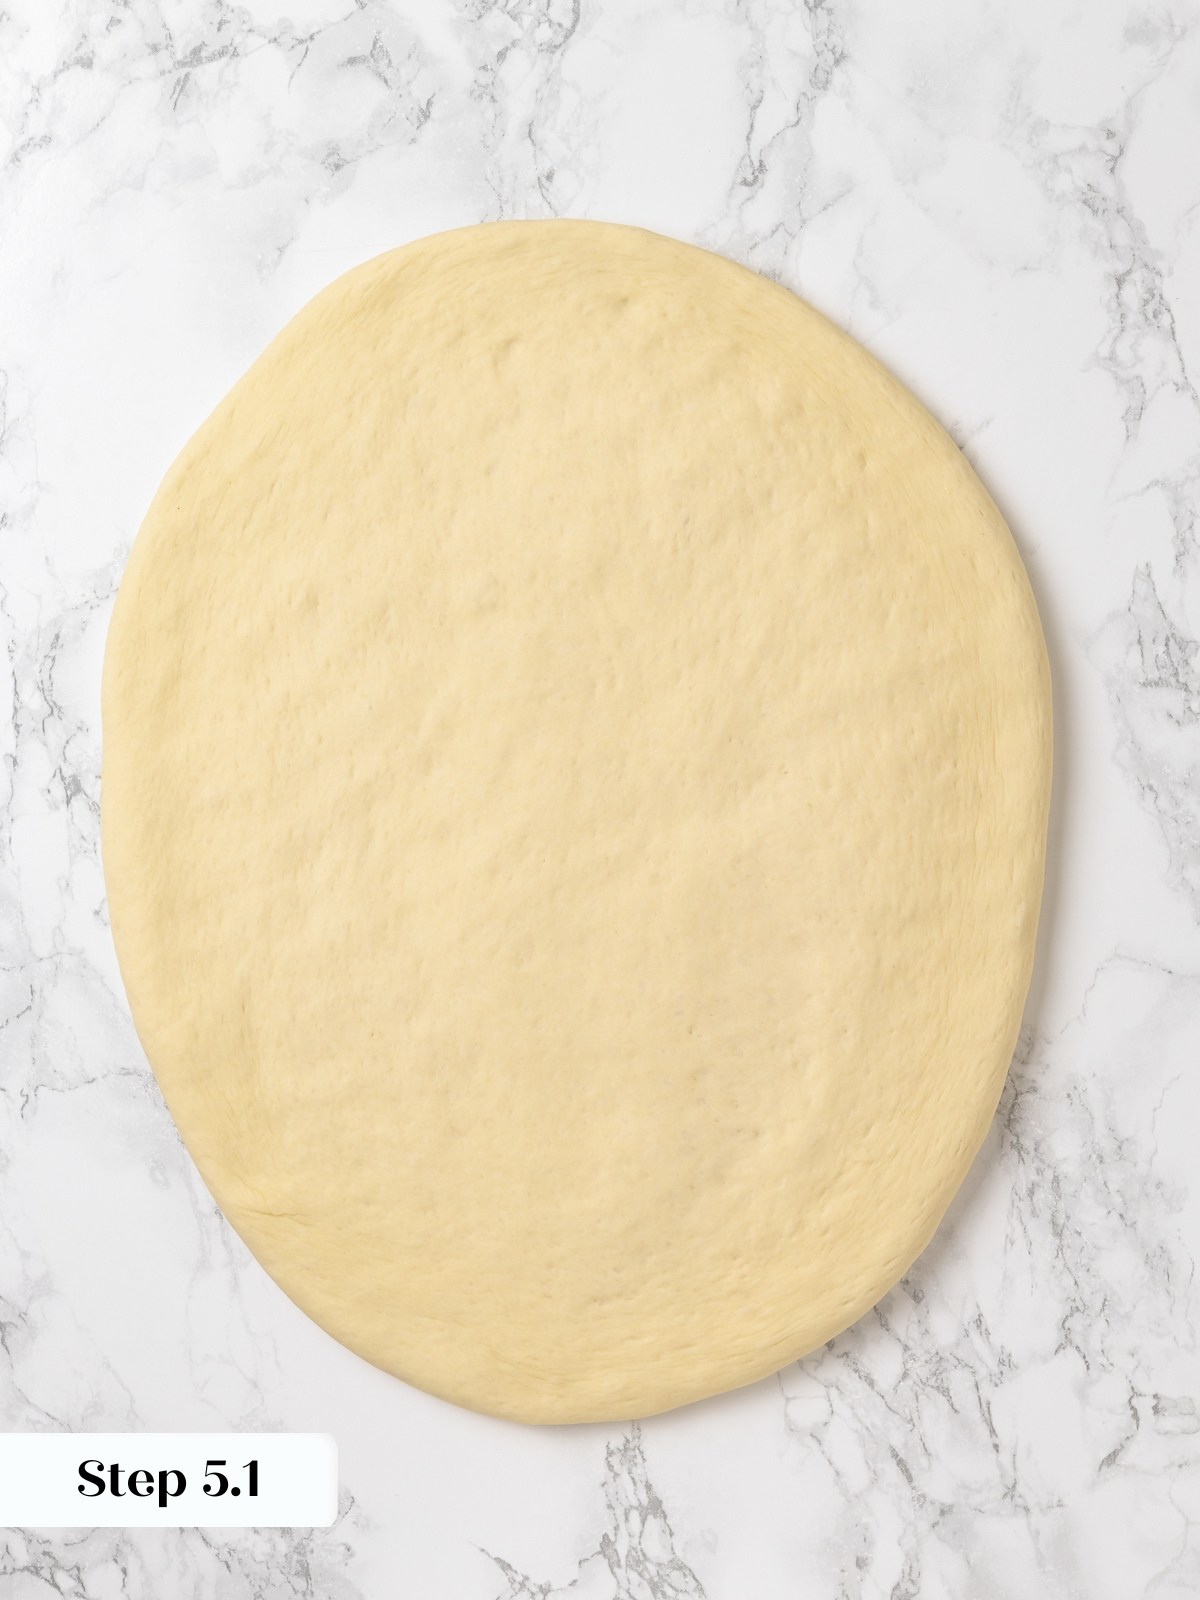

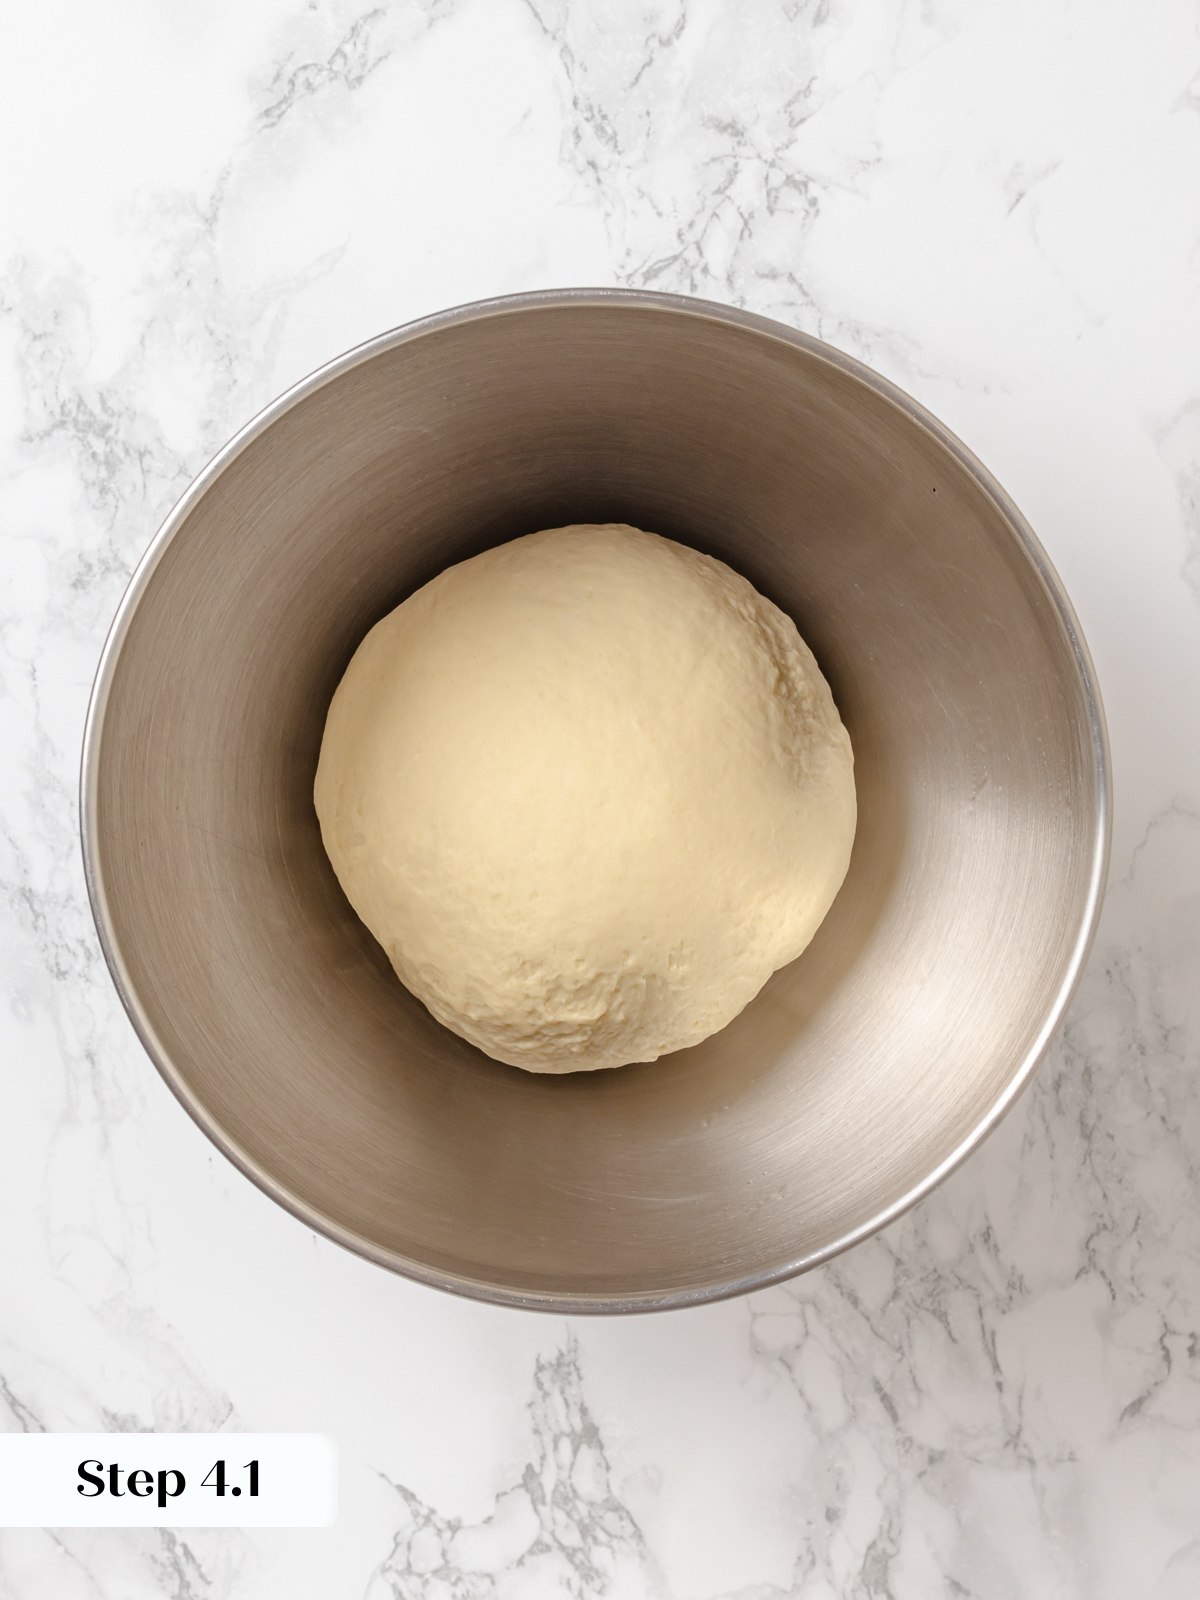
Step 4: Bulk proof the dough. Transfer the dough to a lightly oiled bowl and cover tightly with plastic wrap. Place in a warm spot. After about 30 minutes, flip the dough and press it down to degas it, then cover and return it to its warm spot. (photos 4 & 5) The dough should double in volume over the full bulk proof, which takes about 1 hour 15 minutes to 1 hour 30 minutes total.
Proof times will vary depending on your kitchen temperature. A cooler kitchen can push the bulk proof well past 1 hour 30 minutes. Trust the visual cue: the dough should look noticeably puffed and feel airy and light when you press it, not dense and springy.
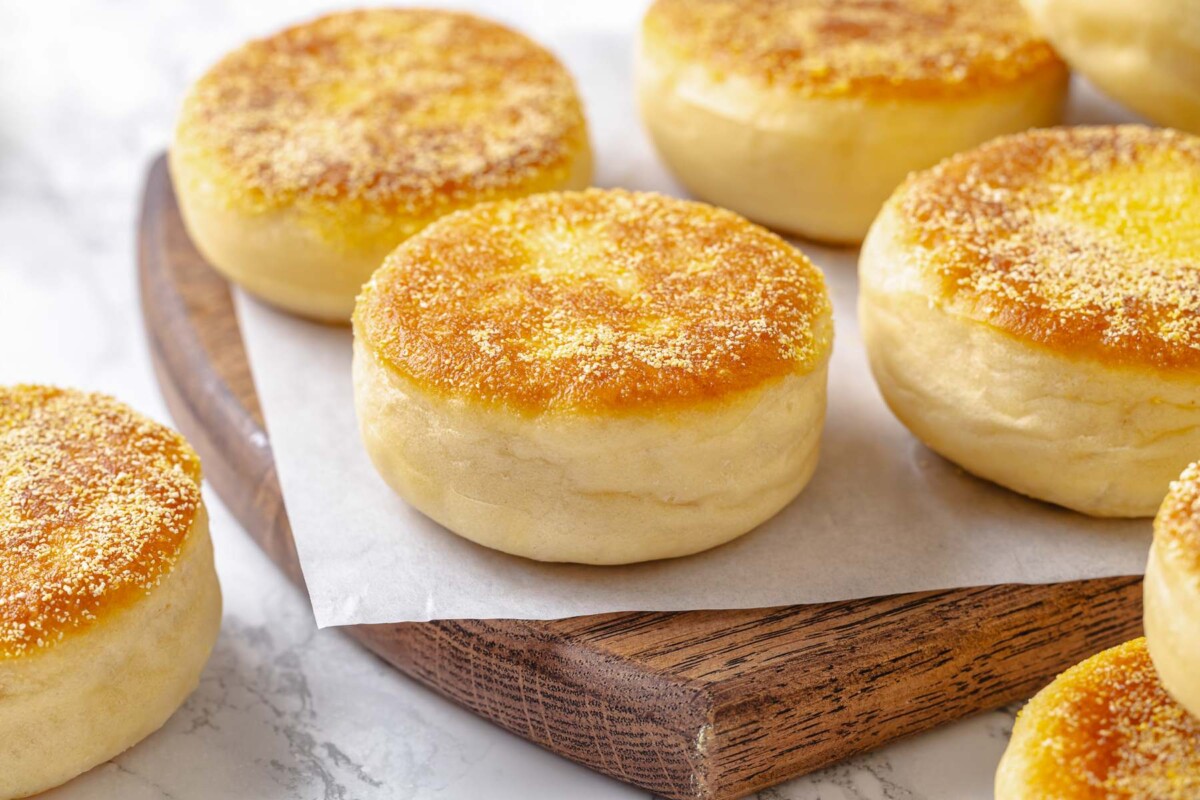
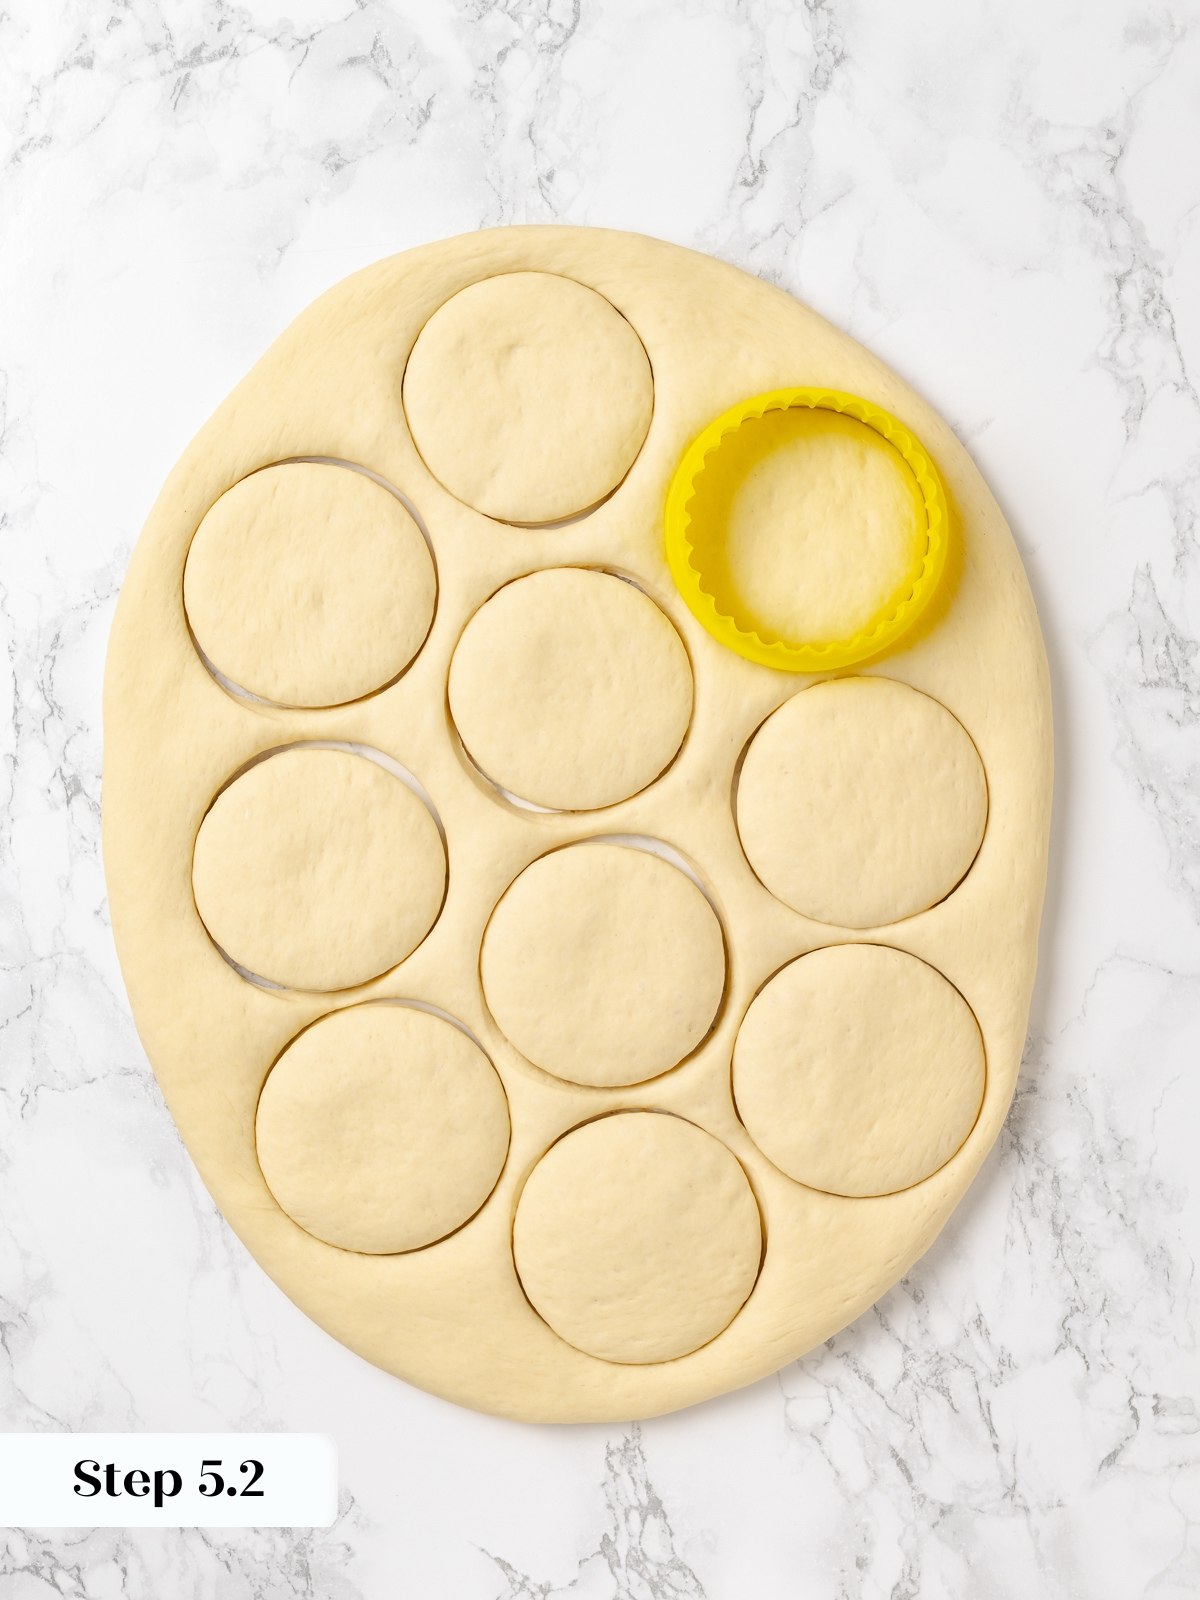
Step 5: Shape the muffins. Generously sprinkle cornmeal over a parchment-lined half-sheet pan and set it aside. Turn the doubled dough out onto a clean, unfloured countertop. Press it down with your fingers and spread it out until it is approximately ¼ inch thick. The dough will grip the surface slightly, which is what you want. That light sticking is what keeps it from springing back as you work. Cut out rounds using a 3-inch biscuit cutter, ring mold, or cookie cutter, pressing straight down without twisting. Lift each round and place it cornmeal-side down onto the prepared pan. (photos 6 & 7)
Pressing out and cutting on an unfloured surface helps the dough stay flat and reach the right thickness without shrinking back instantly. This makes the bottoms tacky, which is why the cornmeal adheres so well. Those bits of cornmeal cook directly in the pan and contribute to the classic English muffin flavor.
Step 6: Proof the scraps and cut again. Gather all the dough scraps remaining after the first cut and knead them back together into a smooth ball. Place the ball in a lightly oiled bowl, cover, and let it proof for about 30 minutes until it is visibly puffed and relaxed. Then press it out to ¼ inch and cut again exactly as you did in Step 5. After resting, the scraps bake just like the first batch.
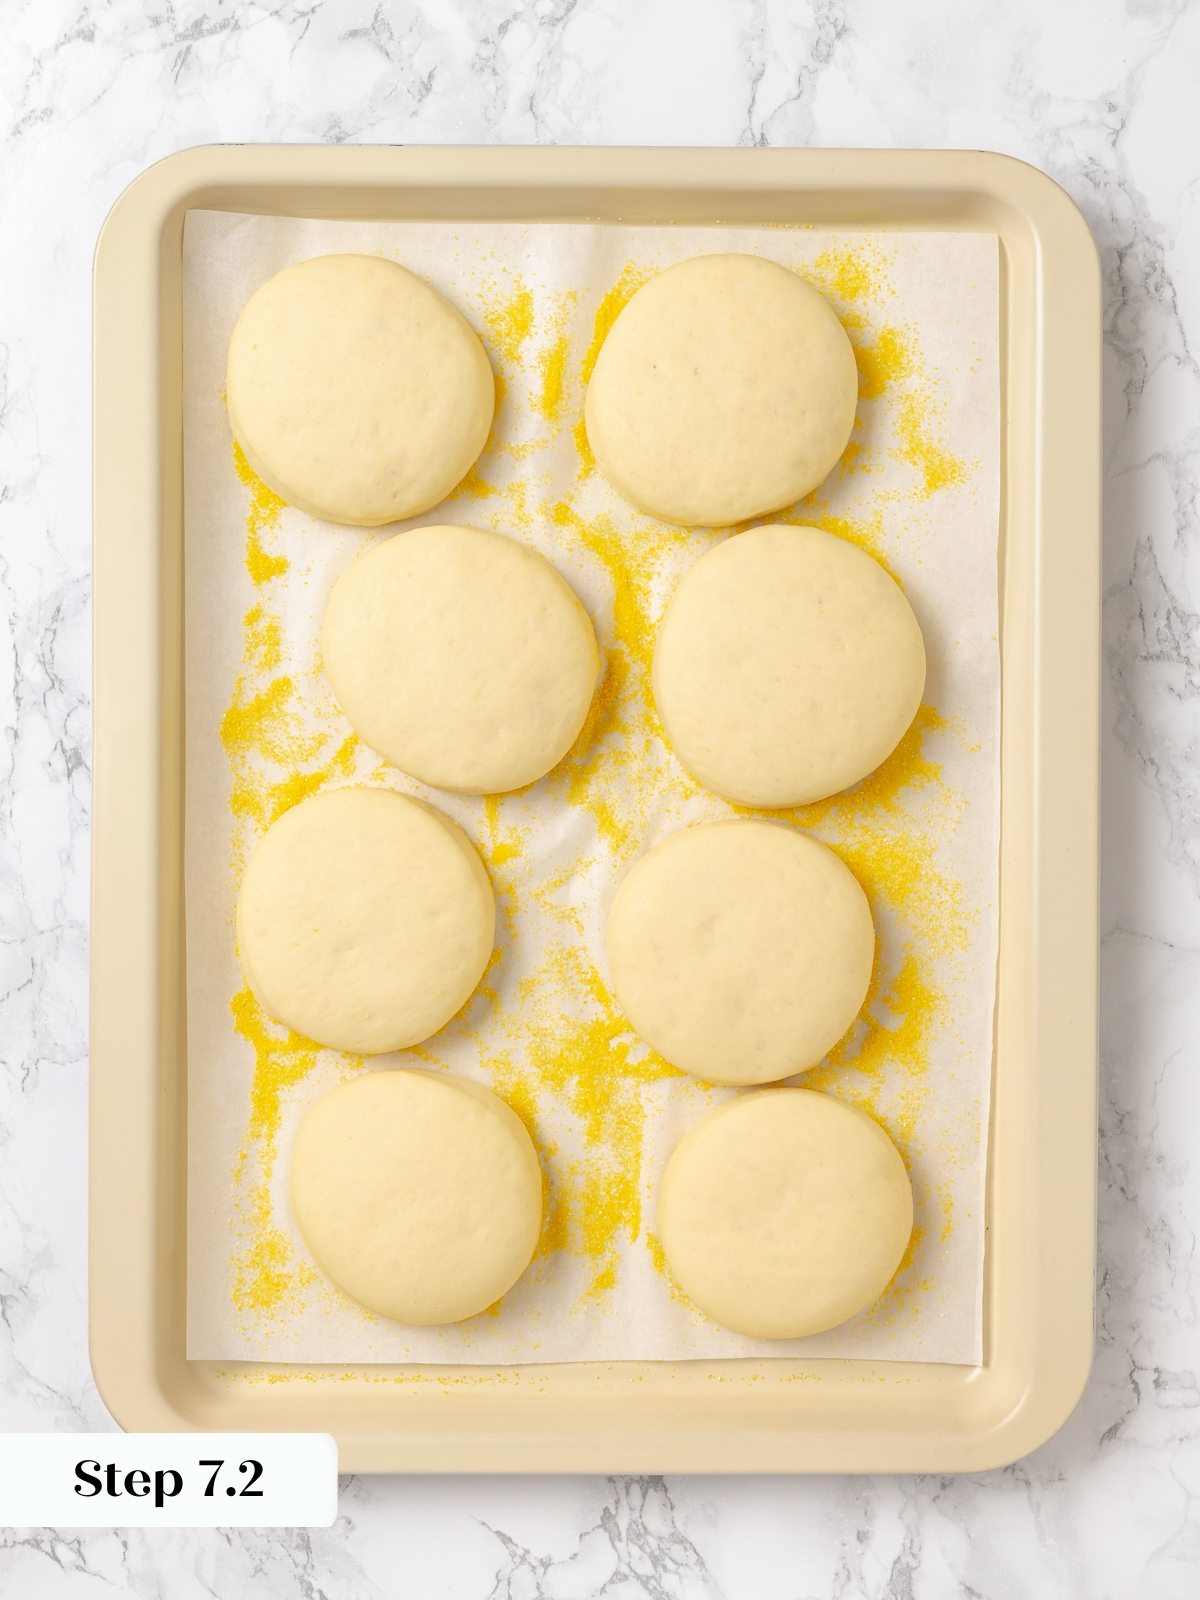
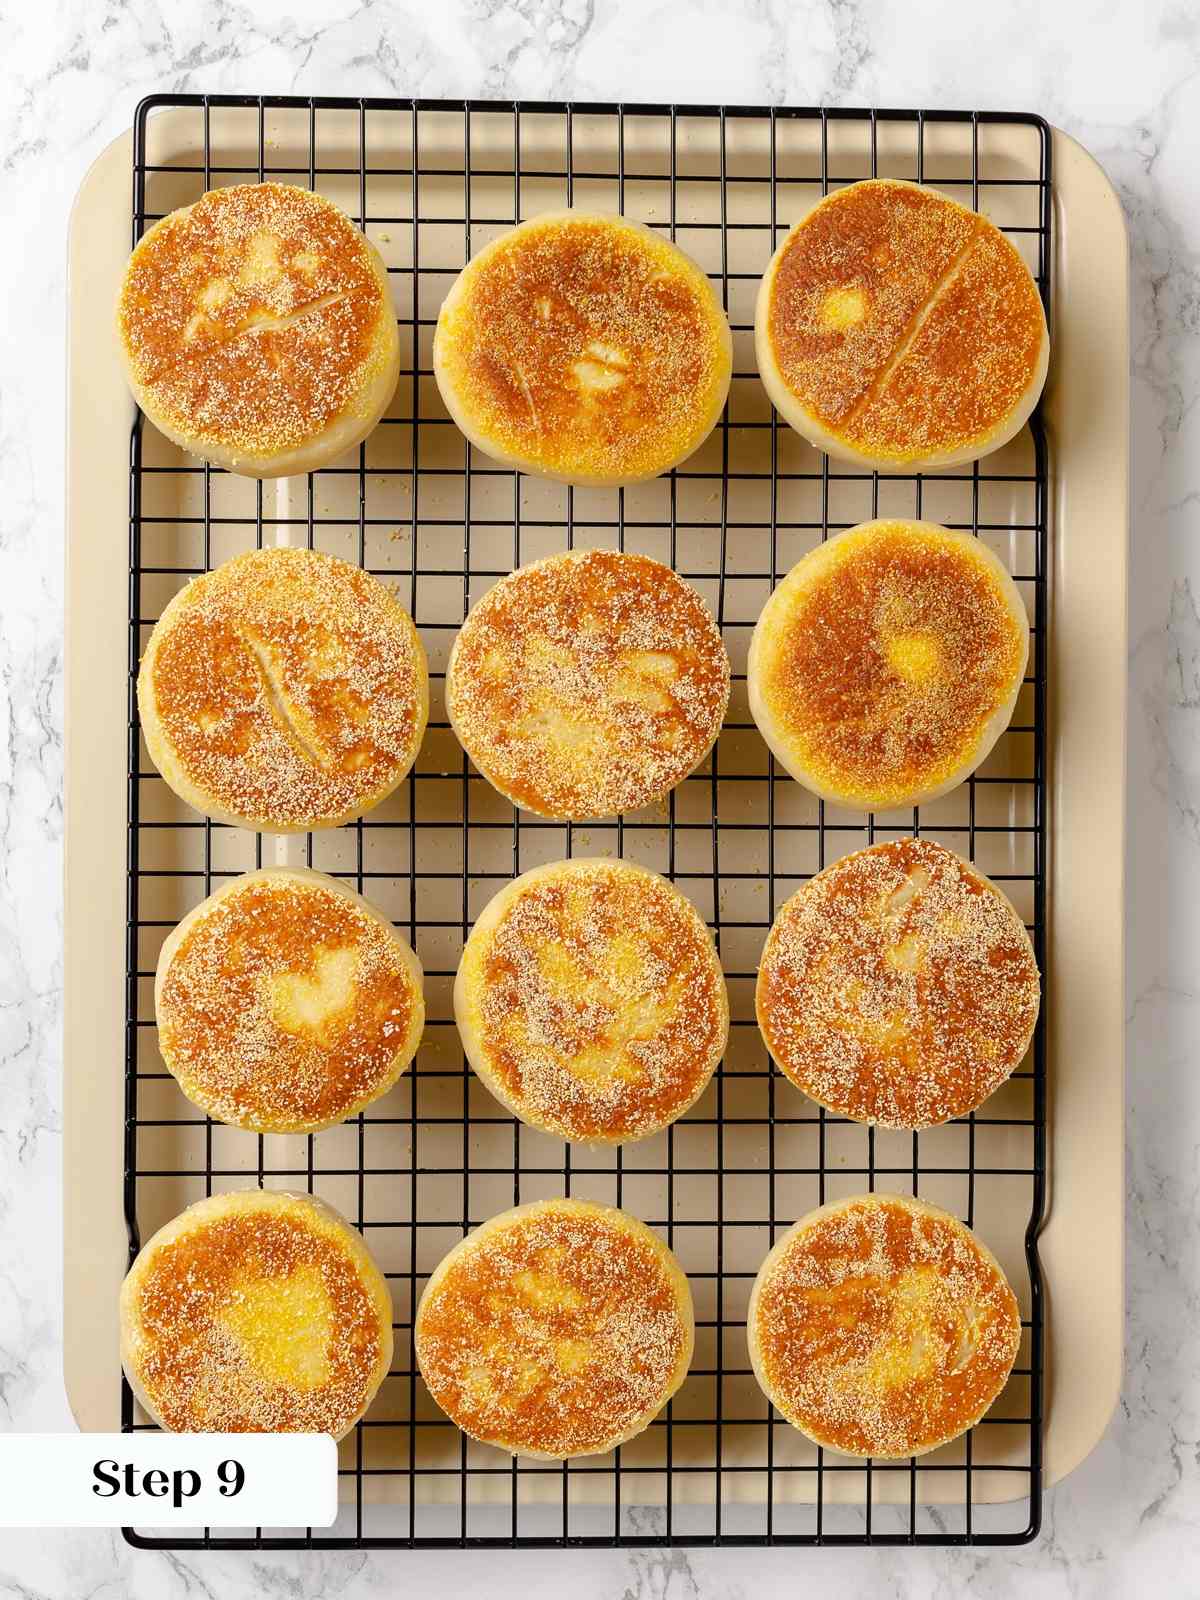
Step 7: Final proof. Cover the pan of cut muffins tightly with plastic wrap and place in a warm spot to final proof for 45 minutes to 1 hour. You are looking for rounds that are visibly puffed and roughly double their original height. (photo 8 & 9) Do not rush this proof. Muffins that go straight into the pan without this rest will be noticeably tighter and less airy inside.
If your kitchen is cool, this proof can take closer to 75 to 90 minutes. Nudge the pan gently; the muffins should jiggle slightly and look pillowy rather than dense and firm.
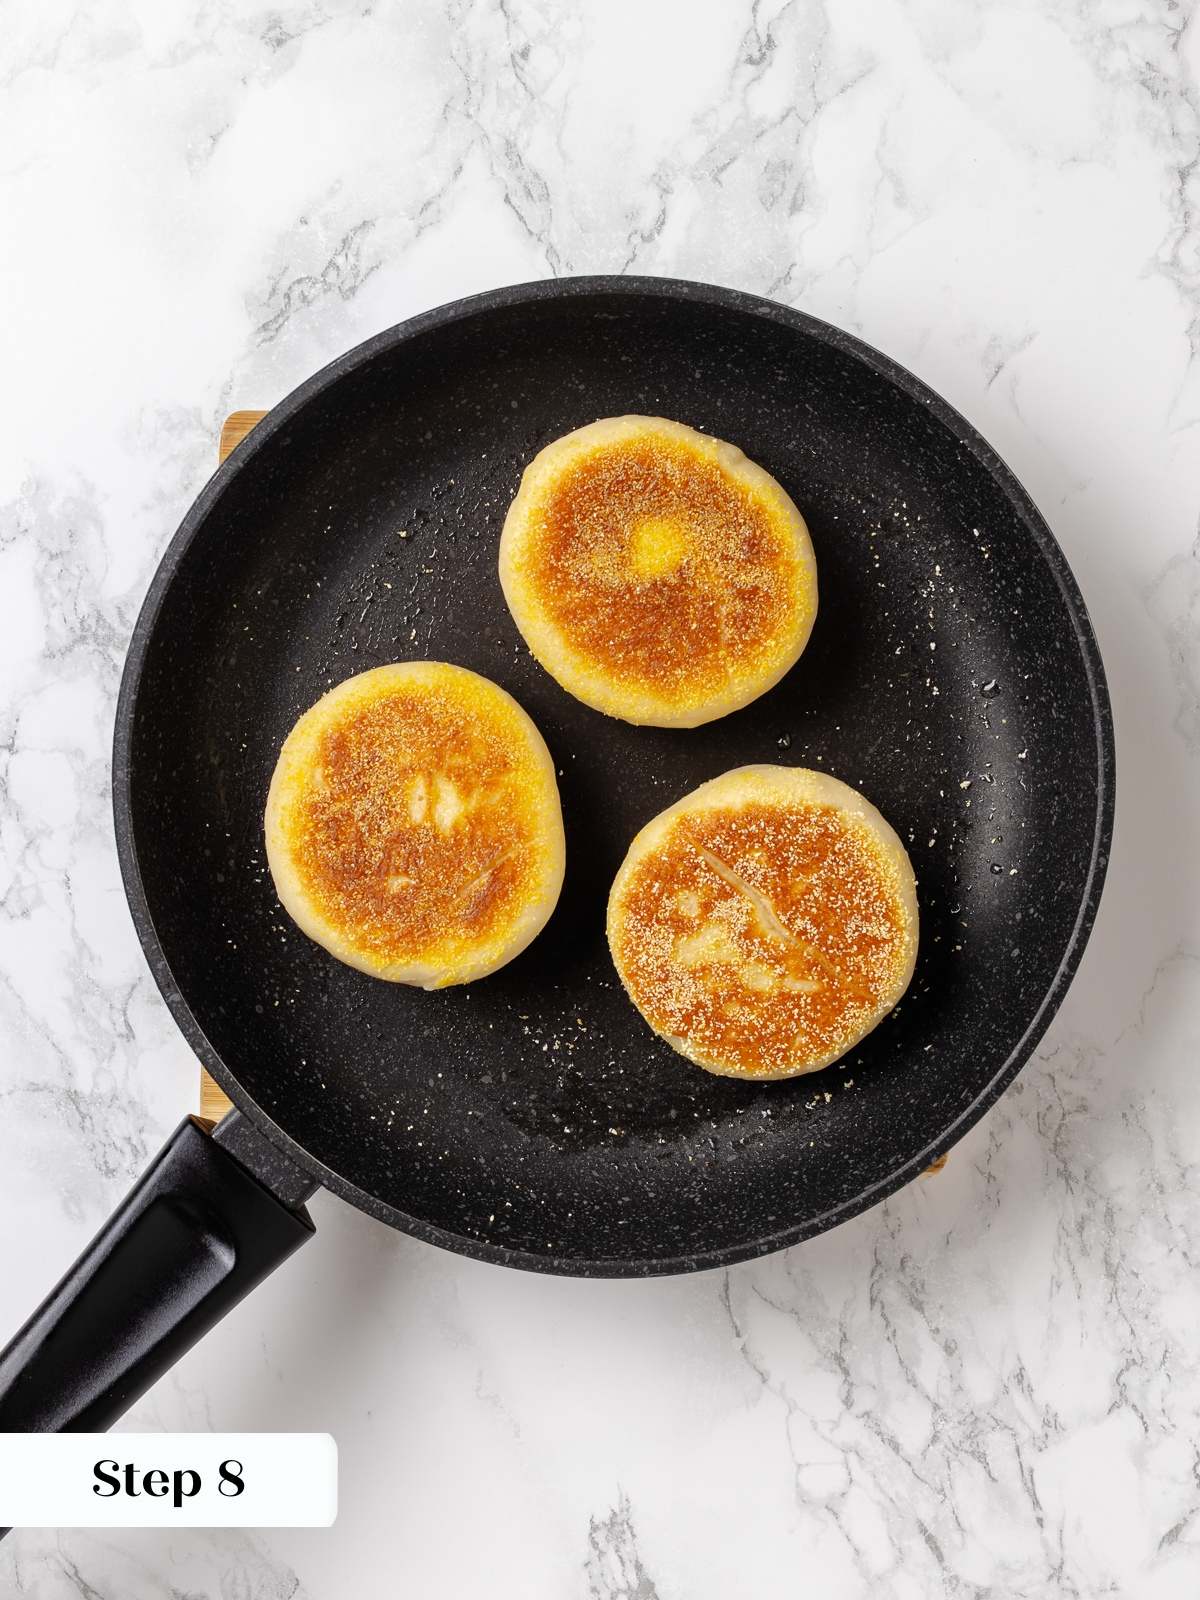
Step 8: Pan-fry the muffins. Preheat the oven to 350°F conventional (no fan) and set a wire rack inside a rimmed baking sheet. Heat a large sauté pan over medium heat with about 1 teaspoon of vegetable oil and 1½ teaspoons of unsalted butter until the butter is melted and the fat is warm but not smoking. Add the muffins cornmeal-side down, working in batches that fit comfortably without crowding. Cook until each side is deep golden brown, about 1½ minutes per side, then transfer to the rack. (photo 10) Wipe the pan clean between each batch to prevent the residual butter from burning and darkening the next round of muffins unevenly.
This is one of those “trust the process” moments. Medium heat is the right temperature here. Too hot and they’ll brown before cooking through. The butter is for flavor and the oil is there to keep the butter from burning, like I do every time.
Step 9: Bake. Transfer the rack and pan to the preheated oven and bake for 10 minutes. The muffins will feel firm and set when pressed lightly on top. (photo 11) Remove from the oven and cool on the rack before splitting or serving.
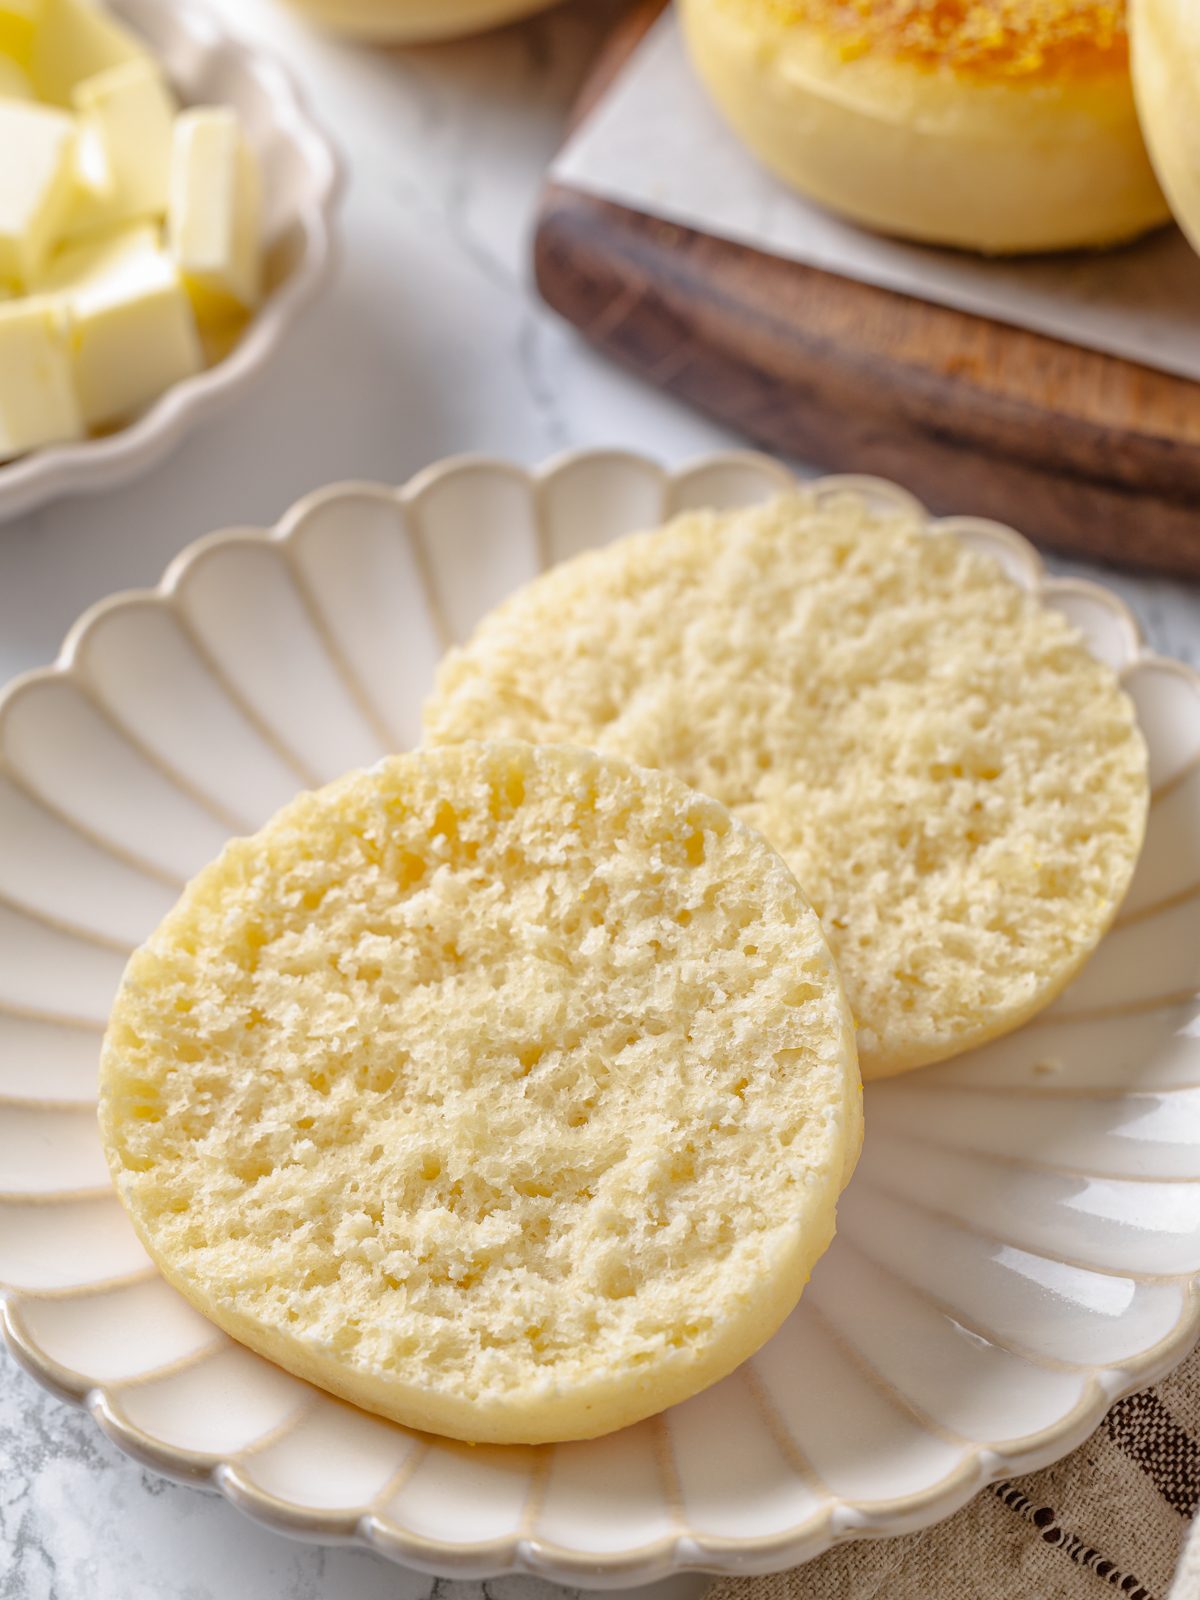
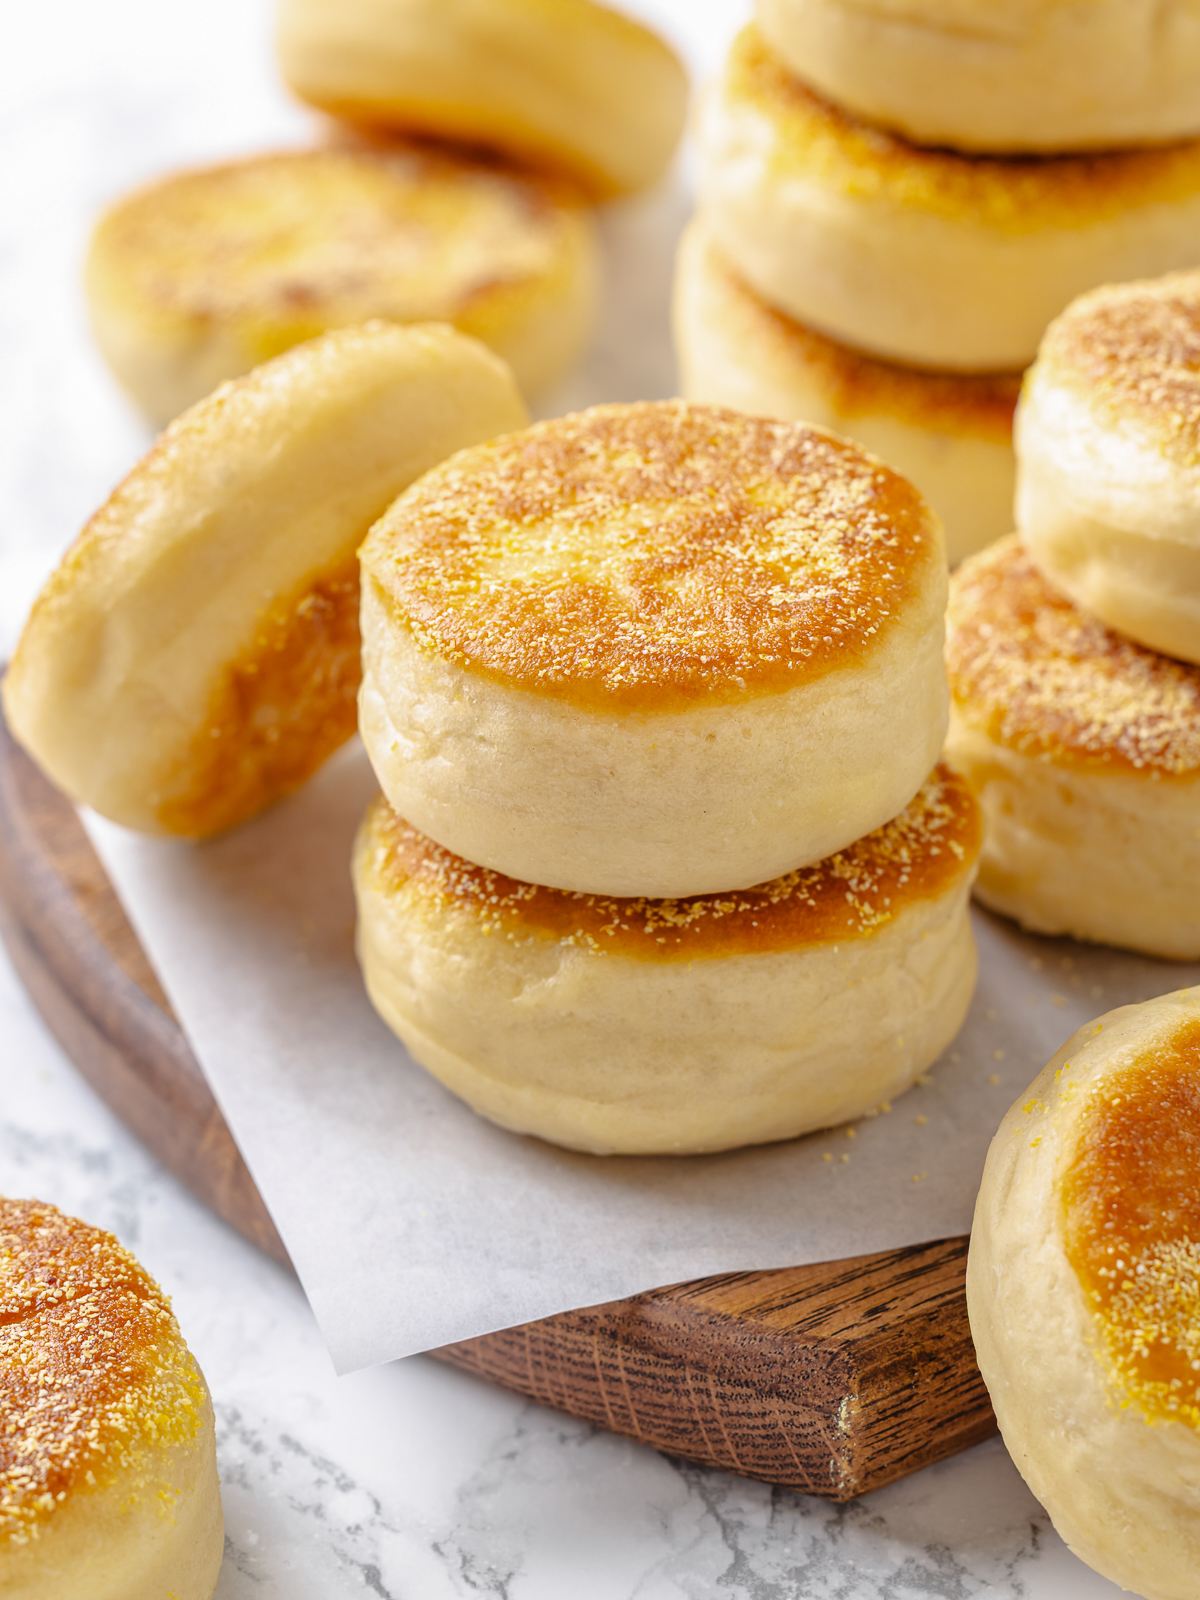
Step 10: Cool and serve. Let the muffins cool on the rack for at least 10 to 15 minutes before splitting. Use a fork to split them rather than a knife to preserve the nooks and crannies inside. (photo 12) Serve toasted with butter, or untoasted if you prefer to taste the full, soft interior without extra crunch.
Recipe FAQs
Store cooled English muffins at room temperature in an airtight bag or container for up to 3 days. For longer storage, freeze them in a zip-top bag for up to 3 months. To reheat, split and toast them directly from frozen, or warm them in the microwave for about 30 seconds like I do when I just need one right now.
Yes, and this is actually one of my favorite ways to plan these. After cutting the rounds and placing them on the cornmeal-dusted pan, wrap the sheet tightly and refrigerate overnight. The next morning, pull the tray and let it rest in a warm spot for at least 30 minutes before cooking and baking as directed.
Usually, it’s because of skipping or rushing the final proof after cutting the rounds. The cut muffins need 45 minutes to an hour to puff visibly and nearly double in height before they go into the pan. If they go in flat, they bake up dense and tight inside, this is the most common issue.
The flavor profile is the main difference. These use dry active yeast and whole milk, so the flavor is mild, buttery, and slightly savory without any tangy notes like in these sourdough English muffins! Check out my whole wheat sourdough bread as well, which shows you how that fermentation works, brings a more complex, slightly acidic flavor that deepens with time. The texture and nook structure are comparable, but the yeast version is ready in about 3 hours while sourdough takes considerably longer.
You can mix and knead the dough by hand, which is fine. It will take about 10 to 12 minutes of active kneading on a clean counter to develop the dough to the point where it passes the windowpane test (when the dough stretches thin without tearing). The dough is soft and a little tacky, so resist the urge to add extra flour, and just keep working it until it smooths out.
Recommended Breakfast Recipes

Breakfast & Brunch

Quick Breads
Breakfast & Brunch

Quick Breads
If you enjoyed this recipe, please leave a star rating and let me know how it goes in the comments below! I love hearing from you and your comments make my day!
English Muffins
Ingredients
- 2 ¼ teaspoons dry active yeast
- 1 ½ cups whole milk, warm
- 1 tablespoon unsalted butter, room temperature
- 4 ¼ cups all-purpose flour
- 2 ½ teaspoons kosher salt
- yellow cornmeal, for shaping
Instructions
- Whisk the yeast into the warm milk in the bowl of a stand mixer fitted with the dough hook. Let bloom for about 10 minutes, until bubbles float to the surface.
- Add the flour and butter. Mix on low speed until a rough dough forms.
- Add the salt. Mix on medium-high until the dough is smooth and passes the windowpane test (a small piece stretches thin without tearing).
- Transfer dough to a lightly oiled bowl, cover with plastic wrap, and bulk proof in a warm spot for about 1 ½ hours. After 30 minutes, flip and degas the dough, then cover and continue proofing until doubled.
- Generously sprinkle cornmeal onto a parchment-lined sheet pan and set aside.
- Turn the doubled dough onto a clean, unfloured countertop. Press and spread it out with your fingers to approximately ¼ inch thick. Cut rounds using a 3-inch biscuit cutter or cookie cutter and place them cornmeal-side down on the prepared pan.
- Knead the remaining dough scraps together, return to the oiled bowl, cover, and proof for 30 minutes. Then repeat step
- Cover the sheet pan with plastic wrap and final proof the cut muffins for 45 minutes to 1 hour, until visibly puffed and doubled in height.
- Preheat the oven to 350°F conventional. Place a wire rack inside a rimmed baking sheet and set aside.
- Heat a large sauté pan over medium heat with about 1 teaspoon vegetable oil and 1 ½ teaspoons butter until warm but not smoking. Add muffins cornmeal-side down and cook about 1 ½ minutes per side, until golden brown. Transfer to the rack.
- Wipe out the pan between batches to maintain even color.
- Bake on the rack-lined pan for 10 minutes. Cool on a rack before splitting and serving.
Notes
- Final proof: Do not skip the 45-minute to 1-hour final proof after cutting. Muffins cooked straight from the cutter are noticeably denser. You want them visibly puffed and doubled in height before they go into the pan.
- Technique: Cut and press the dough on an unfloured surface. The slight sticking keeps the dough from springing back and ensures the cornmeal adheres cleanly to the bottoms, which is what creates the classic flavor and texture in the pan.
- Make-ahead: After cutting, wrap the sheet pan tightly and refrigerate overnight. The next morning, proof at room temperature for at least 30 minutes while the oven preheats, then cook and bake as directed.
- Storage: Store at room temperature for up to 3 days. Freeze, well wrapped, for up to 3 months. Toast directly from frozen.
Nutrition
Nutrition information is automatically calculated, so should only be used as an approximation.
 Like this recipe? Rate & comment below!
Before You Go
If these English muffins have you hooked on homemade breakfast breads, there is plenty more waiting for you. Browse our yeast bread recipes or breakfast recipes for more to try next!


I was nervous about the pan frying step but it turned out to be the easiest part. The dough held its shape perfectly and the bottoms got that beautiful golden crust I was hoping for. These are absolutely worth the three hours.
I never knew homemade English muffins could be this easy! The griddle method is genius and way less intimidating than I expected, plus they freeze beautifully, so I can have fresh-toasted muffins whenever the craving hits. These blow store-bought completely out of the water!
Just finished making these this morning. Followed the recipe but, cut the sugar in half. (Next time I’ll use honey instead of sugar, as I prefer my doughs that way.) I had to pan fry as I don’t have a griddle yet. Turned out light and fluffy with plenty of nooks & cranny’s inside, and a nice crispy outside. I did use the oven to bring center temp to 200F.
Hi there! That sounds wonderful! light, fluffy, and full of those nooks and crannies! It sounds like your pan-fry and oven method nailed it. Honey instead of sugar should be delicious next time, too! Happy baking! ~gvd team
I have only made this recipe once so far, but I think I will be repeating it. It was an easy to follow recipe with useful tips like putting a tray on top to stop them rounding up . They were so light and fluffy. A big hit with my husband.
Can’t wait to make these but I don’t need 16 all at one time. What’s your opinion about freezing the dough once it’s been formed to the individual EM shape?
Cas, I would not recommend freezing the dough before cooking/baking. Rather, I would make all of them and freeze them once cooked/baked (see the post for directions on how to do this). I hope that helps!
Thank you
My english muffins were excellent
These taste OK for the fact that they are English pancakes. I think it should be more specified that if you make a single batch of this recipe, you should only make eight muffins because if you make 16 they are too small! Three hours of my day won’t get back ever again and I’m not going to make another batch.