An easy-to-follow sourdough bread recipe perfect for beginners or advanced bakers! Make this high-hydration sourdough recipe entirely by hand and bake a loaf with a caramelized dark brown exterior, crunchy crust, and a slightly open and soft crumb.

A Quick Look At The Recipe
This is a brief summary of the recipe. Jump to the recipe to get the full details.
Prep Time
30 minutes
Cook Time
1 hour
Proof Time
1 day 11 hours
Total Time
1 day 12 hours 30 minutes
Servings
24 Slices
Difficulty
Moderate with easy to follow instructions
Calories *
188 kcal per serving
Technique
Mix dough, proof and fold, pre-shape, final shape, overnight proof, and bake!
Flavor Profile
Basic sourdough bread with that signature tang.
* Based on nutrition panel
Since I am not a baker and your recipe intrigued me, and your step by steps stimulated me to try my hand to make sourdough bread.
Giangi Townsend
I did follow your schedule, as a novice I did not want to take a risk. Love it!!! Came out perfect and so happy I did. My family was very impressed. Rich in flavor and so light. Thank you and cannot wait to make it again.⭐⭐⭐⭐⭐
Follow this easy and (almost) foolproof sourdough bread recipe, and in no time, you’ll have fresh homemade sourdough bread in your own kitchen. Once you have the sourdough bug, try my sourdough focaccia recipe, this sourdough bread bowl, these sourdough dinner rolls, or listen to your sweet tooth with my cinnamon raisin sourdough recipe!
This is Stephanie’s recipe, which was adapted from The Perfect Loaf’s high-hydration sourdough bread. Chef Lindsey updated this post in 2025 with her professional knowledge, education and experience. This crusty, flavorful bread makes excellent sandwiches like this spicy Thai veggie sandwich.
Why This is the Best Sourdough Bread Recipe for Beginners
- No special equipment, ingredients or fancy tools. This is a straight-forward recipe that relies on a series of folds to develop gluten rather than a machine. I go more in depth about sourdough baking tools for both beginners and advanced bakers in this post on essential sourdough tools.
- No taking the dough’s temperature obsessively like it’s your toddler. Yes, professionally, the most accurate and consistent way to make bread is by controlling the water temperature and, thus, the final dough temperature. However, I am here to tell you that you can make sourdough bread at home at any temperature with time, patience and observation.
- Revised and updated by a professional pastry chef. Chef Lindsey simplified the recipe and streamlined a lot of the process based on my professional experience and training in professional bread making at the International Culinary Center (now part of ICE).
Table of contents
What is Sourdough Bread?
At its most basic, a sourdough bread is any bread leavened with wild yeasts rather than commercial yeast. Cultivating natural or wild yeast takes time, which is where the sourdough starter come into play. A sourdough starter is a fermented mixture containing flour, water, wild yeast, bacteria, and organic acids. Over time, wild yeast from the environment and the flour itself are fed, reproduce and multiply to create a bubbling, active culture that will actually raise a loaf of bread!
Pro Tips for Making Sourdough Bread
- An autolyse is never required but recommended. Autolysing is a process by which the flour and water are mixed and allowed to sit to start gluten development without oxidation. All that means is you will have a more flavorful dough faster. A win-win.
- A high-hydration sourdough produces a more elastic dough and a more open crumb. This recipe in particular has an 80% hydration, defined by the total amount of water divided by the total amount of flour. If you want a more in depth explanation, Sour Flour has a great post on hydration. Autolyse are particularly useful in high-hydration doughs because they can be more difficult to work with.
- You can use any active sourdough starter to make this recipe (including store bought). This recipe assumes that you have an active sourdough starter and a basic knowledge of feeding, storing and creating a levain. If you don’t, don’t stress. Start with my sourdough starter recipe then read my in depth tutorial on how to feed sourdough starter. You can also work your way up by starting with my no-knead sourdough bread recipe!
- Take notes as you go through the sourdough baking processes. This way, you know the exact measurements, the final dough temperature, the timing of each step, and the end result in terms of taste, crumb, texture, etc. The best way to learn how to make sourdough is to try, to fail, and then try, try again.
Ingredients & Substitutions
- Mature Sourdough Starter: Before you make your first loaves, you will need a mature, active sourdough starter. If you have no idea what I’m talking about, start with my sourdough starter recipe and then read the in’s and out’s on how to feed sourdough starter, which also covers storage, discard and troubleshooting.
- Whole Wheat Flour: This recipe uses a combination of bread flour and whole wheat flour, which gives you a lovely nutty flavor but will keep the crumb tighter than using all bread flour or all-purpose flour. You can see what 100% whole wheat flour does to the crumb in my whole wheat sourdough bread post.
- Bread Flour: Bread flour typically has a protein content between 12-13% and will make a more elastic, chewier sourdough than one made with all-purpose flour. You can substitute all-purpose for bread flour in this recipe.
- Fine Sea Salt: Use fine sea salt or kosher salt to enhance the flavor and make the bread more tender.
- Water: Some swear by using distilled water in bread making, but I use tap water in my home, in the restaurants where I was a pastry chef and in culinary school. Granted all have NYC tap water, which some argue is special. You do what makes you comfortable.
- White Rice Flour: I always use white rice flour for dusting the proofing baskets or linen-lined bowls. It doesn’t absorb the moisture and become gummy like glutenous flour and it will help the dough release easily from the basket.
See the recipe card for full information on ingredients and quantities.
Sourdough Bread for Beginners: Step-by-step Instructions
Here are six basic steps for creating a flavorful sourdough bread. Sourdough requires time, patience and keen observation, but anyone and everyone can follow this simple step-by-step guide to their first (or 5,000th) loaf of sourdough bread!
Prepare the Levain:
Levain is actually the French term for a sourdough starter, but in this case, levain is also the mixture we use to feed a portion of our already-mature starter so it has the strength to raise the bread and add flavor. In other words, it’s what makes sourdough, well, sourdough.
Step 1: Place a clean starter jar on a kitchen scale. Tare the scale so it reads “0”, then to the jar add 50g of your mature starter, 200g whole wheat flour and 200g distilled water at room temperature. Stir the mixture vigorously until no dry bits of flour remain, then cover the starter jar loosely with a lid. Leave the levain in warm place (such as the oven with the light turned on) for approximately 12 hours, until it has more than doubled in size or reached its “peak”.


You’ll know the levain has reached its peak when it has grown considerably in size, there are bubbles all throughout, the top of the levain is not domed but instead very flat or even beginning to cave in on itself and there is a pleasant sour smell to it, not off-putting or too vinegar-y.
Autolyse & Mixing the Dough:
An autolyse is a term for mixing all the flour and water for the dough together first and allowing that mixture to rest. This rest time can be long or short, but it allows the water to hydrate the flour, which begins gluten development. This will add more flavor and decrease the total amount of folds needed for a strong, elastic structure.
Step 2: Place a large bowl on a kitchen scale. Tare the weight so it reads “0”, then, to the bowl, add 250 grams of the levain and 800 grams distilled water at room temperature.
Step 3: Stir the mixture with a wooden spoon or one hand (using your fingers like a whisk) until the levain is completely dissolved in the water, then add 800g bread flour and 200g whole wheat flour.
You will notice that we have added the levain to our autolyse. That isn’t wrong, it just limits the amount of time that we can allow the autolyse to sit. We did not add the salt because salt will compete with the flour for hydration, and we want all the water to be available for creating the fledgling gluten network.
Step 4: Mix the dough with a spatula or, more effectively, with your hands until completely mixed together and no dry bits of flour remain.
Step 5: Once the dough is mixed, cover the mixing bowl loosely with plastic wrap and place the bowl in a warm spot in your kitchen (such as the oven with the light turned on) for 15-50 minutes.
Professional Tip: I add the salt on top of the dough, without mixing it in, so that I do not have to measure anything later, nor do I forget it. This is especially useful when multitasking, which, let’s be honest, we always are in the kitchen, professional or not.


Step 6: Add the salt if you didn’t already put it on top, then mix together with your hands or a stiff spoon until everything is completely incorporated. Scrape down the sides of the bowl with a bowl scraper or silicone spatula. Cover the bowl with plastic wrap and return it to its warm place. You are ready for the next step.
Bulk Fermentation & Gluten Development:
Bulk fermentation is the proper jargon for “the time when all the dough ferments together before dividing.” This is the time when the dough gains strength and height, and we’ll help it along to do so. Here’s how.
Step 7: Approximately 30 minutes after mixing the salt into the dough, uncover the bowl and perform a set of four turns. This means you take both hands, lift up the end of the dough farthest from you as high as you can lift it without tearing, then fold it over on itself towards you. Turn the bowl 180 degrees, then repeat. Turn the bowl 90 degrees, then repeat. Turn the bowl another 180 degrees, then repeat. This is ONE SET of turns.
Once the set is complete, cover the bowl again with plastic wrap and return it to its warm place.

Step 8: We will repeat these sets of turns six times at 30 minute intervals (see the sample baking schedule in the next section for an example on timing), then let the dough rest covered without any turns for another 1 hour 30 minutes. This means bulk fermentation in total takes approximately 4 hours 30 minutes.
At the end of bulk fermentation, your dough should be strong, and have grown in size anywhere from 20 to 50 percent and have a few gas bubbles sprinkled throughout. This is good news!
Shaping the Dough:
Step 9: (Divide) Using a spatula or bowl scraper to help coax it out, gently remove the dough from its bowl onto a well-floured surface. Use a bench scraper or sharp knife coated in flour to divide the dough in two equal size pieces.
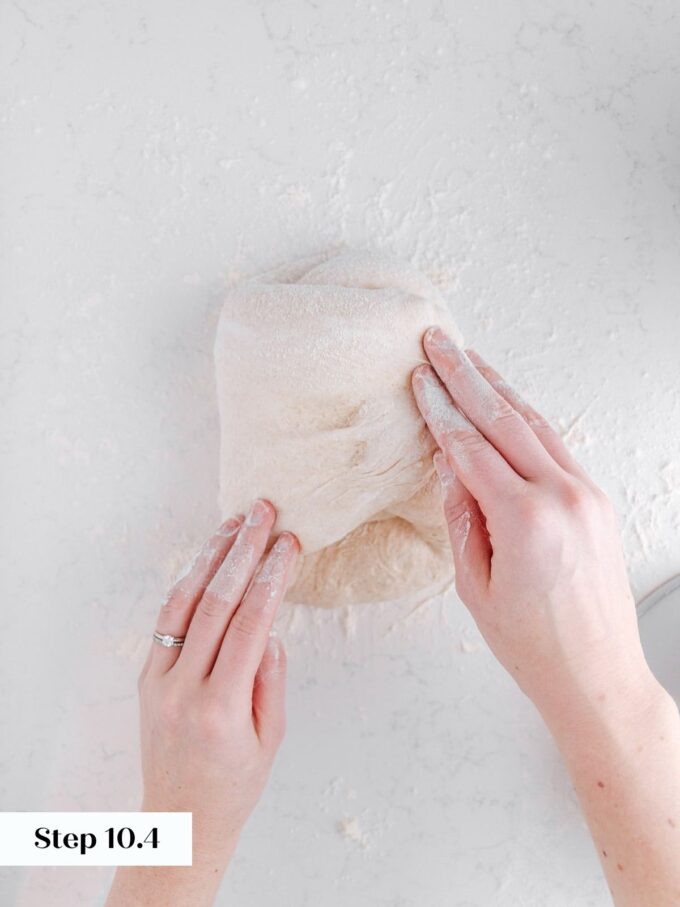
Step 10: (Preshape) Working with one piece of dough at a time and using both hands, lift up the top half and fold it over about 3/4 of the way over itself. Grab the right side of the dough; stretch it out to the right and then fold it over the dough. Grab the left side of the dough; stretch it out to the left and then fold it over the dough. Finally, take the bottom half of the dough, lift it up and fold it completely over the dough to form a “letter.” Repeat with the second piece of dough.


Step 11: (Bench Rest) Cover each piece of dough with a bowl, towel or plastic wrap and let them rest on the counter untouched for 30 minutes.
Pre-shaping loaves helps create a uniform loaf and gently coaxes the dough into the shape that we want rather than trying to force it all at once.
Step 12: While the dough is bench resting, prepare your dough baskets or bowls for the overnight final proof. Sprinkle white rice flour over the banneton basket or linen for lining the bowl(s) until they have a light coating. Set them off to the side.
Step 13: (Final Shape) Cover your hands with flour and, as gently but as quickly as possible, rotate one piece of dough with your hands while leaving it on or close to the surface, shaping into a tight round. I usually cup my hands and gently pull the dough under itself towards my body then rotate and repeat to create a round shape with a tight surface. Use the surface tension or the stickiness of the dough on the bottom, to tighten the loaf into a boule, flouring only your hands as necessary. Repeat this process with the second piece of dough.
Step 14: Gently transfer each piece of dough, seam-side up, to a prepared basket/bowl. Sometimes, if I feel the dough is really slack, I’ll gently pinch the edges of the dough into the center once it is in its basket to help it maintain its shape. Cover each bowl with a plastic bag or plastic wrap, then seal with a clip, rubber band, etc. to avoid as much refrigerator air flow as possible.


Overnight Proof:
Step 15: Let the dough sit, covered, at room temperature for about 20 minutes, then transfer to the fridge for an overnight proof, approximately 15-16 hours.
Professional Tip: You can let the dough proof up to 36 hours in the refrigerator or up to 3 days in the freezer. If they proof this long, there is absolutely no benefit to allowing them a final proof at room temperature because they have achieved their best aeration and will be much easier to score when cold.
Baking Sourdough Bread:
Step 16: The next morning, or 15 hours later, place an oven rack in a place that allows enough space for the Dutch oven, combo cooker or bread pan. Preheat the oven to 500° F for one hour with the top and bottom of your bread baking vessel of choice inside.
Step 17: When the oven is fully preheated, remove one piece of dough from the fridge. Place a piece of parchment paper on top of the basket. Top the parchment with a cutting board. Gently but quickly invert the basket with the cutting board so the dough lands on the parchment paper on the cutting board. Remove the basket. You can use your fingers to gently release it if needed.
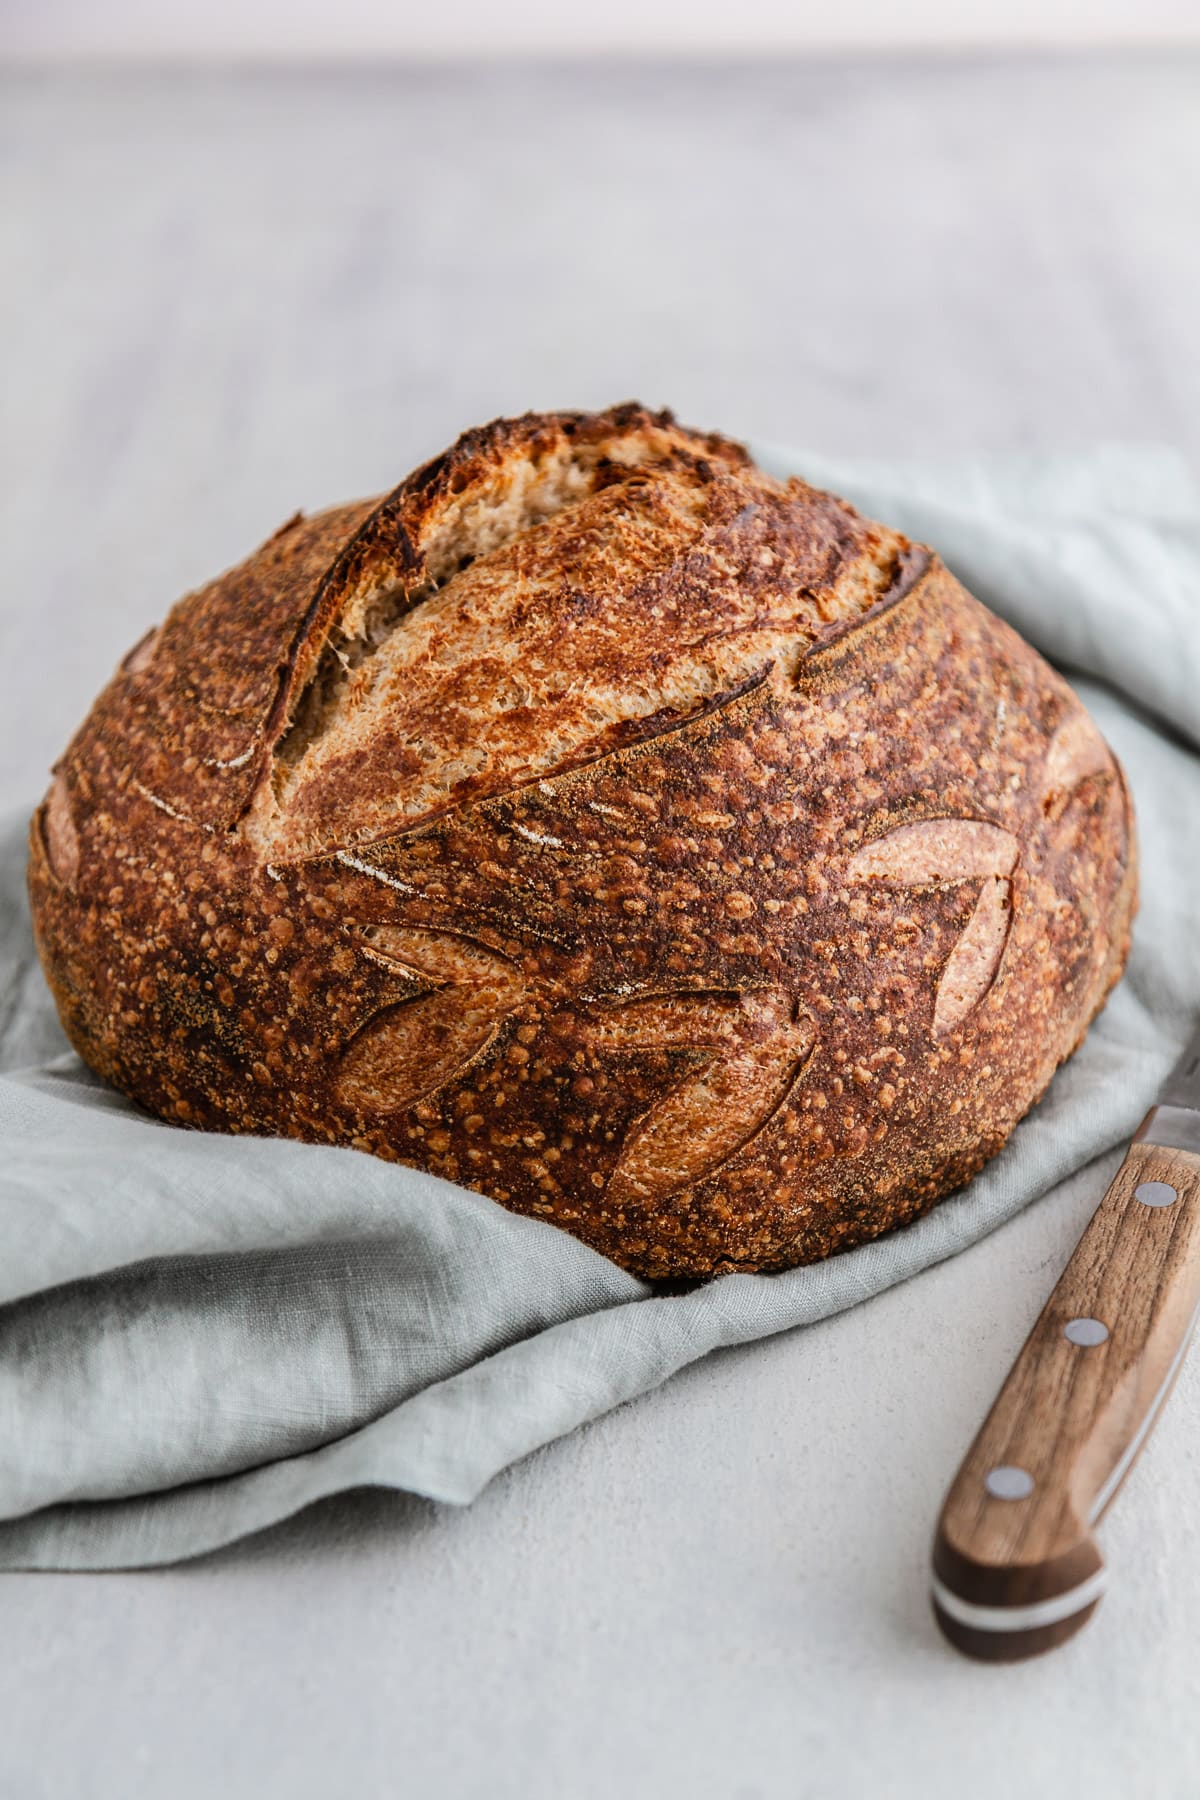
Step 18: Use a bread lame, razor blade, or really sharp knife to score the top of the loaf. You want to score into the loaf about a half-inch deep, on an angle (or straight). Score the dough in several places to allow steam to escape from the dough and for the oven spring to occur. Feel free to get creative here, or keep it simple! A box cut is always a good beginner choice.
Here’s a tip I learned from Laura of A Beautiful Plate: to avoid the parchment paper from crinkling inside the combo cooker/Dutch oven, thereby sometimes giving the bread a weird shape, cut the paper around the dough leaving two “handles” that can poke out of the sides of the cooker in the oven. This helps to transfer the dough to and from the cooker.
Step 19: Using oven mitts, carefully remove the baking vessel from the oven, remove the top and then place the dough into the shallow side of the combo cooker or bread pan (or the pot of the Dutch oven), using the parchment paper to hold it. Cover with the deep side of the combo cooker/bread pan/lid of the Dutch oven, and place in the oven. Reduce the oven temperature to 450° F.
Step 20: Bake, covered, at 450° F for 30 minutes.
Step 21: Uncover the dough (place the top of the cooker/bread pan/Dutch oven next to the dough in the oven to keep it hot for baking the second loaf) and continue to bake another 25-30 minutes until the bread is a deep, dark golden brown and baked through.


An instant thermometer inserted in the center of the loaf should read around 210°F when it’s fully baked.
Step 22: Use the parchment paper to transfer the bread to a cooling rack to cool completely. Repeat the scoring/baking process with the second piece of dough.
I know this is tough to do, but let the bread cool completely before slicing into it! If it’s even the least bit warm, a knife cutting into the bread can make it squish together and “gum up,” which is just sad for everyone. Be patient and you’ll be rewarded!
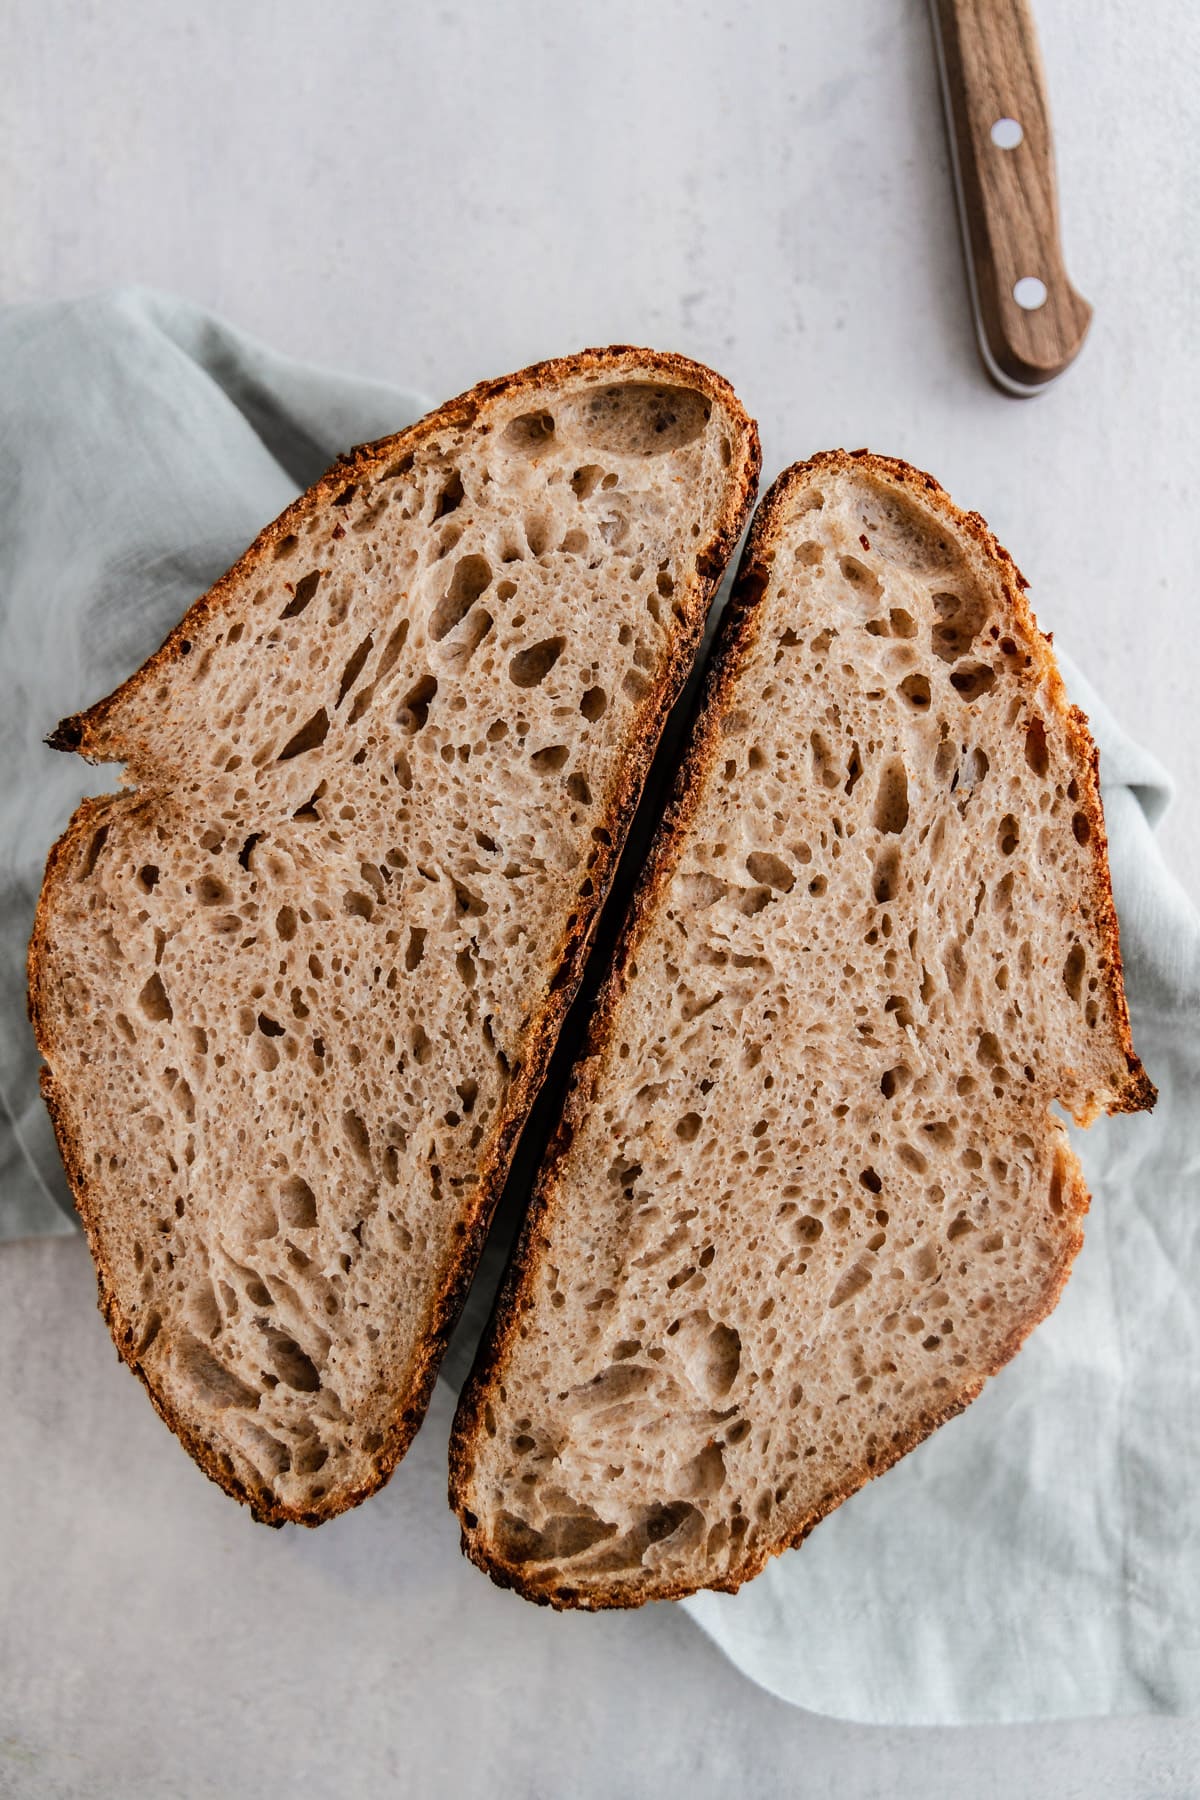
Step 23: Eat! The finished bread, when baked correctly, should have a decent height, a caramelized dark brown exterior, a slightly open crumb, a fluffy but stable interior and a delicate, crisp crust. It should taste like unicorn sprinkles rained down from heaven – or just really, really good.
A Sample Baking Schedule
There is no wrong time to make sourdough, so use a little math to adjust the schedule to fit your needs! Also note that since we aren’t controlling the temperature, that is another variable that might make your dough rise faster or slower than mine. Not wrong, just different.
Day 1:
9:15 PM: Prepare the levain and store in a warm spot 10-12 hours.
Day 2:
- 8:30 AM: Autolyse the dough without the salt.
- 9:20 AM: Finish mixing the dough and place in a warm spot for 30 minutes
- 10:00 AM: Perform the 1st set of turns. Cover and return to its warm spot.
- 10:30 AM: Perform the 2nd set of turns. Cover and return to its warm spot.
- 11:00 AM: Perform the 3rd set of turns. Cover and return to its warm spot.
- 11:30 AM: Perform the 4th set of turns. Cover and return to its warm spot.
- 12:00 PM: Perform the 5th set of turns. Cover and return to its warm spot.
- 12:30 PM: Perform the 6th, and final, set of turns. Cover and return to its warm spot to finish bulk fermentation.
- 2:00 PM: Divide and preshape the loaves. Cover on the bench and allow to sit for 30 minutes. Prepare baskets with white rice flour.
- 2:30 PM: Final shape the loaves, turn into prepared baskets. Cover and allow to proof 20 minutes at room temperature.
- 2:50 PM: Transfer the wrapped baskets to the refrigerator to proof an additional 15-16 hours.
Day 3:
- 7:30 AM: Preheat the oven to 500° F with the Dutch oven or baking vessel inside. You can do both loaves at a time if you have 2 different vessels and your oven allows!
- 8:30 AM: Transfer loaves to parchment, score the loaves, and then place carefully in the bottom of your chosen baking vessel. Replace the lid and place inside oven. Reduce oven temperature to 450° F and bake 30 minutes covered.
- 9:00 AM: Carefully remove the lid from the baking vessel and either remove it from the oven or leave it inside to stay warm for the next loaf. Continue baking the uncovered loaf for an additional 25-30 minutes.
- Cool completely!
Recipe FAQs
To maintain the crunchy crust, store at room temperature, cut side down on a cutting board. It will gradually lose moisture but it will store well at room temperature for up to a week. You can also store well wrapped in the freezer, however, I like to slice my bread before freezing.
If you haven’t sliced the loaf yet, but would like to rewarm it for serving, preheat an oven to 400° F. Place the loaf directly onto the oven rack and bake until heated through. It will take about 15-20 minutes. I know, forever!
You can perform the final proof in the freezer rather than in the refrigerator, but I recommend leaving it in the freezer for 2-3 days. The cold will slow down the fermentation but not stop it. Baking it from frozen will give you the best oven spring and will allow for a better scoring.
Yes, since you are weighing the ingredients and are mixing it by hand, you are only limited to the size of your bowl! You can easily divide the recipe in half to yield 1 loaf, or you can multiply it as many times as you’d like!
The secret to good sourdough bread is time and patience. Anyone can make sourdough but learning to wait until the dough is ready is the hardest part! The good news is that you can always try again tomorrow.
Feed a portion of the starter according to your favorite hydration ratio, for example, equal parts flour and water plus 10% of the weight of the flour in active starter. Then store that at room temperature if you bake frequently, or in the refrigerator or the freezer if you bake infrequently. After feeding, use the remaining starter to make sourdough pancakes, sourdough waffles or even sourdough blueberry muffins!
Recommended Sourdough Bread Recipes

No-Knead Breads

Sourdough

Yeast Breads

Yeast Breads
If you enjoyed this recipe, please leave a star rating and let me know how it goes in the comments below! I love hearing from you and your comments make my day!
Sourdough Bread Recipe
Ingredients
For the levain:
- 50 g mature starter
- 200 g whole wheat flour
- 200 g distilled water
For the dough mix:
- 250 g levain
- 800 g distilled water
- 800 g bread flour
- 200 g whole wheat flour
- 20 g fine sea salt
For the preshape:
- Bread flour or all-purpose flour, for shaping
For the shape:
- White rice flour, for dusting the baskets/linen-lined bowls
Instructions
- At 9:15 p.m. PREPARE LEVAIN: Place a clean starter jar on a kitchen scale. Tare the weight so it reads “0”, then to the jar add 50g mature starter, 200g whole wheat flour and 200g distilled water at room temperature. Stir the mixture vigorously until no dry bits of flour remain, then cover the jar loosely with a lid. Store in a warm place (such as the oven with the light on) for approximately 10-12 hours.
- At 8:30 a.m. (next day) PREPARE AUTOLYSE: The next morning, place a medium to large mixing bowl on a kitchen scale. Tare the weight so it reads “0”, then to the bowl add 250g levain and 800g distilled water at room temperature. Stir the mixture until the levain is completely dissolved. Add 800g bread flour and 200g whole wheat flour. Mix with your hands until mixture is completely incorporated. Cover bowl with plastic wrap and place in a warm place (such as the oven with the light on) for 50 minutes.
- At 9:20 a.m. FINISH THE DOUGH MIX: To the mixing bowl add 20g fine sea salt. Mix with your hands until mixture is completely incorporated. Cover bowl with plastic wrap and place in a warm place (such as the oven with the light on) for 30 minutes.
- At 10 a.m. BULK FERMENTATION: After 30 minutes have elapsed, perform the first set of turns (see post for full description on how to perform a set of turns). Cover the bowl and return it to its warm place.
- At 10:30 a.m. Perform second set of turns. Cover and return to warm place.
- At 11 a.m. Perform third set of turns. Cover and return to warm place.
- At 11:30 a.m. Perform fourth set of turns. Cover and return to warm place.
- At 12 p.m. Perform fifth set of turns. Cover and return to warm place.
- At 12:30 p.m. Perform sixth and final set of turns. Cover and return to warm place to finish bulk fermentation, untouched.
- At 2:00 p.m. PRESHAPE: Gently transfer dough to a well-floured surface. Using a well-floured bench scraper or knife, divide dough into two equal pieces. Use floured hands shape dough into boule (see post for full description on how to preshape). Cover dough with bowls or plastic wrapand let rest on counter for 30 minutes.
- At 2:30 p.m. SHAPE AND PROOF: Dust two banneton baskets or linen-lined bowls with white rice flour. Remove covers from dough. Final shape the dough by using both hands to slide the dough across the table, tightening the surface. Rotate 90 degrees and repeat until a tight, smooth dough round stands proud on your work surface. If your hands stick, dust them with flour and continue. If you find the dough sticky, you can also use a bench scraper to rotate the dough. Carefully transfer dough to one prepared basket. Repeat with second dough.
- Cover each basket with a plastic bag; use a clip to seal bag. Let dough rest in bags or covered with plastic wrap at room temperature 20 minutes, then transfer to refrigerator for an overnight proof.
- At 7:30 a.m. (next day) PREHEAT: Place an oven rack in your oven with enough space that allows enough space for the Dutch oven, combo cooker or bread pan. Preheat the oven to 500° F for one hour with the top and bottom of your bread baking vessel of choice inside.
- Just before baking, remove one dough from refrigerator and uncover. Place a sheet of parchment paper and a cutting board on top of basket. Carefully invert basket with cutting board so dough lands on parchment paper. Remove basket. Use a bread lame to score top of dough.
- At 8:30 a.m. BAKE: Using oven mitts, carefully slide dough on parchment paper to shallow side of combo cooker. Place deep side of combo cooker on top to seal. Reduce oven temperature to 450 degrees F. Bake covered 30 minutes. Using oven mitts, remove top of combo cooker or Dutch oven and return to oven rack in oven to keep hot. Bake bread uncovered for another 25-30 minutes until a deep golden brown (an instant thermometer should read an internal temperature of approximately 210 degrees F). Transfer bread to a cooling rack to cool completely, about 1 hour 30 minutes. Repeat with second loaf.
Notes
Nutrition
Nutrition information is automatically calculated, so should only be used as an approximation.
 Like this recipe? Rate & comment below!
Before You Go
Now that you’ve mastered this sourdough bread recipe, you can start to have even more fun! Experiment with other whole grain flours like rye flour, or whip up a batch of sourdough cinnamon rolls or whole wheat sourdough bread! Explore all our sourdough recipes like this sourdough sandwich bread for more inspiration!


Since I am not a baker and your recipe intrigued me, and your step by steps stimulated me to try my hand to make sourdough bread.
I did follow your schedule, as a novice I did not want to take a risk. Love it!!! Came out perfect and so happy I did. My family was very impressed. Rich in flavor and so light.
Thank you and cannot wait to make it again.
This sourdough bread is so easy and fun to make! Used it for our leftover pulled pork and it was incredibly delicious and I love its texture.
This was my favorite sourdough recipe during lockdown, but then when we all went back to work and couldn’t work from home I sort of forgot about it.
But my son turned 16 this week and as part of his birthday dinner he asked for the sourdough bread I used to make. I went on FB to beg for some starter and a dear friend gave me some and wouldn’t you know it was from her batch that she has been using since COVID when I gave her some!!!
Anyway made the bread and the kitchen was filled with all the smells! The kids came out of their rooms to ask for some before dinner. Needless to say it is something I have promised to get back into making.
Thank you for posting back then and for keeping the instructions so clear 🙂
Thank you for all the instructions and tips to help me make my first loaf of sourdough — amazing!!
Loved this sourdough recipe! Made this a few weeks ago and it was a hit! Would definitely keep this recipe and try other variations in the future!
This is a great recipe for sourdough bread. I’ve tried it myself, and I love the flavor! Every time I make it, it comes out a little different, which is kind of fun.
There are so many sourdough recipes and methods out there and each is interesting and different. I appreciate your instructions and explanations of the various parts of the process. The terminology can be daunting to a beginner but your attention to detail is so refreshing. I have been making this bread for a few months now. Your recipe produced great results and I am thrilled that I found your blog.
Wow! 10/10 bread. I’ve been baking weekly sourdough loaves for 2.5 years and was not understanding very well high hydration bread. This recipe was perfect to go through the steps. Also it’s convenient to have a recipe with overnight bulk fermentation as I usually go for a different method. I baked it in two bread pans and the size of the bread is perfect. Thank you! I wish I cld post a picture..!!
Sasha, Thank you so much for your kind review and rating! I am so glad this recipe worked well for you!
Hi Stephanie! I’m in the process of baking by your very helpful instructions currently. Just about to do the scoring and baking. Unfortunately I realized a little too late that I discarded all of my starter after making the levain 🙁 Is there any way to save my starter from the discard of the levain or is “Godzilla” really gone for good?
Sarah, Ugh, I’ve been there and it’s the worst! As I am also still learning the lifelong process of sourdough baking, I say this with caution but I think you can use the levain to rebuild your starter. It will not have the same flavor profile that your original starter had, and you will need to feed it regularly for a while before baking with it (it’s almost like a “baby” starter again), but you should be able to use it. I hope that helps!