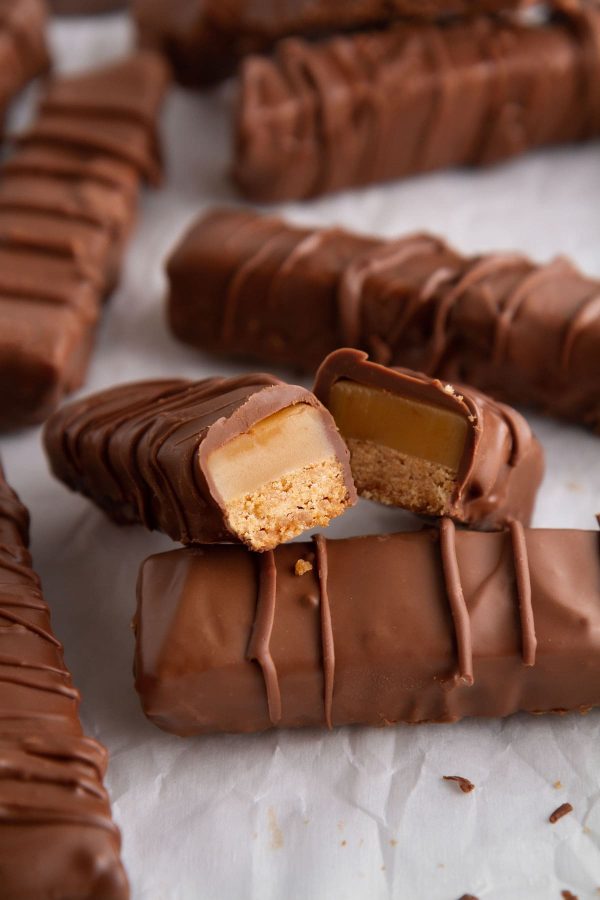
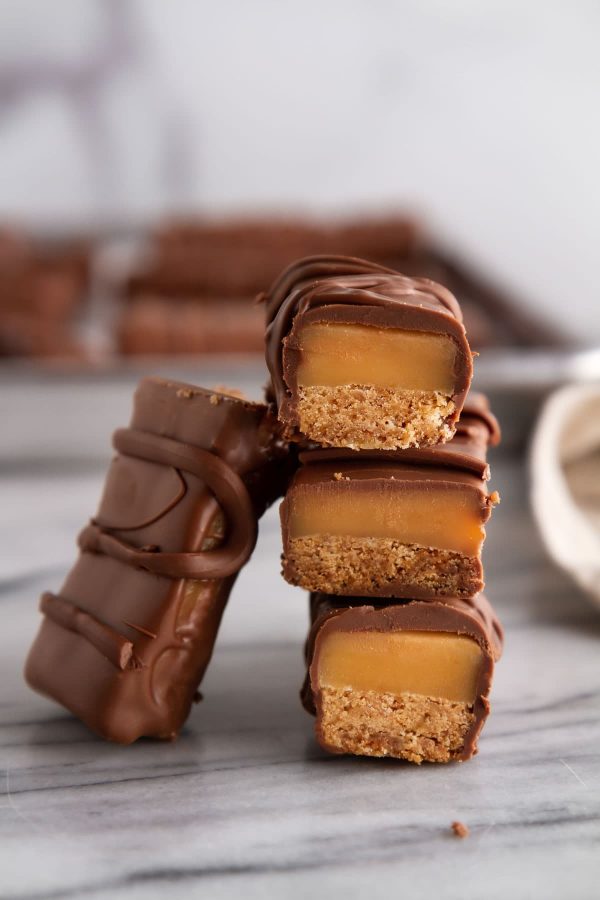
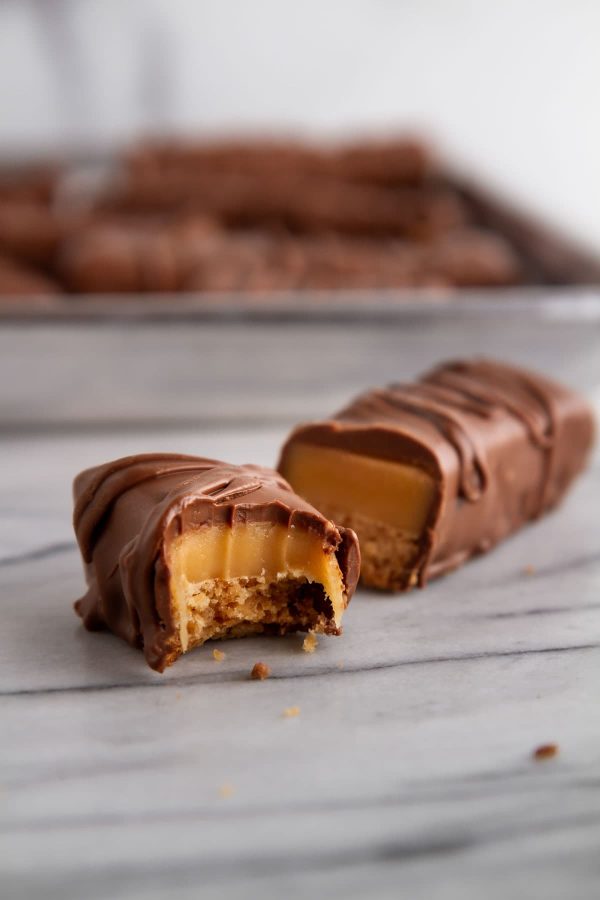
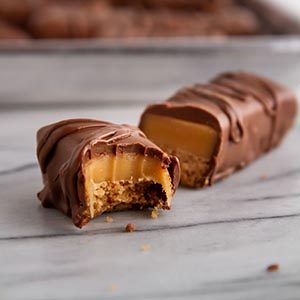
I’m just going to come right out and say it: These homemade Twix bars are even better than the original. Exceedingly thick layers of from-scratch shortbread cookie and chewy caramel are enveloped in a smooth, silky robe of milk chocolate for a candy bar to rule all the candy bars — and you can make it in your own home, no vending machine required.
Homemade Twix Bars Recipe
Welcome to Week 2 of The Snack Series! This week, we’re going to the sweet side with homemade candy bars. These Twix copycats are INSANE, in the very best way; they’re like the Twix bar you’ve always wanted but could never get from the store-bought variety. And while they might be a labor of love and patience, the wait and effort are well worth it. Here’s what you can expect from this recipe:
- 24 full-size candy bars (with an option to freeze some, so you can have candy bars any time)
- A thick, buttery shortbread cookie base
- A perfectly chewy and decadent caramel layer
- A silky-smooth milk chocolate coating
- The perfect dessert for literally any occasion
Ingredients You’ll Need
Don’t be intimidated by the ingredient list for these homemade Twix bars; almost everything is pantry-friendly and/or readily available in the baking aisle at your local grocery store. Here is what you’ll need to make these bars:
- All-purpose flour
- Granulated sugar
- Salt
- Unsalted butter
- Sweetened condensed milk (NOT evaporated milk)
- Brown sugar
- Heavy whipping cream
- Light corn syrup
- Milk chocolate chips (ideal for that Twix-like flavor)
- Vegetable shortening (which helps make the chocolate easy to dip into!)
How to Make Homemade Twix Bars
You’ll want to set aside several hours to make this recipe, but rest assured, most of that time is spent letting the ingredients set and/or chill. Here is the basic rundown of this recipe (remember to scroll down to the bottom of the post for the FULL recipe + instructions!):
- Step One: Make the shortbread crust. Combine the flour, sugar, salt and melted butter to form a thick, smooth dough. Press the dough into a foil-lined 13×9-inch baking pan. Bake until golden; set aside to cool slightly.
- Step Two: Make the caramel filling. Combine sweetened condensed milk, brown sugar, granulated sugar, heavy cream, corn syrup, salt and butter in a large saucepan. Heat over medium-low heat and stir constantly until the mixture thickens, darkens slightly, and has the look and consistency of melted peanut butter.
- Step Three: Top and set. Drizzle the caramel evenly over the shortbread crust. Let the bars set for 1 1/2 hours, then remove the bars from the pan and cut into candy bars (12 rows by 2 rows). Transfer the bars to the freezer for a few minutes to set up more so they don’t crumble when coated in the chocolate.
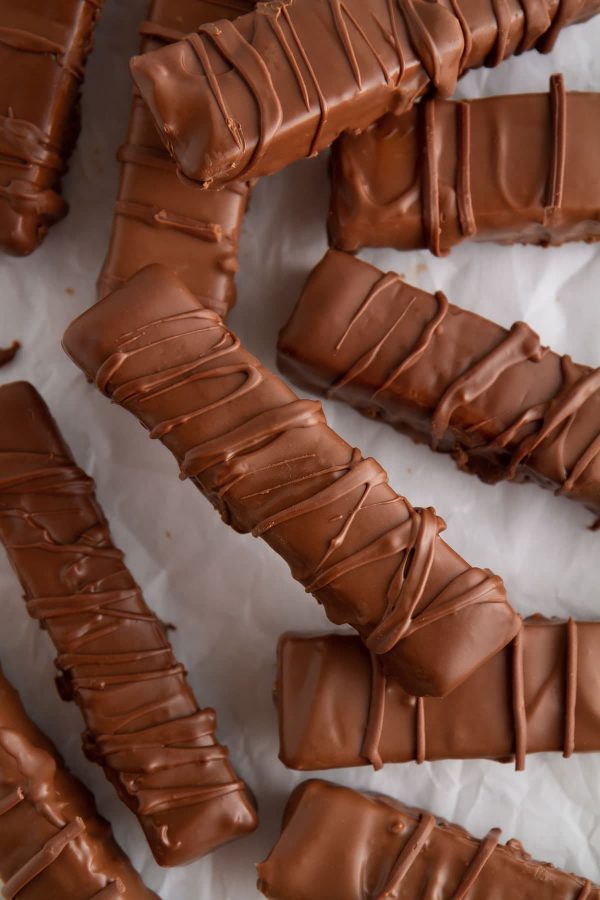
- Step Four: Coat in chocolate. Melt milk chocolate and shortening in the microwave until the mixture is smooth, then use two forks to roll the bars in the chocolate. Transfer to a sheet of wax paper or a cooling rack to set. Drizzle tops with more chocolate, if desired. Transfer the bars to the fridge to set completely for at least 30 minutes. ENJOY.
How to Freeze Homemade Twix Bars
This recipe makes a whopping 24 candy bars, so if you’re not planning to power through all of them in a week’s time, you can freeze them! Place the candy bars in an airtight container or resealable plastic bag; store in the freezer for up to 3 months. Thaw at room temperature before serving (so you don’t break your teeth on frozen caramel, ew).
A Few More Tips
- For a completely smooth candy bar bottom, I recommend transferring the chocolate-coated bars to a sheet of wax paper to set, rather than a cooling rack. Both work fine, but you might get some drips that set underneath the bars if you use the latter option.
- You might get a few crumbs of cookie in the chocolate when you roll the candy bars; that’s OK! If you want the bars to be as pretty as can be, pluck out the crumbs with a fork tine before the chocolate has a chance to set.
- For the best results on your caramel filling, see the Recipe Notes for how I ensure the perfect texture, every time.
More Chocolate Candy Recipes!
- twix caramel fudge
- double chocolate buckeyes
- strawberry covered dark chocolate truffles
- stained glass window cookies
- fluffernutter cups
Homemade Twix Bars
Ingredients
For the shortbread crust:
- 2 cups all-purpose flour
- ½ cup granulated sugar
- ½ teaspoon salt
- 1 cup unsalted butter, melted
For the caramel filling:
- 14 ounces sweetened condensed milk, 1 can
- ¾ cup light brown sugar
- ¼ cup granulated sugar
- ½ cup heavy cream
- ½ cup light corn syrup
- ½ teaspoon salt
- ½ cup unsalted butter
For the chocolate topping:
- 1 ½ cups milk chocolate chips, 9 oz
- 2 tablespoons vegetable shortening
Instructions
- Preheat your oven to 350°F. Line the bottom and sides of a 13×9-inch baking pan with foil.
Make the crust:
- In a medium bowl, whisk together flour, 1/2 cup granulated sugar, and 1/2 teaspoon salt. Add 1 cup melted butter; use a spatula or a wooden spoon to stir the butter into the flour mixture until a soft dough forms.
- Crumble and press the dough evenly into the bottom of the prepared baking pan. Bake for 25 to 30 minutes or until the crust is baked through and the edges are lightly golden. Set aside to cool slightly.
Make the caramel filling:
- While the crust bakes, make the caramel. In a large saucepan over medium-low heat, use a spatula or wooden spoon to stir together sweetened condensed milk, brown sugar, 1/4 cup granulated sugar, heavy cream, corn syrup, and 1/2 teaspoon salt. Add 1/2 cup butter. Stir mixture constantly over medium-low heat for about 15 to 20 until mixture bubbles, thickens, and turns to the consistency and look of melted peanut butter (an instant-read thermometer inserted in the mixture should read between 235°F and 240°F).
- Remove the mixture from heat; pour and spread evenly over the shortbread crust in the pan. Set aside to cool and set for 1 ½ hours.
- Use foil to remove shortbread from the pan. Use a serrated knife to cut into 24 bars (12 x 2 centimeters). Transfer bars to freezer to set slightly while you prepare the chocolate topping.
Make the chocolate topping & dip:
- Add chocolate chips and shortening to a large, shallow, microwave-safe bowl. Heat chocolate on High for 20 seconds. Stir, then continue to heat on High in 20-second increments until chocolate is fully melted and smooth.
- Using two forks, roll each bar in melted chocolate to coat; transfer to a sheet of wax paper or a cooling rack to set. Pipe or drizzle extra chocolate over tops of bars, if desired. Transfer bars to refrigerator; refrigerate for at least 30 minutes, or until chocolate is fully set.
- Store leftover bars in an airtight container at room temperature for up to 1 week.
Notes
- Placing the bars in the freezer before coating in chocolate helps them keep their shape when you roll them in the chocolate. If your bars are still breaking after a short chill, return them to the freezer for a few extra minutes.
- I highly recommend using an instant-read thermometer or candy thermometer to measure the exact temperature of the caramel filling. Too hot, and the caramel will burn; too cold, and the caramel won’t set properly. It’s important to cook the caramel to a range of 235°F to 240°F for best results.
Nutrition
Nutrition information is automatically calculated, so should only be used as an approximation.
 Like this recipe? Rate & comment below!


These were easier than I thought they would be. That caramel is amazing, I want to use it for more, maybe make millionaire bars? I did coat mine in dark chocolate just because that’s what I prefer, and they were amazing.
Tried making homemade Twix bars and now my kitchen looks like a crime scene where butter, chocolate, and my hopes all died violently. The caramel fused to my pan like it was trying to become one with it spiritually, the shortbread crumbled like my will to live, and the chocolate layer came out looking like it survived a heatwave and a fistfight. They technically resemble Twix if you squint, spin in a circle, and lower your standards. Tasted like betrayal with a hint of desperation. 10/10 would cry again.
Deeply sorry for your kitchen crime scene! Caramel fusing to the pan usually means it got too hot; a candy thermometer is a game changer! Crumbly shortbread often means the butter was too cold or it was overworked. For the chocolate, let it cool slowly at room temp. Your bravery deserves a retry. Justice for your Twix! ? ~GVD team
How can I make this in an 8×8 inch pan? Halve all the ingredients??
Also, instead of making the caramel filling, could I just melt werthers soft caramels with some cream?
Hi Jody! Yes, for an 8×8-inch pan, halving all the ingredients is a good approach. As for the caramel filling, you can try using melted Werther’s soft caramels with cream instead! Just heat slowly and stir often until smooth. Just make sure the caramel is thick enough to hold its shape once chilled and sliced. Let us know how it turns out, I’d love to hear if the Werther’s hack works! ~gvd team
Hello! Question, is it possible to leave out the 1/2 teaspoon of salt for the caramel? I’m not fond of salted caramel, and I don’t want the caramel to be too salty. Thanks in advance.
Hi W! Yes, you can leave out the ½ teaspoon of salt in the caramel layer if you’re not a fan of salted caramel. It won’t affect the structure or consistency, just the flavor balance. But feel free to omit it or even reduce it slightly if you just want to dial back the saltiness without losing it entirely. The bars will still set beautifully and taste delicious! Feel free to report back! ~gvd team
Explain how to cut these into the 24 bars. I don’t understand how you do it!
love this, especially since I get to know what’s in these and can even maybe tweak an ingredient or two, thank you!
Really excited to try these! Do you think it would be possible to add a layer of peanut butter? Peanut butter Twix are my favorite –when they’re available!
Laura, That’s a genius idea! I think you can definitely add peanut butter to the layers, or even mix a little into the caramel filling!
Thanks I’ll give it a try and report back. 🙂 Thanks for all the great recipes.