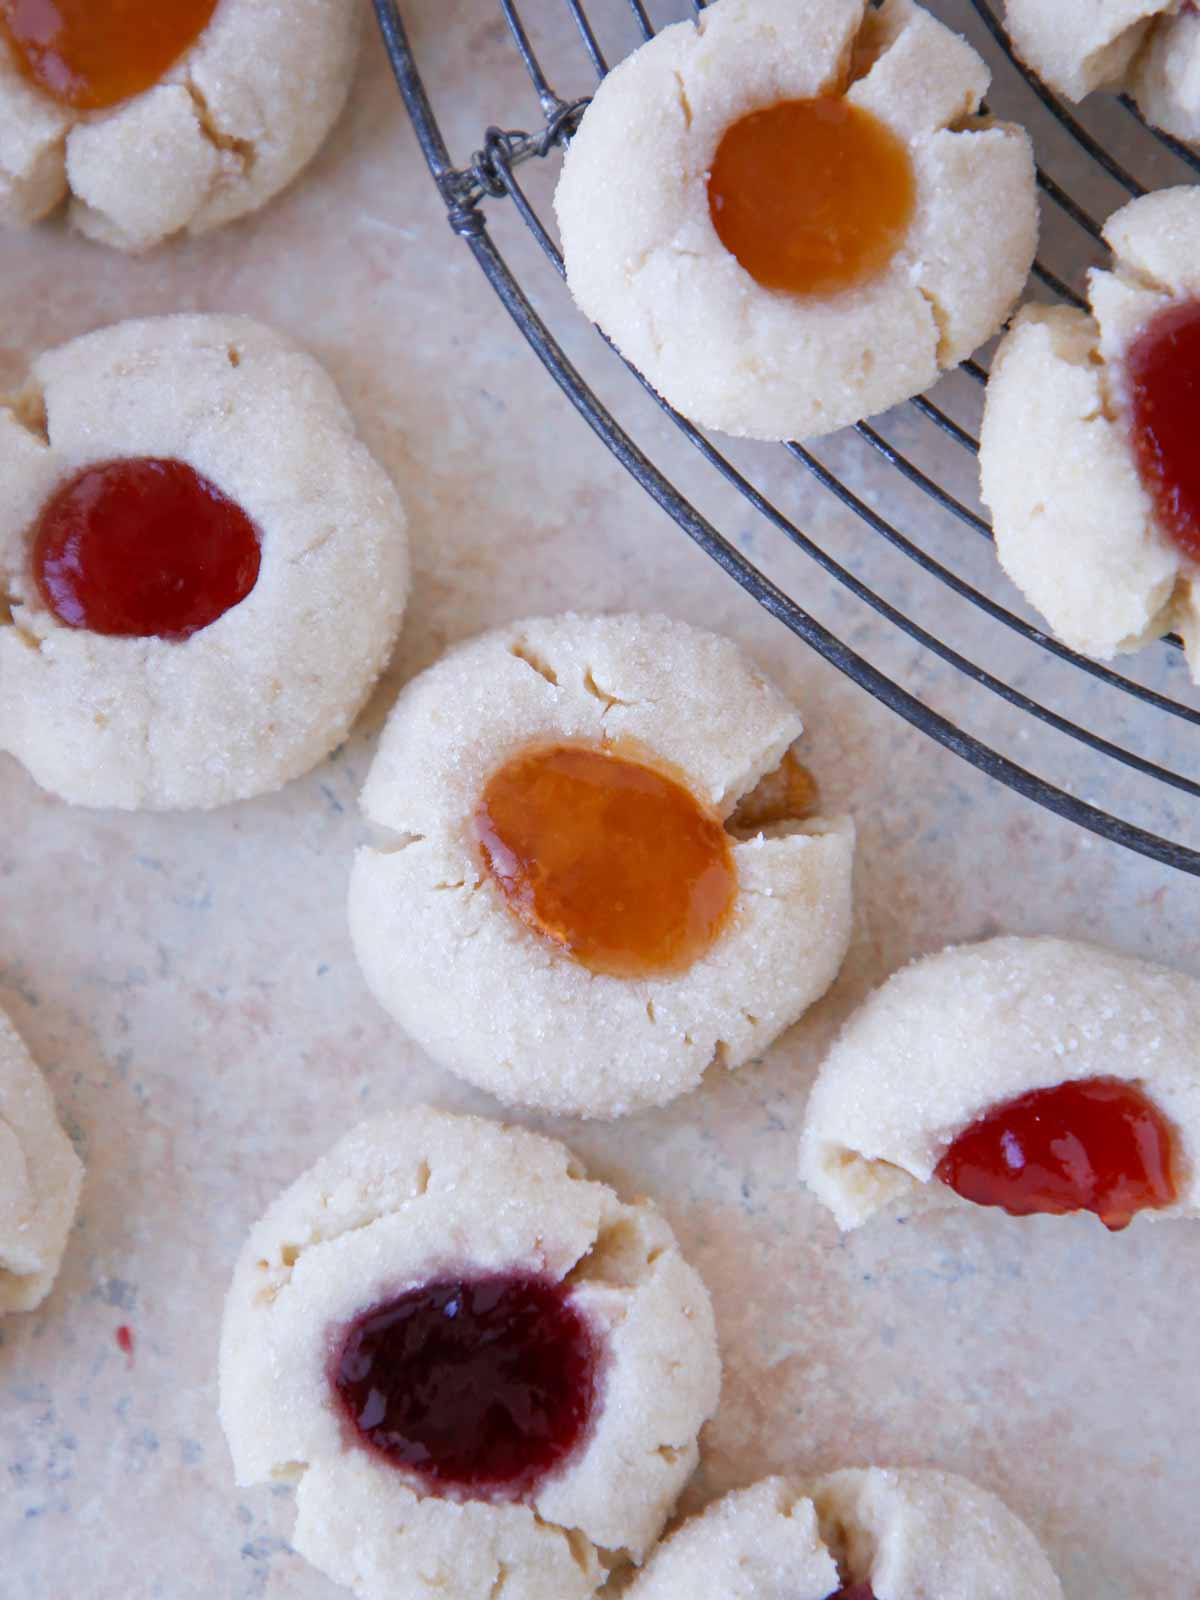
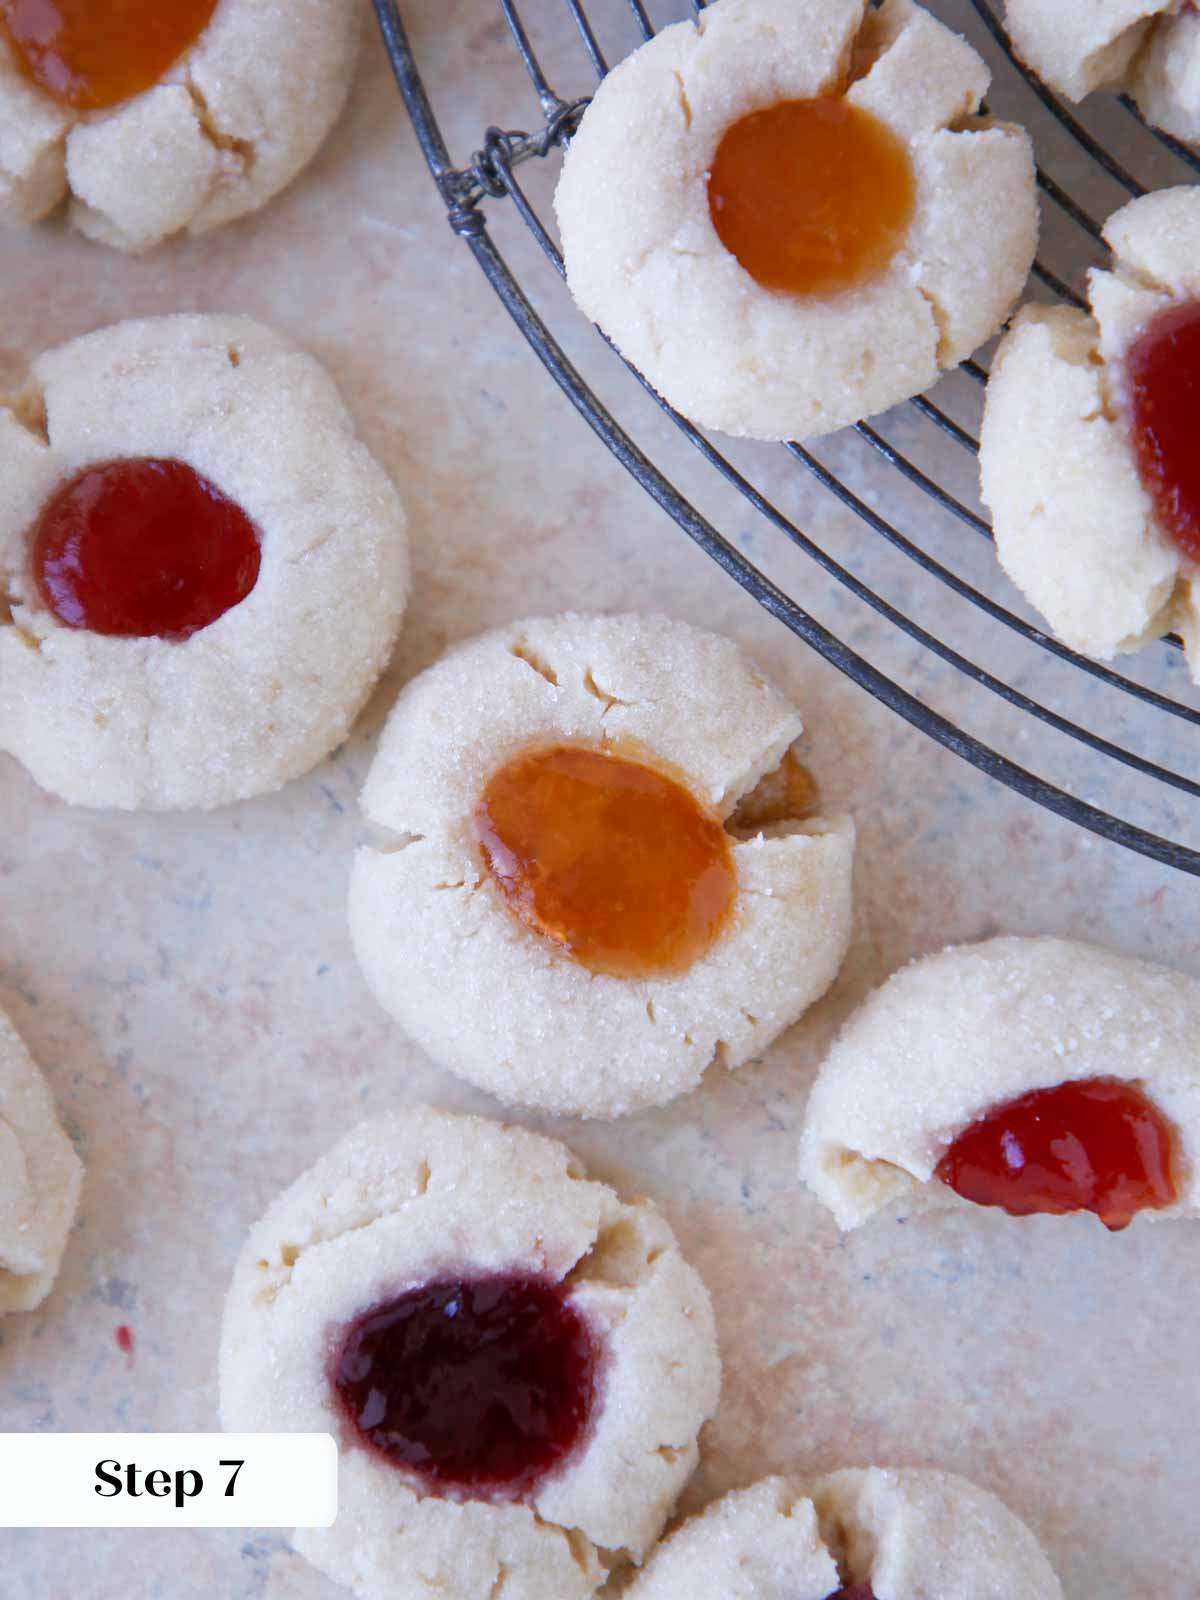
These thumbprint cookies have a crisp, sugary exterior, a buttery vanilla cookie, and a jam filling that sets as they bake. Simple enough for any afternoon, pretty enough to put on a cookie plate.

A Quick Look At The Recipe
This is a brief summary of the recipe. Jump to the recipe to get the full details.
Prep Time
10 minutes
Cook Time
12 minutes
Total Time
22 minutes
Servings
15 Cookies
Difficulty
Easy
Calories *
140 kcal per serving
Technique
Make dough, roll, fill with jam and bake!
Flavor Profile
Buttery, lightly sweet, jammy.
* Based on nutrition panel
I made these for a holiday cookie exchange and they disappeared first. I used red and green sprinkles for the coating! It gave them the prettiest little crunch and the jam stays perfectly set after baking.
⭐⭐⭐⭐⭐
Renata
Why You Will Love This Recipe
- Ready in under 30 minutes. These come together faster than almost any cookie I make. Ten minutes to mix and shape, twelve minutes in the oven, and you’re done just like these chocolate thumbprints!.
- One bowl, no chill time. The dough mixes directly in the stand mixer bowl and goes straight to the baking sheet. There’s no chilling, no waiting, nothing to plan ahead.
- The sugar crust! Rolling each ball in granulated sugar before baking gives the outside a light, crisp shell that contrasts perfectly with the soft center. It’s a small step that makes a real difference.
- Use any jam you love. The filling is completely up to you, which makes this recipe endlessly adaptable to whatever preserves or jellies you have on hand. If you want to go a different direction entirely, my Neapolitan thumbprint cookies are a great variation to try next.
Thumbprint cookies are one of those recipes I keep coming back to because they ask so little and deliver so much. There’s no complicated technique, no chilling the dough, and no fussing with a piping bag.
If you love a cookie that’s simple enough for a Tuesday afternoon but pretty enough to share, these fit the bill every time. They’re also a natural companion to my red velvet crinkle cookies and these carrot cake cookies if you want to put a little spread together for a cookie plate.
Ingredients & Substitutions
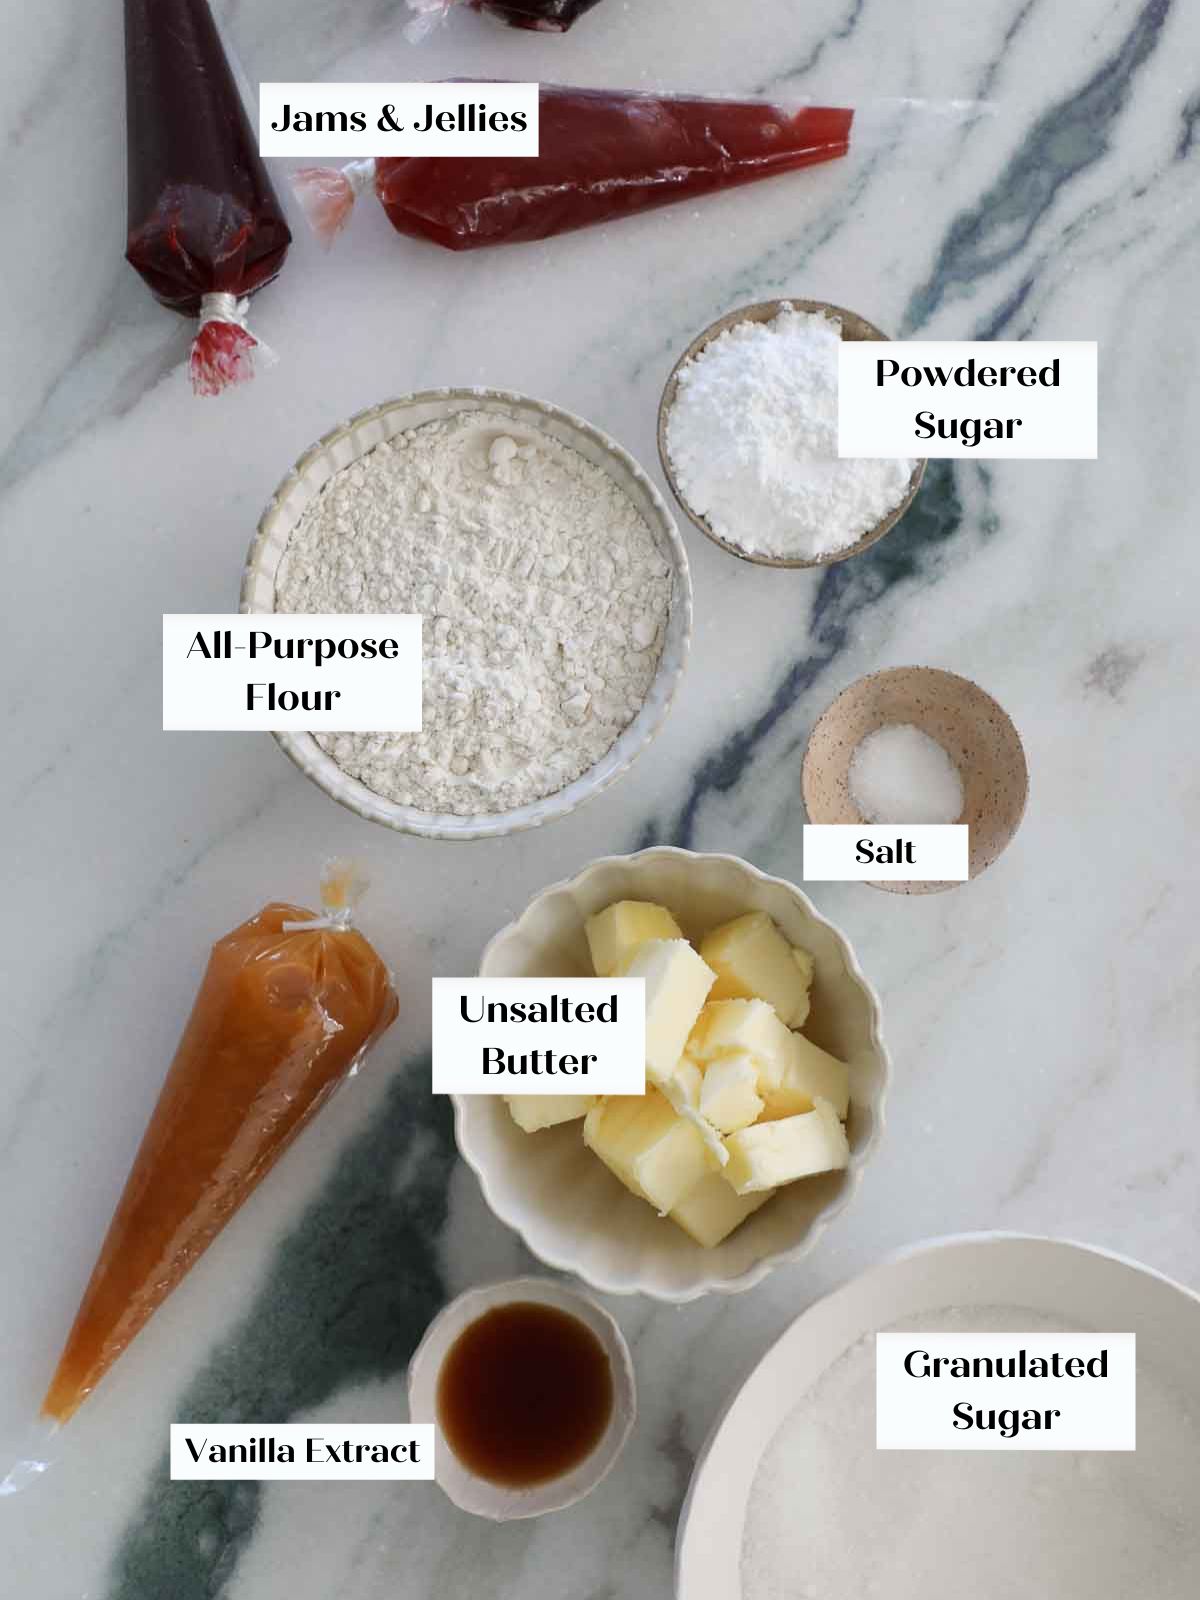
- Unsalted Butter
- Powdered Sugar: Powdered sugar sweetens the dough while keeping the texture delicate and fine. Because it’s so finely milled, it dissolves completely during mixing, which is part of why these cookies stay so soft.
- All-Purpose Flour: Flour gives the dough its structure and holds the thumbprint shape through baking. These cookies are forgiving, but don’t pack the flour into your measuring cup or the dough can turn stiff.
- Kosher Salt
- Vanilla Extract: Vanilla rounds out the flavor of the dough and adds a warm, subtle depth to each cookie. You could also use almond extract!
- Granulated Sugar
- Jam, Preserves, or Jelly: The filling is what makes thumbprint cookies what they are, and almost any jam or preserve you love will work here. Strawberry, raspberry, and apricot are all classic choices! You can use my mixed berry jam too!
Variations for Thumbprint Cookies
- Try a different filling: Bake these cookies without a filling and then, once completely cool, fill with salted caramel sauce, lemon curd, or a chocolate ganache.
- Citrus Sugar Roll. Mix a teaspoon of lemon or orange zest into the granulated sugar before rolling the dough balls. Like I do with my lemon cookies! It adds a bright, fragrant note to the exterior that pairs especially well with apricot or raspberry jam.
- Make them in the shape of a heart. Press them into a small heart-shaped cookie cutter for a perfect heart or mold the dough into the shape of a heart by joining two small balls of dough. A way easier alternative to these chocolate sugar cookies or Valentine’s Day cookies!

Professional Tips for Perfect Thumbprint Cookies
- Use conventional bake, not convection. The fan in a convection oven circulates heat too aggressively for a delicate shortbread-style dough, and these cookies can set unevenly or overbrown at the edges before the centers firm up. Stick with the conventional setting at 325°F, and you’ll get an even, matte surface every time.
- Press the indentation gently and go about halfway down. Pressing too deeply risks cracking the sides of the cookie, while a shallow press won’t hold enough jam. Aim for a clean, rounded well that goes roughly halfway through the ball before you add your filling.
- Watch for the matte surface. These cookies don’t turn golden the way most cookies do, so the visual cue matters more than the timer. When the surface looks dry and matte rather than shiny and glossy, they’re done, even if they still look a little underdone at the edges.
- Fill jam-centered cookies before baking, chocolate-filled ones after. Jam bakes into the dough and sets into the center, but chocolate fillings need to go in once the cookies are completely cool, or they’ll melt into a puddle rather than setting into a clean, glossy center.

How to Make Thumbprint Cookies
Use these step-by-step instructions to make buttery, jam-filled shortbread cookies with a crisp sugar crust and a soft, tender center. Further details and measurements can be found in the recipe card below.
Make the Dough
Step 1: Preheat the oven and prep your pan. Set your oven to 325°F on the conventional setting and line a baking sheet with parchment paper. This takes just a minute, but it’s worth doing first so everything is ready when your dough comes together.
Step 2: Mix the dough. Add the softened butter, powdered sugar, all-purpose flour, kosher salt, and vanilla extract to the bowl of a stand mixer fitted with the paddle attachment. Mix on medium-low speed until a smooth, cohesive dough forms. It will look shaggy and crumbly for the first minute or so, which is completely normal. Keep mixing, and it will come together into a soft, pliable dough that pulls away cleanly from the sides of the bowl. (photo 1)
Portion and Fill
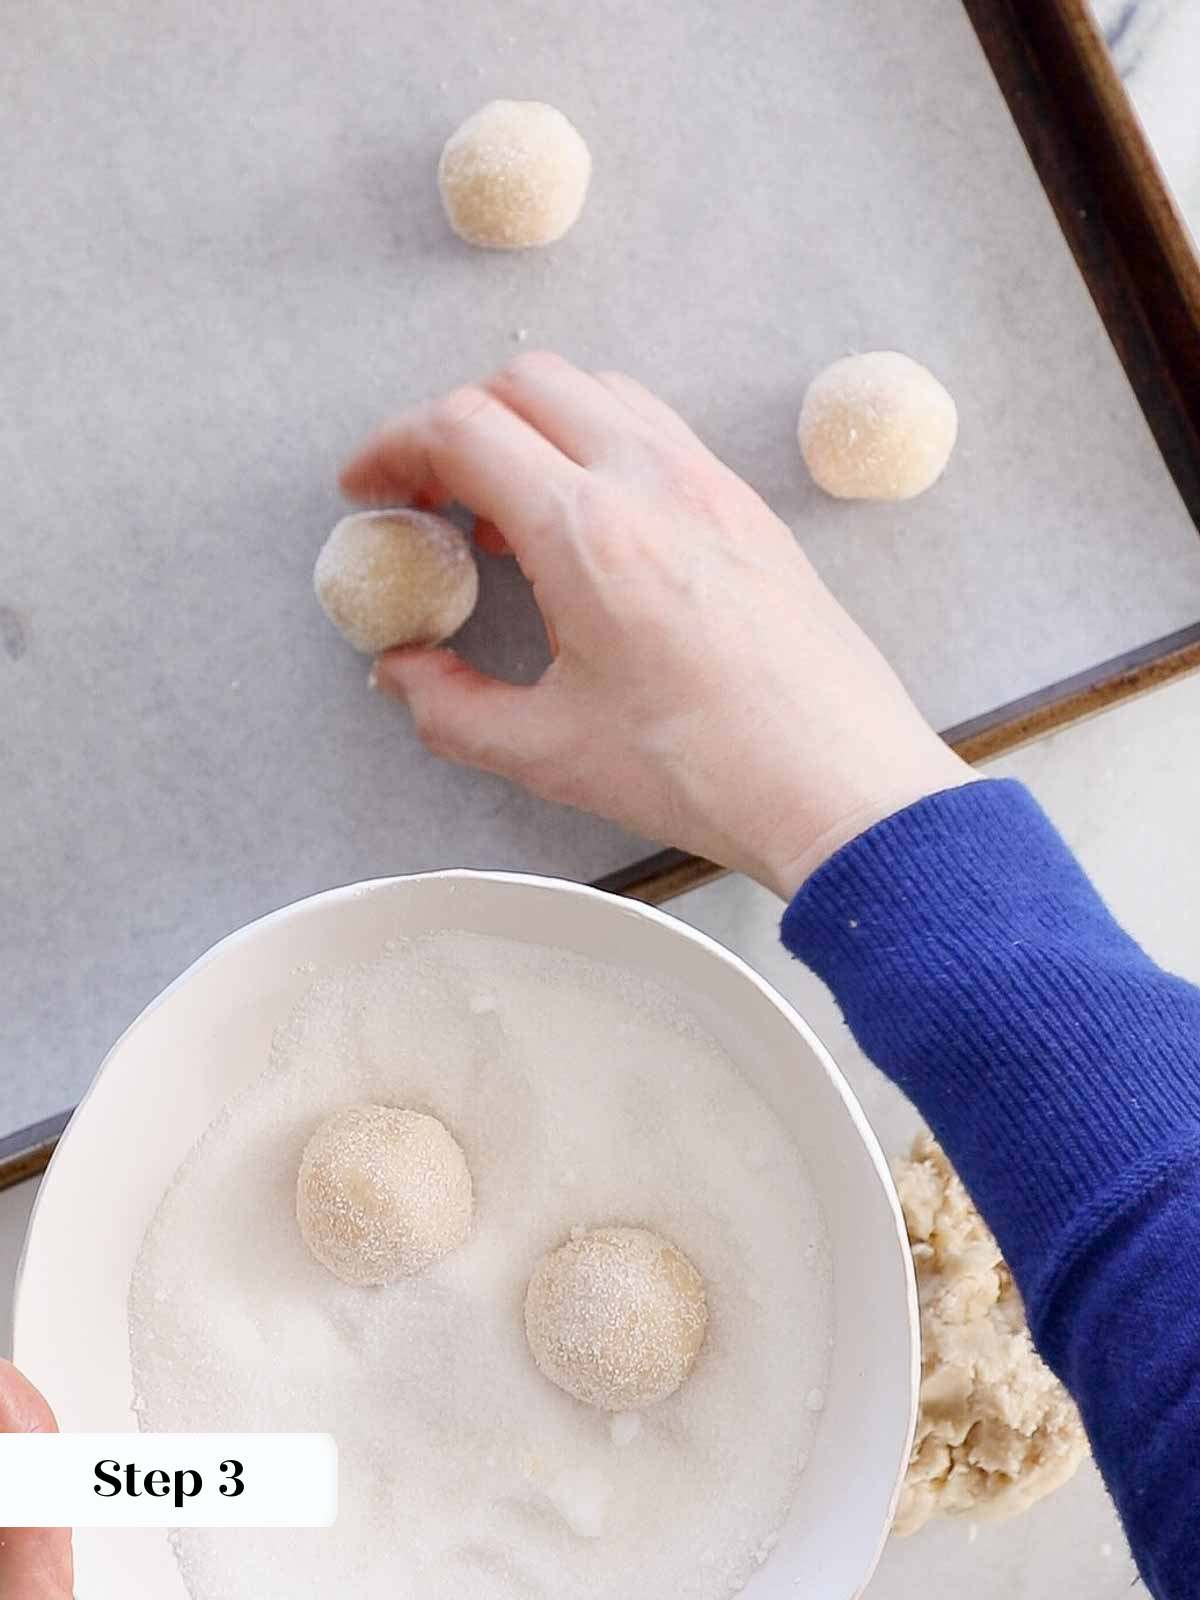
Step 3: Portion and roll the dough. Pinch off pieces of dough roughly an inch across, roll each one between your palms into a smooth ball, then roll it in granulated sugar until it’s fully coated. The sugar crust is what gives these cookies that satisfying, slightly crisp exterior, so don’t rush this part. You should end up with approximately 15 cookies from one batch. ( photo 2 & 3)


Step 4: Arrange and press. Place the sugar-coated dough balls on your prepared baking sheet about an inch apart, offset slightly so they have room to spread. Press your thumb or forefinger gently into the center of each one, making an indentation that goes about halfway down into the cookie. If the edges crack a little, just pinch them back together lightly. (photo 4)
Step 5: Fill with jam. Pipe jam, preserves, or jelly into each indentation before baking. You want enough to fill the well but not so much that it overflows and burns on the parchment. (photo 5)
Bake!
Step 6: Slide the pan into your preheated 325°F oven and bake for 12 to 15 minutes, rotating the tray once at the halfway point. The cookies are done when the surface looks matte and no longer has any glossy sheen. They won’t look deeply golden, so trust that matte finish as your visual cue rather than color.
Step 7: Cool completely. Transfer the baking sheet to a wire rack and let the cookies cool fully before serving. The jam filling stays molten for longer than you’d expect, so give them the full cooling time. (photo 6)


Recipe FAQs
Store cooled thumbprint cookies in an airtight container at room temperature for up to 10 days. If you’ve filled them with jam, there’s no need to refrigerate unless your kitchen runs very warm. You can also freeze them in a single layer, then transfer to a freezer bag for up to 2 months.
Yes, these are a great make-ahead cookie. You can bake the full batch, cool completely, and store them as described above! They actually taste wonderful the next day, once the jam and cookie meld. If you want to prep further in advance, the baked and cooled cookies freeze beautifully, so you can pull them out whenever you need them.
Thumbprint cookies are essentially a shortbread-based dough, which is why they have that tender, slightly crumbly texture. The key difference is the indentation filled with jam, which adds a fruity contrast to the buttery base. If you love that shortbread flavor, my chocolate orange shortbread cookies are worth a look for your next baking session.
Recommended Cookie Recipes

Cookie Recipes

Vegetarian

Cookie Recipes

Christmas Recipes
Thumbprint Cookies
Ingredients
- ½ cup unsalted butter, 113g, softened
- ⅓ cup powdered sugar, 36g
- 1 ⅓ cup all-purpose flour, 173g
- ½ teaspoon kosher salt
- 1 teaspoon vanilla extract
- ¼ cup Granulated sugar, for rolling
- ⅓ cup jam, preserves, or jelly
Instructions
- Preheat the oven to 325°F conventional (no fan) and line a baking sheet with parchment paper.
- Add the butter, powdered sugar, flour, salt, and vanilla extract to the bowl of a stand mixer fitted with the paddle attachment. Mix on medium-low speed until a smooth dough forms.
- Pinch off pieces of dough about an inch across, roll each into a ball, then roll in granulated sugar. You will have approximately 15 cookies.
- Place the dough balls on the prepared baking sheet about an inch apart. Press your thumb or forefinger gently into the center of each cookie to make an indentation about halfway through. Fill each indentation with jam before baking.
- Bake for 12 to 15 minutes, rotating the pan after 6 minutes, until the surface looks matte and no longer glossy. Cool completely on a wire rack.
Video
Notes
Technique: Do not use the convection setting. The fan circulates heat too aggressively for this delicate dough and can cause the edges to set and brown before the centers are done.
Measuring: Weigh your flour if you can. At 173g, it’s a precise amount, too much flour packed into a cup measure will make the dough dry and crumbly, and harder to roll cleanly.
Storage: Store cooled cookies in an airtight container at room temperature for up to 5 days. To freeze, arrange in a single layer first, then transfer to a freezer bag for up to 2 months.
Nutrition
Nutrition information is automatically calculated, so should only be used as an approximation.
 Like this recipe? Rate & comment below!
Before You Go
I hope these thumbprint cookies earn a permanent spot in your baking rotation. Browse our cookie recipes or make these sourdough chocolate chip cookies next!


I made these for a holiday cookie exchange and they disappeared first. I used red and green sprinkles for the coating! It gave them the prettiest little crunch and the jam stays perfectly set after baking
I love these cookies, I can’t stop making them. I’ve made them plain and filled them with all the jams. I’ve also added almond extract, which might be my favorite. And I’ve also added lemon zest, so good every time. The texture is perfect.
ha, these are fun, haven’t had these in years, a nice weekend baking treat, thank you!
Thanks, Sabrina! I agree 🙂