This is the picture-perfect homemade cherry pie recipe! Great for Christmas, the holidays, or to serve at a Fourth of July party. This easy recipe features flaky buttery pie crusts and a sweet juicy cherry filling. Top with vanilla ice cream for the ultimate dessert!

Try these strawberry rhubarb cheesecake bars if you are looking for red desserts this holiday season. Other pretty treats to try are these strawberry brownies and these strawberry shortcake cupcakes. These are all so tasty!
Why You Will Love This Recipe
- Cherry pies are vibrant and juicy. The sweet and slightly sour cherries create a luscious and fruity filling.
- This cherry pie recipe is a classic dessert.
- It is a beloved treat that has been enjoyed for generations. It is both nostalgic and cozy.
- This recipe is versatile and can be enjoyed in various ways.
- It can be served warm or chilled, depending on preference.
- Pair it with a scoop of vanilla ice cream or a dollop of whipped cream.
- A cherry pie is not only delicious but also super pretty. The bright red filling peeking through the flaky golden crust is so lovely.
- There is something comforting about a slice of warm cherry pie.
- The sweet aroma fills the kitchen as it bakes. It is full of tender and juicy cherries. The buttery crust contributes to a heartwarming experience.
- This is a wonderful dessert to share with family and friends during special occasions and gatherings.
- It adds a touch of sweetness and celebration to any event, whether it is a holiday feast, a backyard barbecue, or Valentine’s Day!
- Try this Strawberry Rhubarb Pie for another summer favorite!
What Is a Cherry Pie?
A cherry pie is a classic family favorite dessert consisting of a flaky pastry crust filled with a sweet-tart cherry filling. The filling is typically made with fresh or frozen cherries, sweetened with sugar and lemon.
The cherries release their juices while baking. This creates a thick, fruity filling that contrasts beautifully with the crisp crust. A slice of cherry pie is a delightful balance of buttery pastry and juicy cherries.
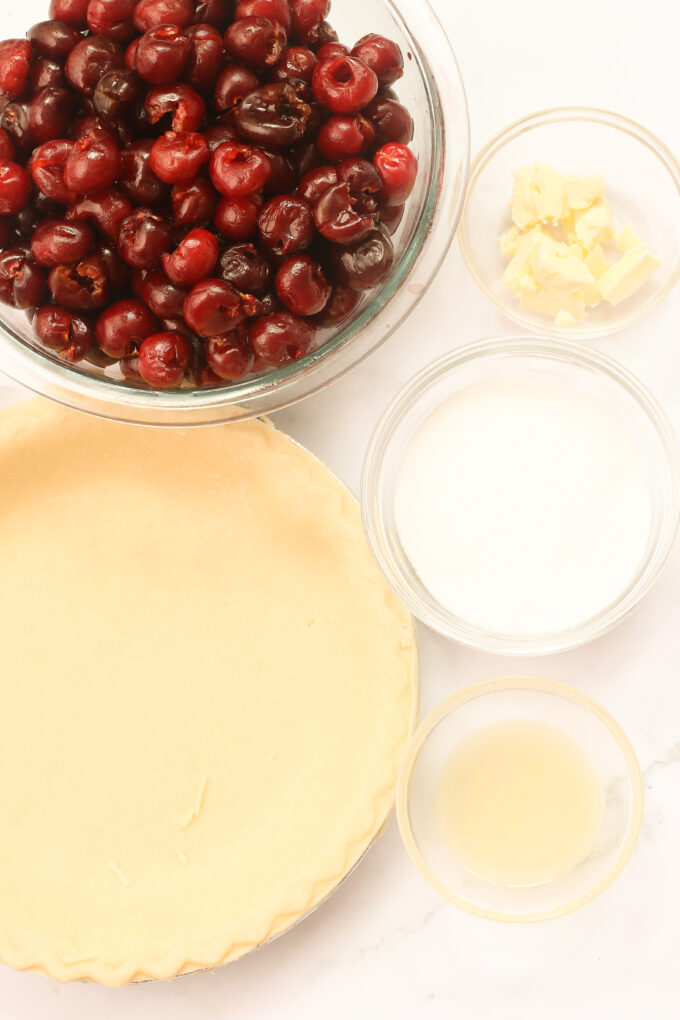
Ingredients and Substitutions
Scroll down to the recipe card for the full cherry pie recipe!
- Use store-bought pie crusts to save time and effort. Look for a package with a bottom and top crust, or make my easy pie crust which uses butter and shortening!
- Fresh cherries are best for flavor and texture. Just as in my cherry cobbler recipe, choose ripe cherries and pit them before using. If fresh cherries are not available, use frozen cherries. Ensure they are thawed and drained properly before using them in the pie.
- Granulated sugar adds sweetness to the cherry filling. Adjust the amount according to the sweetness of the cherries.
- Use cornstarch as a thickening agent for the cherry filling. It helps bind the juices the cherries release and creates a thick filling. Dissolve the corn starch in water before adding it to the cherries to prevent lumps.
- Lemon juice lifts the flavor of the cherry filling. It also brings out the natural flavors of the cherries.
- Almond extract goes well with the flavor of cherries. It adds a subtle nuttiness. Use a small amount to enhance the filling without overpowering it.
- Unsalted butter makes the filling extra juicy and flavorful. Salted butter is also fine to use.
- The beaten egg is used for brushing the pie crust, giving it a golden and shiny appearance when baked.
- Powdered sugar can be dusted on the baked cherry pie as a sweet garnish. Serve the cherry pie with a scoop of vanilla ice cream for a warm and cold experience!
Taste and Texture
A slice of cherry pie offers a delightful combination of flavors and textures. The taste begins with a burst of sweetness. The juicy cherries release their vibrant fruity taste.
The crust provides a delicate, flaky texture that crumbles a little. This creates a satisfying contrast to the rich filling.
How to Make
Step 1
Preheat your oven to 375°F (190°C). In a large bowl, combine the pitted cherries, granulated sugar, cornstarch, lemon juice, and almond extract. Mix well until the cherries are coated evenly. Let the mixture sit for about 10 minutes to allow the cherries to release some juice.

Step 2
Unroll one of the pie crusts and gently press it into a 9-inch pie dish, ensuring it covers the bottom and sides of the dish.
Step 3
Pour the cherry filling into the prepared pie crust, spreading it out evenly. Dot the top of the filling with small pieces of unsalted butter.
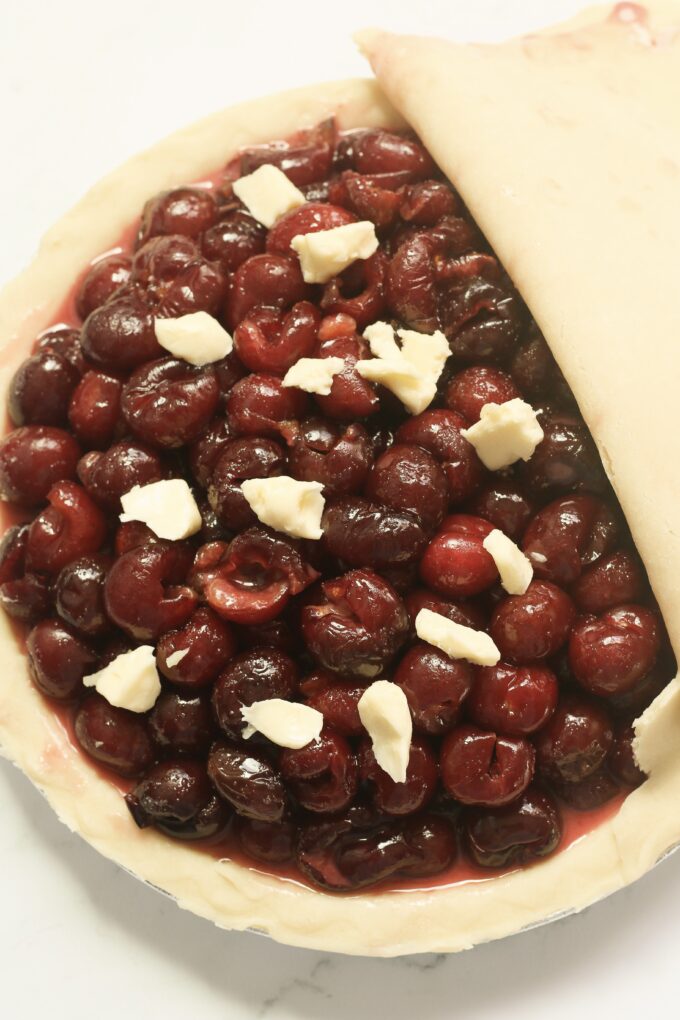
Step 4
Unroll the second pie crust and place it over the cherry filling. You can leave it whole or create a lattice pattern by cutting the crust into strips and weaving them together.
Step 5
Trim any excess crust from the edges and pinch the top and bottom crusts together to seal them. You can crimp the edges using a fork or create a decorative edge if desired.
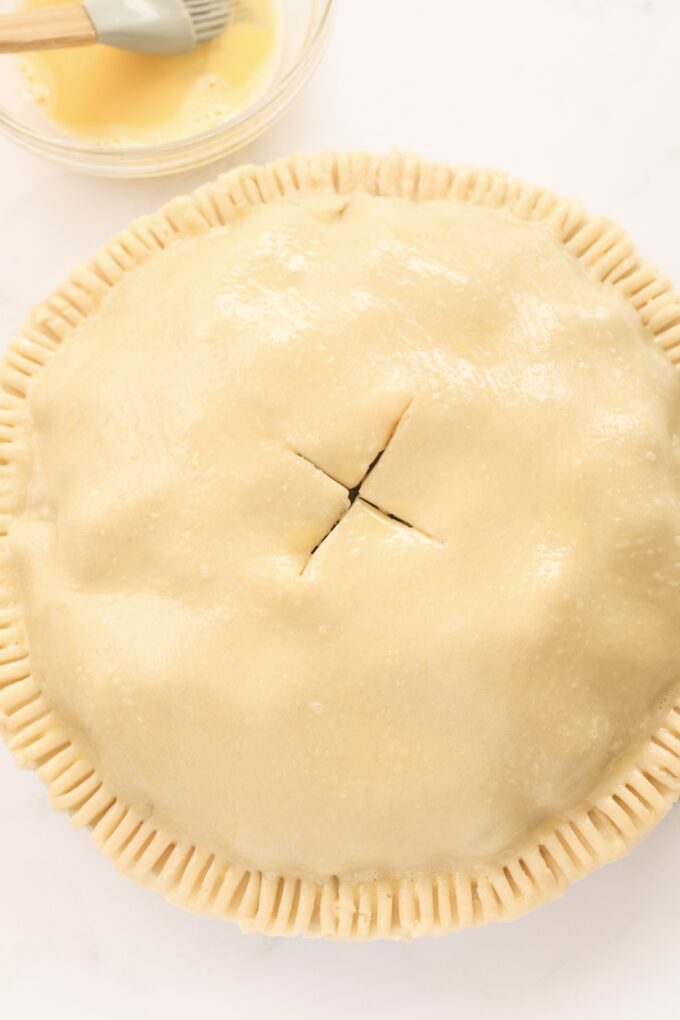
Step 6
Brush the top crust with beaten egg wash. This will give the pie a shiny, golden-brown finish.
Step 7
Using a sharp knife, make a few small slits on the top crust to allow steam to escape during baking.
Step 8
Place the pie on a baking sheet (to catch any potential drips) and bake in the preheated oven for 45 to 55 minutes, or until the crust is golden brown and the filling is bubbly.

Step 9
Once baked, remove the pie from the oven and let it cool on a wire rack for at least 2 hours to allow the filling to set.
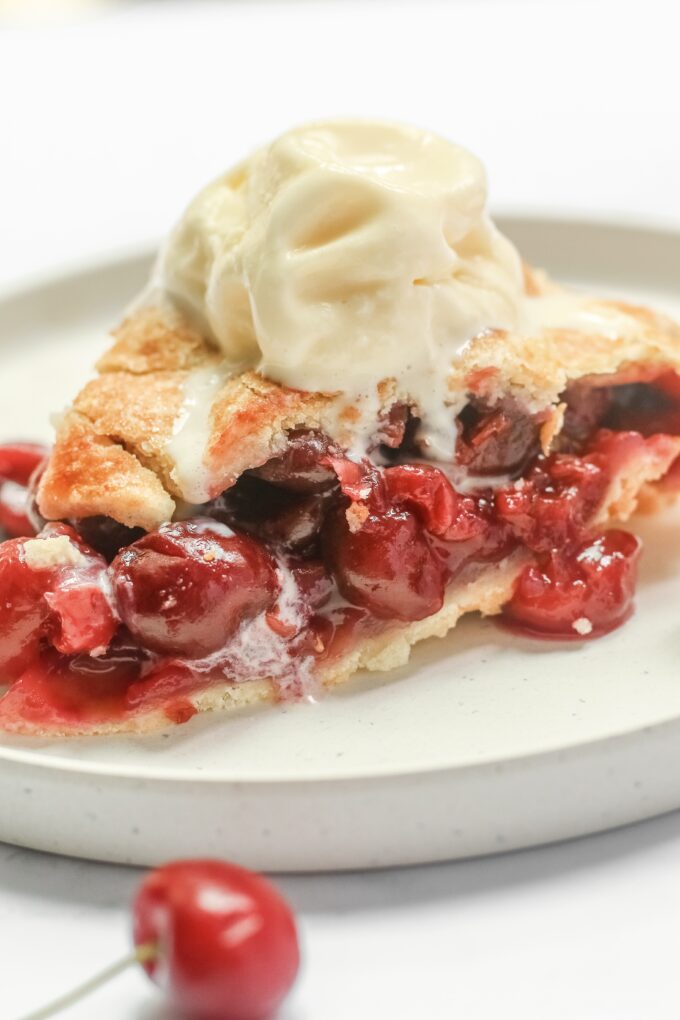
Step 10
Lastly, serve the cherry pie at room temperature or slightly warm. Top with vanilla ice cream!
Expert Tips and Tricks
Select the right cherries. Choose fresh, ripe cherries for the best flavor. Tart cherries like Montmorency are ideal for pies. If using sweet cherries like Bing or Rainier, adjust the sugar amount.
Enhance the flavor. Add a touch of almond extract or lemon zest to the filling for an extra layer of flavor. These ingredients bring out the natural sweetness and brightness of the fruit.
Chill the dough. Ensure the pie dough is well-chilled for a flaky crust before rolling it out. Rest the dough in the refrigerator for at least 30 minutes or overnight. This relaxes the gluten and prevents the crust from shrinking during baking.
Use an egg wash. Brushing the top crust with a beaten egg or milk adds a golden sheen, helps seal the edges, and prevents them from becoming too dry or pale during baking.
Ventilation is key. Cut slits or create a decorative lattice on the top crust to allow steam to escape while baking. This prevents the filling from boiling and keeps the crust from becoming overly soggy.
Protect the edges. Cover the outer edges of the crust with aluminum foil or a pie shield during the initial stages of baking to prevent excessive browning. Remove the shield during the last few minutes of baking for a beautifully golden crust.
Rest before serving. Allow the pie to cool and set for at least a few hours before serving. This helps the filling thicken and set properly, making it easier to slice and reducing the risk of a runny pie.

How to Serve and Store
Serve
Serve this pretty pie with a scoop of vanilla (or even chocolate) ice cream. Dust it with a sprinkling of powdered sugar, and it will be a hit! Cream cheese frosting and whipped cream are other lovely options to serve it with.
For another Southern classic dessert, make this Ambrosia Salad!
Store
Allow the cherry pie to cool completely at room temperature before storing it. This helps prevent condensation from forming inside the storage container.
Place the cooled cherry pie in an airtight container or wrap it tightly with plastic wrap.
Place the airtight container or wrapped pie in the refrigerator. The cool temperature helps maintain the freshness and extends its shelf life.
Cherry pie is best enjoyed within a few days of baking. While it will remain safe to eat for a longer period if properly stored, the quality may start to decline over time.
Frequently Asked Questions
Yes, using canned cherry pie filling is a convenient option for making cherry pie. It saves time and effort. Just choose a good-quality canned filling and adjust the sweetness or tartness.
To prevent a soggy bottom crust, there are a few techniques to try. One method is to blind-bake the bottom crust before adding the filling. Another way is to sprinkle a thin layer of breadcrumbs or almond flour on the bottom crust before adding the cherry filling. These absorb excess moisture and create a barrier between the crust and the filling.
Absolutely! Using homemade pie crust can elevate the overall taste and texture. It allows you to control the ingredients and customize the flavor according to your preferences. Homemade crusts tend to be flakier and more buttery.
You do not have to blind bake the pie. If you choose not to blind-bake, ensure the bottom crust is well-sealed to prevent excessive moisture from soaking in.
Yes, the leftover cherry pie can be frozen to extend its shelf life
Starting the pie at a higher temperature, often called a u0022hot start,u0022 helps set the crust quickly and create a firm structure. This burst of heat helps prevent the crust from becoming soggy due to the juicy filling.

You May Also Like
If you enjoy this homemade cherry pie recipe, please leave a rating and review! You can find more great recipes on Facebook, Instagram, and Pinterest. For other recipes, check out these Pies and Tarts, like my rough puff pastry!
Cherry Pie

Ingredients
- 2 pie crusts, store bought or my easy pie crust recipe
- 5 cups cherries, fresh, pitted
- 1 cup granulated sugar
- ¼ cup cornstarch
- 1 tablespoon lemon juice
- ½ teaspoon almond extract
- 1 tablespoon unsalted butter, cut into small pieces
- 1 egg, beaten (for egg wash)
Instructions
- Preheat your oven to 375°F (190°C). In a large bowl, combine the pitted cherries, granulated sugar, cornstarch, lemon juice, and almond extract. Mix well until the cherries are coated evenly. Let the mixture sit for about 10 minutes to allow the cherries to release some juice.
- Unroll one of the pie crusts and gently press it into a 9-inch pie dish, ensuring it covers the bottom and sides of the dish.
- Pour the cherry filling into the prepared pie crust, spreading it out evenly. Dot the top of the filling with small pieces of unsalted butter.
- Unroll the second pie crust and place it over the cherry filling. You can leave it whole or create a lattice pattern by cutting the crust into strips and weaving them together.
- Trim any excess crust from the edges and pinch the top and bottom crusts together to seal them. You can crimp the edges using a fork or create a decorative edge if desired.
- Brush the top crust with beaten egg wash. This will give the pie a shiny, golden-brown finish.
- Using a sharp knife, make a few small slits on the top crust to allow steam to escape during baking.
- Place the pie on a baking sheet (to catch any potential drips) and bake in the preheated oven for 45 to 55 minutes, or until the crust is golden brown and the filling is bubbly.
- Once baked, remove the cherry pie from the oven and let it cool on a wire rack for at least 2 hours to allow the filling to set.
- Serve the cherry pie at room temperature or slightly warm. Top with vanilla ice cream!
Notes
- Use fresh cherries, not frozen cherries.
- Be sure to pit the cherries.
- Feel free to use homemade or store-bought pie crusts.
- If desired, use the top crust to make a lattice crust.
- Bake until the filling is bubbly and the crust is golden.
- Allow the filling to set for 2 hours after baking.
- Store leftovers wrapped in plastic wrap and covered in foil. Or, use a pie container.
Nutrition
Nutrition information is automatically calculated, so should only be used as an approximation.
 Like this recipe? Rate & comment below!
Before You Go
I hope you enjoyed this professional chef-tested recipe. Get inspired by more pie recipes or head over to my strawberry rhubarb bars next!


My family loves a cherry pie, and this one is perfect. The almond is a great addition. I used frozen cherries, let them defrost before cooking the pie, and drained a bit of the liquid. I am also a big fan of your pie crust recipe, which turns out perfect every time.
I tried this recipe, the taste was delicious. However, the filling was real watery, not thick in any way, not sure if I did something wrong.
Hi LouAnn! I’m glad it was delicious, but let’s get you a thick cherry pie filling! There’s a possibility that your cherries were realllllyyy juicy, in which case you might need to add a bit more cornstarch. Also, if you let the cherry mixture sit for 10 minutes so that the cherries have time to release their juices (then you drain some of the excess) that helps too. You want to be sure your filling is mixed evenly and also that your oven is at the right temperature. Your filling needs time to bubble or it won’t thicken properly! Last but definitely not least, this pie needs 2 hours to cool for the filling to set and get you that nice sliceable pie. Hope that helps and happy baking! ~gvd team
Attempted a second cherry pie, using all your suggestions and the pie was absolutely PERFECT, and delicious. Thank you for providing an easy recipe and baking suggestions!
Hi LouAnn! I’m so happy! Cherry pie is our favorites on this team, so it really brings us joy to hear the tips worked like a charm. Thanks for taking the time to let us know, and happy baking! ~gvd team
Ooohhhh this was so good!!! Served it warm with vanilla ice cream and it was the perfect end to a summer barbecue – thank you!!!
I am so happy to hear that, Ali! Thank you!
I had been craving cherry pie, and this hit the spot. That filling is wonderful. I really loved the flavor the almond extract added. So good!
I have been looking for a good fruit pie recipe, and this was it! The cherries had such a vibrant and delicious flavour, and It was also perfect with some extra cherries, and powdered sugar ontop.
I was kind of nervous to make a cherry pie with fresh cherries (since I normally lazy and use filling lol) but this was so good! And not too hard to do.
This cherry pie recipe turned out perfectly! Used fresh cherries (as mentioned) and it was amazing! The kids can’t get enough of it! We will surely have this on repeat!
I love the cherry pie! I love how sweet and juicy the cherry filling is. I love to eat it warm, with a scoop of vanilla ice cream on top.