A gooey, maple pecan sticky buns recipe that can be made day-of or overnight! Soft, fluffy cinnamon sweet rolls with a caramelized pecan topping!
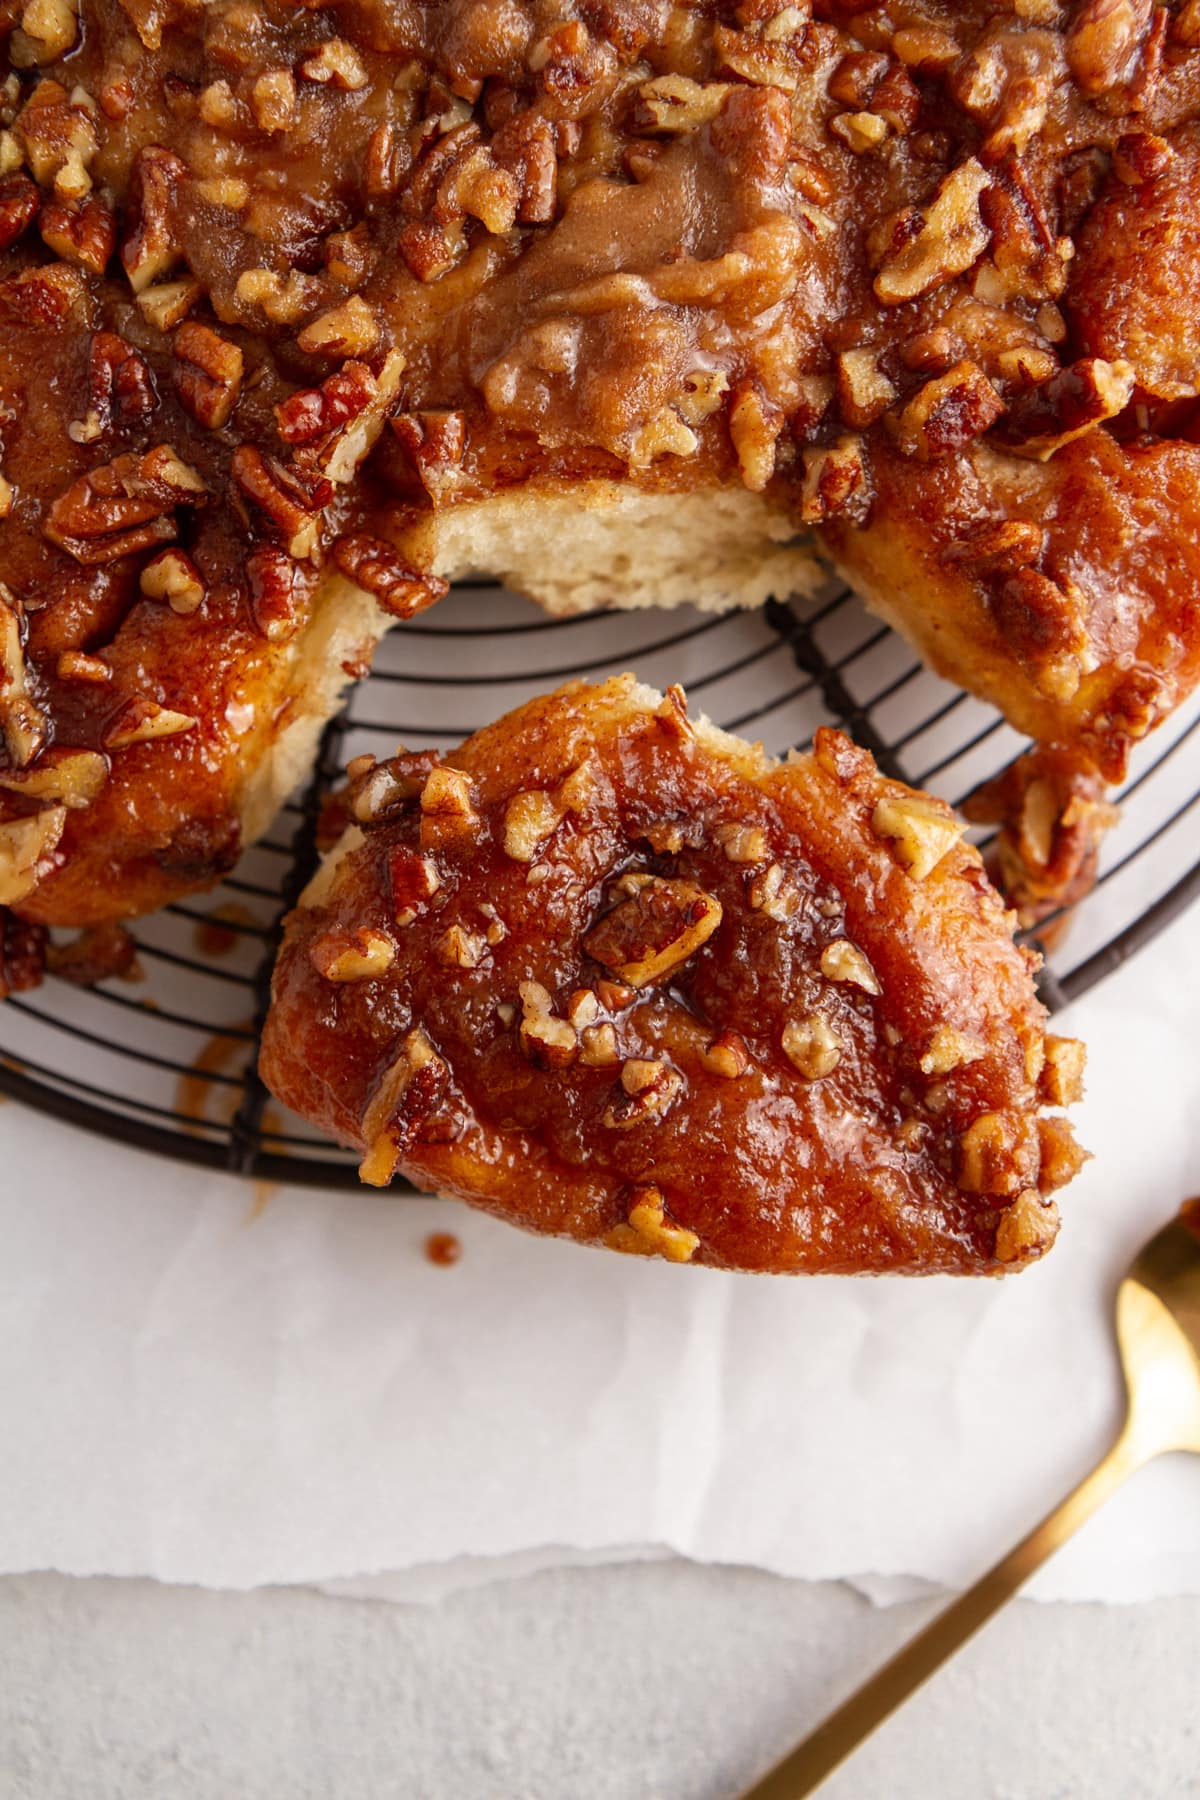
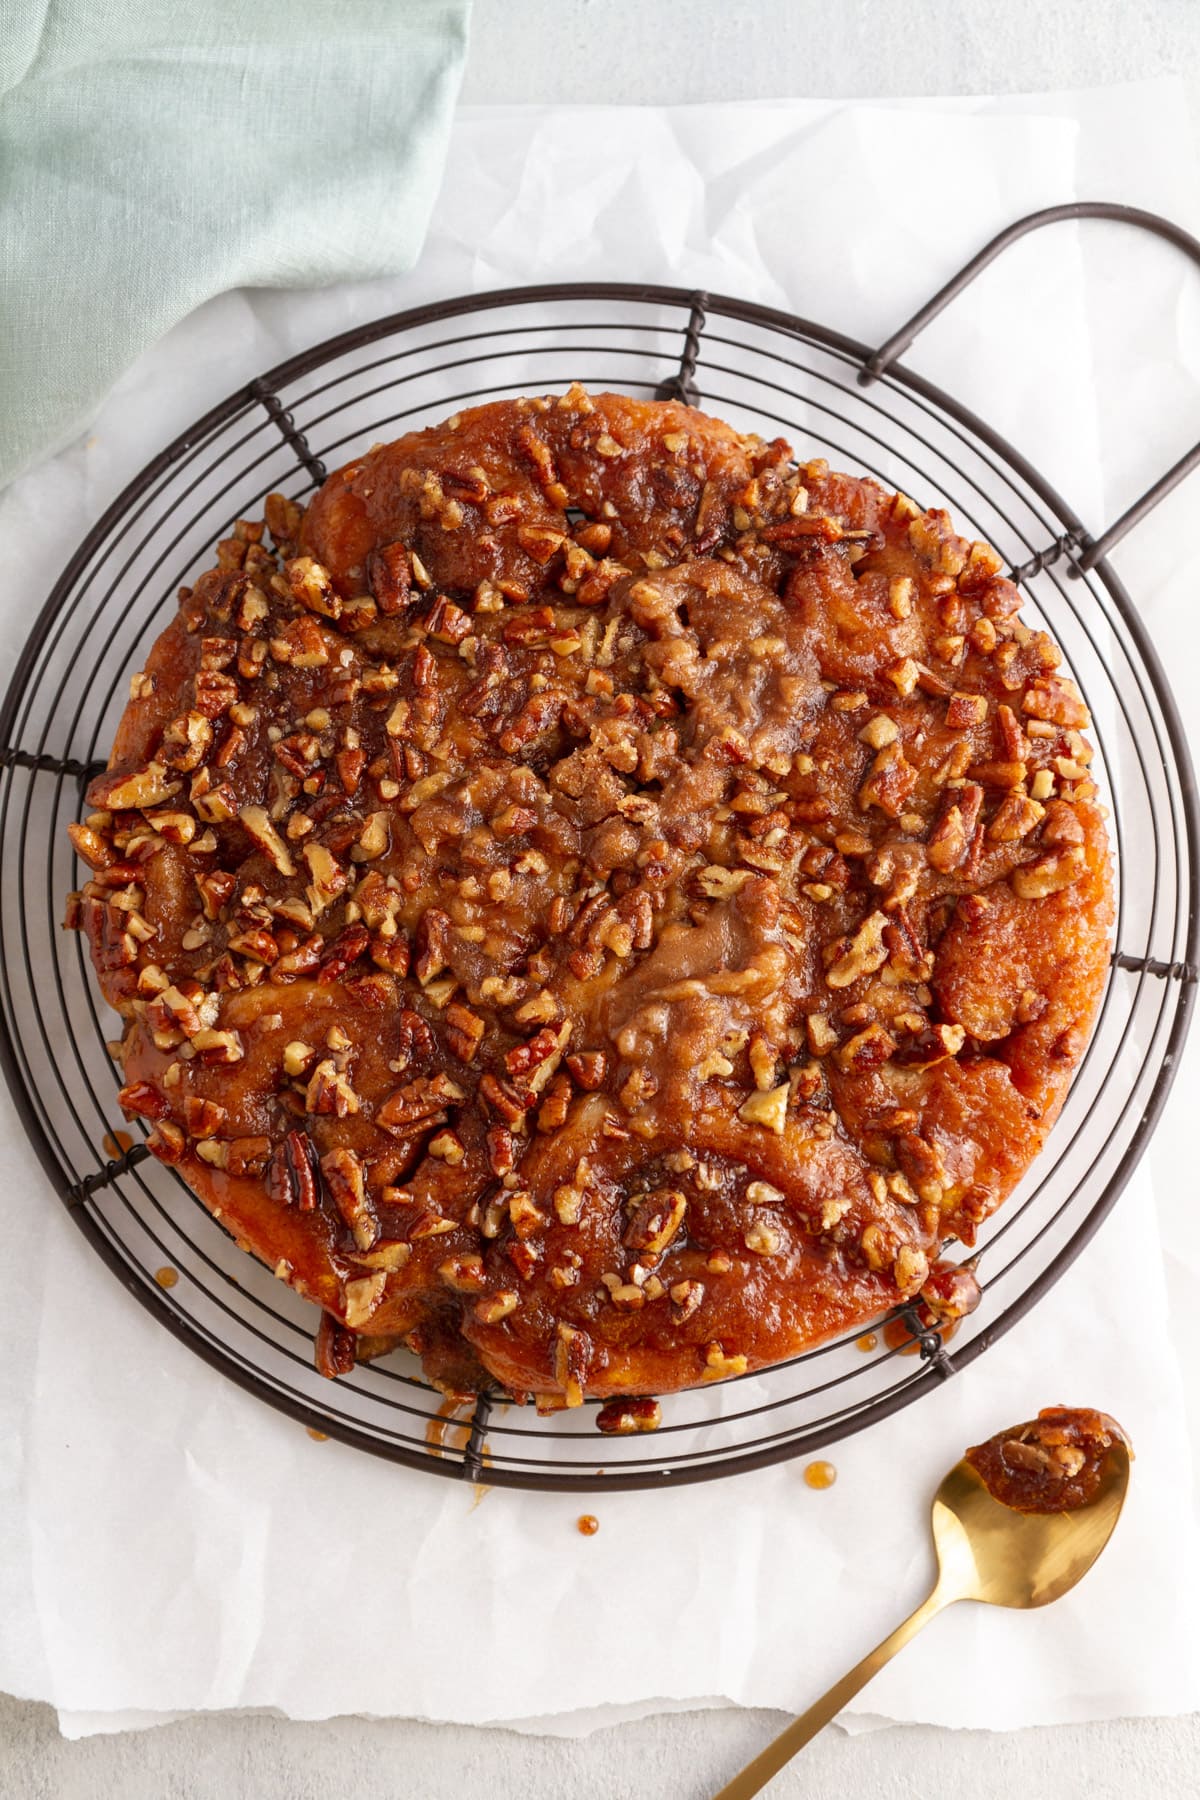
So, what makes a sticky bun a “sticky bun,” exactly? Excellent question. My expert opinion is that sticky buns are overnight cinnamon rolls baked on top of a brown sugar caramel. Before the buns cool completely, the buns are flipped over and the caramel becomes a glaze that melts over the top.
Sticky caramelized pecans and cinnamon-sugar-filled fluffy sweet rolls. Friends, it is theee best morning treat!
Table of contents
Why You Will Love this Sticky Buns Recipe
- Maple brown sugar caramel. 4 of the best words in the English language. Maple rounds out the caramel flavor and takes these buns to the next level! The added bonus is that it takes the place of the more typical corn syrup.
- The sweet roll dough includes milk powder and instant mashed potato flakes! The nonfat milk powder adds flavor and tenderness to the dough, while the instant mashed potato flakes lend even more tenderness and softness. They make this the softest and most tender sweet dough!
- Can be made & baked the same day or rested overnight! I love this kind of versatility in a recipe, because sometimes I need sticky buns RIGHT NOW and sometimes I want to do a little work the night before to make morning-me super happy!
Professional Tips for Making Pecan Sticky Buns
- Give the dough it’s time to rise! Especially in the winter months, dough can be slow-going on the rise time. Be patient. It will get there. To give it a little help, I put my covered bowl of dough in the oven, turn on the oven light and close the door. The heat from the oven light alone helps to proof the dough.
- Pre-cook the caramel for the best texture. The original instructions have you simply combine the topping ingredients and then put it in the bottom of the pan, but this is almost a guarantee to have grainy caramel topping. I have updated the recipe to the way I, as a professional pastry chef, make sticky buns.
- Allow the caramel topping to cool before placing the sliced cinnamon buns on top. It won’t take long, but there is no need to compromise the structure of the dough or lifespan of some of the yeast.
- Flipping the sticky buns to early or too late will be a disappointment. Turn the buns out of the pan too soon and the majority of the caramel topping will drip off; try to turn them out too late and find them glued to the pan! If this does happen, simply warm the whole pan in the oven and then turn out as directed.
Ingredients & Substitutions
- Active Dry Yeast: I prefer active dry yeast for a nice even rise especially when preparing doughs for morning baking. You can also use instant yeast, though I would not recommend rapid rise unless you intend to bake the sticky buns the same day.
- Water
- All-Purpose Flour: I use all-purpose flour in sticky buns as I do in all my cinnamon rolls recipes even these sourdough cinnamon rolls. It provides the perfect amount of structure without too much chew.
- Unsalted Butter
- Granulated Sugar
- Salt
- Nonfat Dry Milk Powder: If you do not have, and do not care to purchase nonfat dry milk powder, you can simply omit the powder and substitute warm milk for the water above.
- Instant Mashed Potato Flakes: Mashed potatoes or mashed potato flakes make the softest, fluffiest breads. Don’t believe me? Try this potato bread recipe or these Hawaiian rolls that are (dare I say it?) better than Kings Hawaiian!
- Maple Syrup: I always suggest using Grade A Robust Taste, Dark Color (formerly Grade B) maple syrup for baking because it is more concentrated. Not only does that impact the flavor but also the texture! I use it no matter if I am pouring it over a stack of sourdough pancakes or using it in maple donuts! You can also omit the maple and substitute for 2 tablespoons of honey or corn syrup.
- Dark Brown Sugar: Light brown sugar also works. Use whichever you have on hand.
- Pecans: If you are not a lover of pecans, simply omit them! They do add a lovely flavor and texture in these sticky buns as they do in my apple dump cake, but it is your kitchen. You could also play with the nut and try chopped walnuts or hazelnuts like in these hazelnut rye rolls.
- Ground Cinnamon
See the recipe card for full information on ingredients and quantities.
Possible Variations
- Use a different mix of spices to add variety to your morning! Replace half the cinnamon with this pumpkin spice recipe or apple pie spice recipe. You could also add a dash of ground cardamom like in cardamom buns or chai spice like in this cinnamon roll pull apart bread recipe.
- Swap out the dough. If you aren’t convinced about the milk powder and instant potatoes, try the more traditional sweet dough recipe from my hot cross cinnamon rolls or sourdough cinnamon rolls.
- Get creative with the filling. Think of sticky buns like cinnamon rolls with their party hats on! You can also never go wrong with a sprinkle of chocolate chips, cinnamon chips or butterscotch chips! I even used frozen raspberries in these raspberry cinnamon rolls or jam like in strawberry cinnamon rolls! Try adding lemon or orange zest like in these lemon poppy seed rolls!
How to Make the Best Pecan Sticky Buns
Use these instructions to make the best maple pecan sticky buns! Measurements can be found in the recipe card below.
Prepare the sweet dough:
Step 1: In a small bowl, whisk yeast with warm water and a pinch of the total sugar. Let mixture stand 10-15 minutes until foamy and slightly thickened.
Step 2: In a large mixing bowl or in the bowl of a stand mixer, add flour, butter, sugar, salt, nonfat dry milk powder and instant mashed potato flakes. Once the yeast are ready, scrape in the yeast mixture. Stir with a wooden spoon or use the dough hook attachment to mix the ingredients on low speed just until a dough forms.
Step 3: If kneading by hand, turn dough out onto a well-floured surface and knead by hand 8-10 minutes until dough is smooth, soft and elastic. If kneading with a stand mixer, increase the mixer to medium speed and knead 5-7 minutes until dough pulls away from sides of bowl and is smooth, soft and elastic.
Step 4: Shape dough into a ball and place in a lightly greased large bowl; turn once to coat. Cover with plastic wrap and let rise in a warm place 1-2 hours until doubled.
Step 5: While the dough bulk proofs, make the caramel: In a medium saucepan melt the butter for the topping then whisk in maple syrup and brown sugar. Bring sugar mixture to a boil and continue to cook over medium heat, stirring frequently, until the sugar is melted and the mixture combines. Add the chopped pecans and allow to cool slightly and then pour mixture into greased 9-inch round cake pan. Spread out using the back of a spoon or tip the pan to spread evenly.
Step 6: Turn the dough out onto a lightly floured surface. Degas the dough and then press into an 8×6-inch rectangle. You could also use a rolling pin. In a small bowl, whisk the filling ingredients until well combined. Sprinkle filling evenly over dough. Starting from one long end, tightly roll up the dough into a log. Pinch the along the edge to seal.
You can brush the dough with a little water to help the filling stick. I don’t use additional butter because there is already butter in the topping, but you could use melted butter as adhesive too!
Step 7: Use a sharp serrated knife to cut the log into 8 equal pieces. Carefully transfer buns to cake pan, spacing evenly. Whatever filling falls out of the buns, sprinkle over the tops once placed. Cover cake pan with plastic wrap and let rise in a warm place 45 minutes to 1 hour until buns are just touching or visibly puffed and feel light and airy when gently touched.
Step 8: While the buns final proof, preheat the oven to 350°F.
Step 9: Remove plastic wrap and bake buns 15 minutes in preheated oven. Tent pan lightly with foil, then continue baking an additional 10-12 minutes until buns are baked through (an instant-read thermometer inserted in the center of one bun should read 185°F).
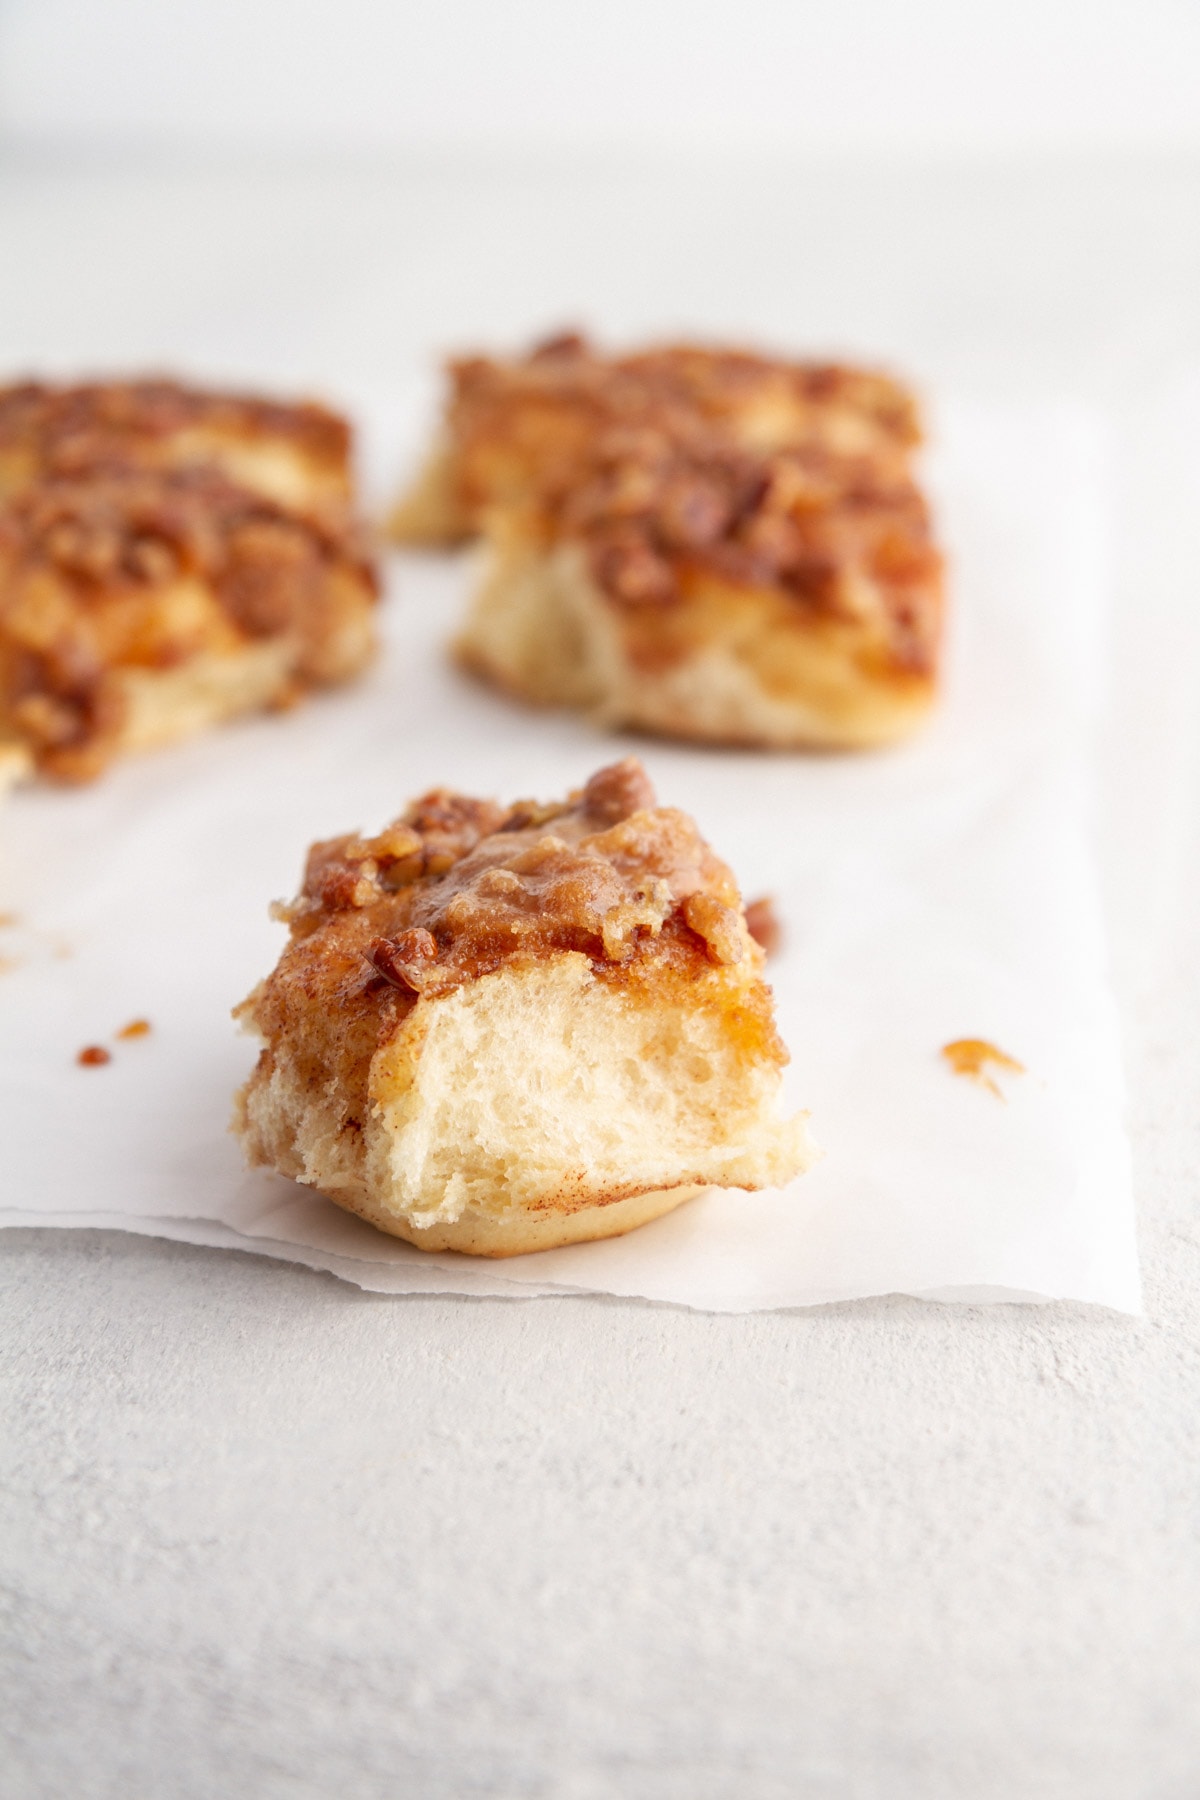
Step 10: Remove buns from oven and place on a wire rack to cool 10 minutes. Wearing oven mitts, turn buns out onto a serving platter or parchment paper-covered baking sheet to cool. Spoon any remaining glaze from cake pan on top of warm buns. Serve warm or room temperature.
How to make sticky buns overnight
Shape the buns, place them in the pan with the glaze, cover the pan tightly with plastic wrap, then immediately place them in the refrigerator (don’t let them rise a second time!). Store the buns in the fridge overnight. In the morning, let the buns sit at room temperature (still covered) 15 minutes – 1 hour until they are light and airy to the touch. Preheat the oven while they sit out and then bake as directed.
Frequently Asked Questions
Store buns in an airtight container or well wrapped at room temperature for up to 5 days, though they are best when consumed within 2 days. You can freeze them baked but I find they lose a little of their luster. You could also use leftovers in this cinnamon roll breakfast bread pudding! Holy, decadence.
Reheat leftovers in the microwave or covered in aluminum foil in a preheated oven. The temperature isn’t important because they are covered.
Serve sticky buns for breakfast, brunch or with afternoon tea and coffee! You could also serve them for Christmas morning or even for Thanksgiving (move over sweet potato casserole!).
If you enjoyed this recipe, please leave a star rating and let me know how it goes in the comments below! I love hearing from you and your comments make my day!
Pecan Sticky Buns

Ingredients
For the dough:
- 1 ¼ teaspoons active dry yeast
- ½ cup warm water, 110-115F
- 1 ½ cups all-purpose flour
- 3 tablespoons unsalted butter, room temperature, cut into cubes
- 1 ½ tablespoons granulated sugar
- ½ teaspoon salt
- 2 tablespoons nonfat dry milk powder
- ¼ cup instant mashed potato flakes
For the glaze:
- ¼ cup maple syrup
- 1 ½ tablespoons unsalted butter, melted
- ½ cup dark brown sugar, packed
- ½ cup pecans, finely chopped
For the filling:
- ¼ cup granulated sugar
- 1 teaspoon ground cinnamon
- 1 ½ teaspoons all-purpose flour
Instructions
- In a small bowl, whisk yeast with warm water and a pinch of the total sugar. Let mixture stand 10-15 minutes until foamy and slightly thickened.
- In a large mixing bowl or in the bowl of a stand mixer, add flour, butter, sugar, salt, nonfat dry milk powder and instant mashed potato flakes. Once the yeast are ready, scrape in the yeast mixture. With a wooden spoon or the dough hook attachment, mix the ingredients on low speed just until a dough forms.
- If kneading by hand, turn dough out onto a well-floured surface and knead by hand 8-10 minutes until dough is smooth, soft and elastic. If kneading with a stand mixer, increase the mixer to medium speed and knead 5-7 minutes until dough pulls away from sides of bowl and is smooth, soft and elastic.
- Shape dough into a ball and place in a lightly greased large bowl; turn once to coat. Cover with plastic wrap and let rise in a warm place 1-2 hours until doubled.
- While the dough bulk proofs, make the caramel: In a medium saucepan melt the butter for the topping then whisk in maple syrup and brown sugar. Bring sugar mixture to a boil and continue to cook over medium heat, stirring frequently, until the sugar is melted and the mixture combines. Add the chopped pecans and allow to cool slightly and then pour mixture into greased 9-inch round cake pan. Spread out using the back of a spoon or tip the pan to spread evenly.
- Turn the dough out onto a lightly floured surface. Degas the dough and then press into an 8×6-inch rectangle. You could also use a rolling pin. In a small bowl, whisk the filling ingredients until well combined. Sprinkle filling evenly over dough. Starting from one long end, tightly roll up the dough into a log. Pinch the along the edge to seal.
- Use a sharp serrated knife to cut the log into 8 equal pieces. Carefully transfer buns to cake pan, spacing evenly. Whatever filling falls out of the buns, sprinkle over the tops once placed. Cover cake pan with plastic wrap and let rise in a warm place 45 minutes to 1 hour until buns are just touching or visibly puffed and feel light and airy when gently touched.
- While the buns final proof, preheat the oven to 350?.
- Remove plastic wrap and bake buns 15 minutes in preheated oven. Tent pan lightly with foil, then continue baking an additional 10-12 minutes until buns are baked through (an instant-read thermometer inserted in the center of one bun should read 185°F).
- Remove buns from oven and place on a wire rack to cool 10 minutes. Wearing oven mitts, turn buns out onto a cooling rack or parchment paper-covered sheet pan to cool. Spoon any remaining glaze from cake pan on top of warm buns.
Notes
Presentation – Let the buns cool 10-15 minutes in the pan before turning over to retain as much topping as possible.
How to proof overnight & bake the next morning – Shape the buns, place them in the pan with the glaze, cover the pan tightly with plastic wrap, then immediately place them in the refrigerator (don’t let them rise a second time!). Store the buns in the fridge overnight. In the morning, let the buns sit at room temperature (still covered) 15 minutes – 1 hour until they are light and airy to the touch. Preheat the oven while they sit out and then bake as directed.
Variations – Use a different dough (any cinnamon roll dough will do!) or vary the flavor by adding zest, juice or spice!
Storage – Store leftover buns in an airtight container at room temperature up to 1-2 days. Rewarm them wrapped in aluminum foil in an oven or unwrapped in the microwave.
Nutrition
Nutrition information is automatically calculated, so should only be used as an approximation.
 Like this recipe? Rate & comment below!
Before You Go
I hope you enjoyed this decadent breakfast recipe. Check out our other delicious breakfast and brunch recipes or dive deeper into bread making with all our yeasted bread recipes!


I love that I can shape and bake these buns the next morning! It made for a very easy birthday celebration for my husband. He loved these rolls, they were super light and full of flavor.
Only 1 1/2 cups of flour? that doesn’t seem enough.
Marti, It’s true — just 1 1/2 cups of flour. The dough is very light.
I just noticed the other water goes in with the flour. I am just used to more water being in the yeast. Sorry!
Charlotte, no worries! Yep, 1 tbsp goes with the yeast, then the rest goes with the flour mixture.
The ingredients say 1/2 cup water. The directions say 1 T of water and the yeast????