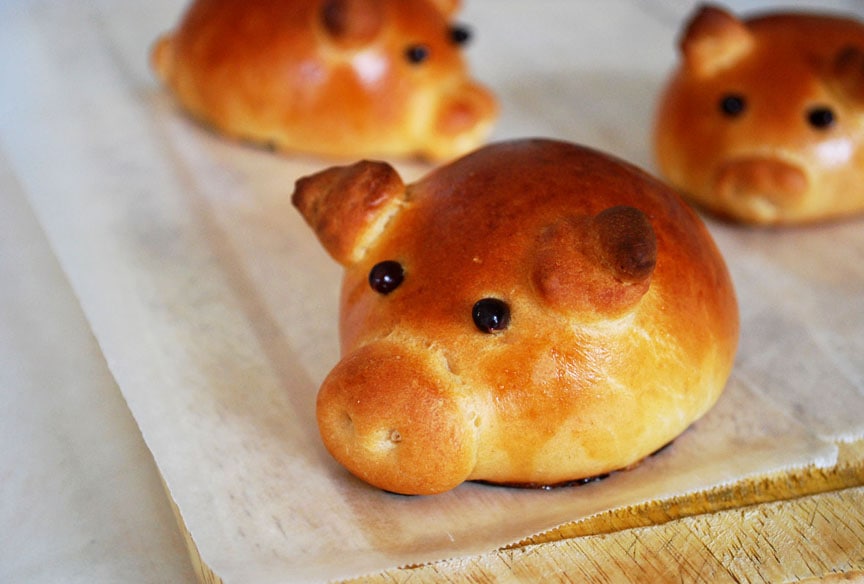
sausage-stuffed piglet buns
Ermagerd you guys, I have the most ADORABLE guest post for you today while I’m on vacation. Leave it to the lovely Caroline and Monica of Pass the Cocoa to come up with something so cute and creative (and delicious). These two are super smart and talented — they’re both college students (at Harvard! And Northwestern!) and in their free time, they bake up yummy things for their blog. And we are all the happier (and droolier?) for it — at least I am, anyway, any time I visit their blog. Anywho, enough of my babbling… let’s talk about piglet buns!
Hello wonderful Girl Versus Dough readers! My name is Caroline, I’m a college sophomore, and I blog with my friend Monica over at Pass the Cocoa. We are both so thrilled that Stephanie asked us to do a guest post for her. I love her beautiful food photography and recipes that you could actually make and eat all the time. My favorites are (true to the blog’s name) the bread recipes, and in that vein, I wanted to share this recipe idea: sausage-stuffed rolls in the shape of pigs!
These piglet buns are adorable and delicious. The salty and spicy sausage is perfectly complimented by the fluffy and slightly sweet bread which also absorbs the grease from the meat. They’ll be a huge hit with kids; my little brother loved them, which must be the only reason they disappeared from the house within two days, right? Ha.
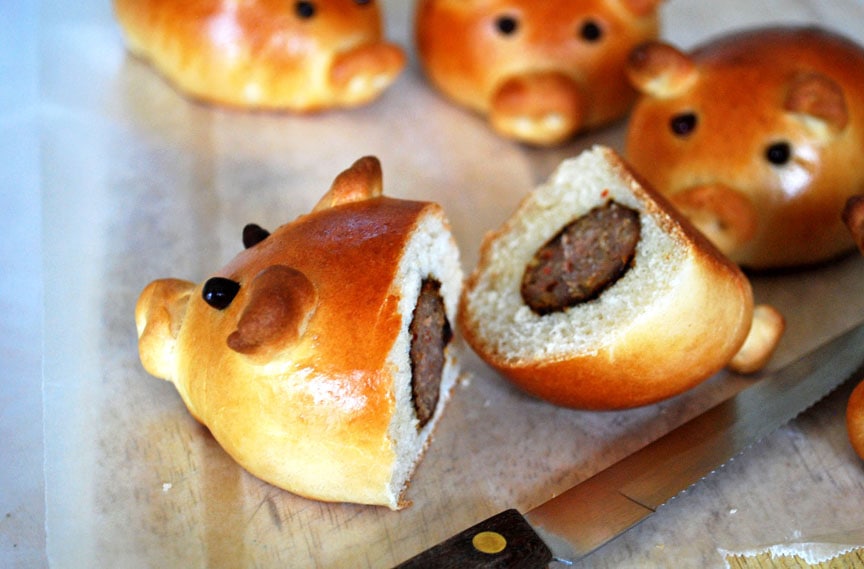
I came across this idea on Kanela y Limón, under the name “Cerditos Preñaos,” or “pregnant piglets.” For my version, I used the Pioneer Woman’s sweet roll recipe for the dough, and used Italian sausage instead of chorizo.
I’d suggest cooking the sausage before making the dough, so that they have time to cool before you wrap them in the dough.
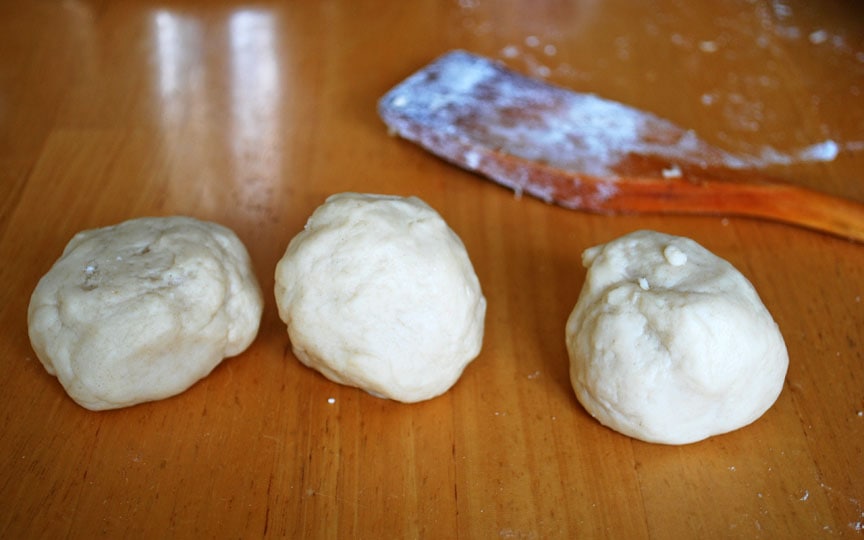
To assemble the piglets, divide the dough into 13 pieces. Set aside one of the pieces to make the snouts, ears, and tails.
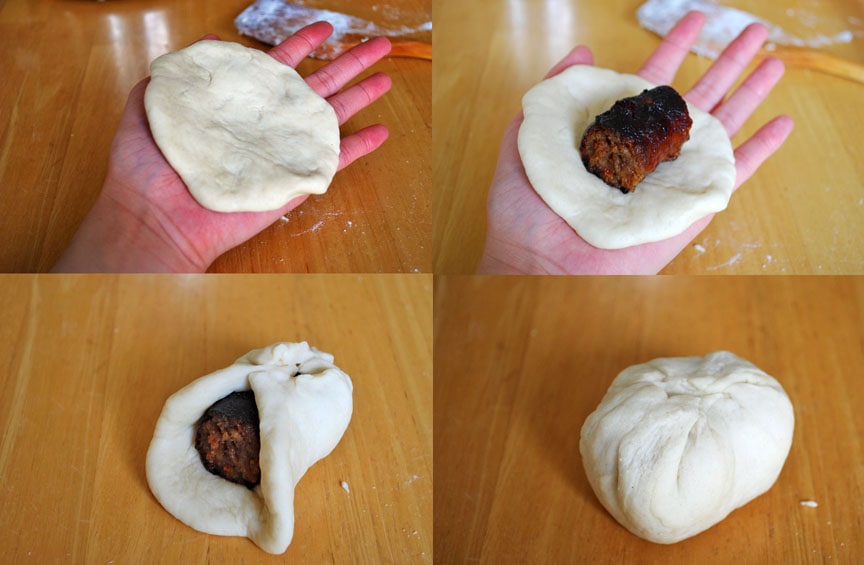
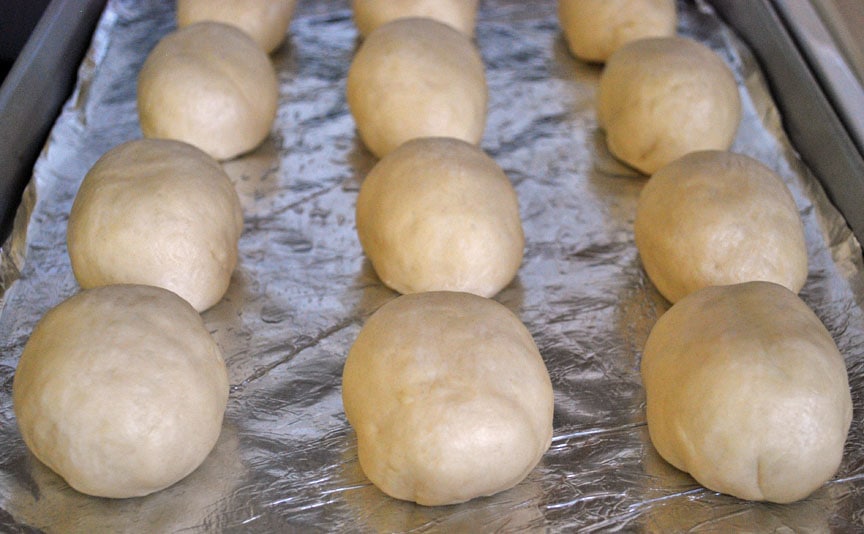
Take a ball of dough, flatten it into a 4-inch circle, and place a piece of sausage in the center. Gather together the edges of the circle and pinch them together. Place them seam-side downwards onto a greased baking sheet, cover with a damp towel, and let them rise for 20-30 minutes. They shouldn’t grow too much bigger, but they should get a little puffier.
I found that it was easier to stick the ears and snouts on the pigs after the egg wash dried a little bit, so I suggest working in groups of three: brush three of the buns with egg wash, make snouts for each, and do the same with the eyes, ears and tail.
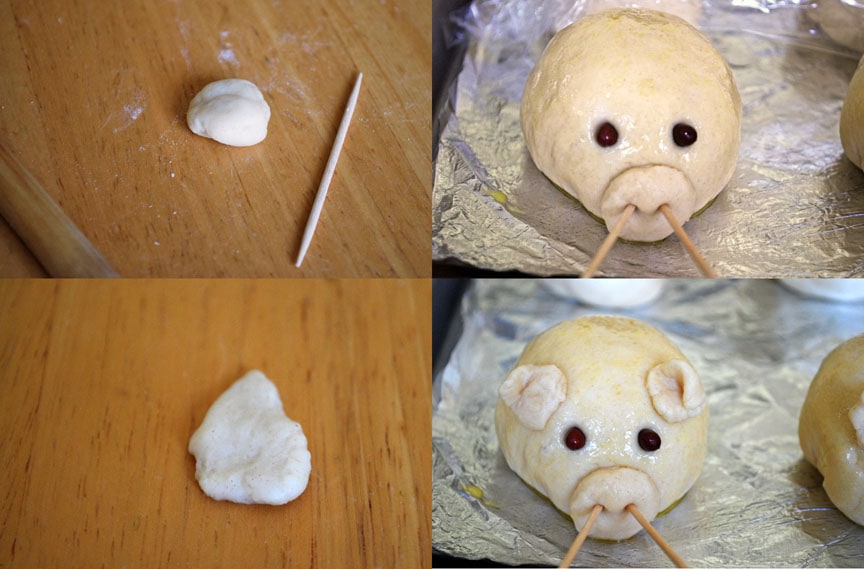
To make the snout, shape a small piece of dough (about the size of a large pea or a small marble) into an oval. Place it onto the face of the pig, and stick two toothpicks into the center of snout. You’ll bake them with the toothpicks in the dough so that the holes don’t close.
Shape two tear drops for the ears, and place them on top of the head. You can fold them down a little if you want.
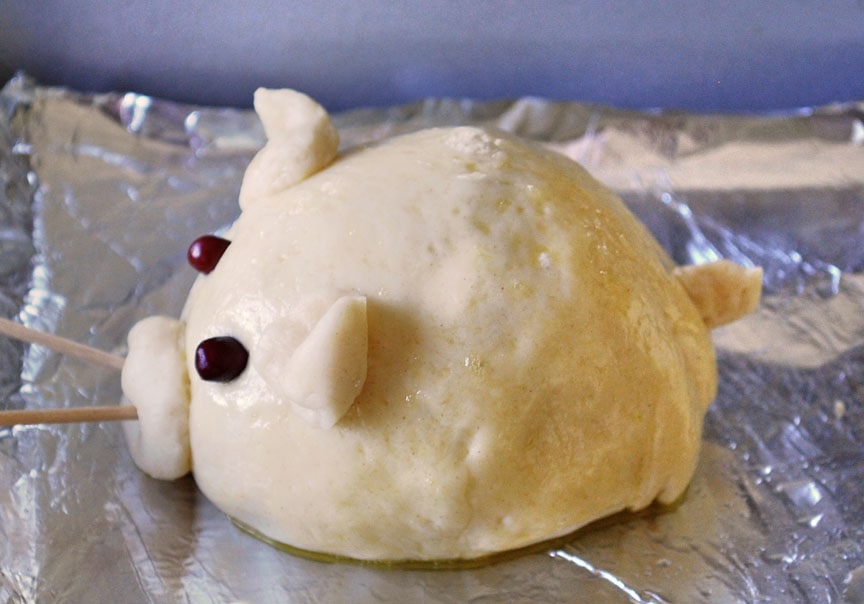
And don’t forget to put a little ball of dough in the back for a tail!
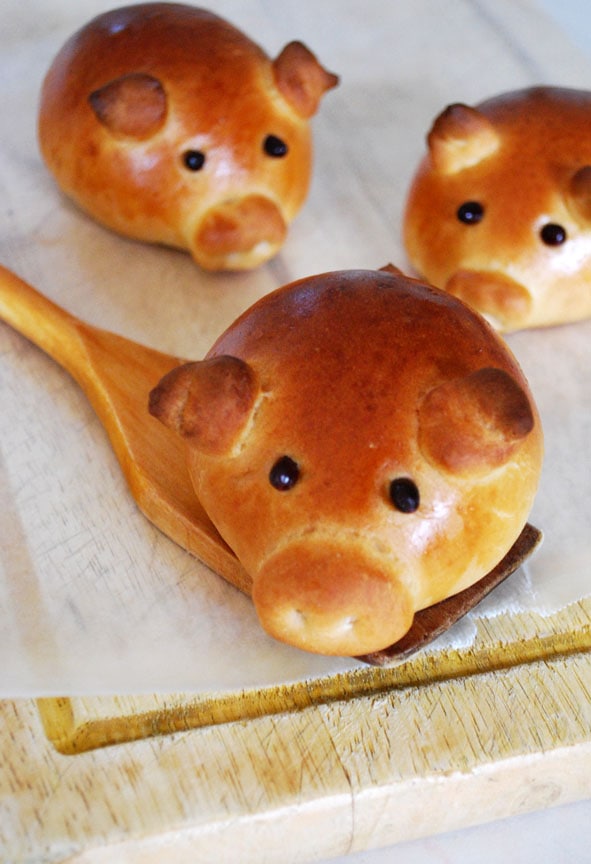
Bake them at 425 degrees Fahrenheit for 15-18 minutes, let cool, and gently remove the toothpicks.
This little piggy went to the market, and this little piggy stayed home. And this little piggy—

Man, I’m having way too much fun with these. Enjoy, everyone!
Love,
Caroline
Sausage-Stuffed Piglet Buns
Inspired by Kanela y Limón, dough recipe adapted from The Pioneer Woman
Ingredients:
For the dough —
1 cup milk
1/4 cup sugar
1/4 cup vegetable oil
1 1/4 teaspoons active dry yeast
2 1/4 cups all-purpose flour, separated
1/4 teaspoon baking powder
1/4 teaspoon baking soda
1 1/2 teaspoons salt
Assembly —
4 Italian sausages, any kind, cooked and cut into 2-inch pieces
Azuki beans, cloves, or peppercorn
1 egg
Toothpicks
Directions:
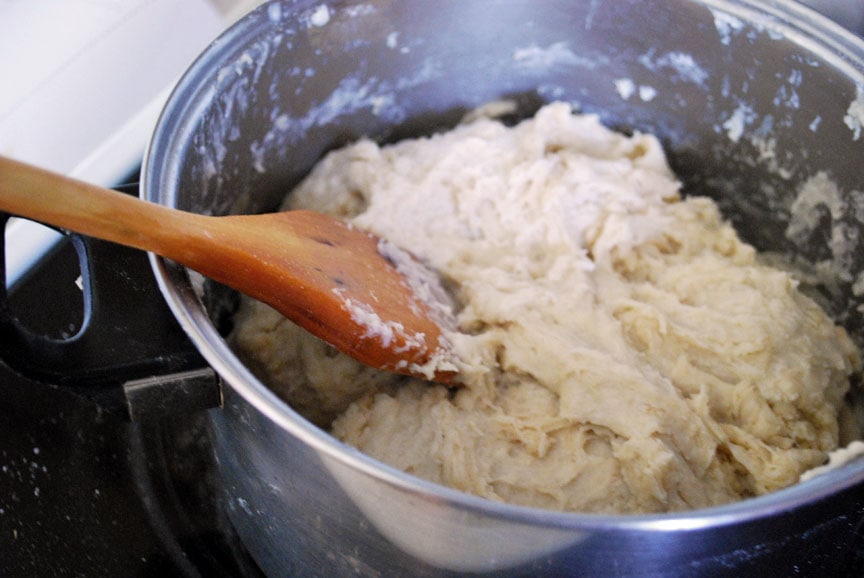
In a pot over medium heat, mix together the milk, sugar, and vegetable oil. Heat until the mixture is just below boiling. Let cool until lukewarm.
Sprinkle the yeast over the liquid and let it sit for a minute.
Stir in 2 cups of flour. The mixture will be very sticky and wet. Let rise in a warm place for 1 hour.
After the dough has risen for 1 hour, stir in the remaining 1/4 cup flour, the baking powder, baking soda, and salt. If the dough is still too wet to work with, add in a little more flour.
Divide the dough evenly into 13 pieces. Wrap one of the pieces in plastic wrap and set aside.
Flatten one of the dough balls into a circle roughly 4 inches in diameter, making the edges of the circle slightly thinner than the center.
Place a piece of sausage at the center of the circle. Gather the edges of the circle around the sausage so that they meet in the middle. Press down on the seams. The dough should be in the shape of an oblong sphere. Place on a greased baking sheet, with the seam facing down. Repeat this process 11 more times.
Cover the dough balls with a damp towel or plastic wrap, and let rise in a warm place for 20-30 minutes, until slightly puffy.
Preheat the oven to 425 degrees F. When assembling the pigs, it is best to work in batches of three. Beat the egg and brush 3 of the dough balls with the egg wash.
Make the snouts for the pig: Unwrap the dough ball you set aside. Break away a piece of dough about the size of a large pea or a small marble, and flatten it into an oval. Place the oval on the side of the dough ball (one of the narrower ends of the oblong sphere). Stick two toothpicks into the oval to make the two nostrils. You will leave the toothpicks in the dough while baking to keep the holes from sealing up in the oven.
Repeat this process for the two other dough balls you brushed in egg wash.
Place two azuki beans, cloves, or peppercorn above the snout for eyes. Do the same for the other two dough balls.
Form two pea-sized pieces of dough into teardrop shapes. Place above the eyes for the pig’s ears. Repeat two more times.
Place a pea-sized piece of dough on the back of the pig for a tail. Repeat twice.
Repeat this process for the other 9 dough balls, working with 3 at a time.
Place in the oven and bake for 15-18 minutes, until golden brown. Let cool, and carefully remove the toothpicks from the pigs’ snouts.
Stephie — YES. I agree. 🙂
The cuteness of these is ASTOUNDING! I almost want to hug them!
OMG….the cuteness is killing me!!
This is simply adorable! I don’t think I could bear to take a bite into one of these 🙂
I can’t even begin to say how cute these are…I love this idea so much!!
Pingback: Of Pop Stars and Protagonists
Those are pretty adorable!! lol… how cute… and so creative!
Okay seriously, this is just too cute! I have to make this for my niece and nephews – they would LOVE it!
I am DYING over these and all their cuteness! I need to make these for my nieces! They’ll gobble em’ up.
I just made these but I didn’t have sausage on hand, so I mixed up some herb and garlic cream cheese, cheddar, and bacon bits and stuffed the buns with that. They came out amazing and adorable. Can’t wait to surprise my boyfriend with them!
If you left the sausage out these would make cute decorations if you put shellac on them to preserve. Just make sure no one tries to eat them.
Can these be made up ahead of time? Or can the dough sit overnite and assemble the next morning? Prefer to make up night before and just stick in the oven?
Jacque — I didn’t make the recipe (it’s a guest post) so I can’t say for certain, but I’m sure you can make the dough ahead of time and refrigerate it overnight, then bring it back to room temperature before assembling it into “piglets.” Hope that helps!
Thank you, I did and they were adorable! Hit of my brunch!!!
Pingback: Sausage Stuffed Piglet Buns |