This whole wheat pizza dough is 100% whole wheat and still bakes up airy and chewy. It is the kind of crust that makes you want to skip the delivery order for good.


A Quick Look At The Recipe
This is a brief summary of the recipe. Jump to the recipe to get the full details.
Prep Time
20 minutes
Cook Time
15 minutes
Proof/Rest Time
8 hours
Total Time
8 hours 35 minutes
Servings
24 Slices
Difficulty
Intermediate
Calories *
60 kcal per serving
Technique
Stand mixer kneading, cold proof.
Flavor Profile
Nutty, earthy, slightly sweet.
* Based on nutrition panel
“I was skeptical that 100% whole wheat dough could stretch this thin without tearing, but after the cold proof it was incredibly extensible and easy to shape. The crust baked up with great chew and my kids didn’t even notice the swap.” ⭐⭐⭐⭐⭐
Monica
Why You Will Love This Recipe
- 100% Whole Wheat, No Shortcuts. This dough uses nothing but whole wheat flour, so every bite has that nutty, earthy flavor you only get from the whole grain.
- Light and Chewy, Not Dense. Whole wheat pizza dough is often heavy and crackerlike, but this one is properly proofed and gluten-developed so the crust stays open and springy. If you have ever made my whole wheat dinner rolls recipe, you know that whole wheat can absolutely deliver on texture when you give it the right conditions.
- Works Just Like Any Great Pizza Dough Recipe. The method is straightforward: bloom the yeast, mix, knead, cold ferment, shape, bake. The cold ferment does the flavor work overnight, so there is no long same-day schedule to manage.
Pizza night in my house almost always starts with this dough. I make the boules the night before, and by the time I pull them from the refrigerator the next evening, they are pillow-soft, fragrant, and incredibly easy to stretch.
If you already love working with whole wheat flour, this dough follows the same principles as my whole wheat bread recipe, so the process will feel familiar from the first mix. Might I also suggest this whole wheat pita bread for easy personal pizzas!
Ingredients & Substitutions
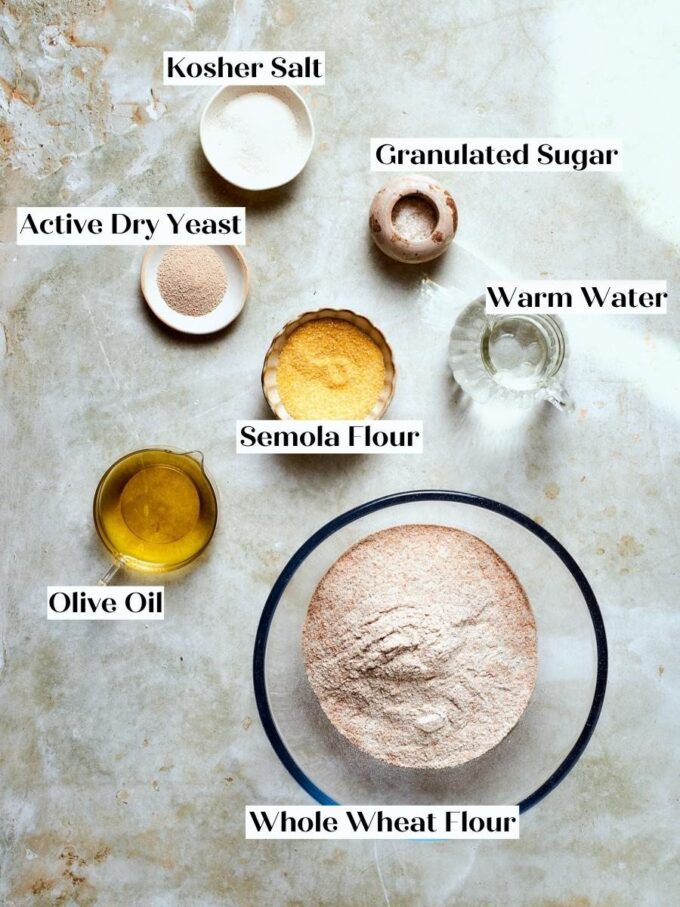
- Active Dry Yeast: This is what leavens the dough and gives the crust its airy, open structure. If you use instant yeast instead, skip the blooming step and add it directly with the dry ingredients, and expect the dough to rise a little faster. Looking for a set it and forget it pizza dough? Make this no-knead pizza dough.
- Whole Wheat Flour: This is the only flour in the recipe, and it delivers the nutty, earthy flavor and chewy texture that make this crust worth making.If you love baking with whole wheat, my whole wheat sourdough bread follows the same whole-grain principles and is a great next project.
- Granulated Sugar: A small amount of sugar feeds the yeast during blooming and helps the dough develop a touch of sweetness that balances the earthy bran flavor.
- Warm Water: The warm water activates the yeast and hydrates the flour. Too hot and it kills the yeast; too cold and fermentation stalls. Looking for a fun alternative to water, try my beer pizza dough next!
- Kosher Salt: Salt strengthens the gluten structure and sharpens the overall flavor. If you use table salt, reduce the amount slightly since it is finer and more concentrated.
- Olive Oil: Olive oil adds moisture and richness, contributing to a tender, pliable dough that stretches without fighting you. Swapping it for a neutral oil like canola will keep the texture the same, but you will lose the subtle flavor olive oil brings.
- Semola Flour, for Shaping: Semola is finely ground durum wheat that is coarser than all-purpose flour but finer than traditional semolina. It keeps the shaped dough from sticking to the peel or work surface without making the bottom gummy, which is exactly what you need when you are launching a stretched, thin-bottomed pizza onto a hot stone.
- *See the recipe card for full information on ingredients and quantities.*
Variations for Whole Wheat Pizza Dough
- Herbed Dough. Mix 1 to 2 teaspoons of dried oregano, rosemary, or Italian seasoning directly into the flour before combining with the wet ingredients. The herbs bloom during the cold ferment, and the flavor comes through in every bite. You can use fresh herbs. I suggest blooming them in oil before adding them to the dough.
- Garlic Oil Base. Instead of plain olive oil in the dough, use garlic-infused olive oil. The dough takes on a subtle savory depth that is especially good with a white pizza.
- Prep a personal pan pizza. Instead of stretching the dough thin, press the dough into an oiled cast-iron skillet or baking pan. Let rise at room temp for 30–60 minutes, then bake for a thick-crust pizza. It’ll turn out more similar to my no knead focaccia!
- Go crazy with your topping! You can pile on roasted vegetables, fresh mozzarella, and a generous ladle of sauce, and this crust will hold. The dough stretches thin without tearing, which means more toppings and a crust that does not go soggy in the center.

Professional Tips for Perfect Whole Wheat Pizza Dough
- Match your pizza size to your equipment before you start. The dough can stretch to 18 inches, but only make a pizza that fits your peel and stone. Trying to launch an oversized pizza onto an undersized stone will cost you the whole thing; I learned that the hard way!
- Room temperature proofing before shaping. Cold dough is tight and fights back when you stretch it, and you will tear through the bottom before you reach a workable size. Let the dough rest at room temperature for 2 to 3 hours after pulling it from the refrigerator; it should feel pillowy and relaxed before you touch it.
- Stretch the bottom crust as thin as you can without tearing it. A thicker bottom stays doughy in the center and shrinks your pizza. Work from the inside out, pressing and rotating gradually, and only pick the dough up to use your knuckles and gravity once it begins moving freely.
- Always shake the peel before you open the oven. If the dough does not slide freely, it will stick mid-transfer and fold over itself on the stone. Dust any spots that cling with more semolina flour, and work quickly once toppings are on, since moisture from the sauce will start bonding the dough to the peel.
How to Make Whole Wheat Pizza Dough
Use these instructions to make a chewy, whole-grain pizza dough with a crisp bottom and a puffy, well-developed edge. Further details and measurements can be found in the recipe card below.
Make Dough
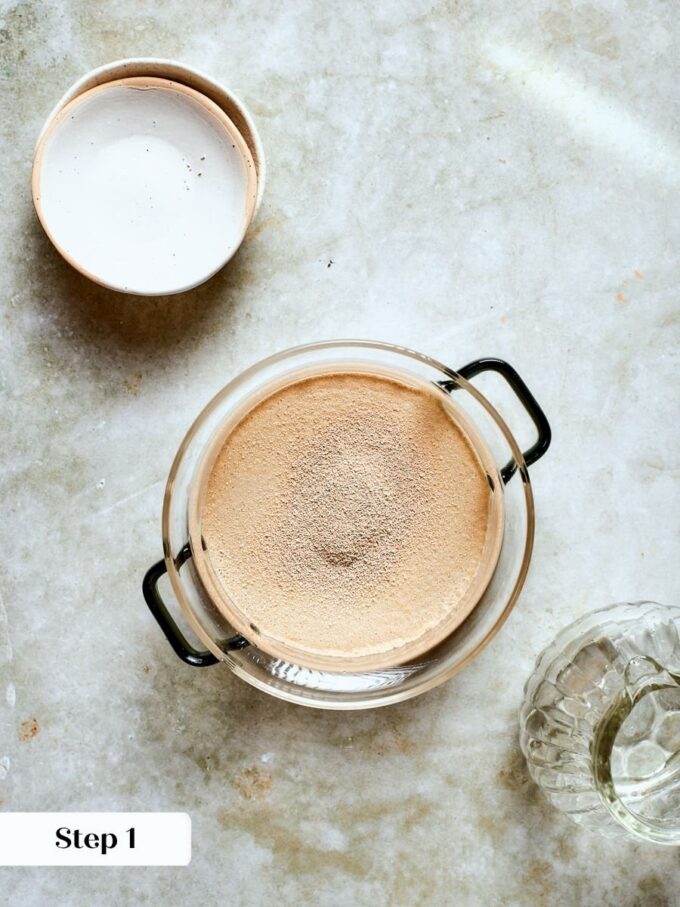
Step 1: Combine the yeast, sugar, and warm water in the bowl of a stand mixer or in a small bowl. Stir gently and let the mixture sit for about 5 minutes. You are looking for a foamy, fragrant surface, The yeast should visibly bubble and puff. (photo 1)
If the mixture stays flat and cloudy after 5 minutes, the yeast may be old or the water was too hot or too cold, aim for around 110°F. It is worth starting over before building the rest of the dough on top of it.
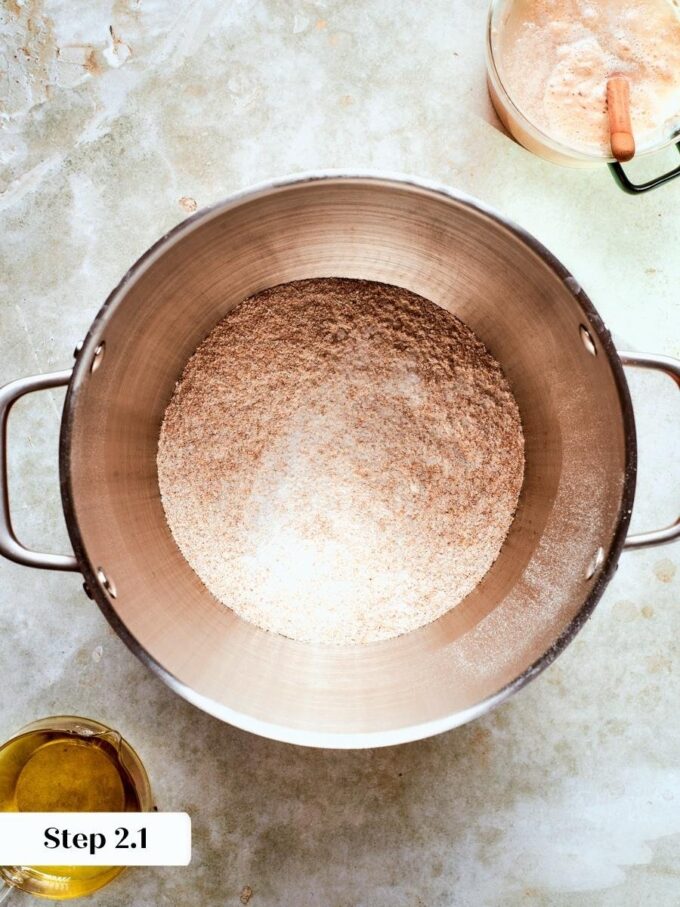
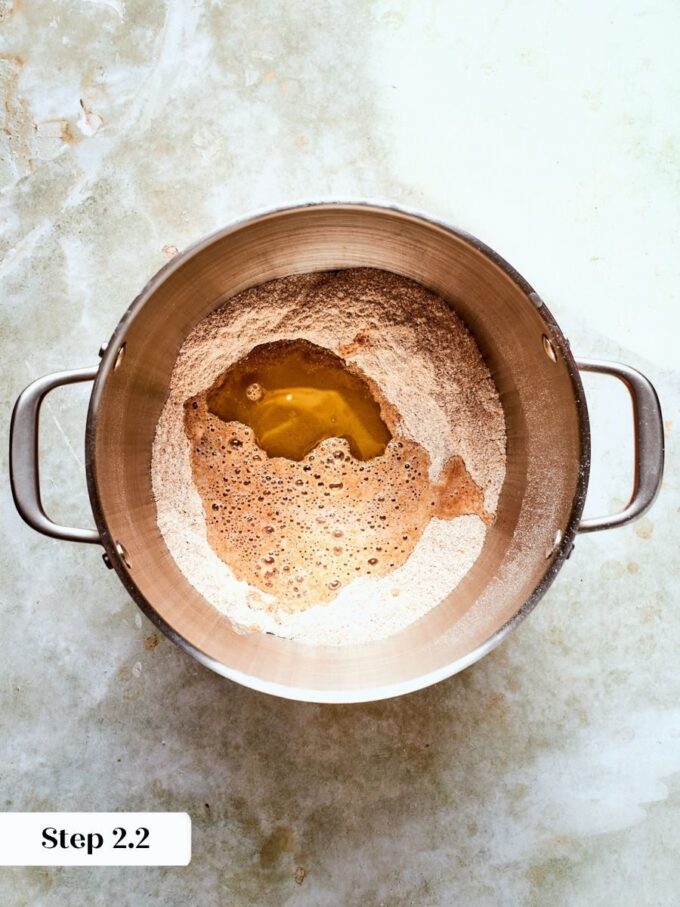
Step 2: Add the flour, salt, and olive oil, and mix until a rough, shaggy dough forms. Whether you are mixing by hand or using a stand mixer on low, the dough will look ragged and uneven at this stage; that is completely normal! Whole-wheat dough often feels stiffer and drier than white-flour dough at the start because the bran in the flour absorbs water more slowly. Resist the urge to add more water. (photos 2 & 3)
If mixing by hand, make a well in the center of your flour-and-salt mixture, then pour in the yeast mixture and olive oil. Stir together with a spoon until a shaggy dough forms. If you are mixing in a stand mixer, add the flour, salt, and oil directly to the bowl with the yeast mixture.
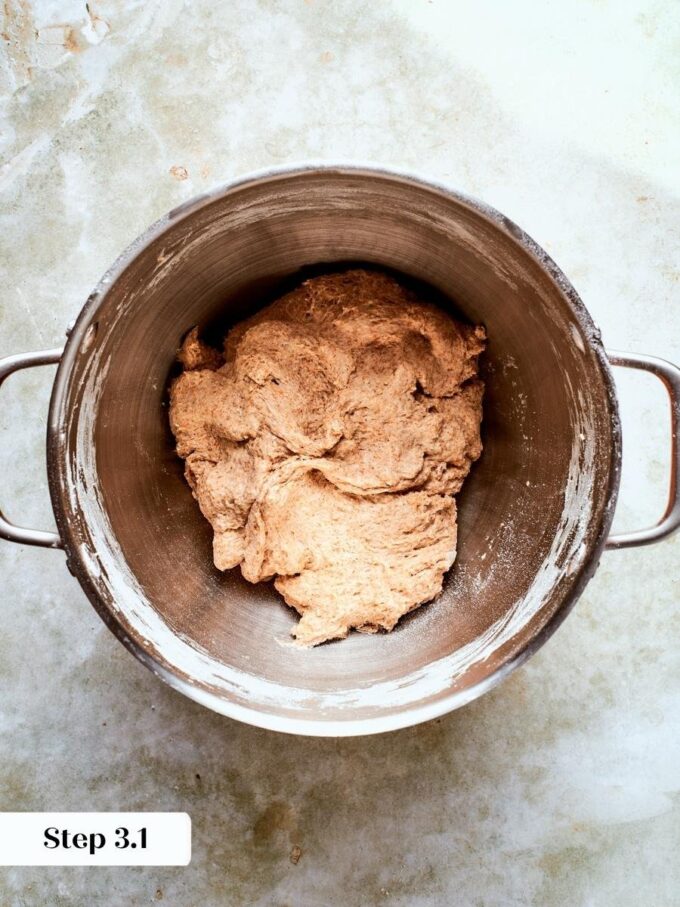
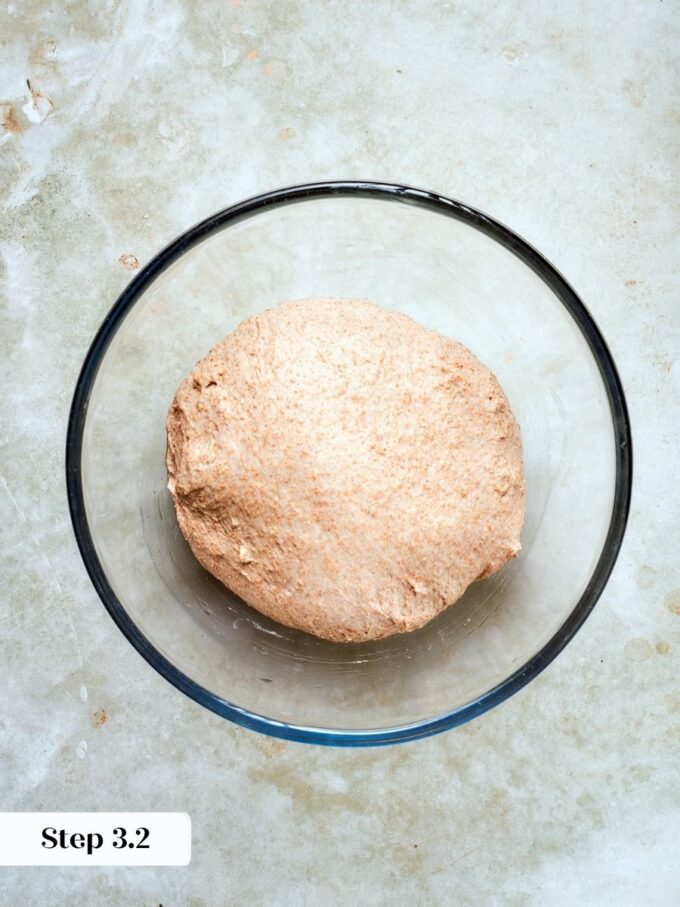
Step 3: Knead the dough until it is smooth and elastic. If you are working by hand, transfer the dough to a lightly floured surface and knead for 5 to 7 minutes. If you are using a stand mixer, increase the speed to medium-high and knead for about 3 and a half minutes. Either way, you are looking for a dough that has gone from rough and shaggy to soft, cohesive, and slightly tacky but not sticky. It will spring back gently when pressed with a fingertip. (photos 4 & 5)
Divide and Proof
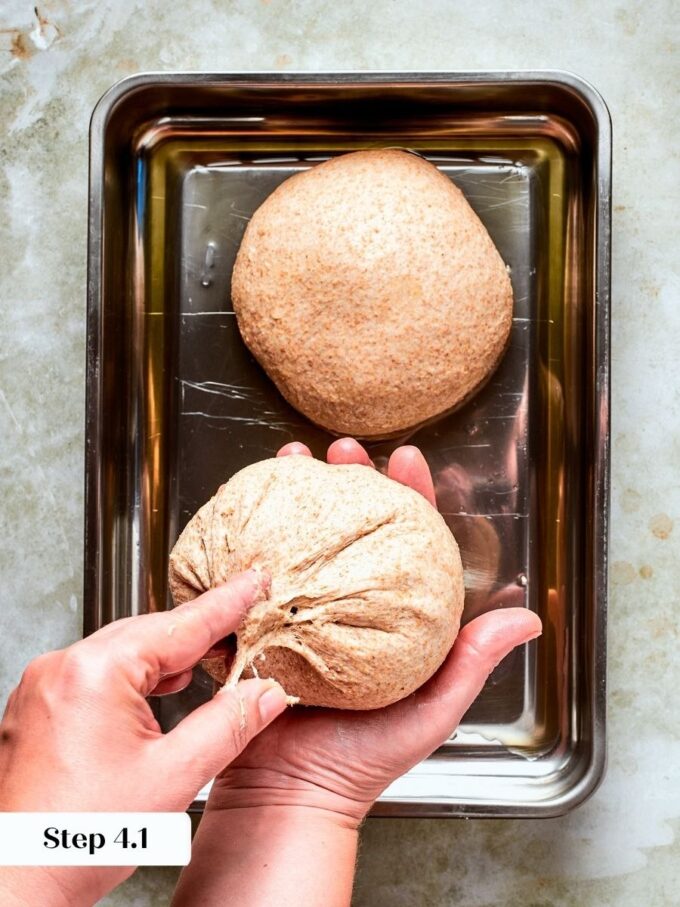
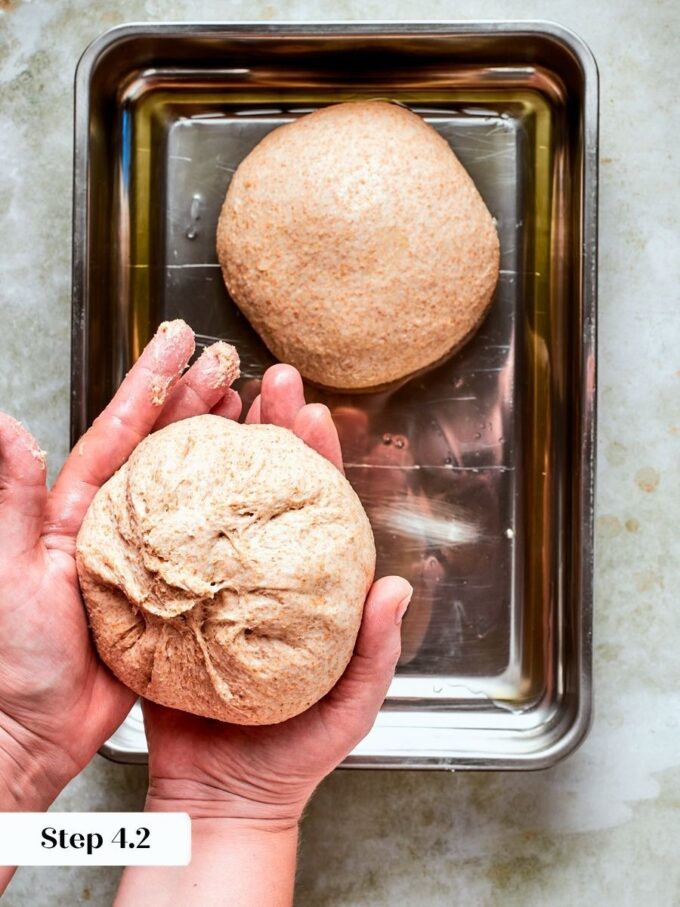
Step 4: Decide how many pizzas you want to make. This recipe makes 2 large pizzas (about 335g each), one extra-large, or 3 smaller ones. Divide the dough accordingly, then shape each portion into a boule: fold each corner of the dough underneath itself and place it seam-side-down on the work surface. Gently cup the dough in your hands and pull it toward your body, rotating a quarter turn, then pulling again. Keep repeating this motion until the dough ball feels taut and no longer slouches against the table. If the surface starts to tear, stop, you are done. Over-tightening does more harm than under-tightening here. (photos 6 & 7)
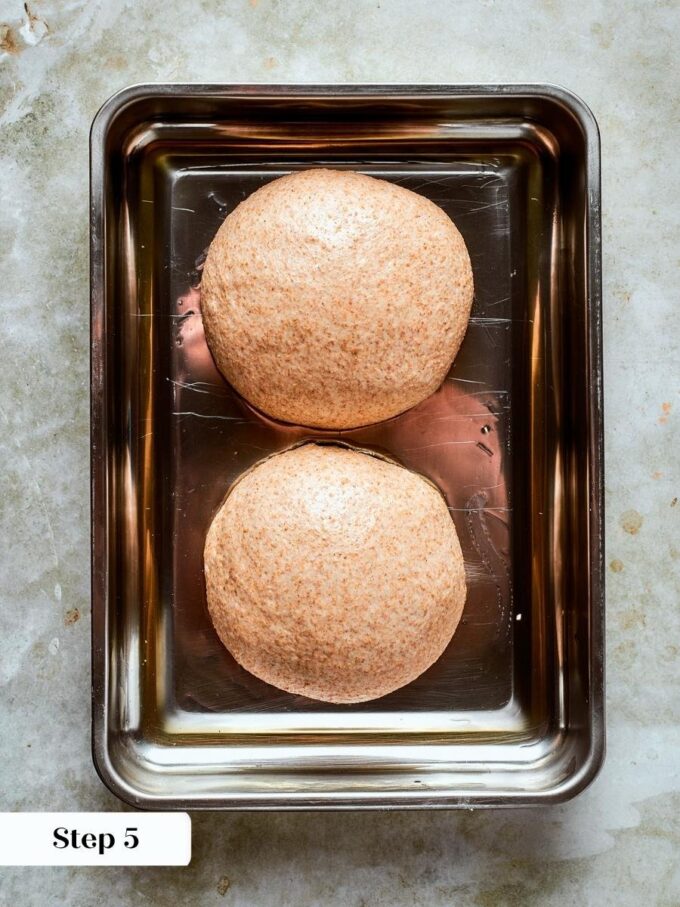
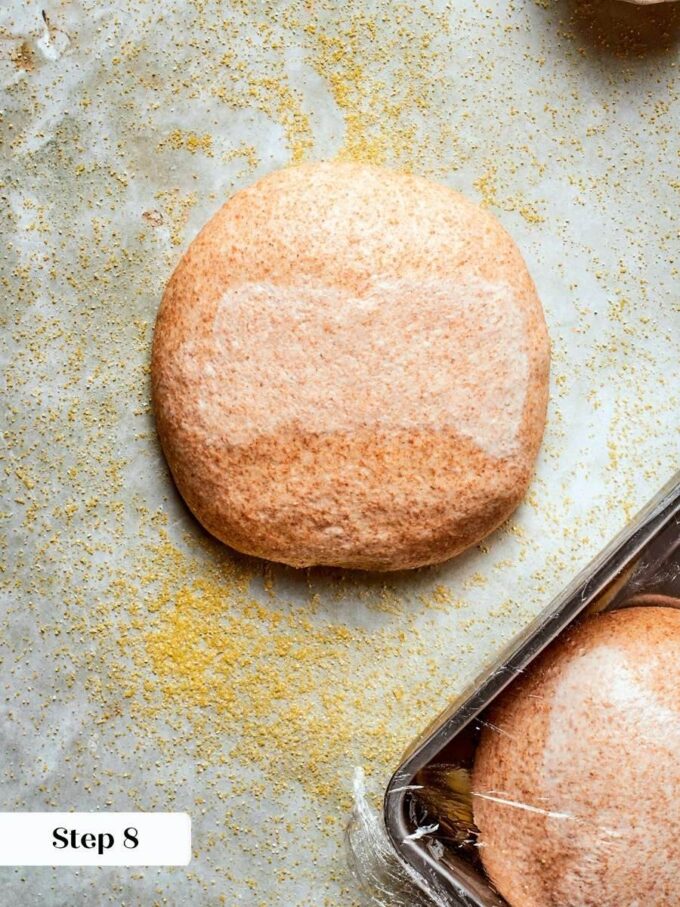
Step 5: Place the shaped dough balls on a rimmed baking sheet or baking dish lightly coated with olive oil. Wrap tightly with plastic wrap and refrigerate for at least 6 hours or overnight. The cold proof develops flavor and makes the dough easier to stretch later. (photo 8)
Step 6: About 2 to 3 hours before you want to bake, pull the tray from the refrigerator and leave it out at room temperature to finish proofing. The dough will relax, puff slightly, and become noticeably softer and more pliable.
Letting it come to room temperature all the way through is what gives you a thinner bottom crust and a fluffier edge once it hits the oven.
Shape
Step 7: Preheat and Prepare. Preheat the oven to 450°F with a pizza stone on the center rack if you have one. The stone needs at least 30 to 45 minutes to heat through fully. A cold stone is one of the most common reasons a whole wheat crust comes out soft and pale on the bottom. If you do not have a pizza stone, slide a metal baking sheet onto the center rack about 5 minutes before you are ready to bake.
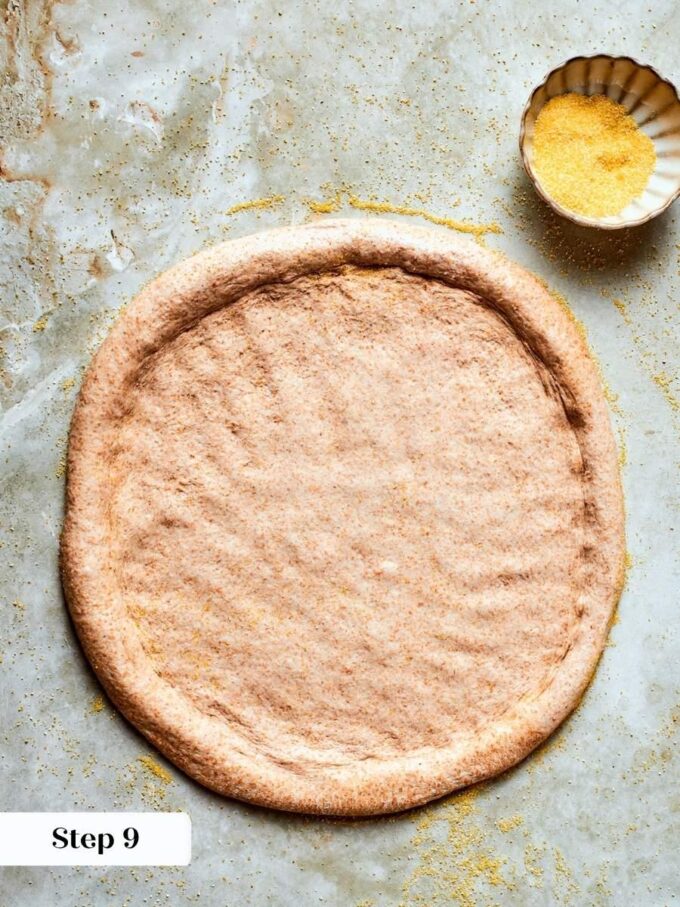
Step 8: Stretch the Dough. Generously dust your work surface with semola flour and place one dough ball in the center. Lightly dust your hands with semola as well, then press your fingers into the dough about half an inch from the edge, working your way around the entire perimeter. This defines the outer crust and keeps it tall and puffy while the center stretches thin. (photo 9)
Semola flour is more finely ground than standard semolina. The smaller grain size lets the dough slide freely on the peel and stone without adding gritty texture to the bottom of the crust.
Step 9: Use the fingers of both hands to gently press and stretch the center of the dough flat, working inside the border you just defined. Rotate the dough as you go, pressing and stretching gradually outward. Once the dough begins to give more easily, you can pick it up and let gravity do some of the work, draping it over your knuckles and slowly pulling your hands apart. Either method works, stay on the surface if the dough feels fragile, or go airborne once it relaxes. Each dough ball stretched to about 18 inches across before baking for me, which is as large as my pizza stone can accommodate. (photo 10)
Especially with whole wheat dough, stretch the bottom crust as thin as you can without tearing it. A thinner center means a better-proportioned slice and a bigger pizza overall. Keep the surface well dusted with semola throughout.

Add Toppings and Bake!
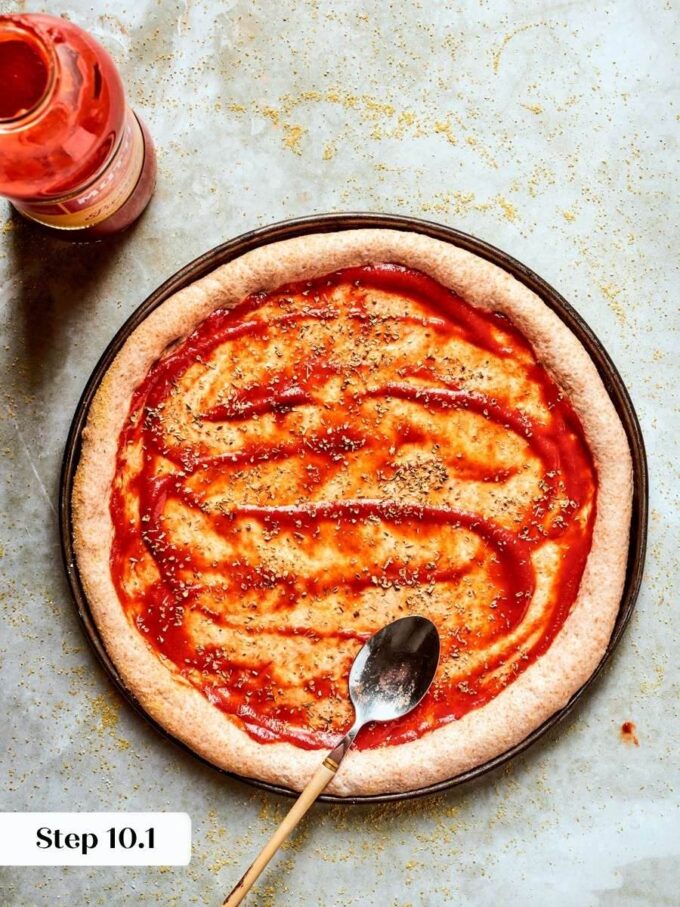
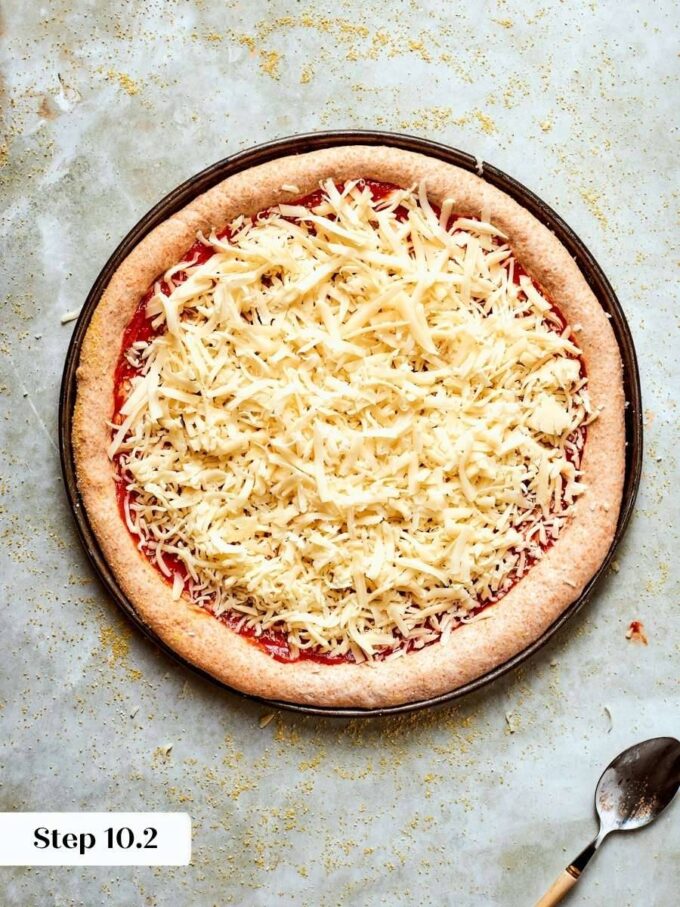
Step 10: Top and Transfer. Transfer the stretched dough to a pizza peel. Spread on some pizza sauce, sprinkle on some mozzarella cheese (a mixture of fresh and low-moisture), and any other desired toppings. Then give the peel a gentle shake. The pizza should slide freely. If any part sticks, lift the edge and dust a little more semola flour underneath before you open the oven. Working quickly from this point helps prevent sticking. (photos 11 & 12)
Step 11: Bake. Open the oven carefully and position the peel over the stone. Get the pizza almost into place, then quickly push the peel forward and pull it back sharply, letting the forward momentum carry the pizza onto the stone while the peel slides out from underneath. Close the oven and bake for about 10 minutes. You do not want to overbake the whole wheat crust, or it will become crunchy and dry, pull it when the edge is deep golden and the cheese is bubbling. If you are baking on a sheet pan instead of a stone, check doneness by lifting one edge: the center should hold its shape and not flop or collapse downward. (photo 13)
Step 12: Finish and Serve. Slide the pizza peel under the finished pizza and transfer it to a cutting board. Cut and serve with a Tuscan kale salad!
Recipe FAQs
Shaped dough balls keep in the refrigerator for up to 3 days wrapped tightly in plastic wrap. For freezing, wrap each boule in plastic wrap and then a layer of foil, freeze for up to 3 months, and thaw overnight in the refrigerator before pulling them out to finish proofing at room temperature. Reheat leftover baked pizza in a 375°F oven for about 8 minutes, or in a skillet over medium heat with a lid on to keep the crust from drying out.
Yes, and honestly this dough is better when made ahead. Shape the boules, place them on an oiled tray, wrap tightly, and refrigerate for anywhere from 6 hours to 3 days. The longer cold ferment deepens the flavor and makes the dough noticeably easier to stretch. Just remember to pull the tray 2 to 3 hours before you want to bake so the dough has time to relax fully at room temperature.
Tearing almost always means the dough was too cold when you started stretching. Cold dough is tight and resists every pull, and if you push through that resistance you go straight through the bottom. Give the dough a full 2 to 3 hours at room temperature after the refrigerator, and wait until it feels genuinely pillowy and relaxed before you touch it. If it still feels stiff, give it another 20 to 30 minutes, which is fine!
Whole wheat pizza dough has a nuttier, earthier flavor and a slightly denser chew than a standard white flour dough, but the texture difference is smaller than most people expect when the dough is properly proofed and gluten-developed. White flour dough tends to be a little stretchier and more forgiving during shaping because there is no bran to interrupt the gluten strands. If you want to explore more whole grain baking, my whole wheat baguette recipe follows similar gluten-development principles and is a great companion project.

Recommended Pizza Recipes

Sourdough

Lunch & Dinners

Yeast Breads

Lunch & Dinners
Whole Wheat Pizza Dough
Ingredients
- 2 ¼ teaspoons active dry yeast
- 1 teaspoon granulated sugar
- 1 ¼ cups warm water, around 110°F or 43°C
- 2 ½ cups whole wheat flour
- 2 teaspoons kosher salt
- 3 tablespoons olive oil
- Semola flour, for shaping
- Toppings as desired, sauce, cheese, vegetables, etc.
Instructions
Make Dough
- Combine the yeast, sugar, and warm water in the bowl of a stand mixer or a small bowl. Stir gently and let sit for about 5 minutes until the yeast is foamy.
- Add the flour, salt, and olive oil to the bowl with the yeast mixture. If mixing by hand, stir until a shaggy dough forms, then transfer to a lightly floured surface and knead for 5 to 7 minutes until smooth and elastic. If using a stand mixer, affix the dough hook and mix on low until a rough dough forms, then increase to medium-high and knead for about 3½ minutes until smooth.
Divide and Proof
- Divide the dough in half (about 335g each) for 2 large pizzas. Working one piece at a time, fold each corner underneath and place seam-side-down on the work surface. Cup the dough in your hands and pull it toward your body, rotating a quarter turn, then pulling again. Repeat until the dough ball has tightened and no longer slouches. If the surface begins to tear, stop; you are done.
- Place both shaped dough balls on a lightly oiled rimmed baking sheet. Cover with plastic wrap and refrigerate at least 6 hours or overnight.
- About 2 to 3 hours before baking, remove the tray from the refrigerator and allow the dough to finish proofing at room temperature.
Shape, add Toppings, and Bake!
- Preheat the oven to 450°F with a pizza stone on the center rack. If you do not have a stone, place a metal baking sheet on the center rack about 5 minutes before baking.
- Generously dust the work surface with semola flour. Place one dough ball in the center and press your fingers about ½ inch from the edge all the way around to define the crust. Press and stretch the center flat using both hands, rotating as you go. Once the dough stretches easily, you can continue on the surface or pick it up and stretch using your knuckles and gravity. Aim for about 18 inches across.
- Transfer the stretched dough to a pizza peel. Add sauce, cheese, and toppings. Give the peel a gentle shake; the pizza should slide freely. If it sticks, add semola flour underneath before transferring.
- Slide the pizza onto the stone by positioning the peel just over it, then quickly pulling the peel back to leave the pizza behind. Bake for about 10 minutes, until the crust is set and the edges are puffed and lightly charred. The bottom should hold its shape when you lift the edge; if it flops, bake 1 to 2 minutes longer.
- Remove from the stone with the peel, transfer to a cutting board, slice, and serve.
Notes
Technique: Stretch the bottom crust as thin as you can without tearing it. A thin bottom crust prevents a dense, bready base and gives you a larger pizza; keep it well dusted with semola at every stage to prevent sticking to the surface, peel, or stone.
Storage: Shaped dough balls keep in the refrigerator for up to 3 days. For longer storage, freeze the shaped, unproofed dough balls for up to 2 months; thaw overnight in the refrigerator, then proof at room temperature for 2 to 3 hours before stretching.
Nutrition
Nutrition information is automatically calculated, so should only be used as an approximation.
 Like this recipe? Rate & comment below!
Before You Go
If this whole wheat pizza dough has you excited about cooking from scratch, there is plenty more waiting for you. Browse our lunch & dinner recipes or you can make this bacon turkey bravo made with this homemade tomato basil bread!