
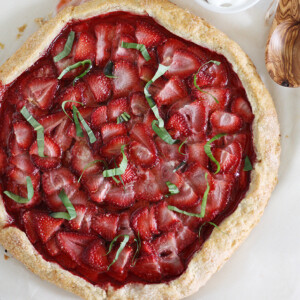
A strawberry galette with a flaky, crust and a bubbly, jammy strawberry filling that comes together without a pie pan or any fussy crimping.

A Quick Look At The Recipe
This is a brief summary of the recipe. Jump to the recipe to get the full details.
Prep Time
45 minutes
Cook Time
45 minutes
Chill Time
1 hour 30 minutes
Total Time
3 hours
Servings
8 Sliced
Difficulty
Intermediate
Calories *
416 kcal per serving
Technique
Free-form, oven-baked
Flavor Profile
Sweet, fruity, buttery, lightly floral
* Based on nutrition panel
I made this for a dinner party and everyone asked for the recipe before dessert was even finished. The crust stayed flaky even after sitting out for a couple of hours, which never happens with my usual pie dough. The basil on top sounds strange but it works perfectly.
⭐⭐⭐⭐⭐
Renata
Why You Will Love This Recipe
- No pie pan needed. A galette is completely free-form, so you fold the crust up by hand and bake it on a parchment-lined sheet pan. There’s no fussing with a pie dish, no crimping, and no blind baking, just like with this peach galette.
- The crust is exceptionally flaky. This recipe uses both chilled and frozen butter, which creates distinct layers of fat in the dough that keep it flaky and tender. Keeping the butter cold at every stage is what makes that texture possible.
- The filling comes together fast. You toss the strawberries with sugar and cornstarch, and they go straight onto the dough, no pre-cooking required. The cornstarch thickens the juices as the galette bakes, so the filling sets up jammy and sliceable rather than watery.
Galettes are the kind of dessert I find myself making when I want something that looks impressive but doesn’t ask much of me. The free-form shape means every one looks a little different, which I think is part of the charm.
It’s the right dessert for a summer dinner when the strawberries are good and you want something to put on the table that feels special without a lot of fuss just like this strawberry bread. If you want something a little more indulgent, my No-Bake French Silk Oreo Pie is a completely different direction and just as easy to pull off.
Ingredients & Substitutions
- All-Purpose Flour
- Salt
- Granulated Sugar: Sugar goes into both the dough and the strawberry filling, so it’s doing double duty here. In the crust, it adds a faint sweetness; tossed with the berries, it draws out their juices and helps the filling set as it bakes.
- Vanilla Bean Seeds: These are scraped directly into the flour mixture, lending the crust a warm, floral depth that vanilla extract can’t quite replicate. If you don’t have a vanilla bean on hand, half a teaspoon of pure vanilla extract stirred into the ice water is a reasonable swap.
- Chilled Unsalted Butter (two forms): This recipe uses both chilled and frozen butter, and that’s intentional. The chilled butter cuts into the flour to form the base of the dough, while the frozen butter forms visible chunks that steam in the oven, producing distinct, flaky layers.
- Ice Water: This brings the dough together without activating too much gluten, which helps keep the crust tender. Add it gradually and stop pulsing as soon as the dough just comes together, even if it still looks a little shaggy.
- Fresh Strawberries: The filling is built around hulled and thinly sliced fresh strawberries, and the quality of your berries really matters here. Ripe, in-season berries will be sweeter and release the right amount of juice as they bake. If you love strawberry desserts, my strawberry cake is another great place to put a peak-season haul to use.
- Cornstarch: This thickens the strawberry juices as the galette bakes so the filling sets rather than pooling and making the crust soggy. Don’t substitute flour here; it won’t thicken as cleanly and can leave a starchy taste.
- Egg Yolk (for egg wash)
- Chilled Butter Pieces (for topping): Small cold butter pieces scattered over the berries just before baking melt into the filling as it cooks, adding richness and helping the surface caramelize slightly.
- Fresh Whipped Cream and Fresh Basil: Both are optional but worth it. The cream softens the filling’s brightness, and a little snipped fresh basil on top adds an herbal note that pairs really well with ripe strawberries.
Variations for Strawberry Galette
- Mixed Berry: Swap half the strawberries for fresh raspberries or blueberries and toss everything together with the sugar and cornstarch as usual. The mix of berries adds a deeper, slightly tart flavor and makes the filling a little more complex without changing the method at all. You could also make this blueberry galette!
- Strawberry Rhubarb: Add a few stalks of thinly sliced fresh rhubarb to the strawberry filling and increase the sugar slightly to balance the tartness. If you love that combination, my strawberry rhubarb pie takes it even further with a full double crust.
- Add some citrus! You can add some lemon, lime or orange zest to the strawberry mixture before adding it to the galette!
- Change the crust: You could make this with my semolina tart crust which I use to make this chocolate strawberry galette(coming soon)!
Professional Tips for Perfect Strawberry Galette
- Keep everything cold. The difference between a flaky crust and a dense, crumbly one almost always comes down to butter temperature. If your kitchen is warm or the dough starts to feel soft or greasy at any point during rolling, stop and chill it for 10 to 15 minutes before continuing.
- Chill the assembled galette before it goes in the oven. The recipe calls for a 15-minute chill after folding the edges, and it’s worth taking seriously. Cold dough holds its shape when it hits the oven heat, which keeps those folded sides from slumping and the filling from running out before the crust sets.
- Toss the berries and get the galette in the oven quickly. Once the strawberries are tossed with sugar and cornstarch, they start releasing juice right away. Arrange them on the dough immediately and don’t let the filling sit in a bowl while you do something else, or you’ll end up with a soggy bottom crust.
- Let it cool before you slice it. The filling needs time to set as it cools, and cutting into a hot galette means the juices will run everywhere. Patience pays off here. Room temperature is the sweet spot for both texture and flavor.
How to Make Strawberry Galette
Use these step-by-step instructions to make a shatteringly flaky, vanilla-scented galette crust with a jammy fresh strawberry filling. Further details and measurements can be found in the recipe card below.
Make the Tart Dough
Step 1: Combine the dry ingredients. Add the flour, sugar, salt, and vanilla bean seeds to the bowl of a food processor and pulse a few times to combine.
Step 2: Cut in the chilled butter. Cut the chilled butter into small cubes and add them to the food processor. Pulse about 10 times until the butter is cut into the flour and the mixture looks crumbly. The texture here should resemble coarse, damp sand with some slightly larger pieces of butter still visible throughout.
Work quickly at this stage. If the butter starts to feel soft or greasy against your fingertips when you check the texture, slide the food processor bowl into the freezer for five minutes before continuing.
Step 3: Add the frozen butter. Cut the frozen butter into small cubes and add them to the food processor. Pulse just until a coarse meal forms with a few larger, visible chunks of butter still intact. Those irregular butter chunks are what will steam in the oven and create the flaky layers in the finished crust, so resist the urge to keep pulsing until the mixture looks uniform.
Step 4: Add the ice water. Pour the ice water into the food processor and pulse just until the dough comes together, about 10 pulses. It may still look a little shaggy or uneven, and that’s completely fine. Turn the dough out onto a clean countertop and press it together into a smooth disk.
Stop pulsing as soon as the dough just holds together when pressed. Overworking it here develops gluten and toughens the crust.
Step 5: Roll and chill the dough disk. Place the dough disk between two large pieces of plastic wrap and use a rolling pin to roll it out to a roughly half-inch thick round. The plastic wrap keeps the dough from sticking and means you won’t add any extra flour at this stage, which keeps the crust tender. Seal the dough in the plastic wrap and refrigerate for at least 45 minutes.
The dough can chill up to 2 days in the refrigerator, or wrap it first in plastic and freeze it for up to a month if you want to get ahead.
Step 6: Roll and cut the chilled dough. Unwrap the chilled dough and roll it out on a lightly floured surface to a roughly quarter-inch thick round. Transfer the dough circle to a lightly floured sheet of parchment paper set on a baking sheet, then slide the whole thing into the refrigerator to chill for 30 minutes.
Prepare the strawberry filling
Step 7: Toss the hulled and sliced strawberries with the sugar and cornstarch in a bowl. Work quickly once everything is combined, because the sugar will start drawing moisture from the berries almost immediately, and you want the filling on the dough before it releases too much liquid and makes the base soggy.
Assemble
Step 8: Remove the chilled dough from the refrigerator and immediately place the strawberries on top, arranging them in slightly overlapping concentric circles if you’d like a polished look, and leaving a 1-inch border clear around the edges. Carefully fold the border up over the outer edge of the filling, pressing gently to keep the folds in place. Return the assembled galette to the refrigerator and chill for 15 minutes so the crust firms back up before baking.
Step 9: Add the egg wash, sugar, and butter. Preheat the oven to 350°F while the galette chills. Once chilled, brush the folded crust with the egg wash, then sprinkle the crust with the 2 teaspoons of sugar. Scatter the small pieces of chilled butter evenly over the berries. The butter will melt into the filling as it bakes and add richness to the jammy center.
Bake
Step 10: Slide the galette into the preheated oven and bake until the crust is deep golden brown and the filling is bubbling and slightly thickened, about 45 minutes. You’ll know it’s ready when the edges have a rich, toasted color and the juices are visibly bubbling up through the strawberries rather than just pooling at the edges. Transfer the baking sheet to a cooling rack and let the galette cool completely to room temperature before slicing.
Cooling fully is worth the patience here. Cutting into a warm galette lets the still-liquid filling run out before it sets, so give it the full cooling time.
Step 11: Serve with whipped cream and fresh basil. Slice the cooled galette into wedges and serve with a generous spoonful of fresh whipped cream. If you’d like, snip a few fresh basil leaves over the top just before serving. The basil is optional, but its slightly sweet, herby note against the jammy strawberries is one of those combinations that’s quietly surprising in the best way.
Recipe FAQs
Store any leftover strawberry galette loosely covered at room temperature for up to one day, or refrigerate it for up to three days. The crust will soften slightly in the fridge, so if you want it crispier, reheat individual slices in a 300ºF oven for about 10 minutes. I usually just eat it cold straight from the fridge, which is completely fine!
Yes, and the dough is actually the best place to get ahead. You can make and chill the dough disk up to two days in advance, or wrap it in plastic and then foil and freeze it for up to a month. When you’re ready to bake, roll it out, assemble the filling, and finish as directed.
The most common cause is skipping or shortening the chill times. The instructions call for chilling the rolled dough before adding the filling, and then chilling the assembled galette again before baking — both steps help the butter stay cold and firm so the crust bakes up flaky rather than dense and wet. The cornstarch in the filling also matters, so don’t leave it out or the berry juices will pool and soak through before the crust has a chance to set.
This dough and method work beautifully with most stone fruits and berries. Peaches, raspberries, or a mix of blueberries and blackberries all behave similarly to strawberries when sliced and tossed with sugar and cornstarch. Just keep the prep and chilling steps the same, and you’ll get the same flaky, golden result.
Recommended Pie & Tart Recipes
Pies & Tarts

Pies & Tarts

Pies & Tarts

Pies & Tarts
Strawberry Galette
Ingredients
For the crust:
- 2 ½ cups unbleached all-purpose flour
- 1 teaspoon salt
- 1 teaspoon granulated sugar
- 1 vanilla bean, Seeds
- ½ stick unsalted butter, chilled
- 1 ½ sticks unsalted butter, frozen
- ½ cup ice water
For the filling:
- 1 lb fresh strawberries, hulled and cut into ¼-inch slices
- ¼ cup granulated sugar
- 2 teaspoons cornstarch
For assembly:
- 1 egg yolk , mixed with 1 tablespoon water for egg wash
- 2 teaspoons granulated sugar
- 1 tablespoon unsalted butter, chilled, cut into small pieces
For serving :
- Fresh whipped cream, optional
- fresh basil, Snipped optional
Instructions
- Combine flour, sugar, salt, and vanilla bean seeds in a food processor. Cut chilled butter into small cubes and pulse into the flour mixture about 10 times. Cut frozen butter into small cubes, add, and pulse just until a coarse meal with a few larger butter chunks forms.
- Add ice water and pulse just until a dough forms, about 10 times. Turn dough out onto a countertop and form into a disk. Place between two large pieces of plastic wrap and roll out to a 1/2-inch thick round. Seal and chill at least 45 minutes or up to 2 days.
- Unwrap the chilled dough and roll out on a floured surface to a 1/4-inch thick round. Cut into a 10-inch circle and discard scraps. Transfer to a lightly floured sheet of parchment on a baking sheet and chill for 30 minutes.
- Heat oven to 350ºF. Toss sliced strawberries with sugar and cornstarch. Immediately arrange strawberries on the chilled dough in slightly overlapping concentric circles, leaving a 1-inch border. Carefully fold the dough edges up around the filling. Chill the assembled galette for 15 minutes.
- Brush the dough with egg wash and sprinkle with 2 teaspoons sugar. Dot the berries with chilled butter pieces. Bake until golden brown and the filling is bubbly, about 45 minutes. Cool to room temperature on a wire rack before serving. Top with fresh whipped cream and snipped basil just before serving, if desired.
Notes
Technique: Do not skip either chill time. Chilling the rolled dough before adding the filling, and chilling the assembled galette before baking, keeps the butter cold so the crust bakes up flaky rather than dense and soggy on the bottom.
Cornstarch: The cornstarch is not optional. It thickens the berry juices as they release during baking so they don’t pool and soak through the crust before it has a chance to set.
Storage: Store leftover galette loosely covered at room temperature for up to one day, or refrigerate for up to three days. Reheat individual slices in a 300ºF oven for about 10 minutes to crisp the crust back up, or eat it cold straight from the fridge, which is completely fine!
Nutrition
Nutrition information is automatically calculated, so should only be used as an approximation.
 Like this recipe? Rate & comment below!
Before You Go
I hope this strawberry galette earns a regular spot in your summer baking. Browse our Bread Recipes or try these strawberry cinnamon rolls next!




I laughed out loud when I read about you trying a new recipe. I’ve done that my. entire. life. I’ve yet to learn my lesson even after the 1,000 years I’ve been cooking. Plus, I inadvertently taught Stephie to do the same thing. So far, no one has died, so that’s a good thing, although I have the same fears. Love the looks of this. Looks so good!
Wow, so gorgeous, Stephanie! And what a fun dessert for friends, too!
Anna — Deal. 😉 And YES to that coconut milk whipped cream… that would be a magical combo, for sure.
Laura — Thank you so much, dear! Happy weekend to you, too 🙂
Next time you awesome food bloggers decide to have a dinner party, please invite me! How about I provide the table and yall provide the food, eh, eh!? 😀 Haha I was reading on Pinch of Yum what classy eaters y’all are 😉 Your galette is gorgeous and I’ve got to try it! I’ve also been wanting to try that coconut milk whipped cream stuff everyone seems to be crazy about…perhaps that on the side!
Prettiest galette ever. Seriously. Have a great weekend! 🙂
Kelly — It’s always great when the results turn out well, but I’m waiting for that one day when it just becomes a disaster and I end up having to order pizza or something. 🙂 But you’re right — totally pays off when it’s a success! Thanks!
Rachel — Thank you so much!
Ashley — Thank you, love!
Kelli — Yep. Yep. Yep. Samesies, all the way. 🙂 Thanks, friend!