
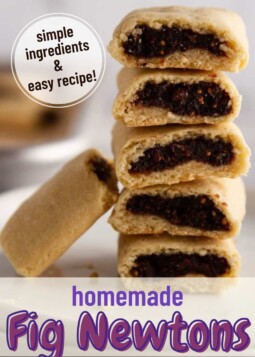
If you, like me, experience nostalgia through food, these homemade Fig Newtons are chock-full of it. A sweet, no-cook fig filling is surrounded by a cake-like pastry dough to make your favorite childhood snack from scratch. Made from simple ingredients, you’ll love feeding these to your family as a special treat on the regular!
Homemade Fig Newtons Recipe
Welcome to Week 3 of The Snack Series! This week, we’re going old-school with a childhood favorite of mine — Fig Newtons! Or just “Newtons,” as I guess they call them now? Anyway, were you as obsessed with these as a kid as I was? I think it was just because they tasted like cookies to me, lol. In any case, my homemade version pays homage to the OG but is made from all the good stuff, so you know exactly what you’re snacking on. Here’s what you can expect from this recipe, which is an adaptation/amalgamation of the genius recipes by Stella Parks and Lost Recipes Found:
- A flavorful, smooth fig filling
- A delicious, cakey pastry dough exterior
- A simple, straightforward ingredient list
- An easy-to-follow recipe that makes for a fun baking project!
- A boatload of Fig Newtons in one batch to snack on all week long
Ingredients You’ll Need
As I mentioned, the ingredient list for these fig-filled cake bites is super-simple, with easy-to-find ingredients from your pantry or local grocery store. A true win! Here’s what you’ll need:
- Dried Mission figs: Grab a bunch so you can make this fig bread next! (I used the Sun-Maid variety, but any brand of Mission figs will work)
- Unsweetened applesauce (or sweetened, if you don’t mind the added sweetness)
- Fresh-squeezed orange juice (I also used clementine juice in a pinch, and it worked great)
- Unsalted butter
- Granulated sugar
- Light brown sugar
- Large eggs
- Vanilla extract
- All-purpose flour
- Salt
How to Make Homemade Fig Newtons
Don’t be intimidated by the steps of this recipe; there is a lot to do, yes, but all of it is very easy and straightforward! I’ll walk you through all of it so you can end with around 60 yummy snacks to enjoy all week long. As always, please refer to the full recipe below for detailed ingredients and instructions. Here’s an overview of what to do:
- Step One: Make the fig filling. Pulse together figs, applesauce and orange juice to a smooth, thick paste. Transfer the paste to a pastry bag fitted with a plain 1/2-inch tip; set aside.
- Step Two: Make the pastry dough. In a stand mixer with the paddle attachment or in a large bowl using an electric hand mixer, beat butter and both sugars together until creamy and smooth. Beat in eggs, vanilla, flour and salt until a dough forms. Shape the dough into a disk, cover with plastic wrap and refrigerate for at least 1 hour.
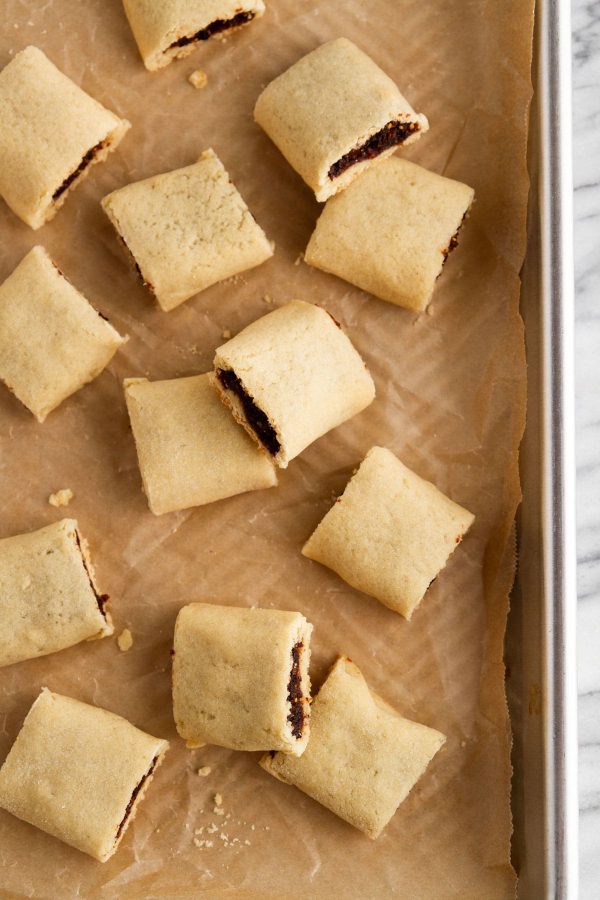
- Step Three: Assemble the cookies. Divide the disk of dough in half (keep the other half refrigerated). Roll the dough on a floured surface to a 14×9-inch rectangle; trim the edges to form a perfect rectangle shape, then cut the rectangle into three strips, each 14×3 inches. Pipe fig filling down the length of each strip, then fold the dough over the filling and place seam-side down. Press down each strip to flatten slightly.
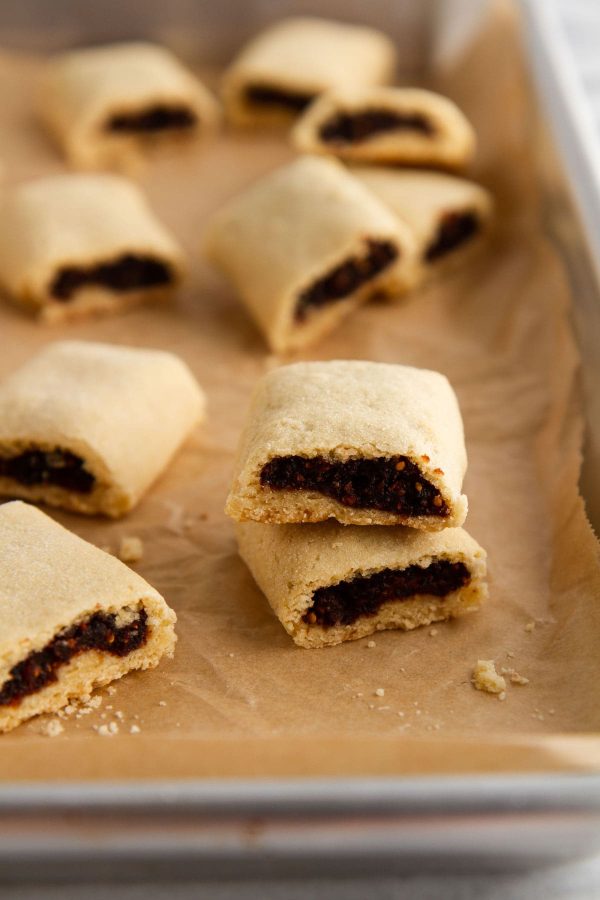
- Step Four: Bake the cookies. Arrange the strips of dough spaced evenly apart on a parchment paper-lined baking sheet. Bake until lightly golden, about 15 to 17 minutes. While still warm on the baking sheet, cut each strip into squares, about 1 1/2 inches each. Either transfer the cookies to a cooling rack to cool completely, or store in an airtight container between layers of paper towel (this will help the cookies absorb steam and retain moisture).
- Step Five: Repeat process with remaining dough half. Enjoy!
Why Mission Figs?
Mission figs, as opposed to any other variety of dried fig, will deliver the most accurate flavor to resemble the store-bought variety of Fig Newtons. You can use another type of dried fig, but know that you might have to add more or less water to the filling to make it smooth, and that the flavor may vary.
Can I Make These Ahead of Time?
Sure can! As noted in the Recipe Notes below, you can make the fig filling up to 1 week in advance; store in an airtight container in the fridge until you plan to use it. You’ll want to let the filling warm up for a bit at room temperature so it’s easily pipeable. As for the pastry dough, you can assemble the dough, wrap it in plastic wrap and refrigerate for up to 3 days ahead of time before using. If the dough feels too difficult to roll out, let it warm up at room temperature for a few minutes. To freeze your Fig Newtons, see Recipe Notes below!

More Snack Recipes!
- homemade goldfish crackers
- homemade twix bars
- homemade fruit and nut crisps
- fluffernutter cups
- no-bake blueberry peanut butter granola bars
Homemade Fig Newtons

Ingredients
For the no-cook fig filling:
- 2 ½ cups dried Mission figs, stems trimmed
- ⅓ cup unsweetened applesauce
- 2 tablespoons fresh-squeezed orange juice
For the pastry dough:
- ½ cup unsalted butter, softened
- ½ cup granulated sugar
- ½ cup light brown sugar, packed
- 2 large eggs
- ½ teaspoon vanilla extract
- 2 ½ cups all-purpose flour
- ¼ teaspoon salt
Instructions
Make the fig filling:
- Cut the figs in half. Add to a food processor along with applesauce and orange juice. Pulse until the mixture is roughly chopped, then scrape down the sides of the bowl. Continue to pulse, adding 1 teaspoon water as needed, until the mixture is a smooth, thick, but spreadable paste.
- Spoon the filling into a large piping bag fitted with a 1/2 inch plain tip. Set aside.
Make the pastry dough & assemble:
- In the bowl of a stand mixer fitted with the paddle attachment or in a large bowl using an electric hand mixer, cream butter and both sugars on medium speed for 2 to 3 minutes or until the mixture is smooth, light and fluffy. Beat in eggs and vanilla extract until just incorporated, then beat in flour and salt until well-combined.
- Shape dough into a large, flat disk about 1-inch thick; cover tightly with plastic wrap. Refrigerate for at least 1 hour to chill and set.
- Preheat your oven to 350°F. Line a large rimmed baking sheet with parchment paper; set aside.
- Divide chilled disk of dough in half; cover one half and keep refrigerated until needed. On a well-floured surface, roll remaining half to a 14×9-inch rectangle; use a bench scraper or pizza cutter to trim ends as needed to form a perfect rectangle shape.
- Using bench scraper or pizza cutter, cut dough into three, 14×3-inch strips. Pipe fig filling down the center of each strip, about 1-inch wide and 1/4-inch tall. Using wet fingers, roll the strip of dough lengthwise over the filling; pinch the seam to seal, then roll over so the seam is facing down. Gently press the filled dough down to flatten slightly. Repeat with remaining strips of dough.
- Transfer strips to the prepared baking sheet, spaced about 3 inches apart. Bake for 15 to 17 minutes or until the dough is baked through and just very lightly golden. While the dough is still warm, use a bench scraper or knife to cut the strips into squares, each about 1 1/2 inches long.
- Option 1 — To get really soft, cakey squares, immediately transfer the warm cookies to an airtight container, with paper towel between each layer. Let the cookies sit in the container for at least 6 hours to absorb the steam, which helps them retain their cake-like texture.
- Option 2 — Allow the cookies to cool completely on a cooling rack, then store in an airtight container. They will be a little drier, but still delicious!
- Repeat Steps 6-9 with second half of dough.
- Store leftover cookies covered in an airtight container at room temperature for up to 1 week. TIP: These cookies taste best eaten the day after they're made and beyond.
Notes
- Recipe adapted from and inspired by Stella Parks and Lost Recipes Found.
- Need a visual cue? Check out my Reel to see how these are made from start to finish.
- Make ahead: Refrigerate fig filling in an airtight container for up to 1 week. Refrigerate pastry dough disk for up to 3 days.
- Freeze: You can freeze these cookies, fully baked and cooled. Cool the cookies completely on a cooling rack (see Option 2 in Recipe). Transfer to an airtight container or a resealable plastic bag. Freeze for up to 3 months. Thaw at room temperature before serving.
Nutrition
Nutrition information is automatically calculated, so should only be used as an approximation.
 Like this recipe? Rate & comment below!


If you wanted to make a flavor, such as blueberry, how would you do that?
Hi Stephanie I love where your heads at! Simply swap the fig filling for a blueberry one: cook 2 cups of fresh or frozen blueberries with 2-3 tbsp sugar and a squeeze of lemon juice over medium heat until thick and jammy, about 10-15 minutes. Let it cool completely before filling. The dough stays exactly the same! You could use this method with almost any berry or fruit — raspberry and strawberry work beautifully too! ~GVD team
Great final product! The mission figs took some looking for and costed $9, and still had to add some Turkish figs to have enough. I used a chopped up apple with a little water replacing the apple sauce, and lemon juice instead of orange juice. I do with what I have. Turned out great. I used a baggy with the corner cut for my pastry bag. Worked fine.
This is the spirit of baking we love! And a chopped apple with water for applesauce, lemon for orange juice, a zip-lock bag for a pastry bag, you made it work with what you had and still got a great result! Thanks so much for sharing your substitutions, other readers will find them really helpful! ~GVD team
I never thought I would have used the Figs in my pantry. Great recipe! Love every bite.
Hi Sandi! I’m so glad to hear that, thank you for taking the time to come back and let us know. Happy baking, and hope you enjoy it many more times! ~gvd team
Really enjoyed making this recipe to use up my fig spread but what we loved the most is the dough itself. Delicious! Going to try to make this dough into another completely different ? Thank you!
Hi Josie! I love hearing that, the dough is such a treat on its own. I’d be so curious to hear what other creations you make with it, and happy baking! ~gvd team
These are so delicious! I hate buying store bought because of the junk in them and these are an even better and tastier option! I cannot wait to make again and play around with what I put in the filling!
Oh hooray, Cathleen! I am so happy you enjoyed them! Thank you so much for taking the time to come back to comment and rate! Let me know what other fillings you try! I love the raspberry newtons myself 🙂 ~Lindsey
Never in a million years would I have thought I’d make my own fig newtons. Your recipe was great – couldn’t have been happier. Thanks!!!
Hi Michael! We love to hear it! Thanks for taking the time to come back and rate/comment! Always makes our day. ~gvd team
Hi, Stephanie—I’ve got the dough all made and am wondering if there should be some kind of leavening like baking powder or soda. All the other recipes I previewed had something like that.
Hi DesertD, There is no leavening here, because we don’t want these to be puffed up in any way.
Any tips for using a gluten-free flour? Thanks.
Hi Ellen, I think you could easily swap the flour here for an all-purpose 1:1 gluten-free flour and the results would be similar.
I can’t wait to make these! I loved these as a kid and didn’t think of them as anything other than cookies. Aren’t they? So, which way do you prefer them after baking? Which would seem like the originals? Put into a container right away or allowed to cool? Thanks for this!
Hi Colleen, I’m excited for you to try them! I personally preferred the ones that were put into the container right away — they were soft and cakey, just like the store-bought variety, whereas the cooled ones were a little crunchier. Enjoy!