A professional sourdough pretzel recipe that yields perfect soft pretzels using only sourdough as leavening or a combination of sourdough discard and commercial yeast. I walk you through all my secrets for the best homemade pretzels.

A Quick Look At The Recipe
This is a brief summary of the recipe. Jump to the recipe to get the full details.
Prep Time
30 minutes
Cook Time
18 minutes
Build + Proof + Rest + Chill Time
15 hours 30 minutes
Total Time
16 hours 18 minutes
Servings
12 Pretzels
Difficulty
Intermediate
Calories *
208 kcal per serving
Technique
Straight Dough
Flavor Profile
Savory, Malty, Slightly Tangy, Salty
* Based on nutrition panel
“I was nervous about the lye bath but followed the instructions exactly and the pretzels came out with the most incredible dark, crackly crust. The dough was beautifully smooth and easy to shape after the overnight rest.” ⭐⭐⭐⭐⭐
Margot
Why You Will Love This Recipe
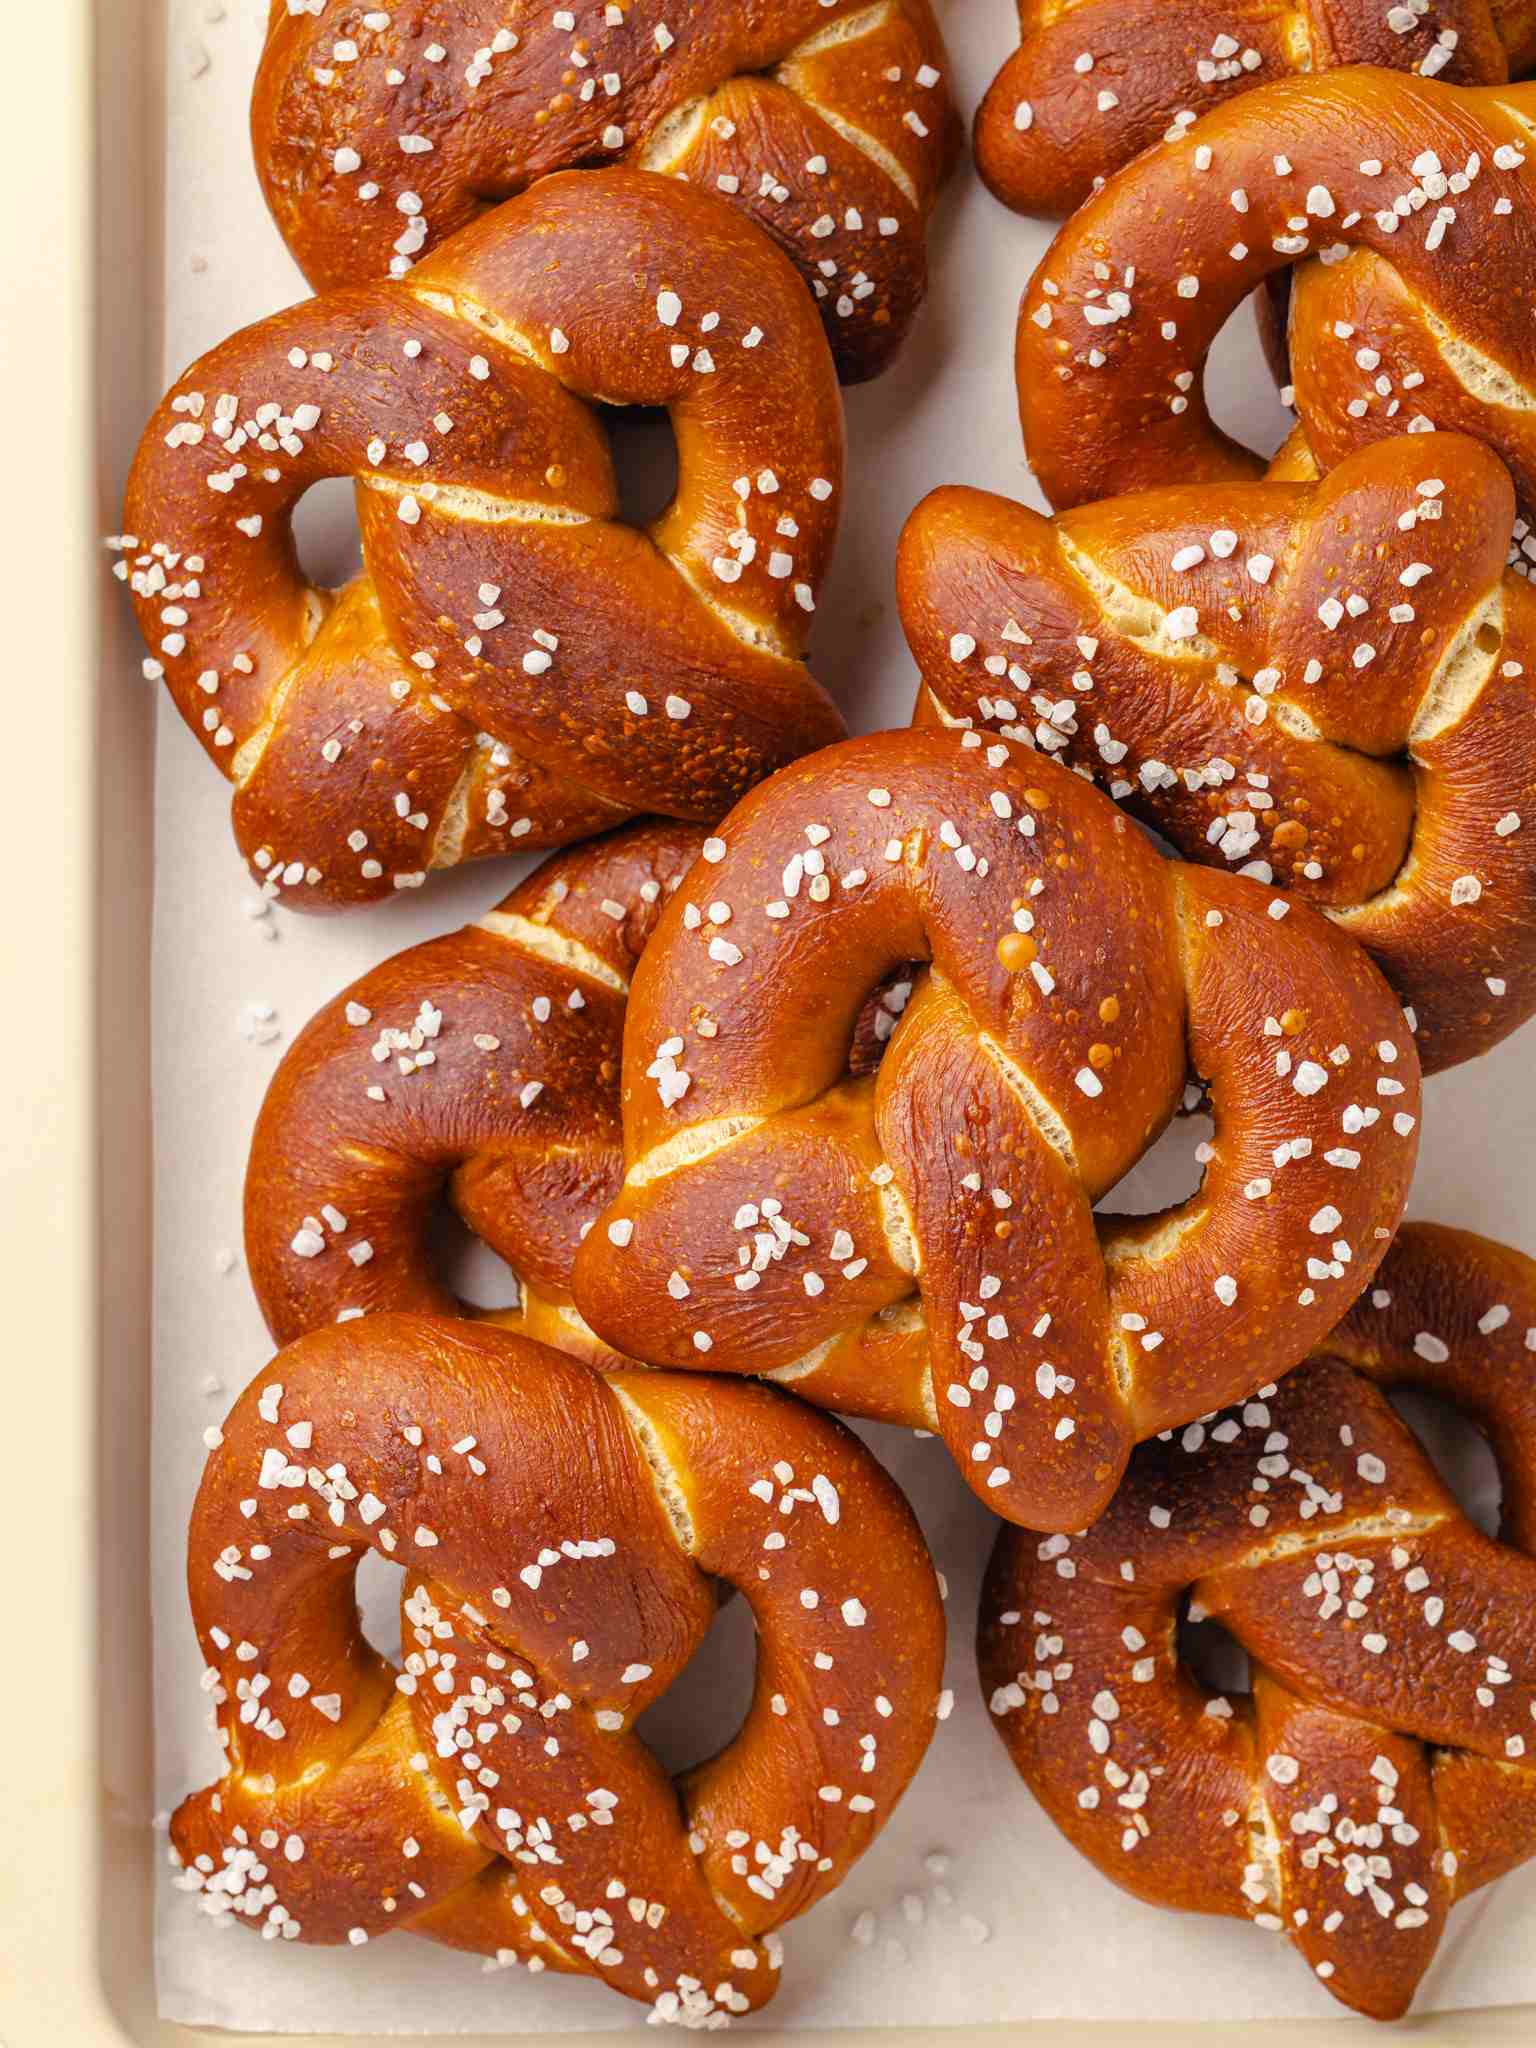
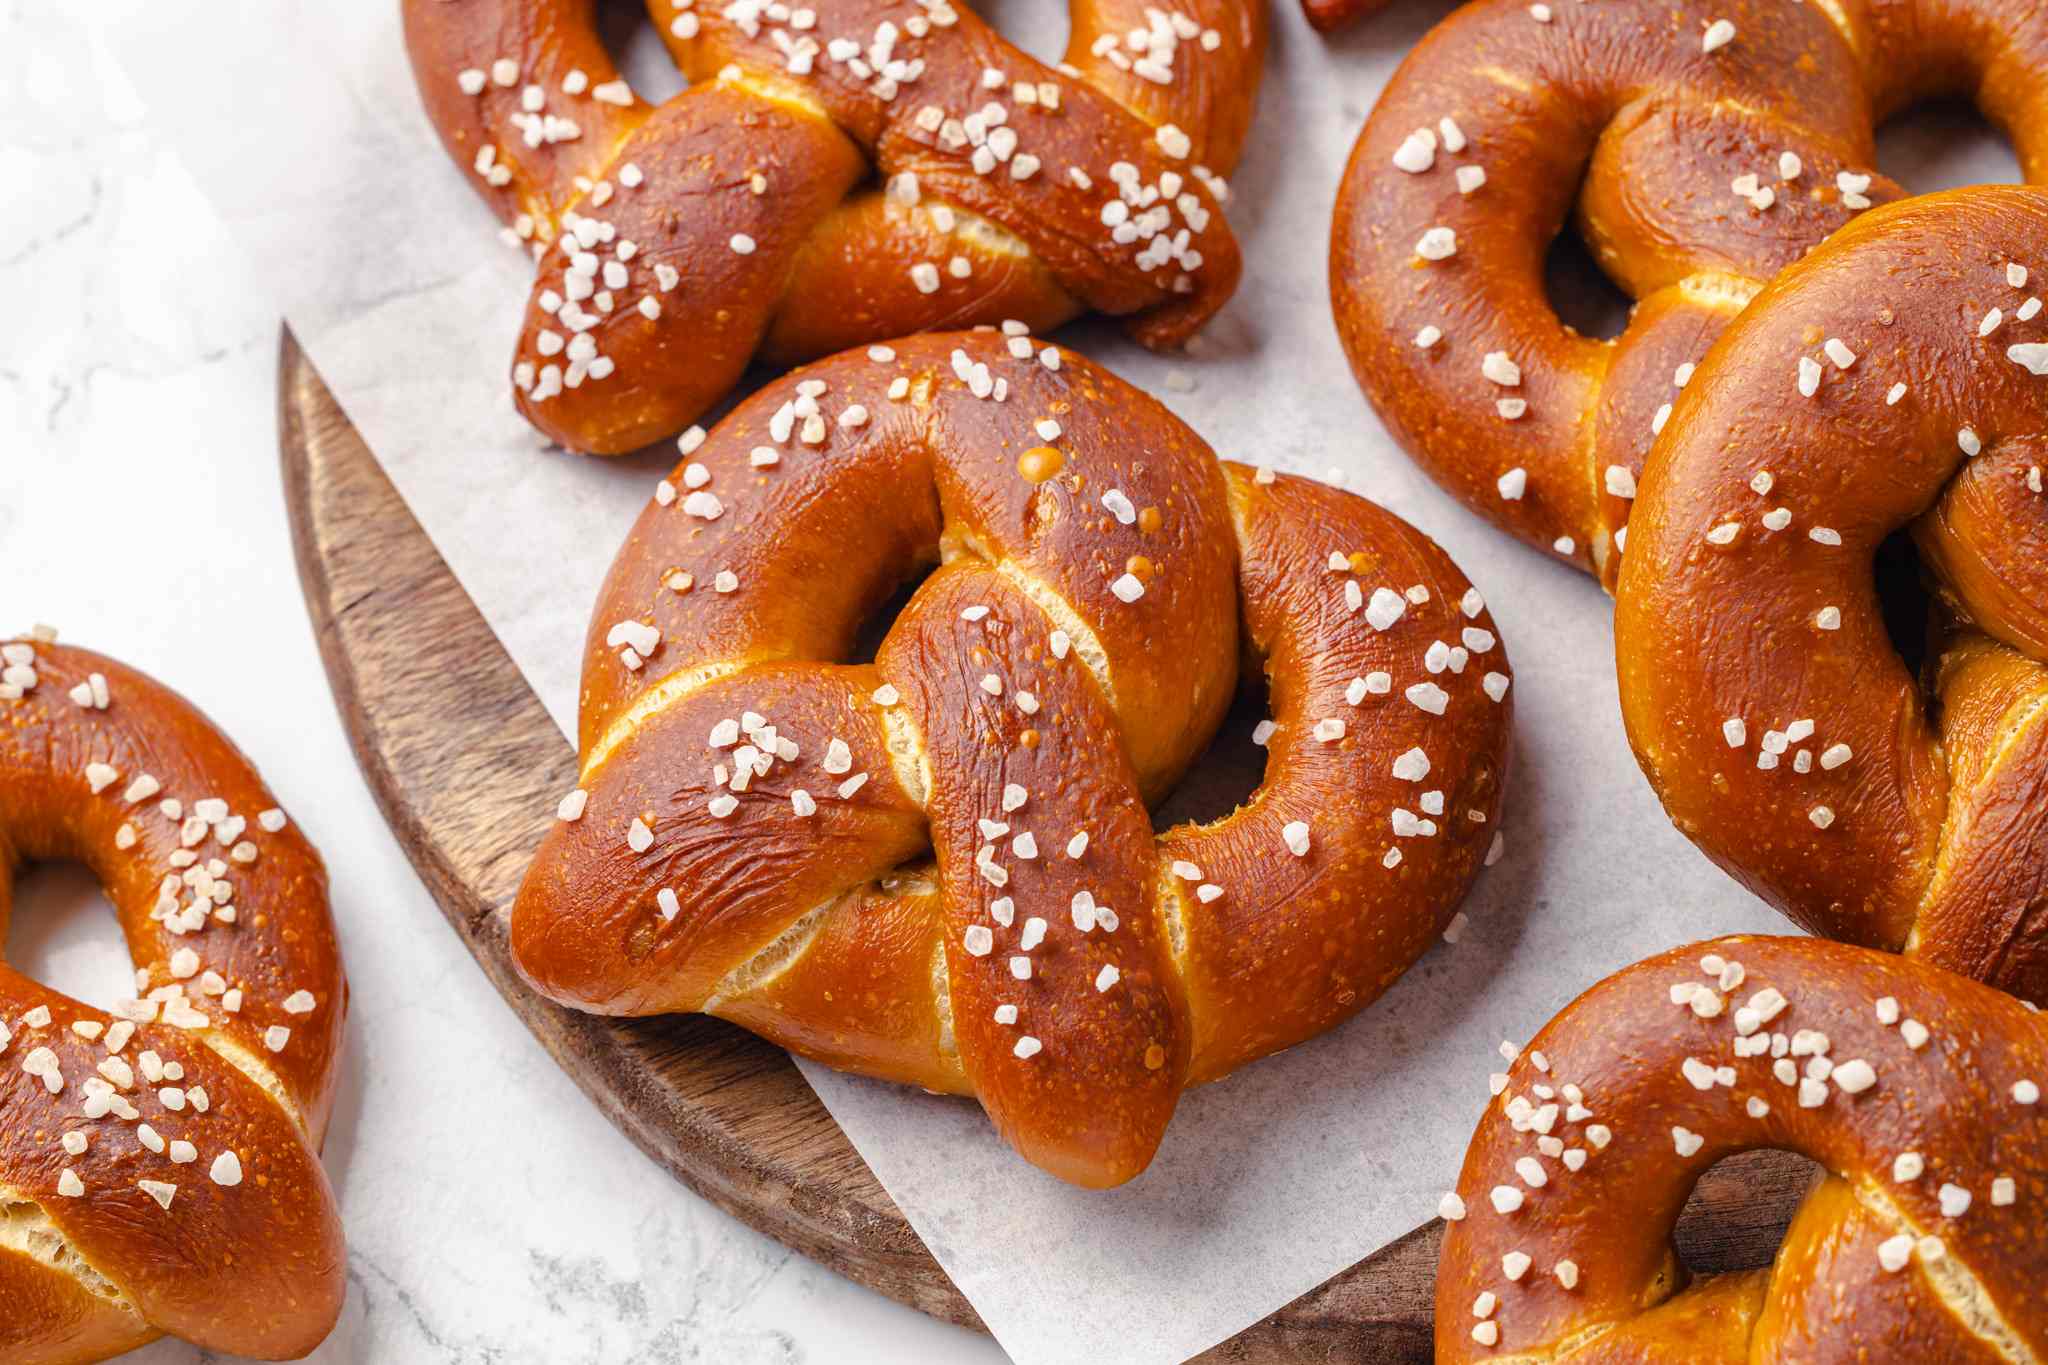
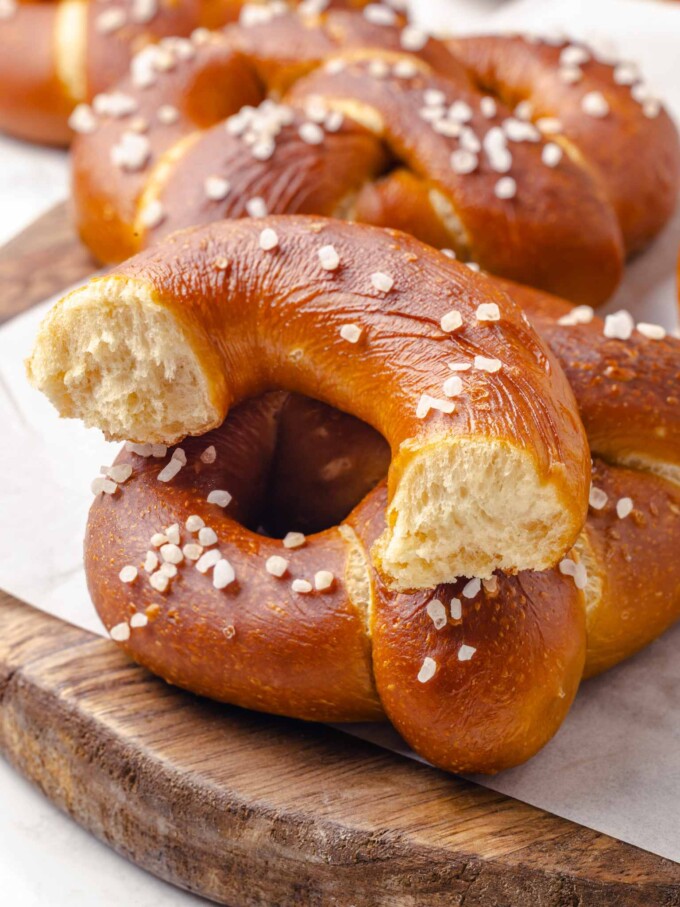
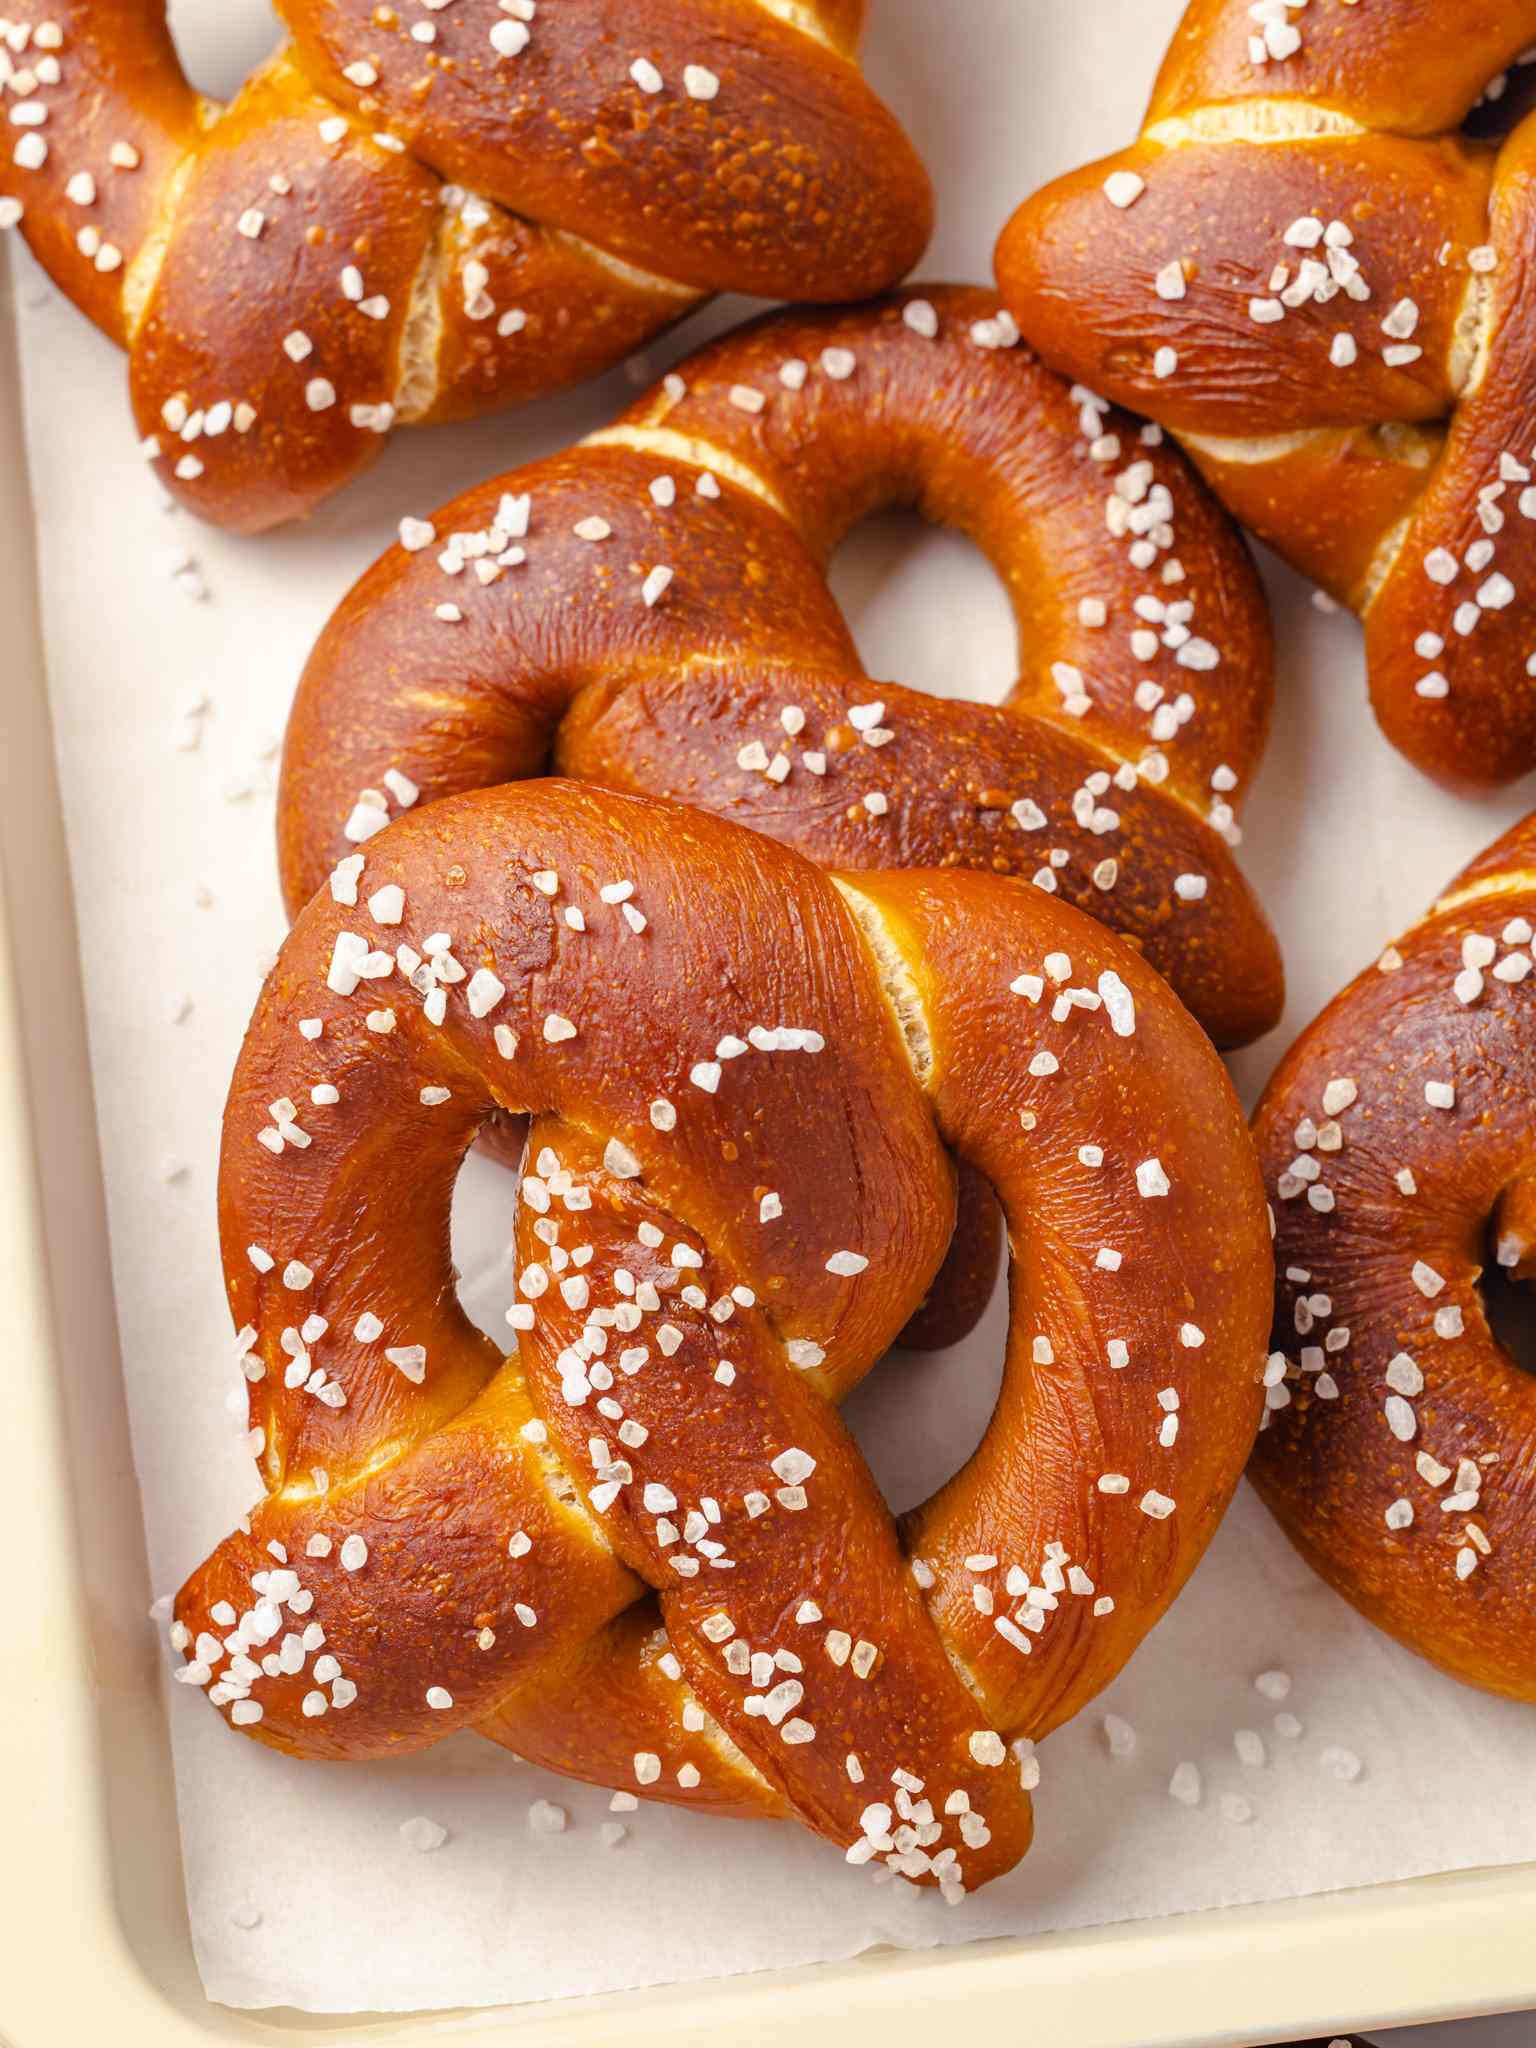
- Soft, chewy pretzel texture. The lye bath is what gives these pretzels that iconic dark, soft skin rather than the crunchy crust you get from a baking soda solution. One dip for 30 seconds and the difference is striking!
- A great use for sourdough discard. This recipe uses a sourdough build made with just 11g of starter, so it is a natural fit for bakers who already keep discard on hand. For more discard ideas beyond pretzels, my ultimate sourdough discard recipes roundup is a good place to start, or just head right over to these sourdough biscuits
- Two leavening options, one reliable recipe. You can make these with sourdough starter alone or add active dry yeast to cut the proofing time from 2 hours down to about 45 minutes. Either way, the flavor and texture hold up, so you can match the recipe to your schedule. If you are building your sourdough baking routine and want to see how starter behaves across different recipes, my same day sourdough bread recipe is a helpful reference for understanding the full arc from mix to bake.
- Real pretzel flavor, not bagel flavor. Malt syrup is what makes these taste like a pretzel rather than their softer, sweeter cousin, the sourdough discard bagels.
Testing this recipe was one of the more hands-on projects I have done on this site. I ran four separate test batches at once, comparing lye versus baking soda, peak starter versus older discard, same-day baking versus overnight retarding, and the results genuinely surprised me! So, know this recipe is the very best version of sourdough pretzels!
These pretzels are the kind of thing I want at a party, torn apart and eaten warm with mustard on the side. If you are new to working with sourdough and want to build some dough confidence first, my easy sourdough bread recipe or sourdough dinner rolls are a great place to get comfortable.
Ingredients & Substitutions

- High-Gluten Flour: Its high protein content builds strong, elastic gluten strands, and substituting all-purpose flour will produce a noticeably softer, less chewy result.
- Sourdough Starter: You can use sourdough discard with commercial yeast, or use the starter at its peak for this recipe. This does assume that you have an active sourdough starter; if you are lost or just beginning your journey, start with my sourdough starter recipe and learn how to feed sourdough starter. If you don’t have sourdough starter, head over to my soft pretzel recipe instead!
- Malt Syrup: Malt syrup is responsible for that deep, savory sweetness and the characteristic color of a real pretzel. It is far more concentrated than any other liquid sweetener, and its texture is closest to that of a thick salted caramel sauce. I have tested this recipe with honey and maple syrup, and both work, but the flavor shifts noticeably toward a bagel rather than a pretzel, especially when paired with a baking soda bath instead of lye.
- Unsalted Butter: Adds fat and helps make the pretzels tender and chewy on the inside. Using unsalted butter helps control the salt content of the dough.
- Kosher Salt: Salt controls fermentation and seasons the dough from the inside out. The amount here is calibrated for the low-hydration dough, so measure by weight rather than volume if you can. Different brands of kosher salt have very different crystal sizes, and a tablespoon of one is not the same as a tablespoon of another.
- Active Dry Yeast (Optional): Adding yeast shortens the final proof from roughly 2 hours down to about 45 minutes. There is no need to bloom it in warm water first, since this is a straight-dough method and it will hydrate quickly enough once everything is combined. If using the commercial yeast, you can make this recipe with sourdough discard.
- Lye Solution (or Baking Soda Solution): The dipping solution is what transforms shaped dough into a pretzel. A 4% lye solution produces the deep mahogany color, soft skin, and quintessential flavor that baking soda simply cannot replicate. Baking soda works, but the result is golden rather than dark brown, and the skin turns crunchy instead of soft.
- Pretzel Salt: Pretzel salt does not dissolve during baking the way table salt or flaky salt does. It holds its shape even at 450°F, which is why it is the right salt here and not a substitute.
Variations for Sourdough Pretzel Recipe
- Pretzel Bites: Divide the rolled ropes into 1-inch pieces instead of shaping full pretzels. They prove faster and are easier to serve in a crowd. It would be perfect with some mustard, melted cheese, or this reuben dip
- Overnight Retard: After shaping, wrap the baking sheets tightly and refrigerate overnight instead of doing a same-day final proof. I found the overnight-retarded doughs were the easiest to handle during dipping, and the longer fermentation deepens the sour note without changing the final bake time.
- Seeded Tops: Skip the pretzel salt and press sesame seeds, poppy seeds, or everything bagel seasoning onto the surface immediately after dipping. The alkaline coating from the dip helps the seeds adhere better than they would on plain dough.
- Cinnamon sugar! After the pretzels come out of the oven, brush them with melted butter and coat them in cinnamon sugar! You can use the ratios from my snickerdoodle cookies or these apple cider donuts!
Professional Tips for Perfect Sourdough Pretzel Recipe
- Never use aluminum with a lye solution. Lye reacts with aluminum, discoloring your bakeware and leaving an off-putting taste on the pretzels. Use stainless steel, plastic, or glass for the dipping setup, and line your baking sheets with parchment paper. At bread school, we baked on large, seasoned cast iron sheets, and the results were breathtaking, but parchment on a steel pan works beautifully at home.
- Do not rush the bench rest. I worked through three test batches simultaneously, and every batch that waited the full 30 minutes shaped more cleanly and stretched more evenly than the ones I tried to roll early. The intensive mix tightens the gluten considerably, and the dough simply will not roll to two feet without tearing if it has not had time to relax.
- Degas the dough completely as you roll. Pressing firmly is not optional here. Large bubbles trapped in the rope will burst during baking, leaving the surface looking cratered. Pop any that persist rather than rolling over them and hoping for the best.
- Choose lye if you want a real pretzel. The visual and textural difference between a lye-dipped pretzel and a baking soda-dipped one is striking. The lye produces that perfect deep mahogany color and a soft skin, while baking soda gives you a golden, crunchy exterior. If you are comfortable working with lye safely, it is the version worth making.
How to Make Sourdough Pretzel Recipe
Use these instructions to make chewy, golden sourdough pretzels with a deeply flavored crumb and that signature pretzel crust. Further details and measurements can be found in the recipe card below.
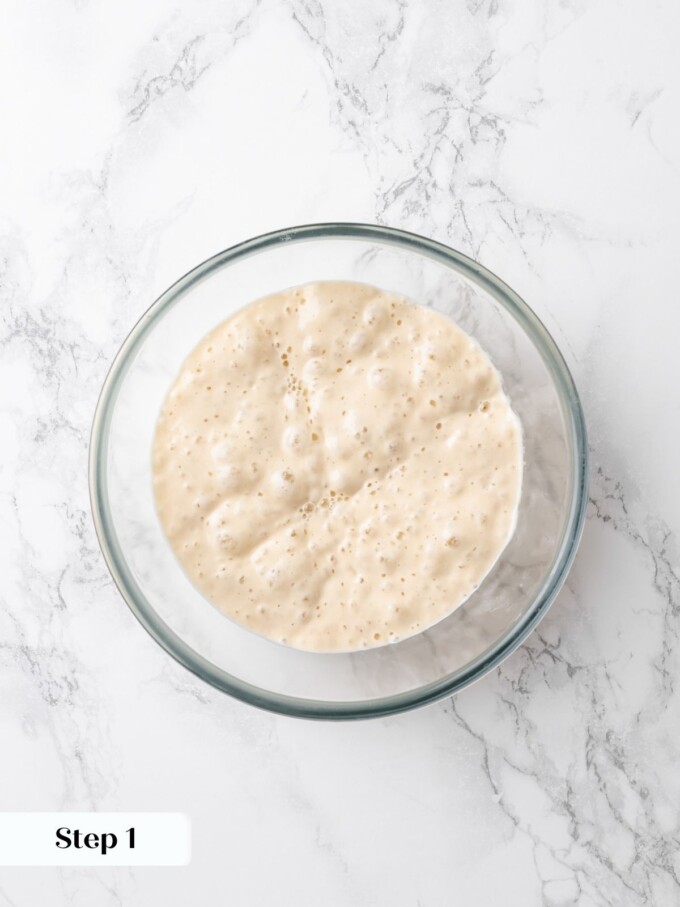
Step 1:Build the sourdough 12 to 18 hours ahead. Combine 113g all-purpose flour, 113g water, and 11g sourdough starter in a jar or bowl and stir until no dry flour remains. Leave it at room temperature overnight. It is ready when it has doubled in volume and looks bubbly and slightly domed across the surface. (photo 1)
Make the dough:
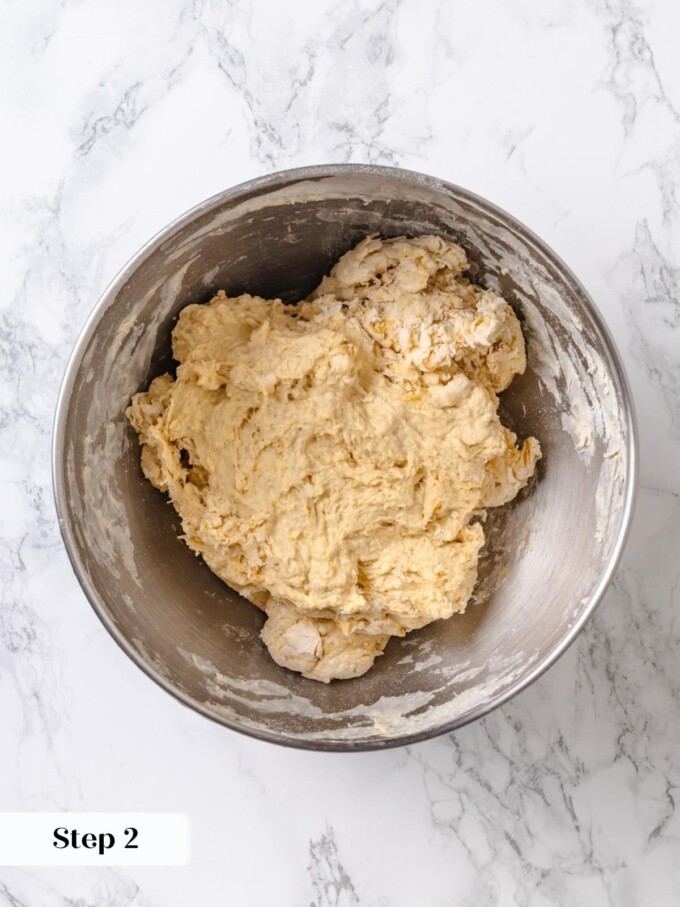
Step 2: Combine all dough ingredients. Add all the dough ingredients to the bowl of a stand mixer fitted with the hook attachment: high-gluten flour, warm water, sourdough starter, malt syrup, butter, kosher salt, and active dry yeast, if using. Mix on the lowest speed until everything has incorporated and a rough, shaggy dough forms, about 2 to 3 minutes. If your butter was cold, you may see unincorporated pieces still clinging to the dough at this stage, and that is completely normal. You do not need to wait for it to fully disappear before moving on. (photo 2)
This is a lower-hydration dough, and the windowpane will look different from that in a brioche loaf or soft enriched dough. Expect it to be a bit stiffer and less translucent. What you are looking for is stretch without tearing, not a paper-thin membrane.
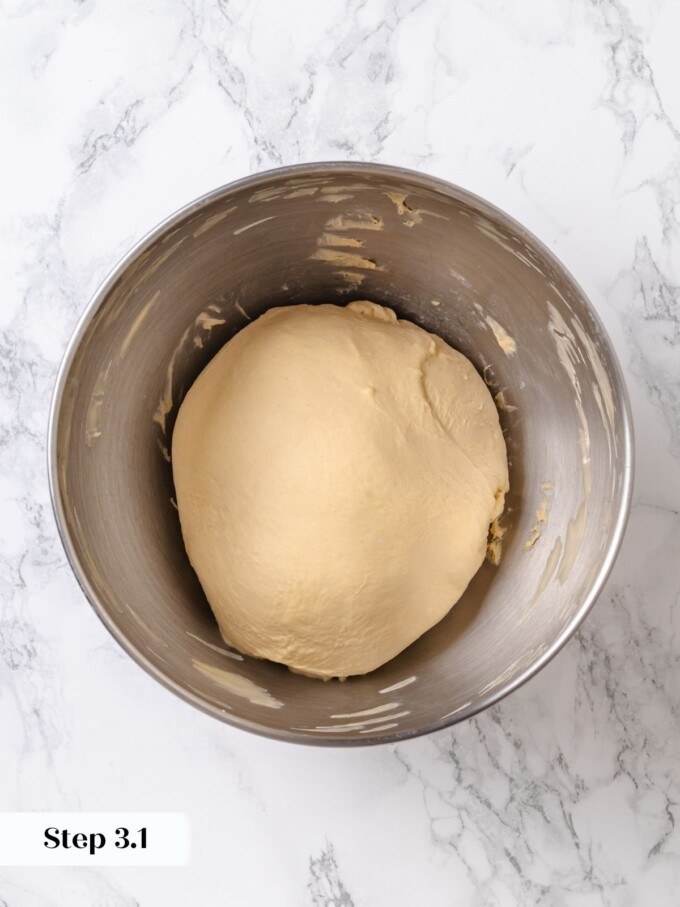
Step 3: Develop the gluten: Increase the mixer speed to medium (speed 6 on a KitchenAid 5-quart) and develop the dough for approximately 6 minutes. After a few minutes, you will notice it pulling cleanly away from the sides of the bowl. (photo 3)
Test for the windowpane (when the dough stretches thin and nearly translucent without tearing) by pulling a small piece between your fingers. It will be slightly more opaque and less dramatic, but it should still hold without ripping. If it tears immediately, mix for another minute or two and test again. (photo 4)

Divide and Preshape:
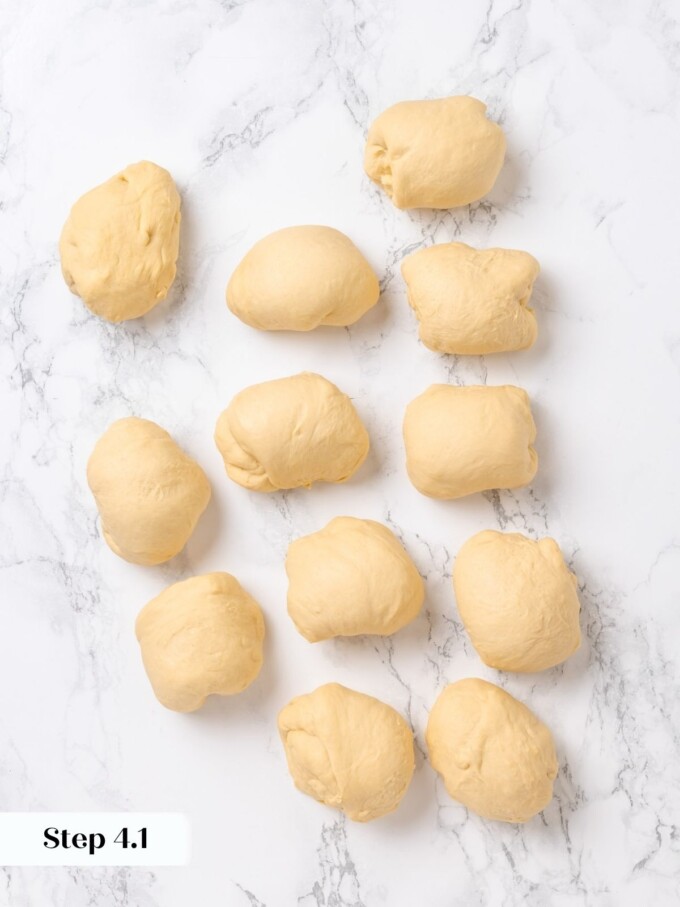
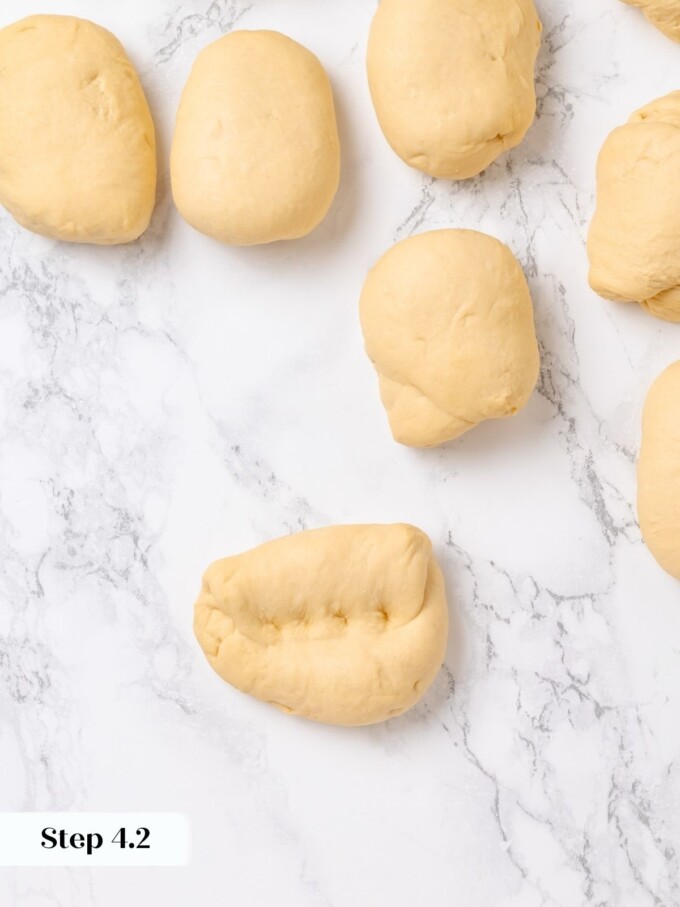
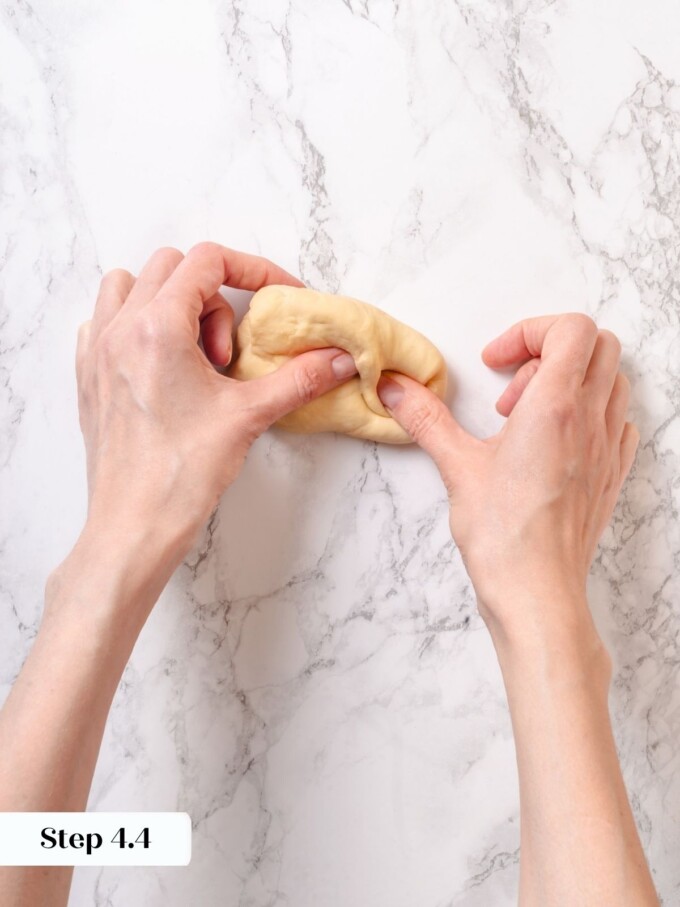
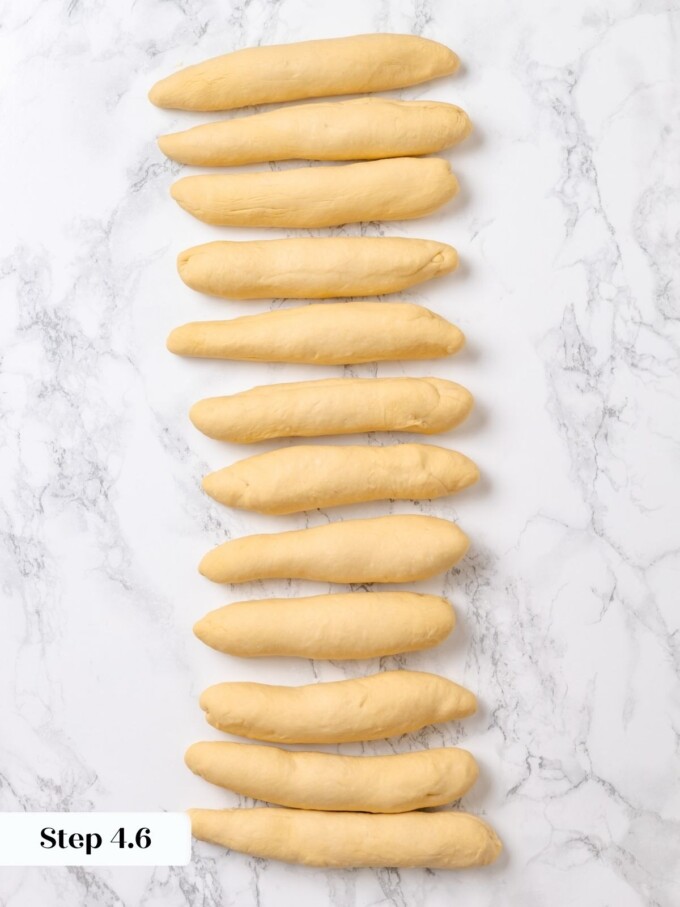
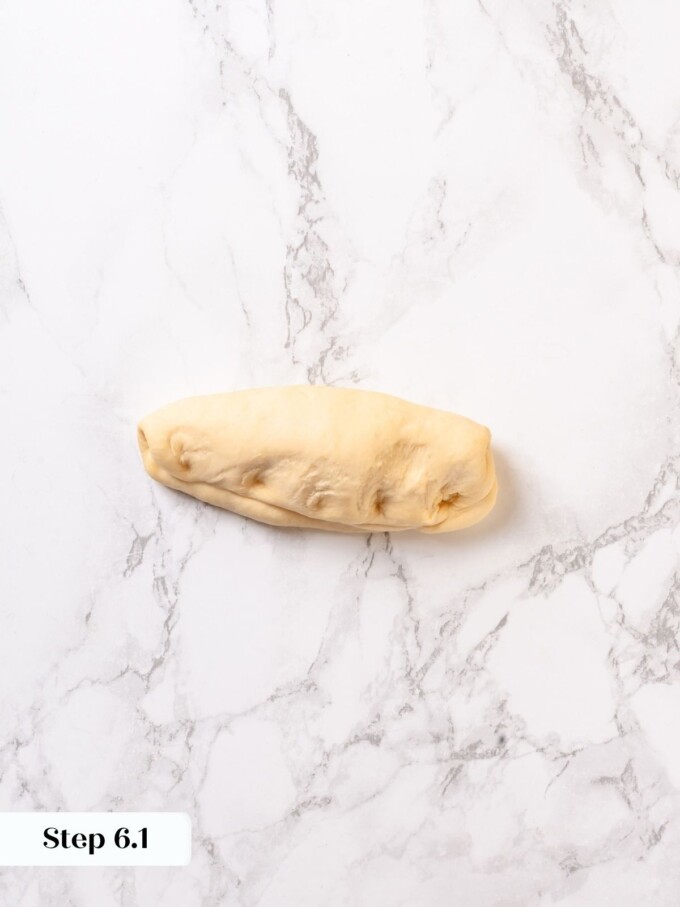
Step 4: Turn the developed dough out onto a clean work surface and divide it into 12 equal pieces, each roughly 100g. To preshape, take one piece and stretch it gently into a small rectangle. Fold each short side toward the center, then perform two sets of thumb folds as you would when shaping a loaf (as shown in my rye bread recipe.) Once you have a little rope, roll it gently to seal the edges completely, then extend it as far as it will go. Tuck the piece under plastic and move on to the next. Continue until all 12 are preshaped. (photos 5-10)
The pieces are small, so it will feel a little awkward, but you can still fold the top over your left thumb and seal it with your right thumb rather than the heel of your hand. Unlike when shaping a loaf, you do not need to control the length here. Let the dough lengthen naturally as you tighten and seal.
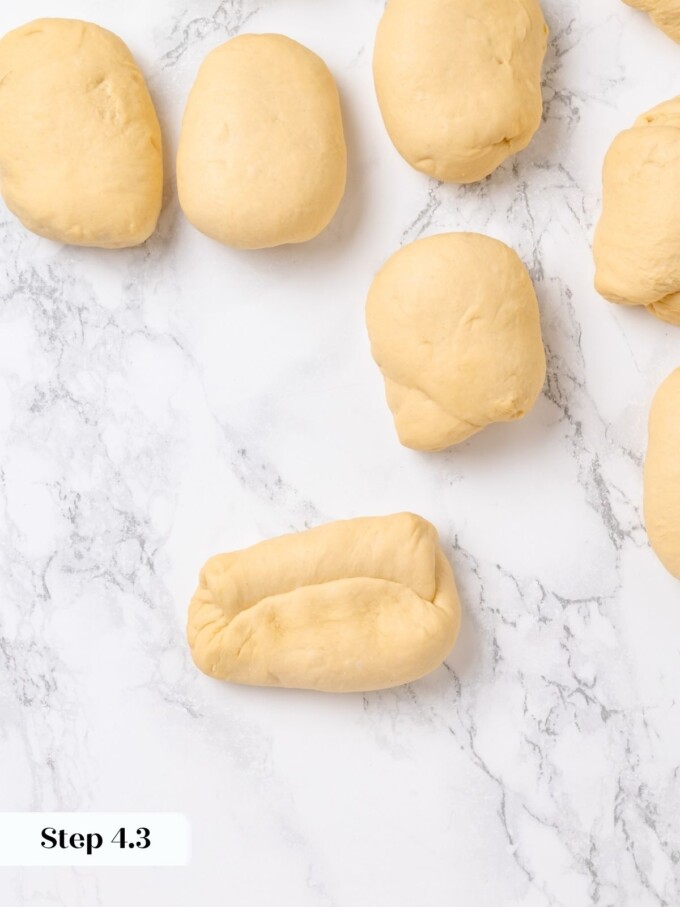
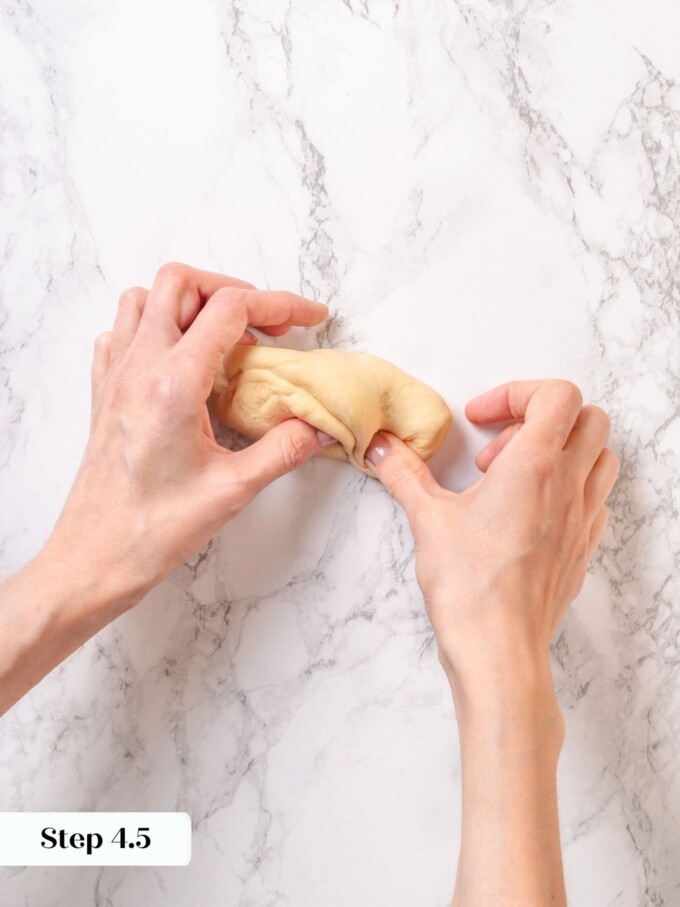
Keep the preshaped ropes covered with plastic wrap as you work. The surface dries out faster than you expect, and cracked dough will not roll smoothly into a long rope later.
Bench Rest:
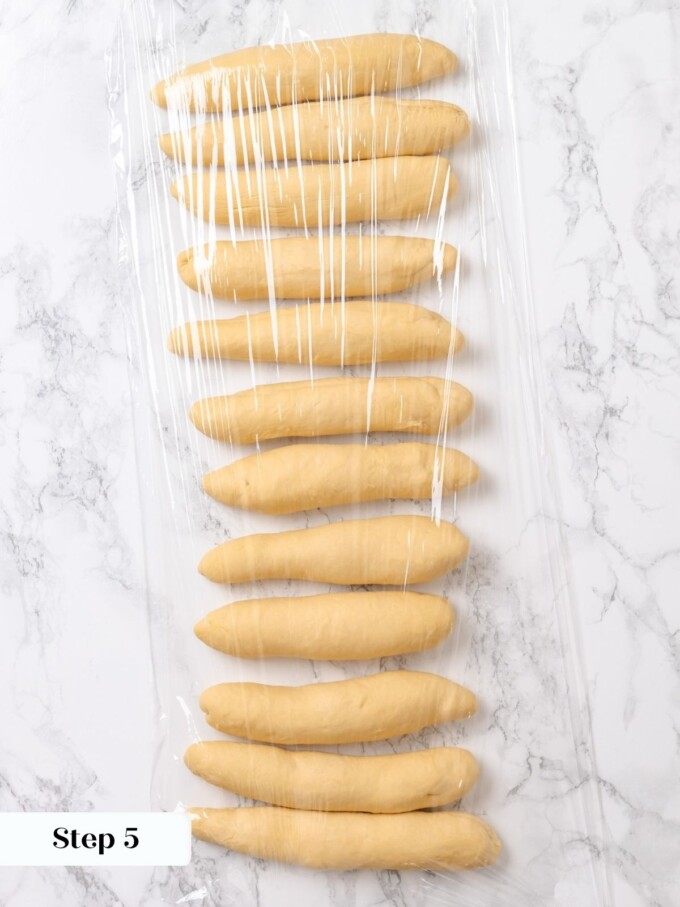
Step 5: Let all 12 pre-shaped pieces rest under plastic for 30 minutes before rolling and final shaping. The dough is tight from mixing and dividing, and skipping this rest makes rolling to length nearly impossible. After 30 minutes, the gluten will have relaxed, and the dough will feel noticeably softer and more extensible. (photo 11)
Roll and Shape:
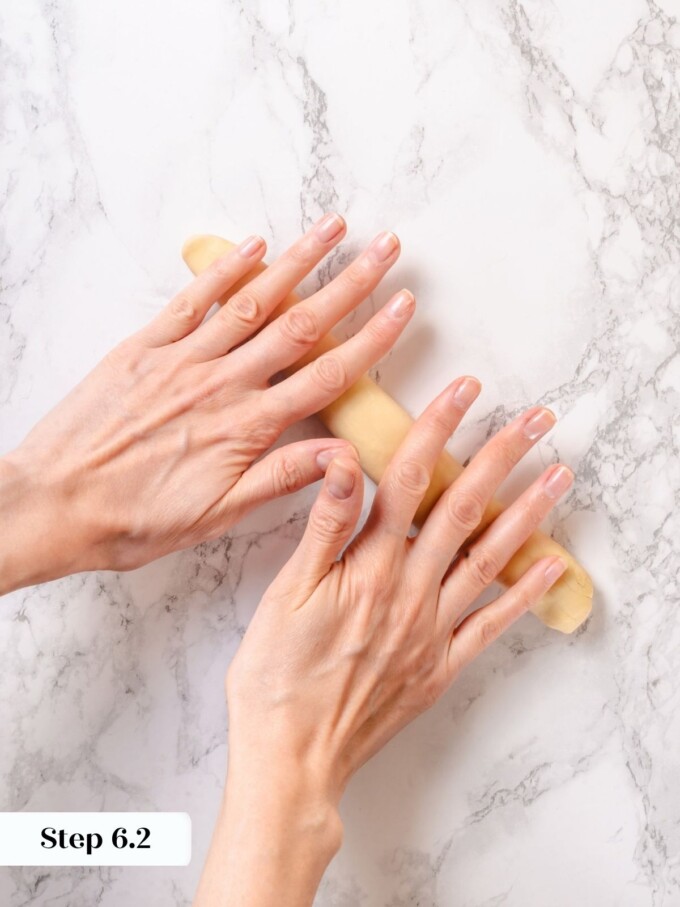
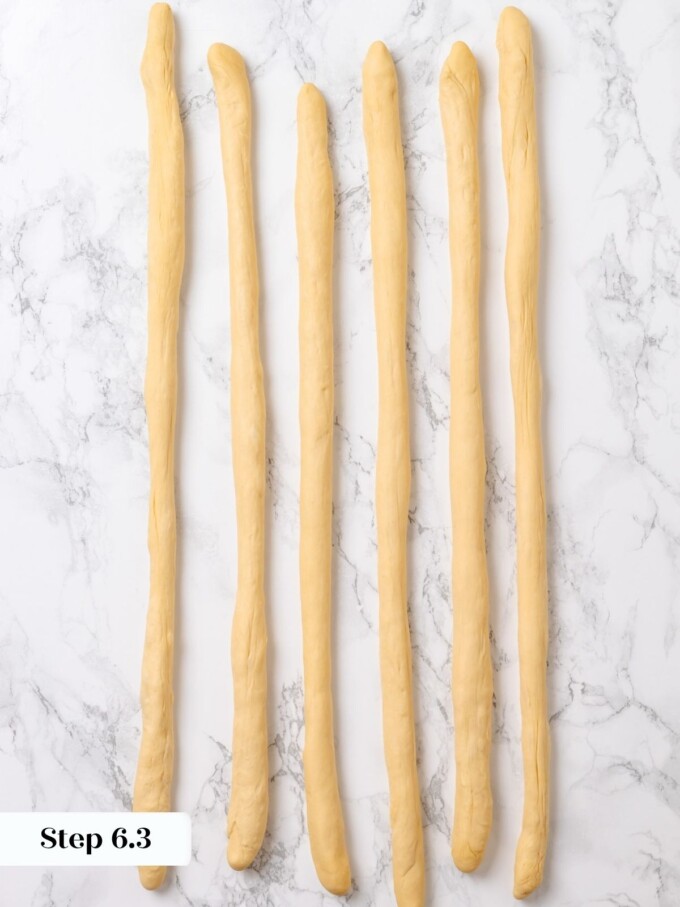
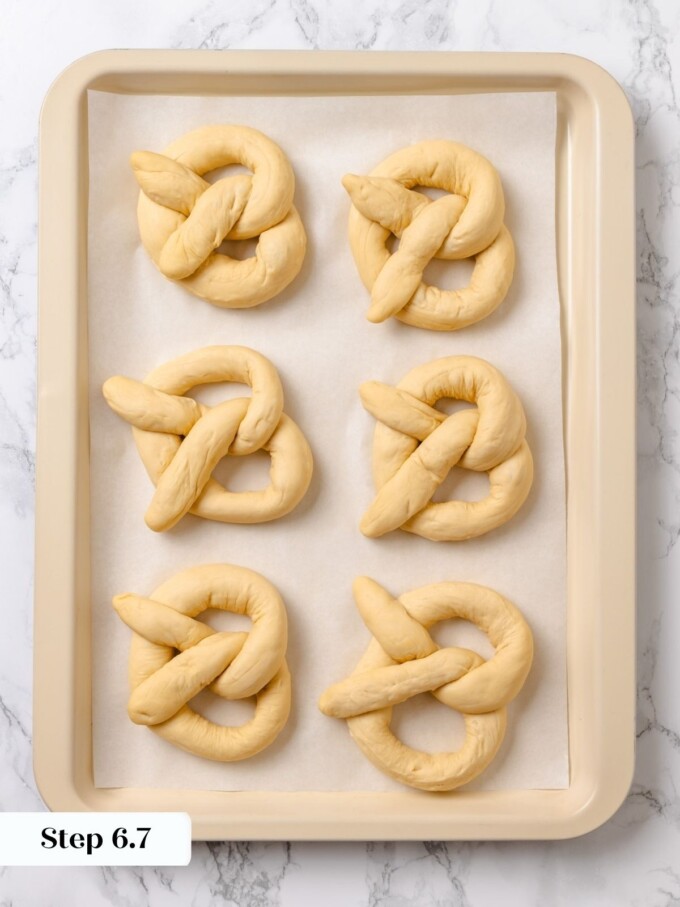
Step 6: Line two rimmed baking sheets with parchment paper and spray lightly with nonstick cooking spray. Working with one piece of dough at a time, roll it out to about 2 feet long. Press firmly and evenly as you roll. Pop any persistent large bubbles. The rope should be even in thickness from end to end.
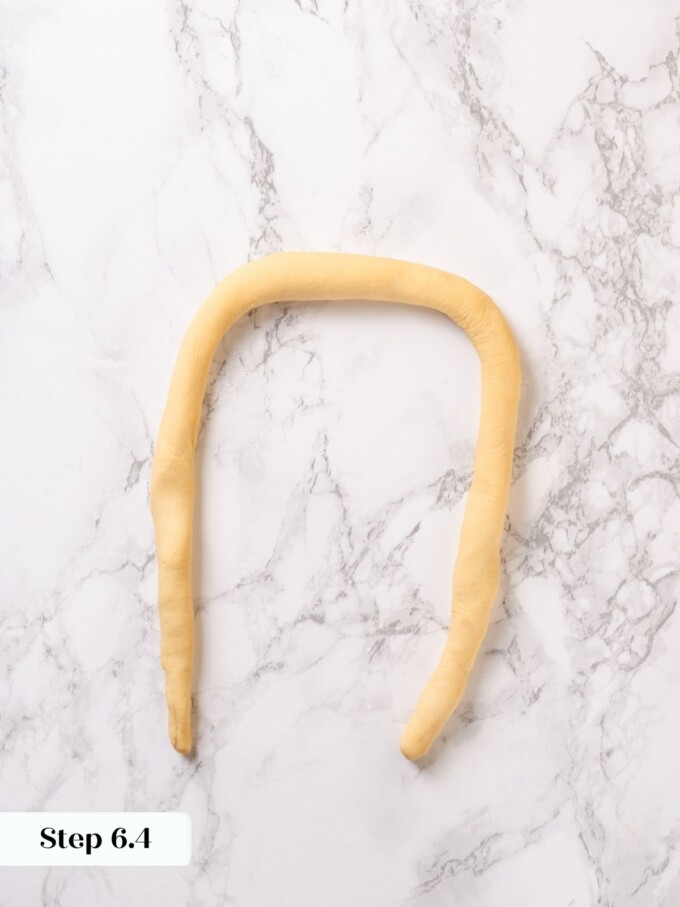
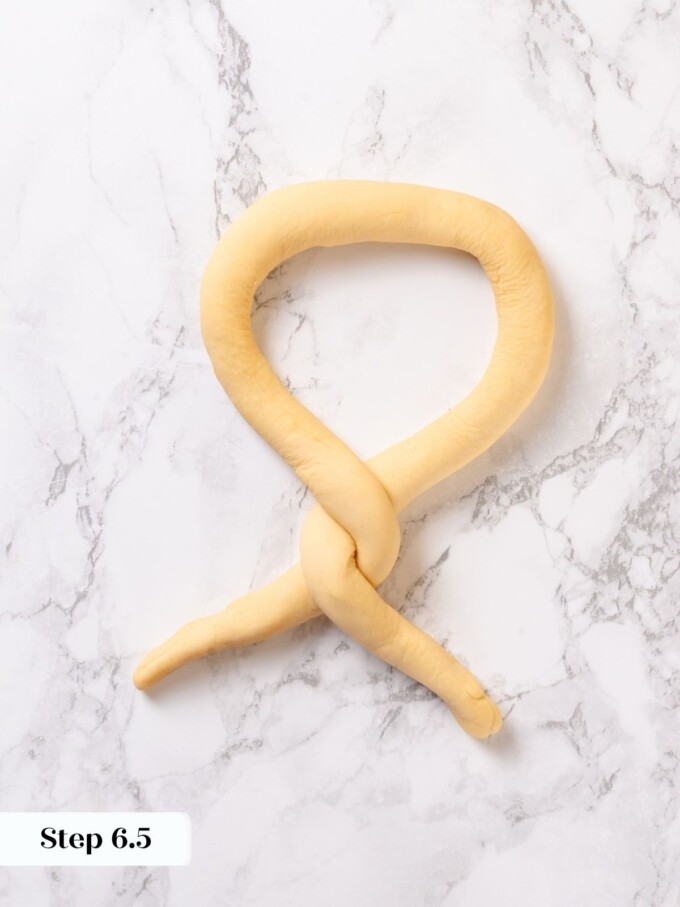
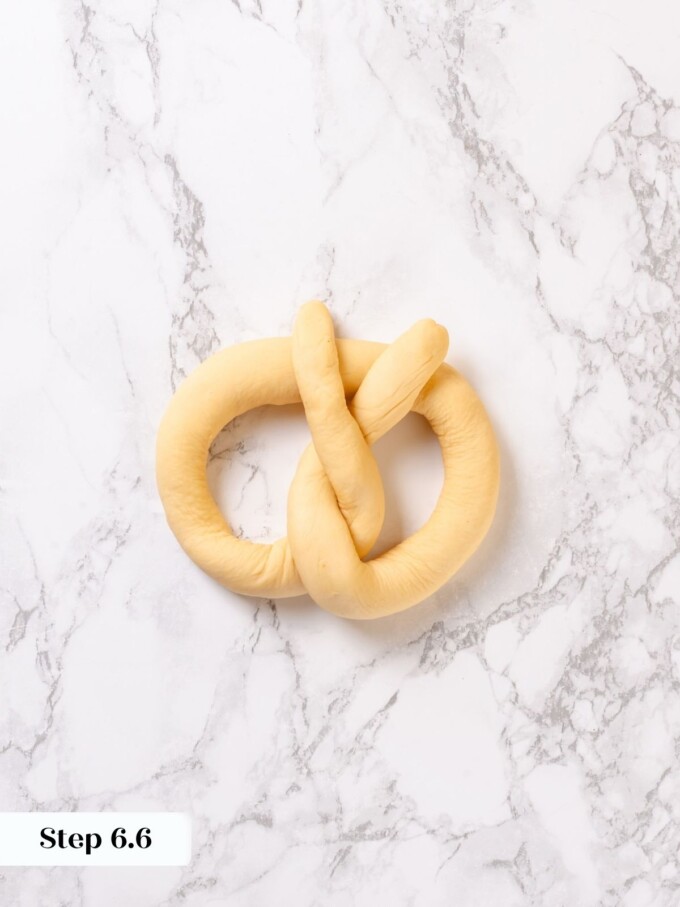
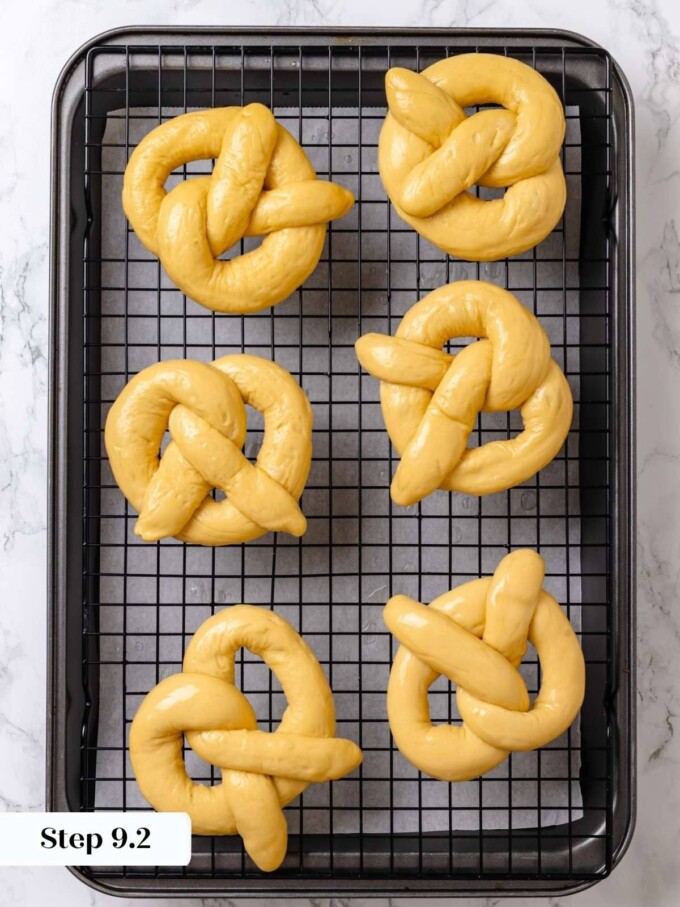
To shape, grab one end in each hand and pull the ends up and away from you along the bench, forming a U shape. Twist the two ends around each other once, then fold them down toward you and over the bottom of the U. The twist should now sit in the center of the pretzel like the middle of a heart. Overlap the ends over the bottom curve and press lightly to secure. Pick up the shaped pretzel and set it gently on the prepared parchment. You can fit 6 pretzels per sheet. (photos 12-18)
The shaping is similar to shaping each strand for a challah recipe, except you really want to encourage length and an even thickness. I do taper the ends for aesthetics by pressing more firmly as I roll to the end. Don’t rush the bench rest.
Final Proof:
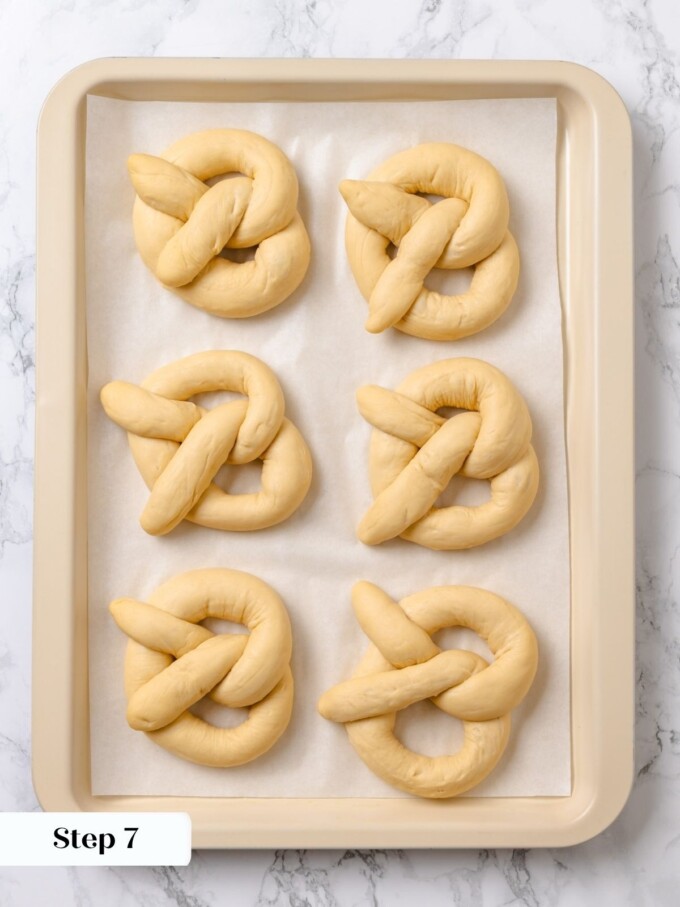
Step 7: Wrap both trays well with plastic wrap and place in a warm spot to final proof. This will take approximately 2 hours for pretzels leavened with sourdough only, or about 45 minutes if you added the active dry yeast. The pretzels are ready when they are visibly risen and very soft to the touch. Press one lightly with a fingertip and it should feel pillowy, almost delicate. (photo 19)
If you are not using any added commercial yeast, proof in a warm spot and then refrigerate the wrapped trays for 30 minutes before dipping. The cold firms the dough just enough to make it much easier to handle in the dipping solution.
Chill and Prep:
Step 8: Once the pretzels have finished proofing, place the wrapped trays in the refrigerator for 30 minutes while you prepare your dipping solution and preheat the oven to 450°F. The chill firms the dough so the pretzels hold their shape during dipping and do not stretch or distort when you transfer them.
To prepare a 4% lye solution: Add 1,670 g (about 2 quarts) of cold water to a large glass or stainless steel bowl, then add 70 g of food-grade lye and stir gently until fully dissolved. Do not use any aluminum bowls, pots, or utensils. The lye reacts with aluminum, ruining both your equipment and your pretzels.
To prepare a baking soda solution: Combine 1 quart of water and 4 teaspoons of baking soda in a pot and bring to a rolling boil. A vigorous boil matters here. On one of my test batches, the solution was not at a full boil, and the pretzels did not develop properly.
Set up a dipping station before you pull the pretzels from the fridge. Pretzels on the left, dipping solution, then a wire rack set inside a baking sheet to catch drips, and finally the parchment-lined baking sheet you will bake on. Keep the pretzel salt close by so you can salt immediately after each dip.
Dip and Salt:
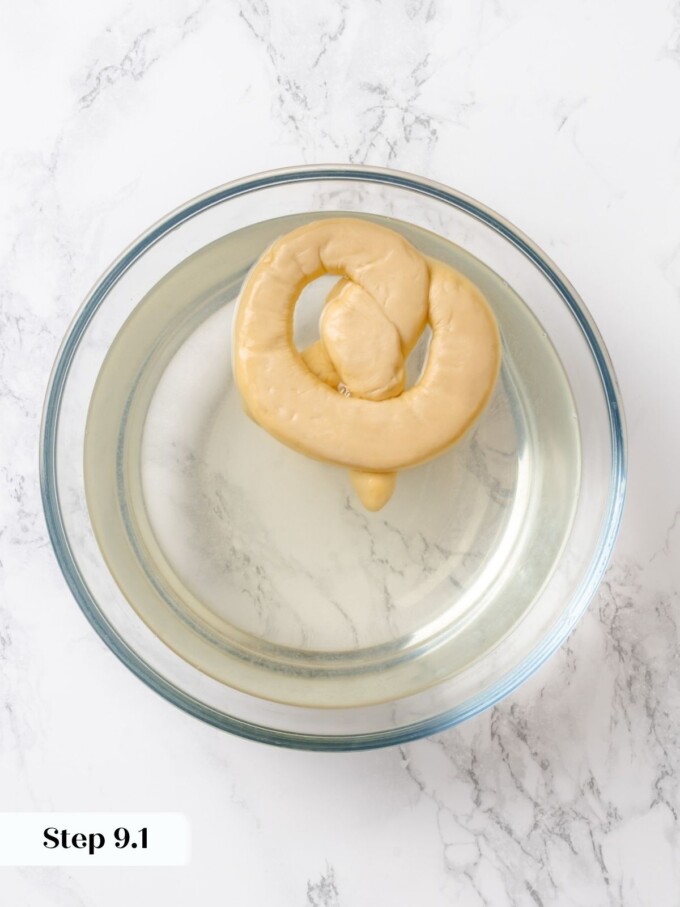
Step 9: Working quickly and carefully, dip the pretzels one at a time.
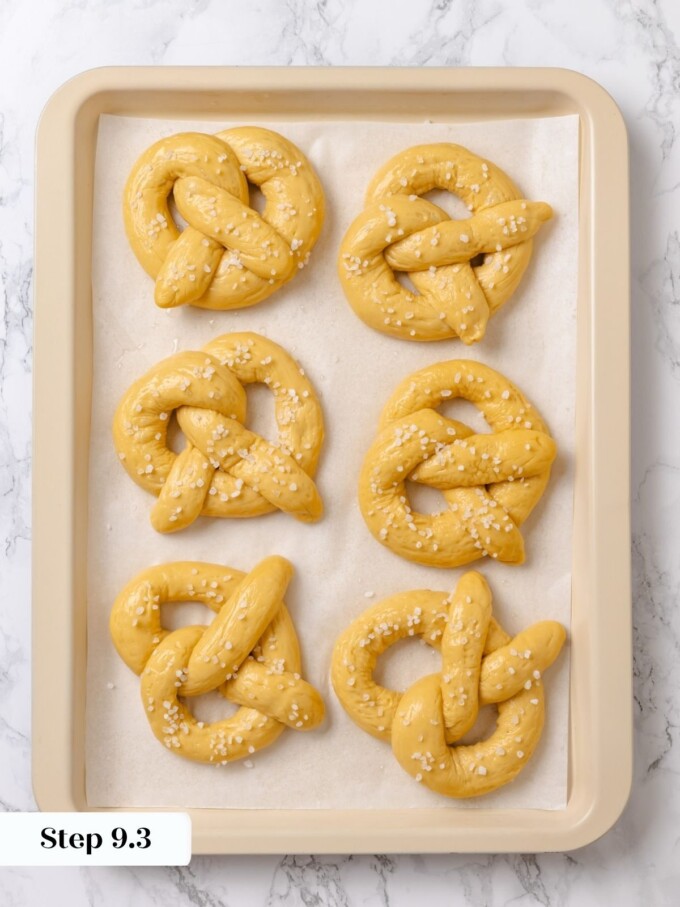
With the lye solution, place 1 to 2 pretzels top side down in the solution for 30 seconds. Flip using a slotted spoon or spider, then transfer to the wire rack and let drip for 10 to 15 seconds before moving to the prepared baking sheet. Sprinkle immediately with pretzel salt. The surface stays damp a little longer with lye, so you have a small window to work with each pretzel before salting. (photos 21 & 22)
With the baking soda solution, place 1 pretzel top side down in the boiling liquid for 5 seconds, then flip and transfer directly to the baking sheet. Salt after every 2 to 3 pretzels rather than one at a time, because the surface dries out faster than you expect with the baking soda bath.
Bake:
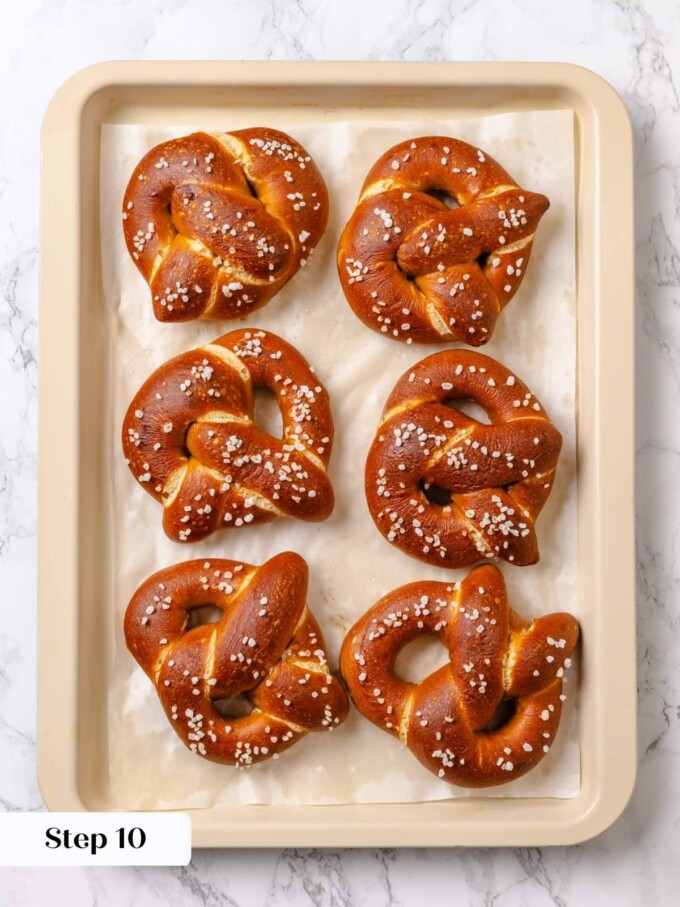
Step 10: Bake in the preheated 450°F oven for 18 minutes, rotating the pans after the first 10 minutes. Lye-dipped pretzels will bake to a deep, even brown with a soft, slightly yielding skin. Baking soda-dipped pretzels will be golden brown with a crunchier exterior. Both are done when they are richly colored across the entire surface and feel set when you gently shake the pan. Adjust bake time up or down for pretzels larger or smaller than 100g. Allow to cool for a few minutes before eating. (photos 23 & 24)
Recipe FAQs
Sourdough pretzels are best eaten the day they are baked. They will keep at room temperature for up to 2 days loosely wrapped, though the exterior will firm up as they sit. To reheat, a few minutes in a 350°F oven brings them back nicely, or a quick 20 seconds in the microwave. Freeze-bake pretzels for up to 1 month, and reheat directly from frozen in the oven at 350°F for about 10 minutes.
Yes, and the overnight retard is actually one of my favorite ways to handle this recipe. After shaping, wrap the baking sheets tightly in plastic and refrigerate overnight. The pretzels will slowly proof in the fridge, and I found the chilled dough was the easiest to handle when dipping. Bake them straight from the refrigerator the next morning after dipping in your solution of choice.
The most likely culprit is a rushed bench rest. This dough goes through an intensive mix that tightens the gluten considerably. If you try to roll it to two feet before it has had a full 30 minutes to relax, the dough will snap back and tear rather than extend. Every single test batch I rushed came out shorter and uneven compared to the ones that waited the full rest. Give the preshaped ropes the full 30 minutes under plastic, and they will roll out smoothly and evenly.
You can swap in honey or maple syrup, but the flavor shifts towards a bagel and away from a pretzel. Especially if you are also using the baking soda bath instead of lye. Malt syrup is more concentrated than any other liquid sweetener and has a savory depth that honey and maple simply do not have. If you can find food-grade malt syrup, it is worth tracking down for this recipe specifically.
Recommended Discard Recipes

Appetizers & Snacks
Rolls & Biscuits
Lunch & Dinners
Sourdough
Sourdough Pretzel Recipe
Ingredients
Sourdough Build
- 1 cup all-purpose flour, 113g
- ½ cup water, 113g
- 2 teaspoons sourdough starter, 11g
- **Pretzel Dough**
- 5 cups high-gluten flour, 600g
- 1 ½ cups warm water, 300g
- 1 ¼ cups sourdough build, 238g
- 1 tablespoon malt syrup, 20g
- 2 tablespoons unsalted butter, 28g
- 3 ½ teaspoons kosher salt
- 2 ¼ teaspoons active dry yeast, optional
- **4% Lye Solution, recommended**
- About 2 quarts cold water, 1670g
- Food-grade lye, 70g
- **Baking Soda Solution, alternative**
- 1 quart water
- 4 teaspoons baking soda
- **For Finishing**
- Pretzel salt, for topping
- Nonstick cooking spray, for pans
Instructions
- Combine the flour, water, and starter for the sourdough build 12 to 18 hours before you plan to mix the dough. Let sit at room temperature until doubled in volume.
- Once the build has doubled, combine all dough ingredients in the bowl of a stand mixer fitted with the hook attachment. If using active dry yeast, add it directly with the other ingredients. There is no need to bloom it first.
- Mix on the lowest speed until all ingredients are incorporated and a rough dough forms. If the butter was cold, some may remain unincorporated at this stage, which is fine.
- Increase speed to medium (speed 6 on a KitchenAid 5-quart) and mix for about 6 minutes, until the dough passes the windowpane test (when a small piece stretches thin without tearing). Note that this lower-hydration dough will look different from a brioche windowpane.
- Turn the dough out onto a clean surface and divide into 12 equal pieces, roughly 100g each. Keep all pieces covered with plastic wrap as you work.
- Preshape each piece by stretching it gently into a small rectangle, folding each short side toward the center, then performing two sets of thumb folds as you would when shaping a loaf. Fold the top over your left thumb and seal with your right thumb. Roll gently to seal the seam and lengthen the rope as much as the dough allows. Place under plastic and repeat with all pieces.
- Let the preshaped pieces bench rest, covered, for 30 minutes. Do not rush this step.
- Line two rimmed baking sheets with parchment paper and spray lightly with nonstick cooking spray. Working one at a time, roll each piece out to about 2 feet long, pressing firmly enough to thoroughly degas the dough. Pop any persistent large bubbles. Taper the ends slightly by pressing more firmly as you roll toward each end.
- Shape each pretzel by holding one end in each hand, pulling the ends up and away from you to form a U shape, twisting the ropes around each other once, then folding the ends down toward the bottom of the U. Overlap the ends over the bottom loop and press lightly to secure. Place gently on prepared parchment. Fit 6 pretzels per sheet.
- Cover the trays with plastic wrap and proof in a warm spot until visibly risen and very soft to the touch. This takes about 2 hours for 100% sourdough-leavened pretzels or about 45 minutes with added active dry yeast.
- Transfer the covered trays to the refrigerator for 30 minutes. Preheat the oven to 450°F.
- To prepare the lye solution: Add 1670g cold water to a large glass or stainless steel bowl. Add 70g food-grade lye and stir gently until dissolved. Do not use any aluminum bowls, utensils, or baking sheets; they react with lye.
- To prepare the baking soda solution: Combine 1 quart water and 4 teaspoons baking soda in a pot and bring to a rolling boil.
- Set up a dipping station: pretzels, then dipping solution, then a wire rack set over a baking sheet, then your prepared baking sheets with pretzel salt nearby.
- To dip in lye solution: Place 1 to 2 pretzels top side down in the solution for 30 seconds. Flip with a slotted spoon or spider and remove to the wire rack for 10 to 15 seconds. Transfer to the prepared baking sheet and sprinkle with pretzel salt.
- To dip in baking soda solution: Place 1 pretzel top side down in the boiling solution for 5 seconds. Flip and remove directly to the prepared baking sheet. Sprinkle with pretzel salt after every 2 to 3 pretzels, as the surface dries out quickly.
- Bake for 18 minutes, rotating the pans after 10 minutes. Allow to cool slightly before serving.
Notes
Nutrition
Nutrition information is automatically calculated, so should only be used as an approximation.
 Like this recipe? Rate & comment below!
Before You Go
If this sourdough pretzel recipe has you hooked on baking with sourdough, there is plenty more where that came from. Browse our sourdough recipes but might I suggest making these sourdough cinnamon rolls next!
I was nervous about the lye bath but followed the instructions exactly and the pretzels came out with the most incredible dark, crackly crust. The dough was beautifully smooth and easy to shape after the overnight rest.
This made our day, Margot! The lye bath intimidates so many bakers, so we’re SO glad you trusted the process — that dark, crackly crust is absolutely worth it and truly impossible to achieve any other way! Thank you for taking the leap and sharing your results, comments like yours mean everything! ~GVD team