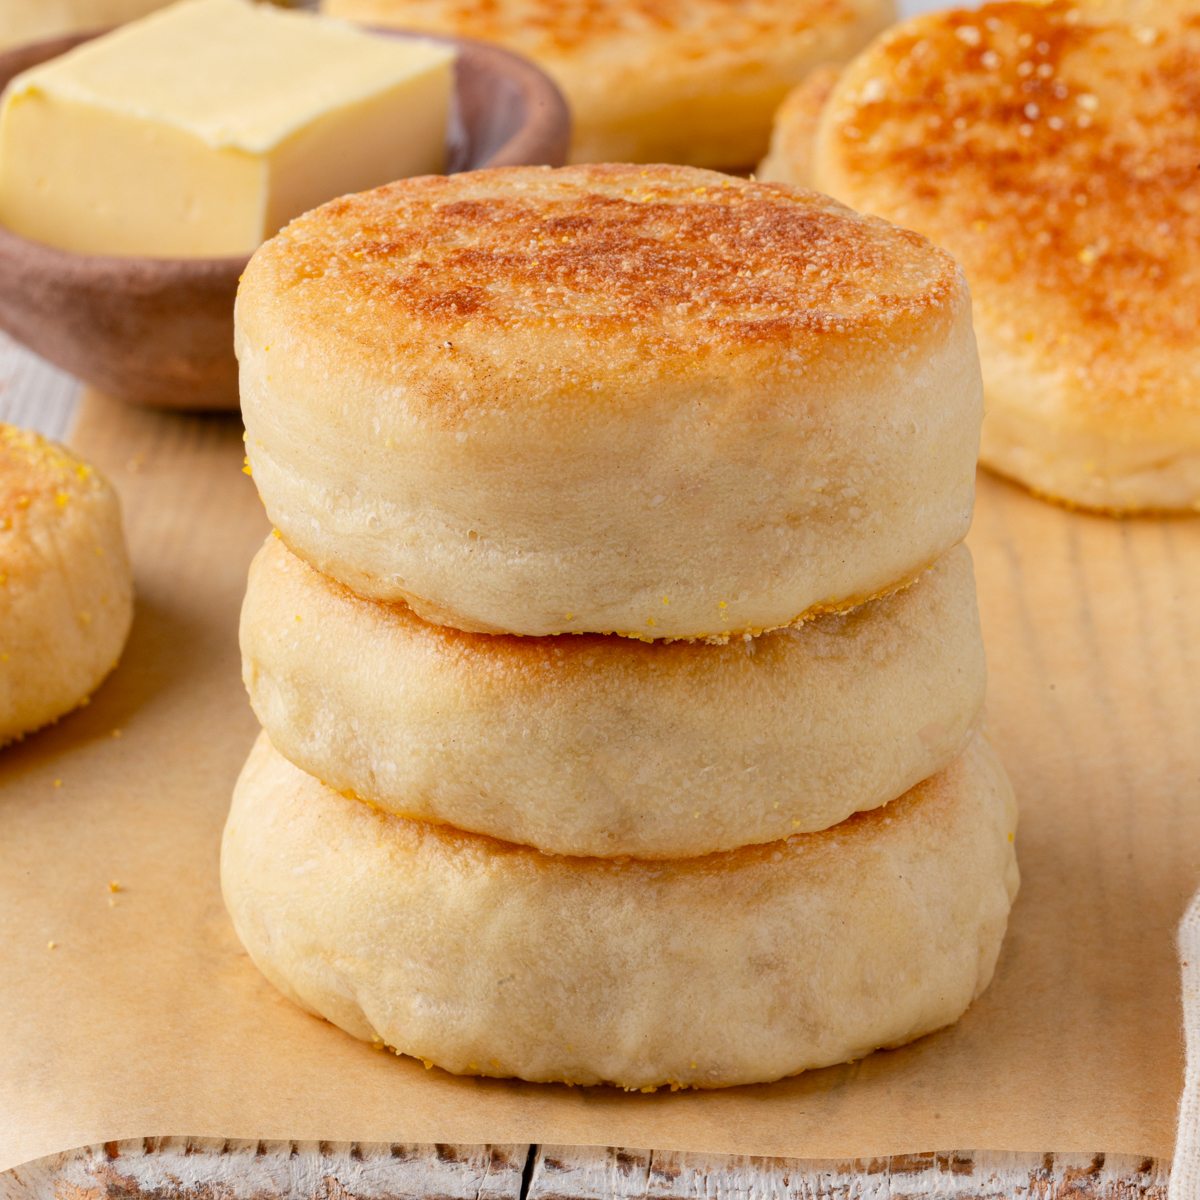
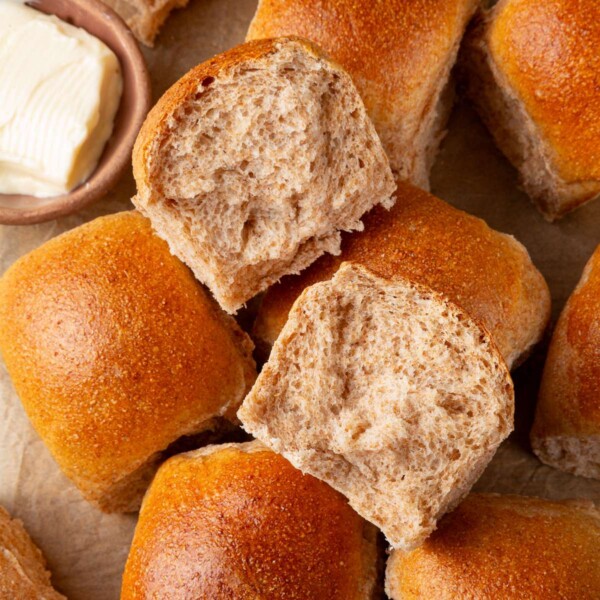
These sourdough English muffins have a crunchy cornmeal crust, a soft open crumb, and all the deep nooks and crannies that hold butter the way you want!


A Quick Look At The Recipe
This is a brief summary of the recipe. Jump to the recipe to get the full details.
Prep Time
20 minutes
Cook Time
25 minutes
Proof/Rest Time
1 hour 45 minutes
Total Time
2 hours 30 minutes
Servings
12 muffins
Difficulty
Intermediate
Calories *
145 kcal per serving
Technique
Stand mixer dough hook method.
Flavor Profile
Slightly tangy, buttery, classic English muffin flavor.
* Based on nutrition panel
“I was nervous about the pan-frying step but it went perfectly thanks to using both butter and oil. The dough was soft and easy to handle after the second proof, and the nooks inside were exactly what I was hoping for.” ⭐⭐⭐⭐⭐
Margot
Why You Will Love This Recipe
- Classic nooks and crannies, every time. The pan-fry-then-bake method creates the open, craggy crumb that makes English muffins worth making from scratch. Giving the cut rounds a full final proof before they hit the pan is the step that makes the biggest difference.
- Works with a discard or an active starter. You do not need to plan around a freshly fed starter at its peak. If you have a jar of refrigerated discard and a teaspoon of active dry yeast, you are ready to go, and the results are just as good! Use my ultimate guide to sourdough discard recipes for more discard-inspired bakes.
- A straightforward process with no special timeline required. Same-day baking is completely doable from start to finish in a few hours, or you can cut the rounds and refrigerate them overnight for a morning bake. If you have already made my sourdough sandwich bread, the dough-handling skills here will feel familiar.
There is something genuinely satisfying about splitting open a homemade English muffin and finding a springy, open crumb beneath a golden, cornmeal-crusted bottom. I tested this recipe with multiple leavening combinations, and each batch taught me something new about how a simple final proof can change everything.
These are used in many different ways in my house, from a simple toasting with butter to a person’s pizza! If you have made homemade English muffins before without sourdough, this version builds directly on that foundation, adding the depth that only a starter can bring. If you don’t have a starter yet, head over to my sourdough starter recipe, and then you can also make these sourdough discard bagels!
Ingredients & Substitutions
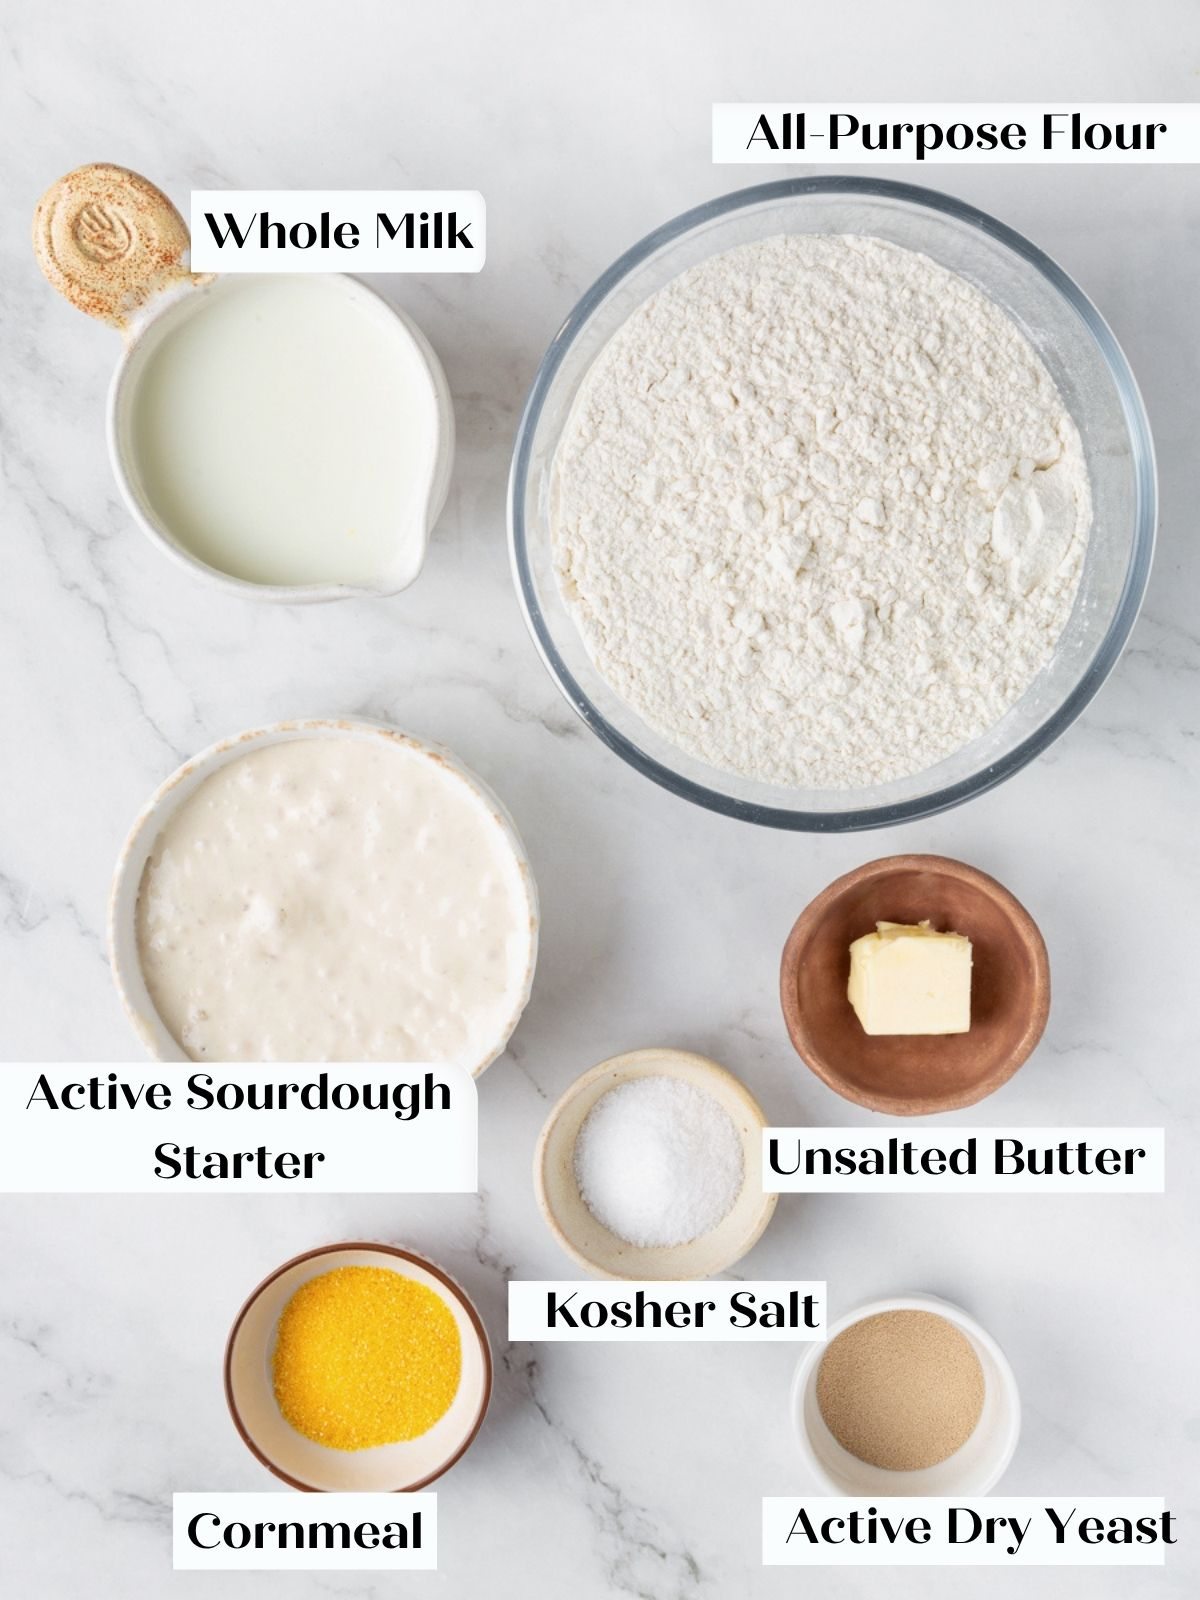
- Active Sourdough Starter: This is the primary leavening agent and the source of the mild tang and open crumb in these muffins. It works equally well at peak activity or straight from the refrigerator as discard. If you are new to maintaining a starter, how to feed sourdough starter walks through exactly what you need to know before baking.
- Whole Milk, Warmed: Warm milk hydrates the flour and enriches the dough, which contributes to a soft, tender crumb. If you substitute a non-dairy milk, the texture may differ slightly, and you may need to adjust for hydration.
- Unsalted Butter: The small amount worked into the dough adds richness and flavor. Use it at room temperature so it incorporates smoothly rather than clumping.
- All-Purpose Flour: This gives the dough enough structure for a good rise and a light, open crumb without making the muffins dense.
- Kosher Salt: Salt strengthens gluten and controls fermentation, but it is deliberately added after the initial mix. Delaying the salt lets the milk fully hydrate the flour and begin developing gluten first. If you add salt at the start with everything else, the dough will look impossibly dry and take roughly twice as long to come together, which is fine if you forget, but not ideal!
- Active Dry Yeast: This is listed as optional but recommended, and I mean it. The added yeast gives an extra rise boost that produces a more consistently open crumb, especially when using discard that is not at peak activity. Without it, the muffins will take longer to proof and tend to be denser. If you want to understand the full range of leavening combinations I tested and why this one came out on top, the easy no-knead sourdough bread post covers how natural versus commercial leavening interact in a sourdough context.
- Cornmeal: Dusted on the baking sheet, the cornmeal clings to the sticky cut rounds and travels with them into the pan, where it toasts and contributes the slightly crunchy, nutty bottom that is a signature of English muffins. Do not skip it. Flour will not give you the same result.
- Vegetable Oil and Unsalted Butter, for the Pan: The combination of both fats is intentional. Butter provides flavor, and oil raises the smoke point, so the butter does not burn before the muffins are cooked through. Wipe out the pan between batches to keep the color even.
Variations for Sourdough English Muffins
- Overnight Refrigerator Proof. Cut the rounds, place them on the cornmeal-dusted sheet pan, wrap the pan well, and refrigerate overnight. The next morning, let them proof in a warm spot for at least 30 minutes before cooking. This method requires added commercial yeast, so it is not recommended for a starter-only version. The muffins will be too dense and nearly doughy without the extra lift.
- Starter-Only, No Added Yeast. You can omit the active dry yeast entirely if you prefer a fully natural fermentation. Expect a noticeably longer final proof and a slightly denser crumb with less dramatic nook-and-cranny structure. And be sure to make these the same day just like this same day sourdough bread recipe!
- Herb and cheese: Press finely chopped chives or rosemary and a handful of shredded sharp cheddar into the dough during the final minute of mixing. The cheese melts into the crumb during baking, and the herbs come through in every bite. If you love this flavor combo, make this cheddar biscuit recipe next!

Professional Tips for Perfect Sourdough English Muffins
- Use both butter and oil in the pan, and wipe it out between batches. Butter provides the flavor you want on the crust, and oil raises the smoke point so the butter does not burn before the muffins are cooked through. If the butter starts to brown before you have even added the muffins, your heat is too high. Wipe the pan clean between rounds to maintain an even, deep golden color on every batch. But if you love brown butter, you should make these sourdough chocolate chip cookies!
- Do not skip the final proof. This is the step most bakers rush, and it is the one that matters most for an open crumb. The cut rounds should visibly double in height and look puffed before they go into the pan. If you cook them too soon, the crumb will be tight, and the muffins will be dense, no matter how well everything else went just like when making this sourdough pretzel recipe.
- Watch the pan temperature before you commit. Proof times and pan temperatures vary more than any clock can account for. A medium heat setting on one stovetop runs hotter than on another, so use the butter as your guide: if it melts and foams gently without browning, you are ready. The same principle of using visual cues over strict timing applies across all my sourdough bakes. For more in-depth cues on sourdough, head over to my sourdough bread recipe for beginners.
How to Make Sourdough English Muffins
Use these instructions to make light, nook-filled sourdough English muffins with a classic cornmeal bottom and an open, tender crumb. Further details and measurements can be found in the recipe card below.
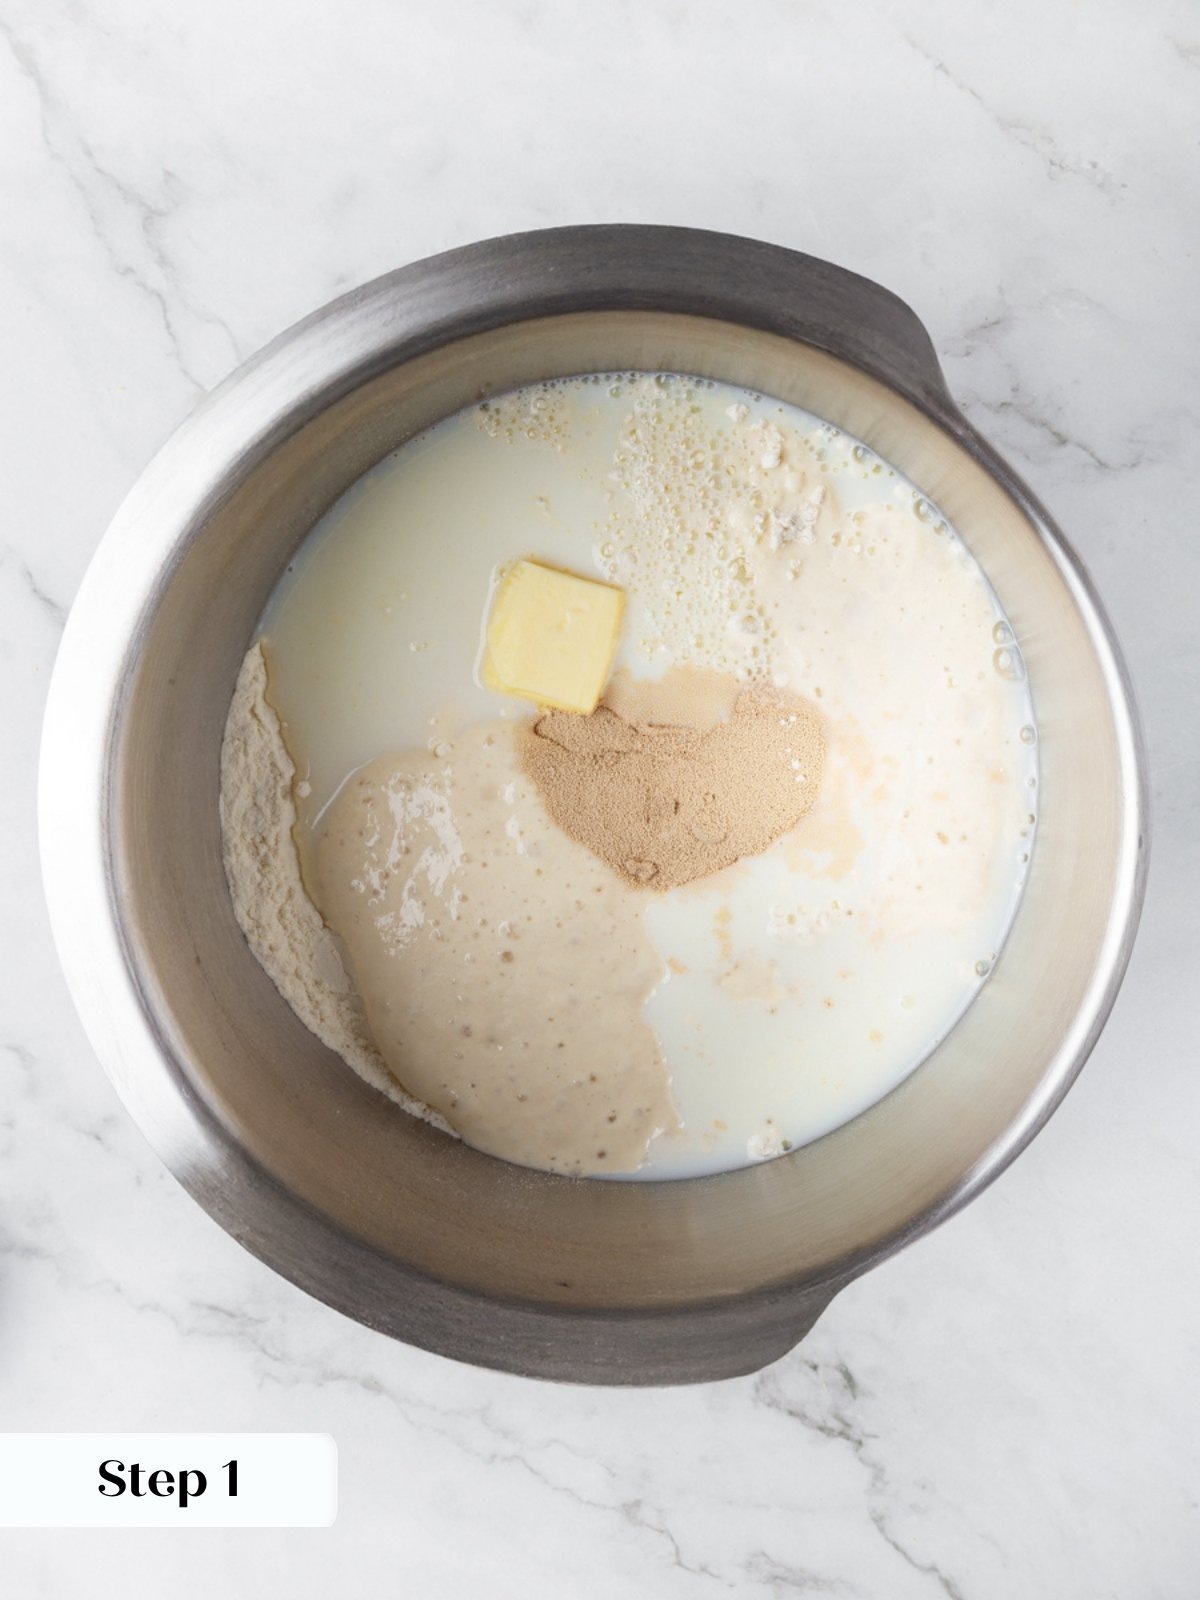
Step 1: Mix the Dough. Combine the warm milk, butter, flour, active sourdough starter, and optional active dry yeast in the bowl of a stand mixer fitted with the dough hook. Mix on low speed until a rough but cohesive dough forms. The dough will look shaggy and uneven at this stage. (photo 1)
Delaying the salt helps the milk hydrate the flour and begin developing gluten. Otherwise, the salt competes with the flour for hydration. You can add everything together, but it will look like dry dough, and you will need to incorporate it for about twice as long.
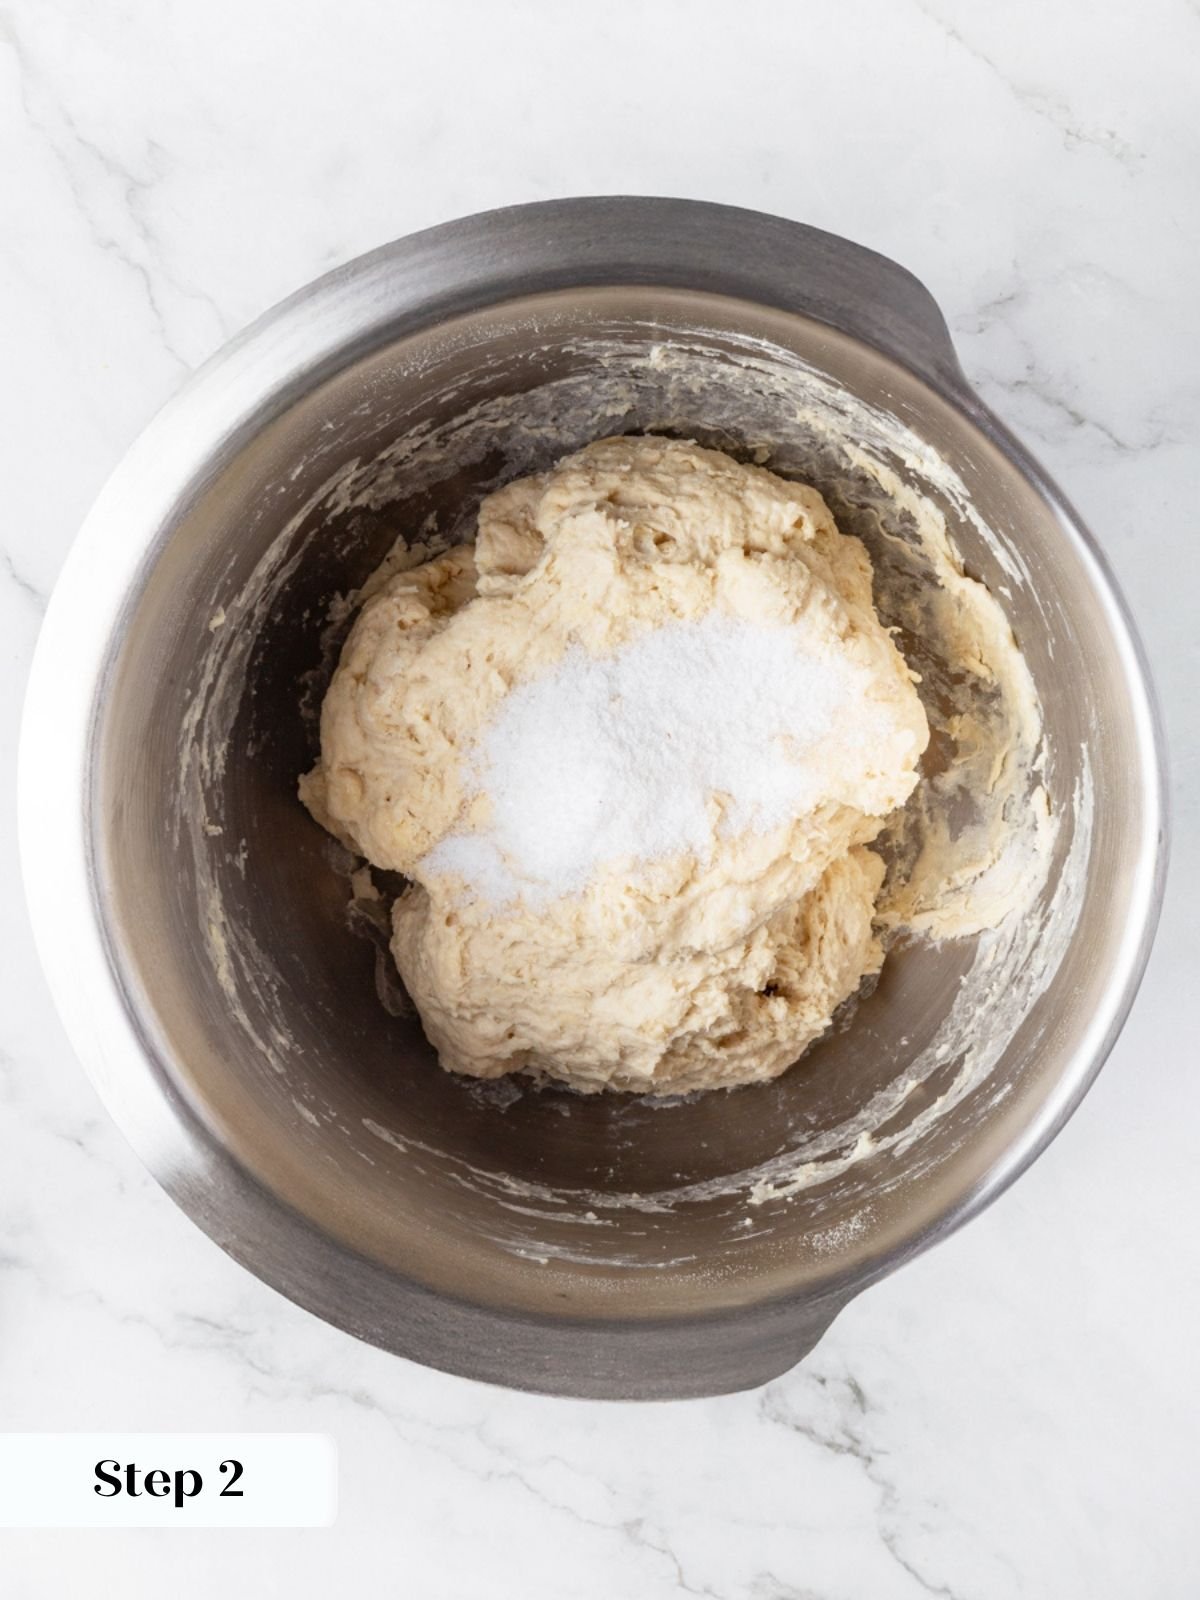
Step 2: Develop the Dough. Add the salt and increase the speed to medium-high. Mix until the dough is smooth, elastic, and pulls cleanly away from the sides of the bowl, about 6 minutes on medium-high speed. The dough should feel soft and slightly tacky but not sticky. (photos 2 & 3))
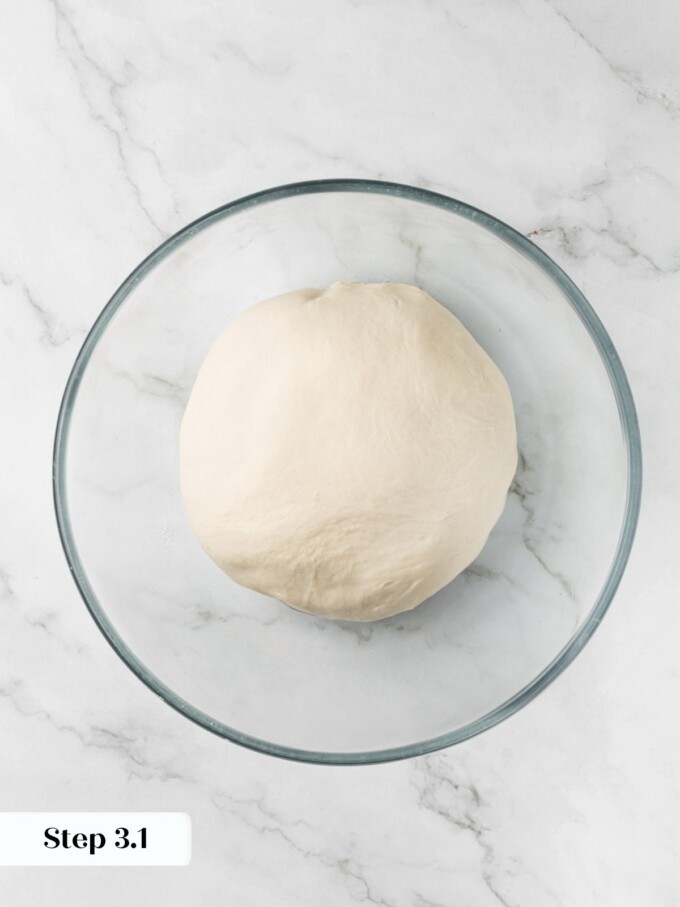
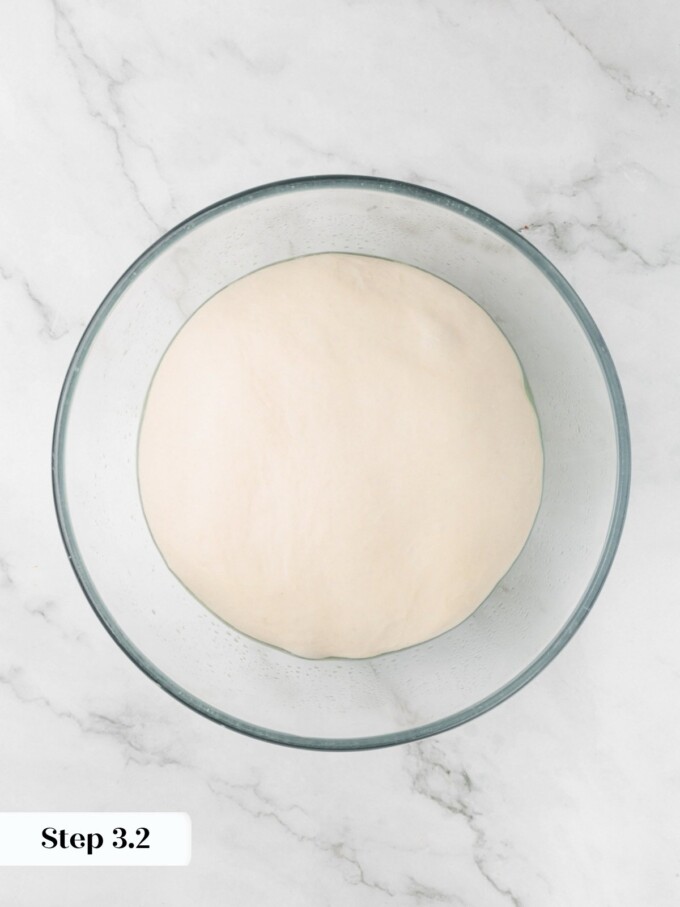
Step 3: First Bulk Proof. Transfer the dough to a lightly oiled large bowl and cover tightly with plastic wrap. Place it in a warm spot and let it proof for 30 to 40 minutes. The dough will look slightly puffed but will not yet be doubled. (photos 4 & 5)
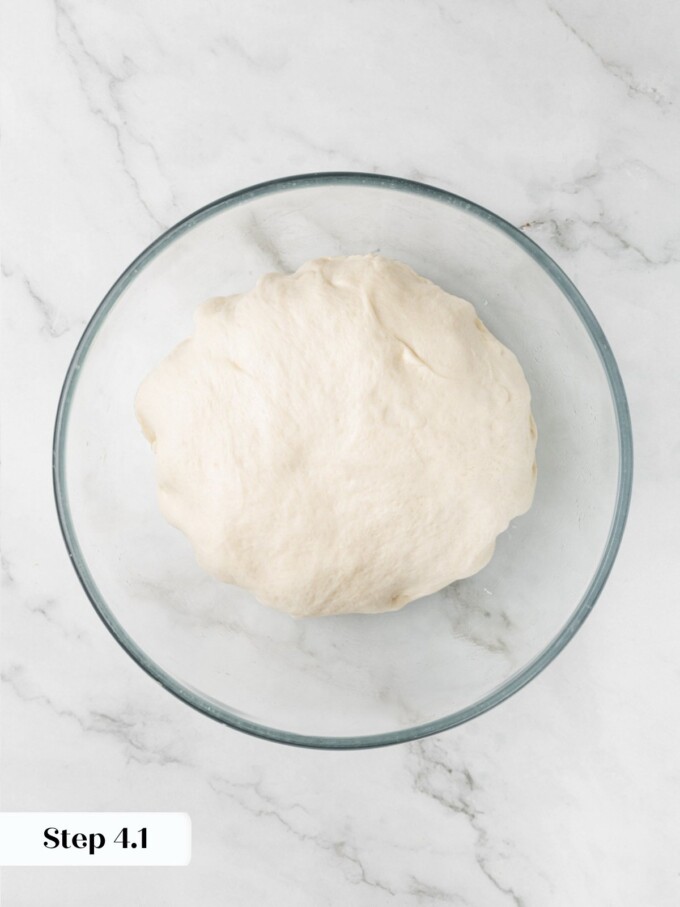
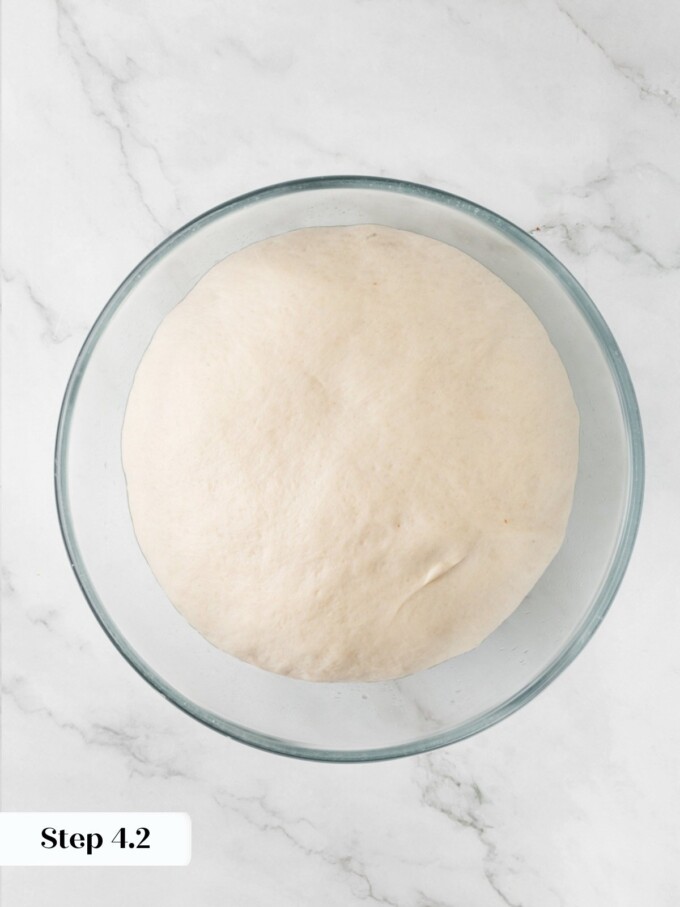
Step 4: Degas and Finish the Proof. Flip the dough over in the bowl and degas it by folding the edges in toward the center and pressing down firmly, or simply press down across the surface if you prefer. Re-cover the bowl and return it to the warm spot to finish proofing until the dough has clearly doubled in size, which should take about 30 to 40 more minutes. When it is ready, the dough will look puffy and feel airy when you gently press into it. (photos 6 & 7)
Proof times vary depending on your kitchen temperature and the activity level of your starter. A cooler kitchen can push either proof stage significantly longer. Trust the visual cue of a fully doubled, airy dough rather than the clock.
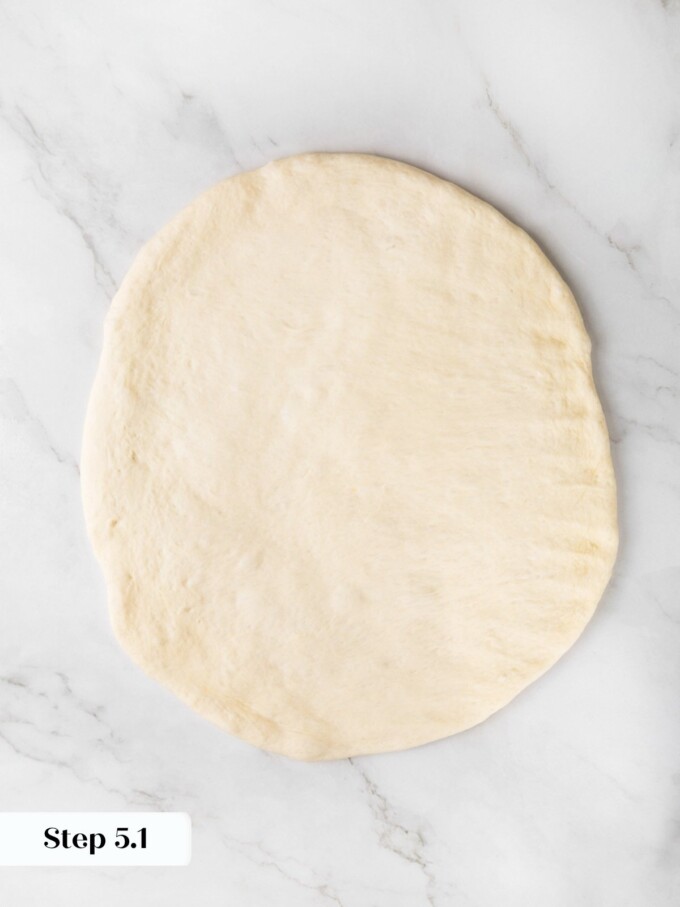
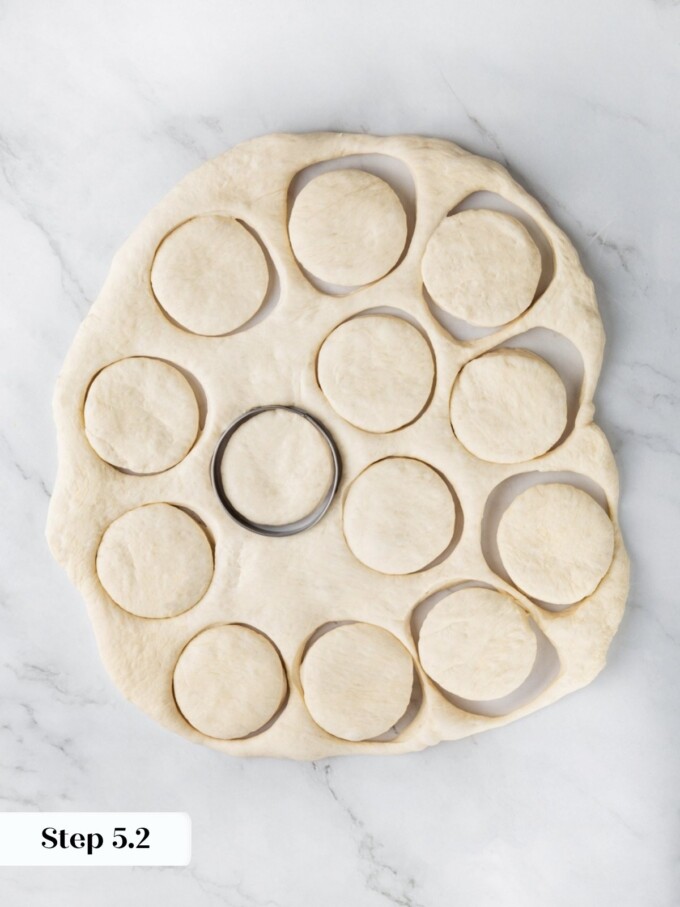
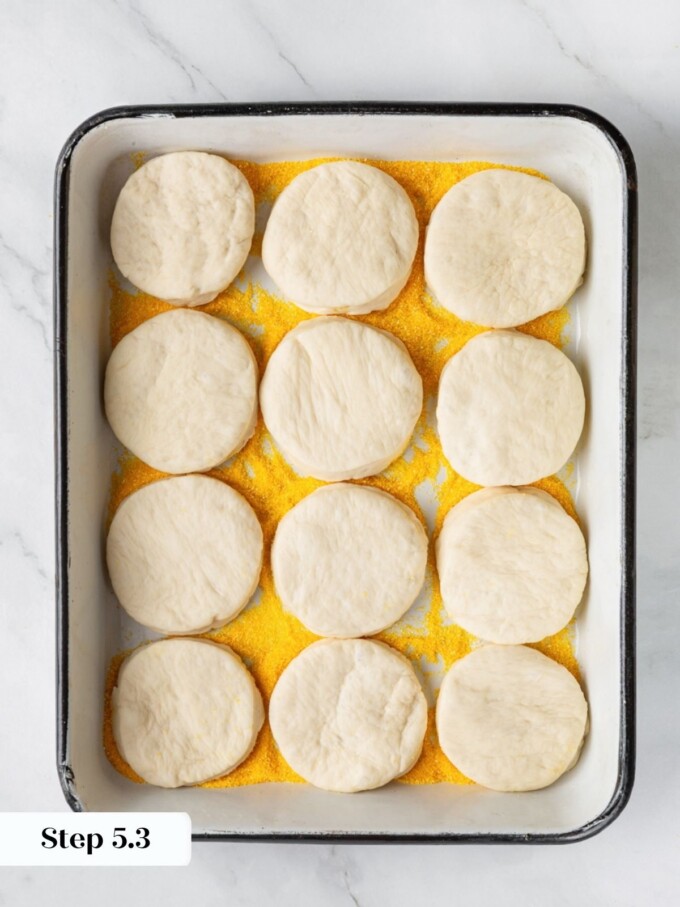
Step 5: Shape the Dough. Turn the dough out onto a smooth, unfloured work surface and press out any remaining air with your hands. Using your fingers, press and spread the dough out into a flat circle about ¼ inch thick. Cut out 2½-inch rounds using a biscuit cutter or circular cookie cutter, then lift each round and place it directly onto a half-sheet pan generously dusted with cornmeal. (photos 8 & 9)
Pressing out and cutting the dough on an unfloured surface helps you achieve the right thickness without it shrinking back instantly. This makes the bottoms sticky, which is why you traditionally place them on a cornmeal-dusted surface. The cornmeal adheres to the bottom of the pan and will also cook in the pan, adding to the classic English muffin flavor.
Step 6: Handle the Scraps. Gather any remaining scraps and knead them back together into a smooth ball. Place the ball in a bowl, cover it, and let it bulk proof for an additional hour before pressing and cutting a second batch the same way you did the first. Skipping this extra proof will leave the scrap muffins noticeably denser, so the wait is worth it.
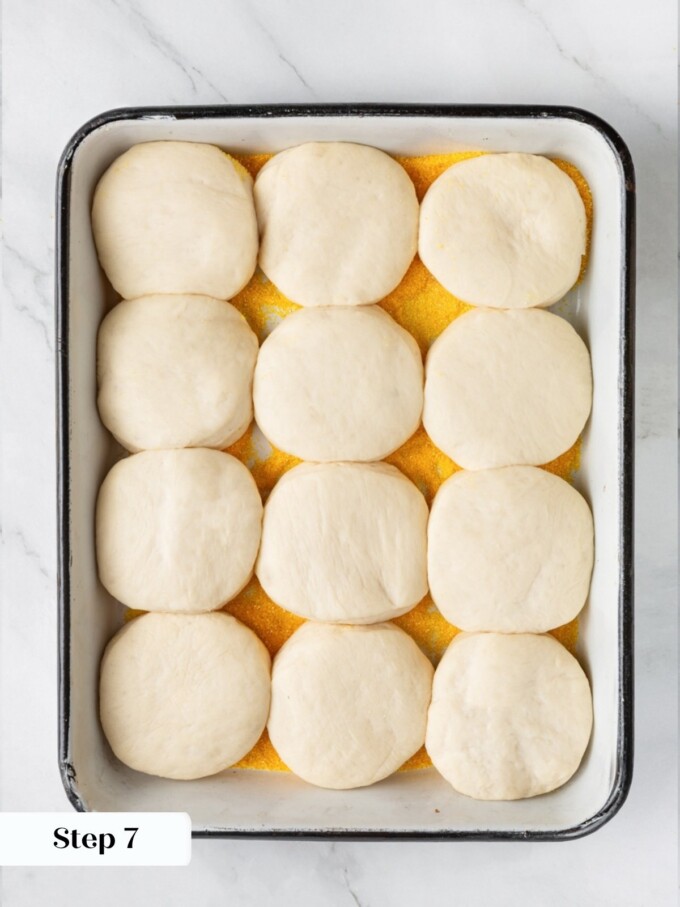
Step 7: Final Proof. Wrap the sheet pan tightly with plastic wrap and let the cut rounds proof at room temperature for 45 minutes to 1 hour. If you made the dough without added commercial yeast, plan for at least an hour, possibly longer, depending on how warm your kitchen is. You are looking for rounds that are visibly puffed and roughly double in height before you move on. (photo 10)
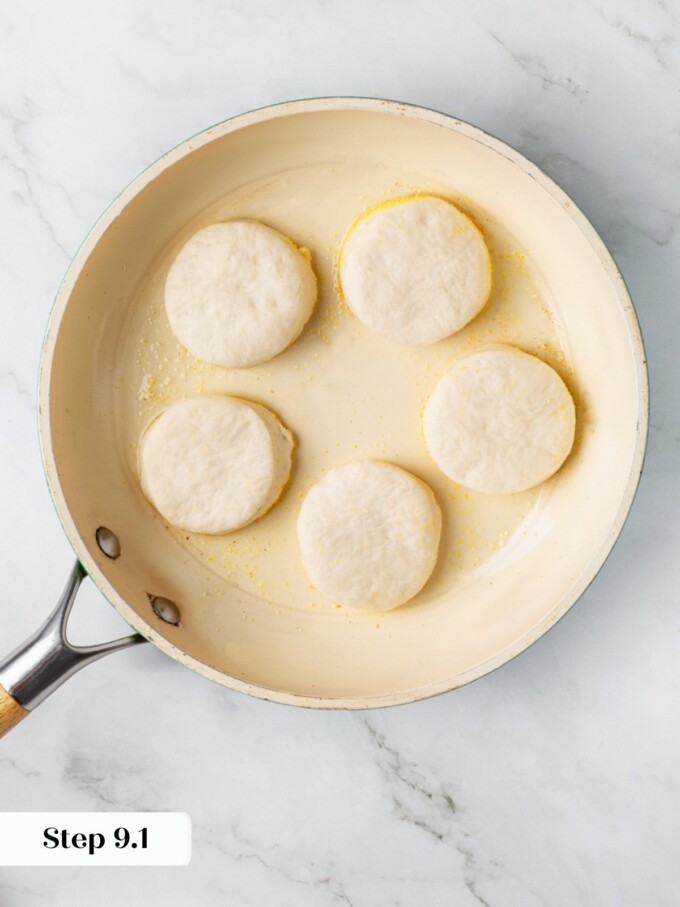
Step 8: Preheat the Oven and Pan. While the rounds are finishing their proof, preheat the oven to 350°F conventional (no fan). Set a wire rack inside a rimmed baking sheet and place it in the oven, or line a flat baking sheet with parchment if your rack is not oven-safe. Heat a large sauté pan over medium heat with approximately 1 teaspoon of vegetable oil and 1½ teaspoons of unsalted butter until warm but not smoking.
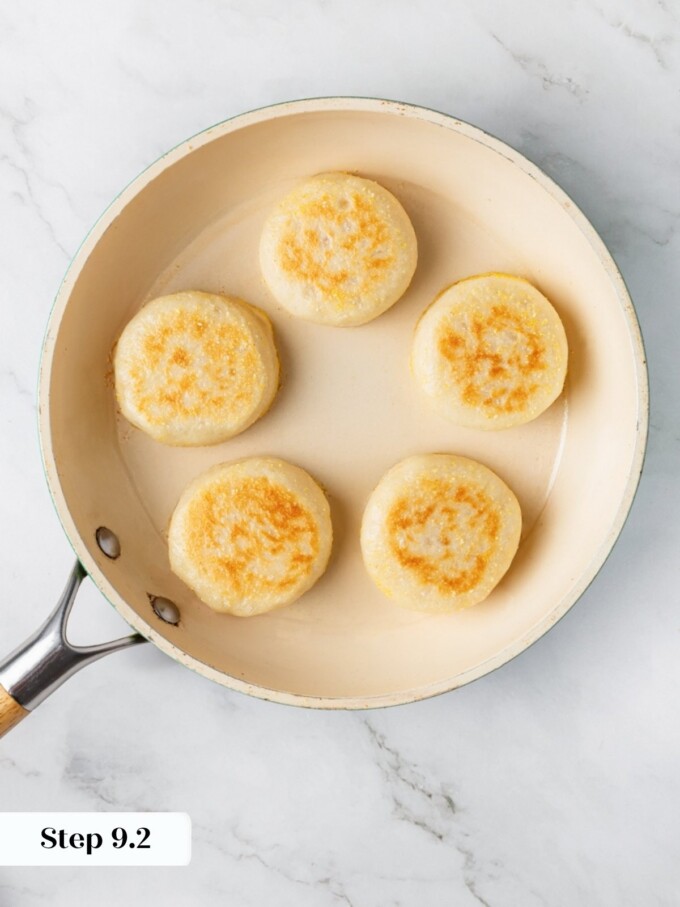
Step 9: Pan-Fry the Muffins. Add the proofed English muffins to the preheated pan, cornmeal side down, working in batches, so you do not crowd the pan. Cook until golden brown on the first side, about 1½ to 2 minutes, then flip and cook the second side until golden brown, about 1 minute. The first side typically takes a little longer than the second. If the butter begins to brown before you have added the muffins, your heat is too high. Pull the pan off the burner briefly and let it cool down before continuing. Transfer the cooked muffins to the rack set inside the baking sheet. (photos 11 & 12)
Wipe out the pan between batches to keep each round an even, dark golden brown.
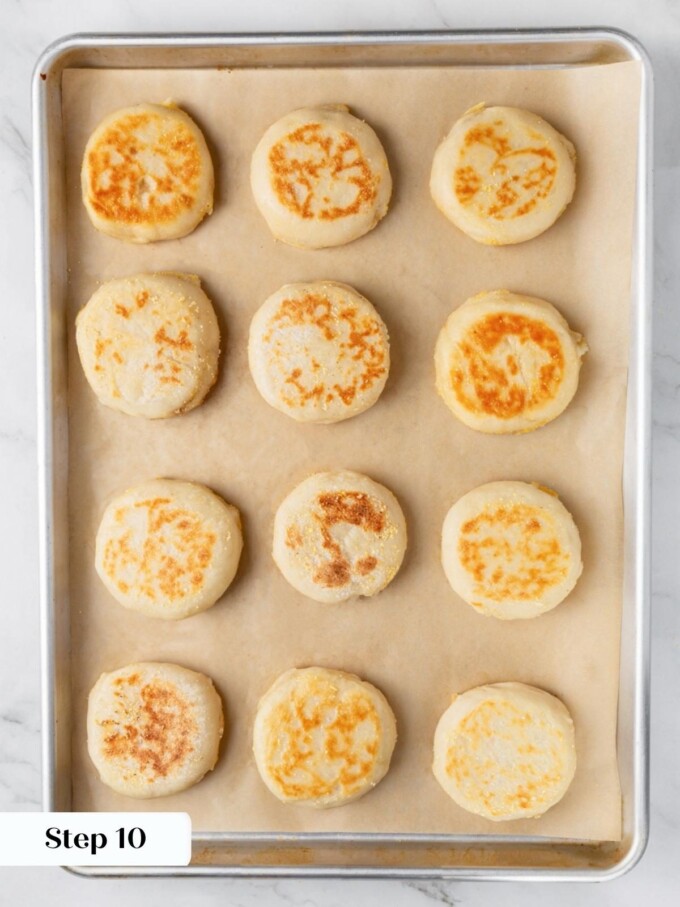
Step 10: Bake to Finish. Slide the rack of pan-fried muffins into the preheated oven and bake for 10 minutes. Transfer to a wire rack and let them cool before splitting. To get the best nooks and crannies, fork-split rather than cutting with a knife; a knife compresses the crumb, and you will lose those open pockets.(photo 13)
Recipe FAQs
Store cooled muffins in an airtight container or zip-top bag at room temperature for up to 3 days. For longer storage, freeze them in a single layer, then transfer to a freezer bag for up to 3 months. To reheat, toast directly from frozen in a toaster or warm in the microwave for about 30 seconds.
Yes, with one condition: the dough must include added commercial yeast if you are refrigerating the cut rounds overnight. After cutting, place the rounds on the cornmeal-dusted pan, wrap the pan very well, and refrigerate. The next morning, let them proof in a warm spot for at least 30 minutes. A starter-only version will be too dense and nearly doughy after an overnight cold rest, so the active dry yeast is not optional here.
The most common reason is a skipped or rushed final proof. The cut rounds need to visibly double in height and look puffed before they go into the pan. If they go in too soon, the crumb closes up, and no amount of careful cooking will fix it. The second most likely culprit is cooking without added commercial yeast and not allowing enough extra proof time, especially in a cool kitchen.
The flavor is the clearest difference: sourdough English muffins have a mild, pleasant tang that classic English muffins lack. The texture is very similar when both are given a proper final proof, though the sourdough version can produce a slightly more open crumb with more dramatic nooks and crannies.
You can, though the dough will take more effort by hand. Mix the dough in a large bowl until it comes together. Then knead on an unfloured surface for 10 to 12 minutes, or until smooth and elastic. Make sure you still delay the salt. Once added, continue kneading until the dough smooths out.
Recommended Sourdough Recipes

Breakfast & Brunch

Yeast Breads

Yeast Breads

Breakfast & Brunch
Sourdough English Muffins
Ingredients
- 1 cup whole milk, warmed (260g)
- 1 tablespoon unsalted butter, room temperature (15g)
- 3 ¼ cups all-purpose flour, 403g
- 1 cup active sourdough starter or discard, 200g
- 2 ½ teaspoons kosher salt, 10g
- 1 teaspoon active dry yeast, optional but strongly recommended
- Cornmeal, for the bottoms
- Unsalted butter, for the pan
- Vegetable oil, for the pan
Instructions
- In the bowl of a stand mixer fitted with the dough hook, combine the warm milk, butter, flour, starter, and optional yeast. Hold the salt back for now. Mix on low speed until a rough but cohesive dough forms.
- Add the salt and mix on medium-high speed until a smooth dough forms, about 6 minutes.
- Transfer the dough to a lightly oiled large bowl, cover with plastic wrap, and bulk proof in a warm spot for 30 to 40 minutes.
- Flip the dough over and degas by folding the edges in and pressing down, or simply pressing down all over. Cover and return to the warm spot until doubled, about 30 to 40 minutes more.
- Turn the dough out onto a smooth, unfloured work surface. Degas and press the dough out with your fingers into a circle about 1/4 inch thick.
- Cut out 2 1/2 inch rounds using a biscuit cutter or round cookie cutter. Place cut-side down on a cornmeal-dusted half-sheet pan.
- For scrap dough, knead the pieces together, cover, and bulk proof for an additional hour before pressing and cutting again.
- Cover the pan loosely with plastic wrap and final proof for 45 minutes to 1 hour, until visibly puffed and doubled in height. Dough made without added yeast will need longer.
- Meanwhile, preheat the oven to 350°F (no fan) and set a wire rack inside a rimmed baking sheet.
- Heat a large skillet over medium heat with about 1 teaspoon vegetable oil and 1 1/2 teaspoons butter until warm but not smoking. If the butter browns before you add the muffins, the pan is too hot.
- Add the muffins cornmeal-side down and cook until golden brown, about 1 1/2 to 2 minutes per side. Transfer to the rack-lined baking sheet. Wipe out the pan between batches.
- Bake for 10 minutes. Cool on the rack and serve toasted.
Notes
Nutrition
Nutrition information is automatically calculated, so should only be used as an approximation.
 Like this recipe? Rate & comment below!
Before You Go
If these sourdough English muffins earned a spot in your regular rotation, there is plenty more waiting for you. Browse our sourdough recipes or head right over to this no kead sourdough bread.
Hi,
I want to make these sourdough english muffins (they look delicious!), but the recipe on this page with ingredients and ratios seems to be for no-knead pizza dough. I’m not sure if this is an error on my end, but is there a way for me to access the amounts for the English muffins? Thanks!
Hi LB, We did have a technical issue where the wrong recipe was displaying on this page, but it has since been fixed. You should now be able to see the correct sourdough English muffin recipe with the proper ingredients and measurements. Sorry for the confusion and hope you enjoy making them — they really are delicious! ~GVD team
I was nervous about the pan-frying step but it went perfectly thanks to using both butter and oil. The dough was soft and easy to handle after the second proof, and the nooks inside were exactly what I was hoping for.
So happy to hear everything went exactly the way you hoped! Thank you for coming back and sharing! ~GVD team