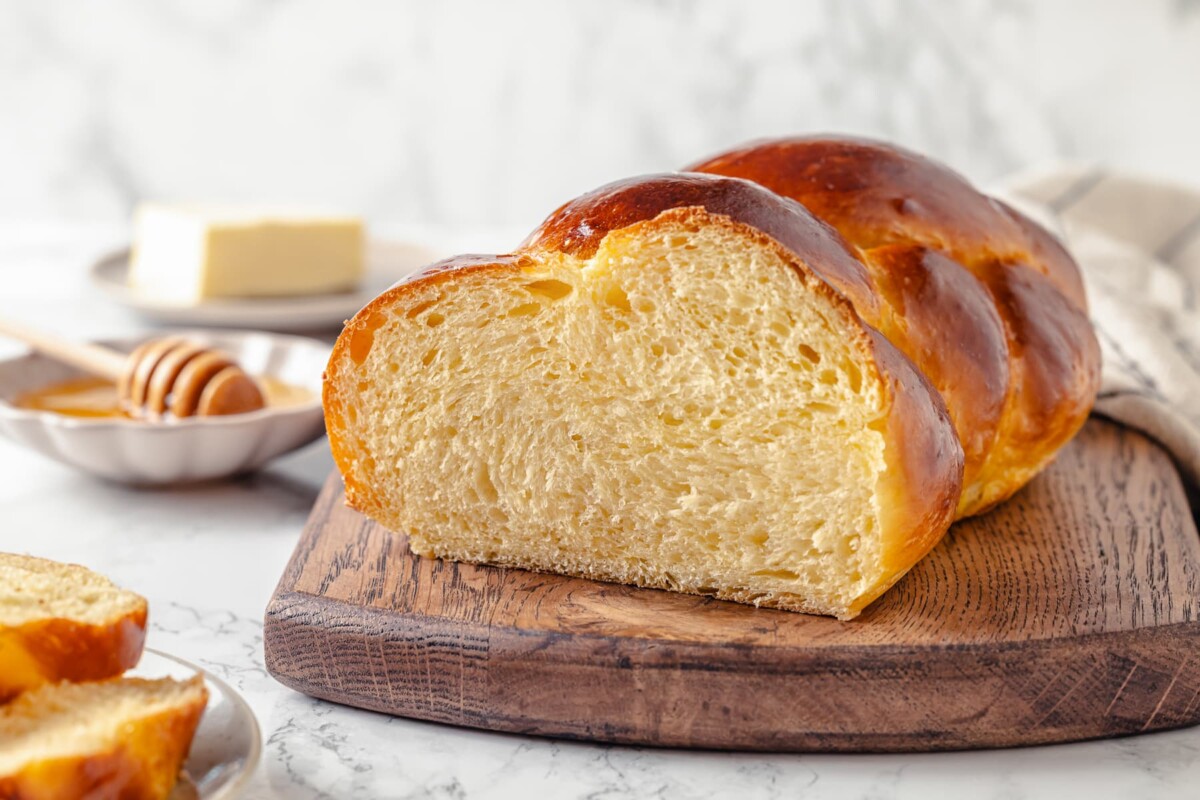
A pastry chef shares her recipe for soft, tender challah. This easy challah recipe makes a rich loaf lightly sweetened with honey.
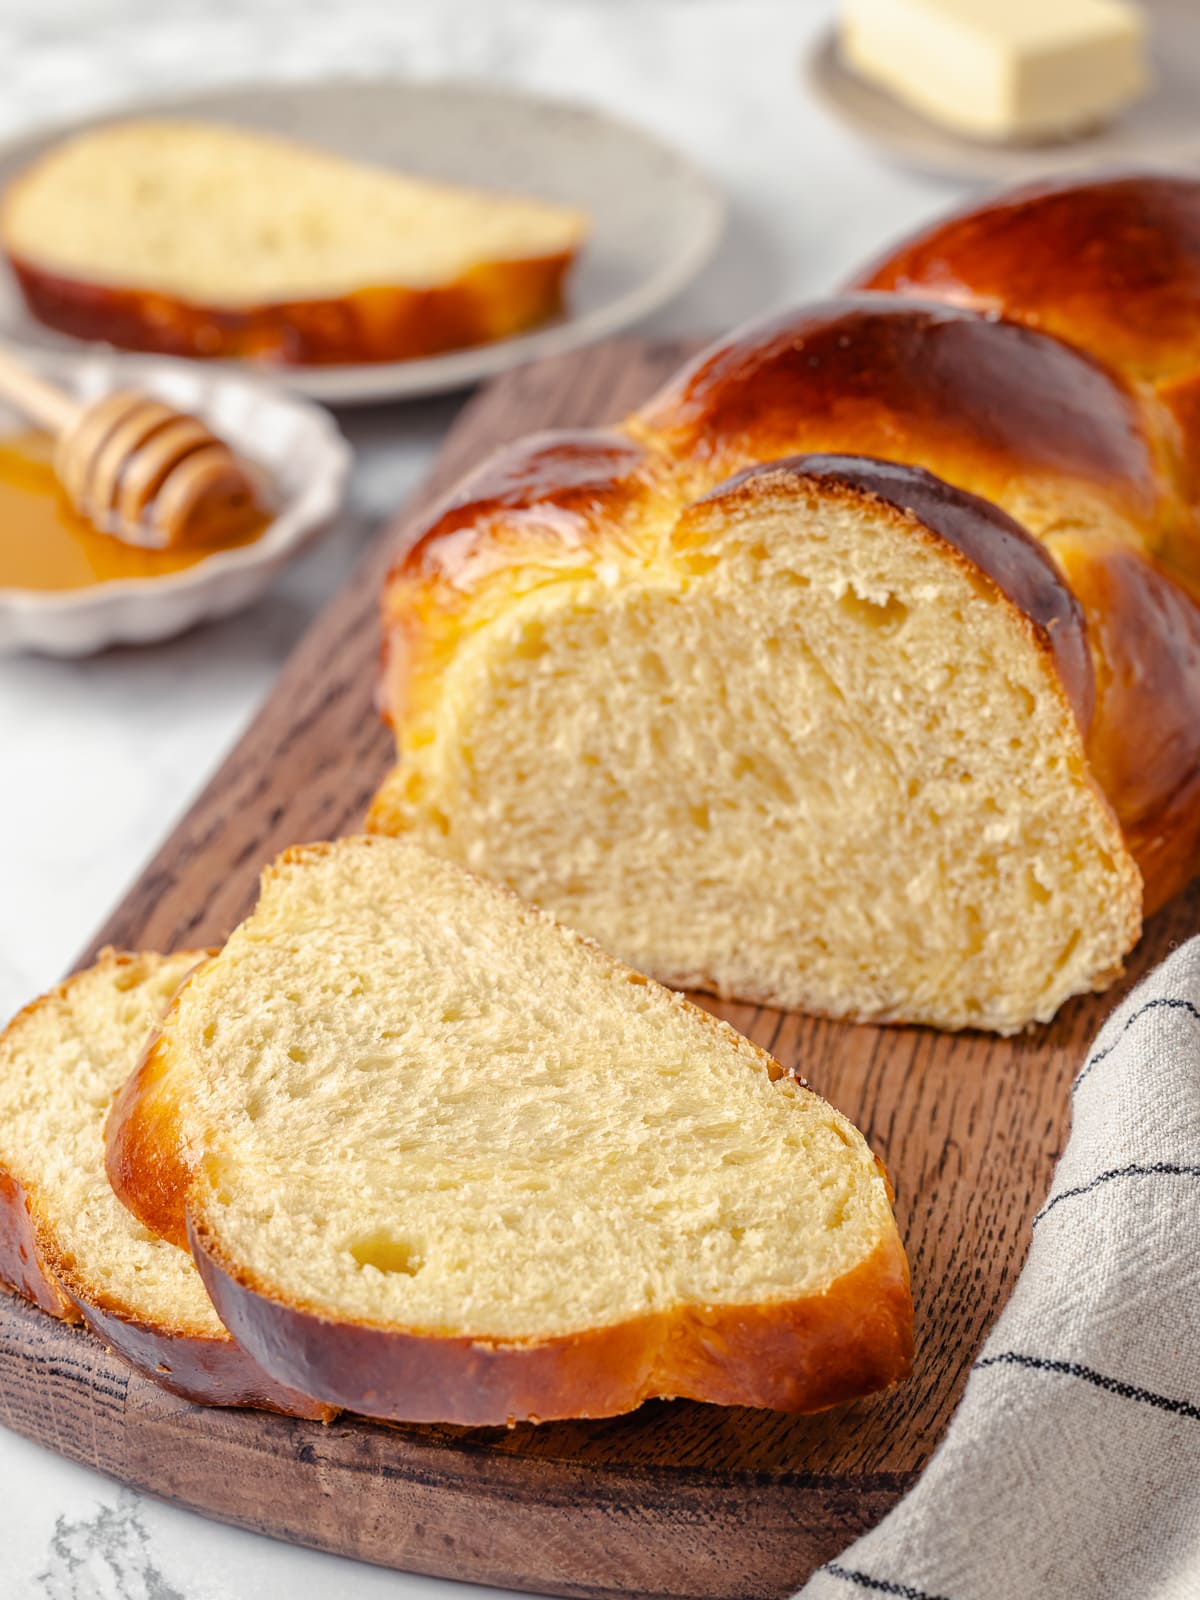
Challah is one of those breads that is (almost) universally loved by all. Not only is the perfect companion to soups, beef chili, or soaking up the last drop of this slow cooker shredded beef; but it makes the best French toast, bread pudding and toast!
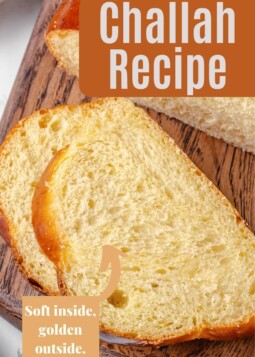
This challah recipe makes a soft, chewy, irresistible bread! It is easy enough for kids to make and share in the fun from the mixing to braiding and eating!
Why You Will Love this Recipe
- Soft, easy dough that isn’t sticky. This is actually an excellent beginners dough even easier than my classic Italian bread recipe! No bench flour necessary! Just oil your hands for easy handling.
- A tender, moist, flavorful loaf. There is the perfect amount of honey and sugar for flavor and browning, and a mix of eggs and egg yolks for a rich, soft bread that isn’t too eggy.
- Contains no dairy or meat. Unlike a brioche loaf, which is a similar enriched bread, this challah does not contain milk or butter to keep it pareve.
Table of Contents
Ingredients & Substitutions

- Water: You could use milk instead of water and it will add more flavor and add to the soft texture like it does in sandwich bread, but then the recipe will not be pareve or traditional.
- Granulated Sugar & Honey: I like the combination of granulated sugar and honey for the perfect flavor and texture but you could use 3 tablespoons of either rather than both.
- Vegetable Oil: I use canola oil when making challah because it has a neutral flavor. Some bakers use olive oil, but I find that significantly changes the flavor.
- Active Dry Yeast: The recipe is written for active dry yeast but you could also use instant yeast with reduced proof times. Watch carefully for over proofing! The dough gets most of its flavor from the eggs, yolks, and honey, unlike no knead dutch oven bread, which relies on time to develop natural flavor and structure.
- Kosher Salt: Kosher salt not only adds flavor but it helps with gluten development and also tenderizes the dough. This makes it easier to work with and more delicious to eat!
See the recipe card for full information on ingredients and quantities.
Possible Variations
- Choose a different braid or shape! If you are more comfortable, make a 3-strand braid like my pumpkin challah. You could also wrap either braid into a wreath like Italian Easter bread.
- Mix or braid in a flavor: Incorporate nuts, chocolate, raisins or other dried fruits into the dough like I did in this chocolate chip challah recipe or add a swirl of your favorite jam like this fig raspberry swirled challah! You could even take inspiration from this Nutella babka and use your favorite chocolate hazelnut spread!
- Add a spice or flavor the dough. Add a ground spice like the cardamom in Finnish pulla (cardamom bread) or make it cinnamon raisin! You can also add a puree and spice like I did in this pumpkin challah recipe.
- Add a topping right before baking. A sprinkle of sesame seeds, poppy seeds, or even flaked sea salt would be a lovely addition. Let your imagination run wild from there! Maybe try everything bagel seasoning!
Professional Tips for Making Challah
- Consider mixing 2 loaves if using a stand mixer. I made 1 loaf in my 5 quart stand mixer and I had to finish kneading in the oil by hand, which I never had to do in large batches in my bakery. Plus, you can use that second loaf for overnight French toast casserole with blueberries!
- Adding the oil after the gluten develops makes the whole process faster!
- Avoid braiding the strands too tightly. The dough needs space to expand both during proofing and during baking. If you braid too tightly, the dough will end up tearing and may actually spread out rather than up during baking (especially the 3 strand braid).
- The double egg wash. This bread is unique in that I brush it with egg wash right after shaping and again before baking. This allows for maximum expansion without sticking to covering and also a supremely glossy, dark golden brown crust!
How to Make Braided Challah like a Pro
Use these instructions to make this professional, yet easy, challah recipe! Further details and measurements can be found in the recipe card below.
Mix the dough:
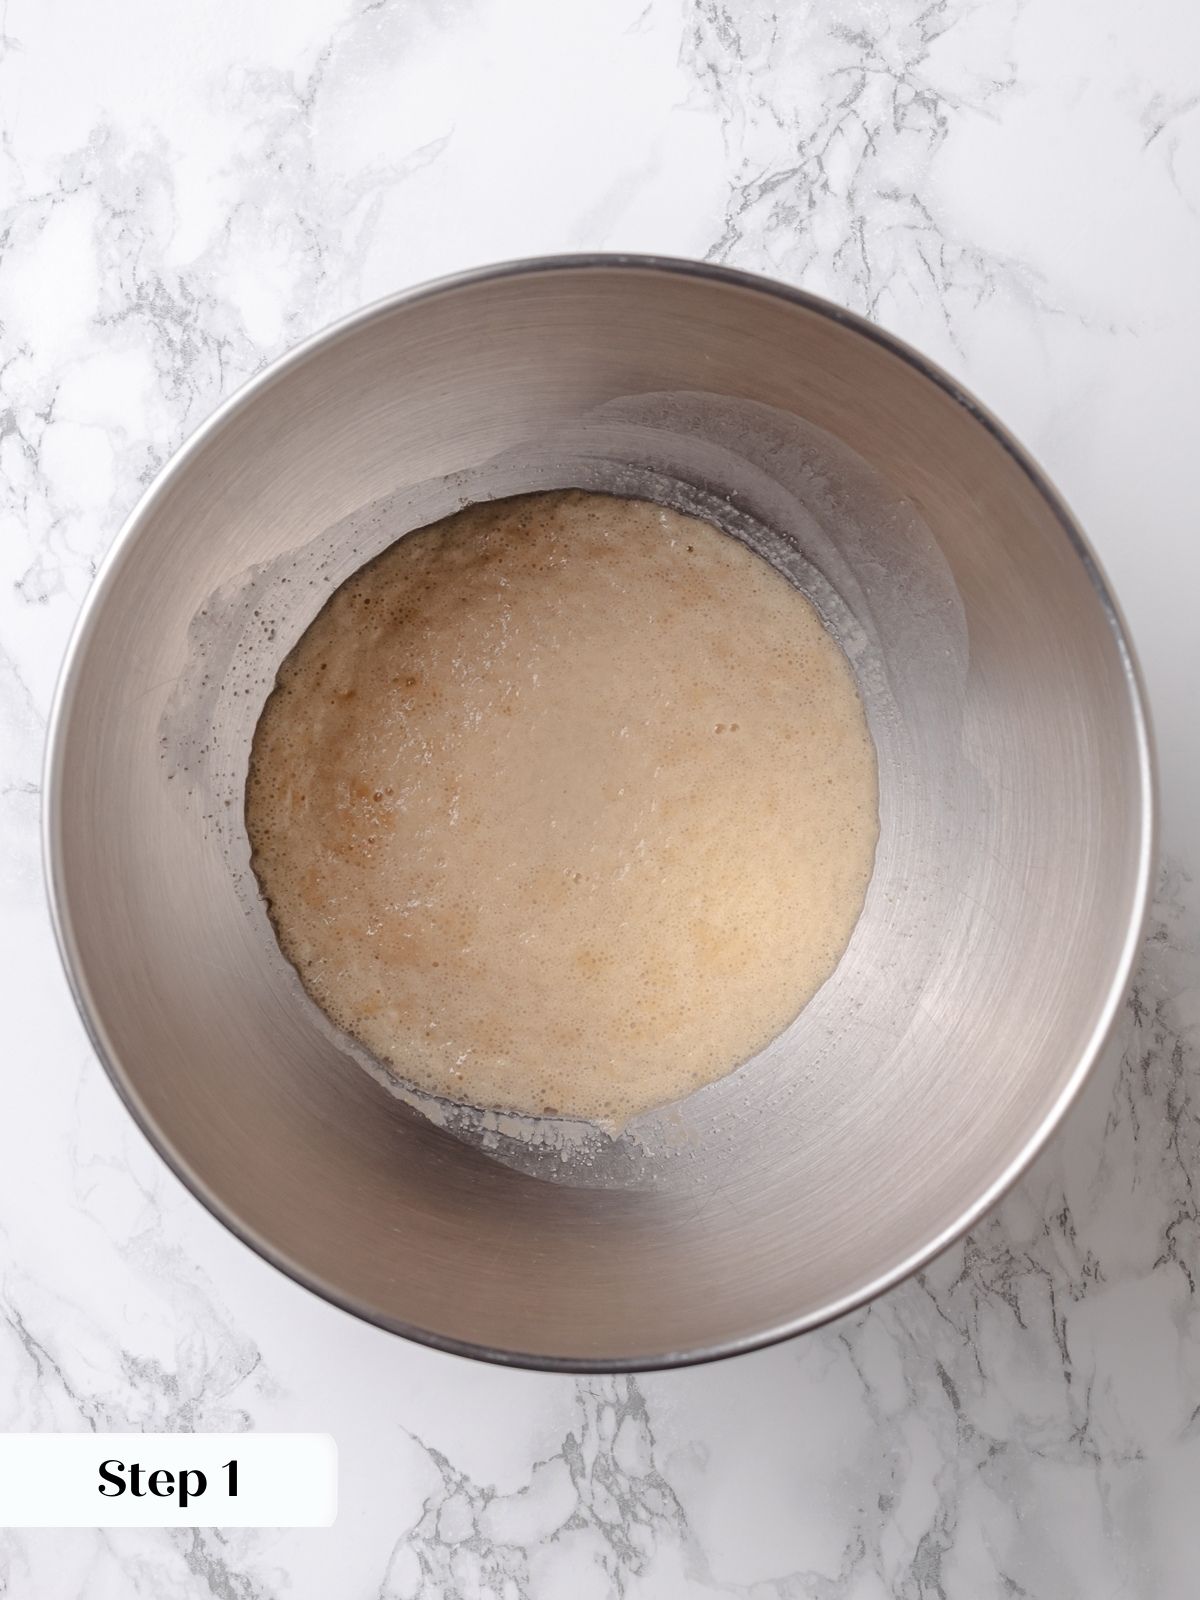

Step 1: Bloom the yeast. In the bowl of a stand mixer, or a large mixing bowl, add warm water, yeast and honey. Whisk or stir to distribute. Let stand 5-10 minutes or until foamy (photo 1). The honey will speed it up!
Step 2: Mix and knead. Once the yeast is foamy, add flour, sugar, salt, eggs and egg yolks to the yeast mixture in the stand mixer bowl (photo 2) and mix on low speed with the dough hook attachment until incorporated. Increased to medium speed to develop gluten. The dough will become smooth and elastic and you will be able to pull a window pane like brioche buns.
Test dough with oiled hands. You want to pull a smooth window pane that lets light through and doesn’t have thick veins.
Step 3: Slowly add oil with the mixer on the lowest speed. Depending on the size of your mixer, the oil might need help incorporating. If that is the case, stop the mixer, cut up the dough with a bowl scraper or using the dough hook, and then manually knead the oil into the dough in the bowl.
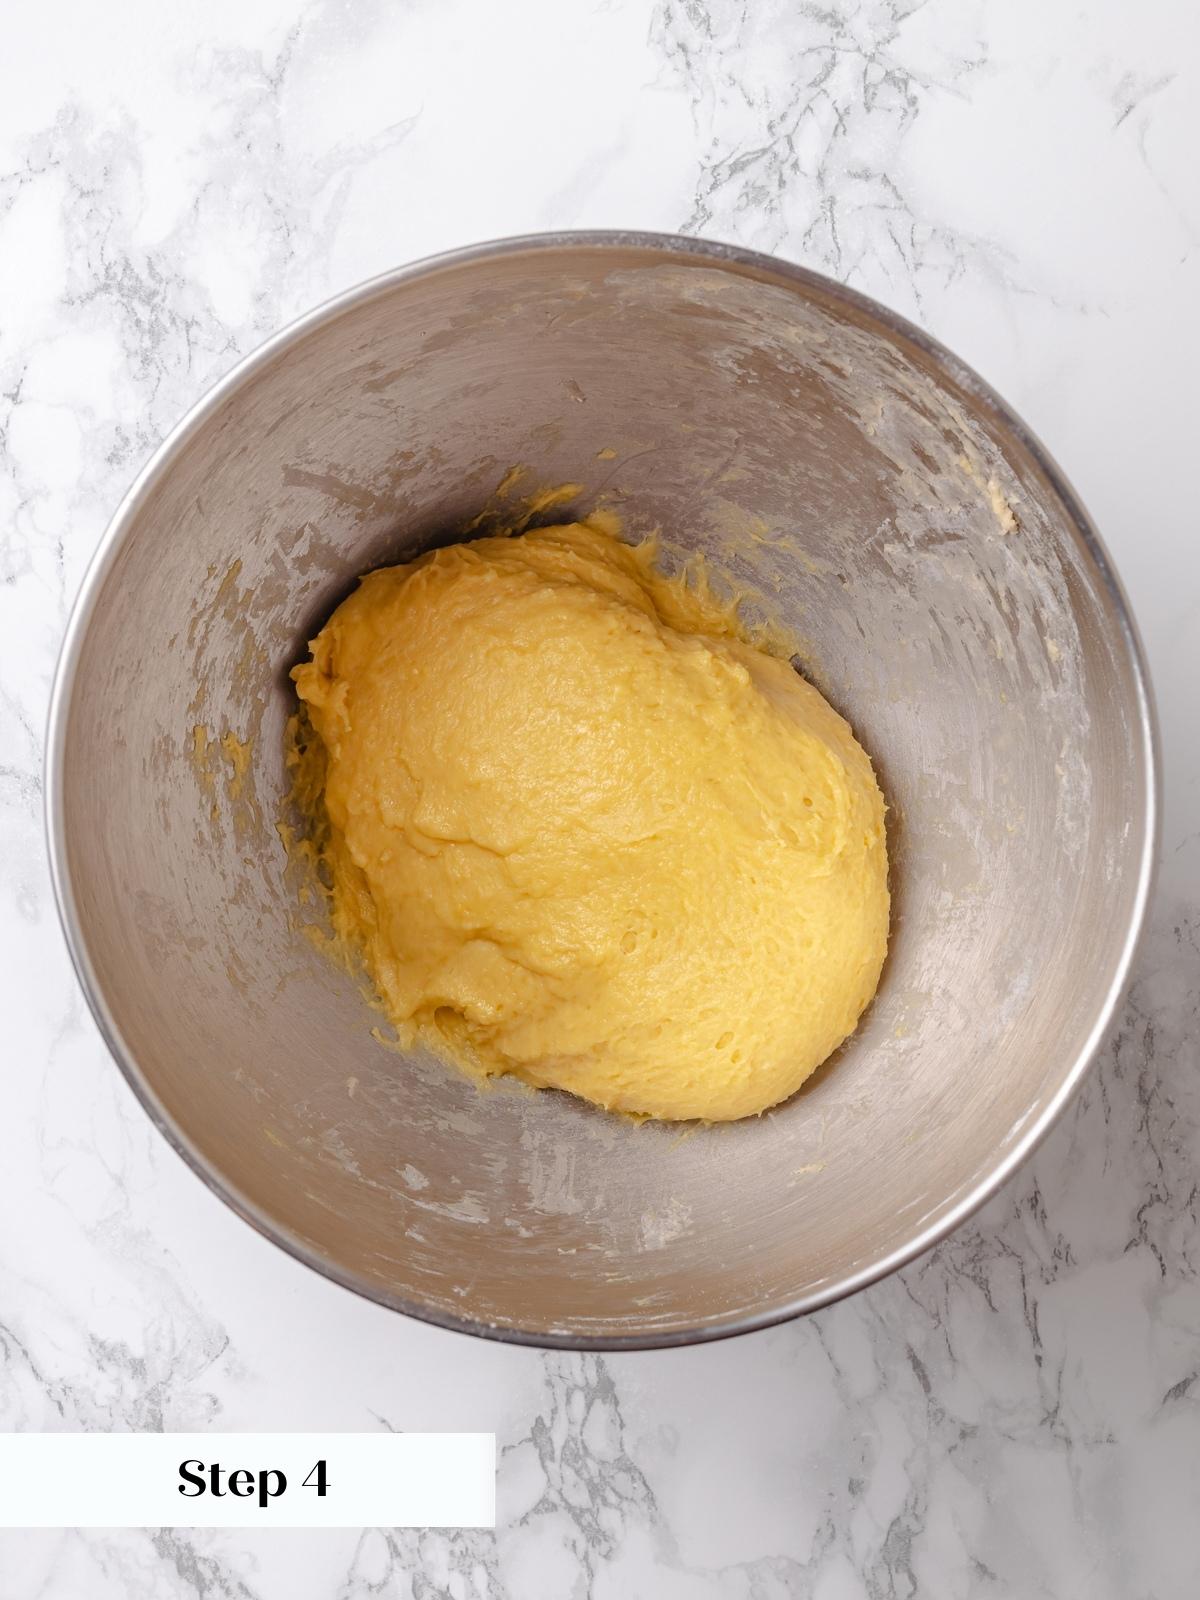
Step 4: Work the oil in. Once the oil is mostly incorporated, turn the speed up to medium-high and work the oil in completely using the dough hook. It makes a very smooth, manageable dough (photo 3). It does stick to the hands a bit but oiling the hands and bowl scraper help tremendously.
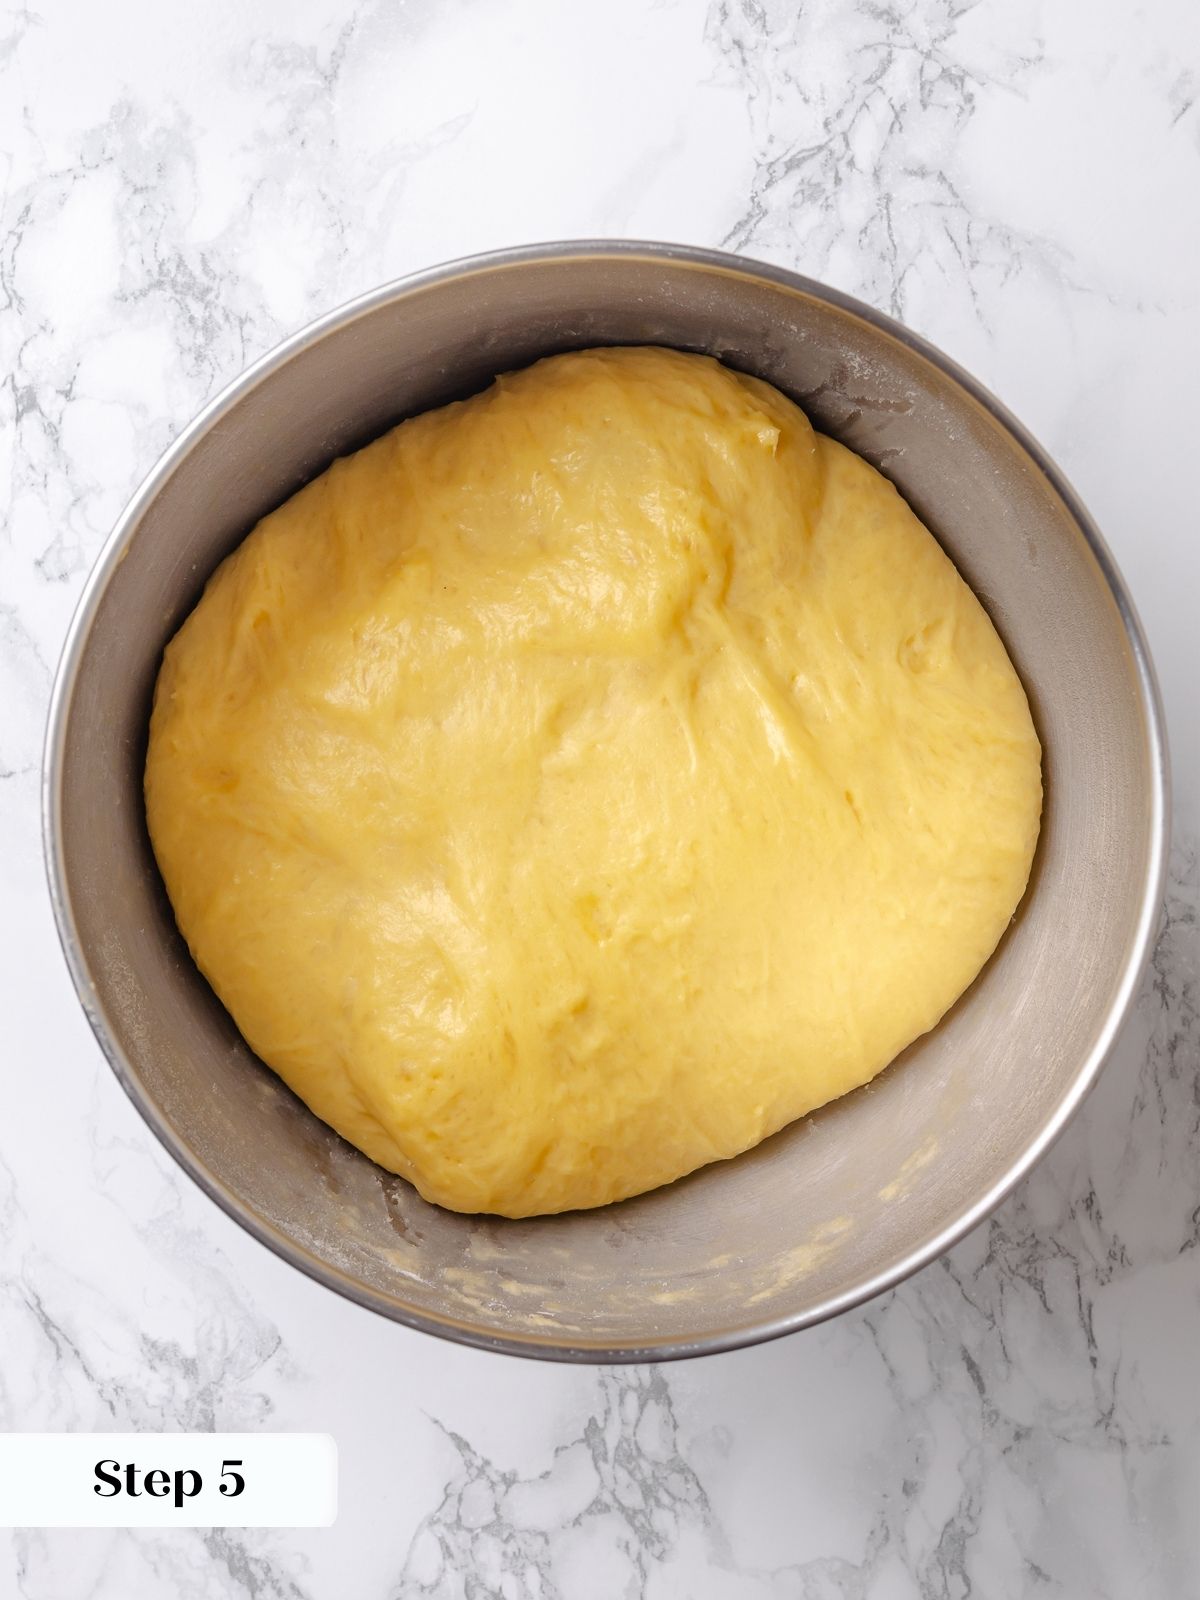
Step 5: Bulk proof the dough. Scoop the dough into a lightly oiled large bowl, cover and let the dough rise in a warm place for approximately 1 ½ hours (photo 4), performing one set of stretch and folds after 45 minutes. These folds will redistribute the yeast to new food and also degas the dough.
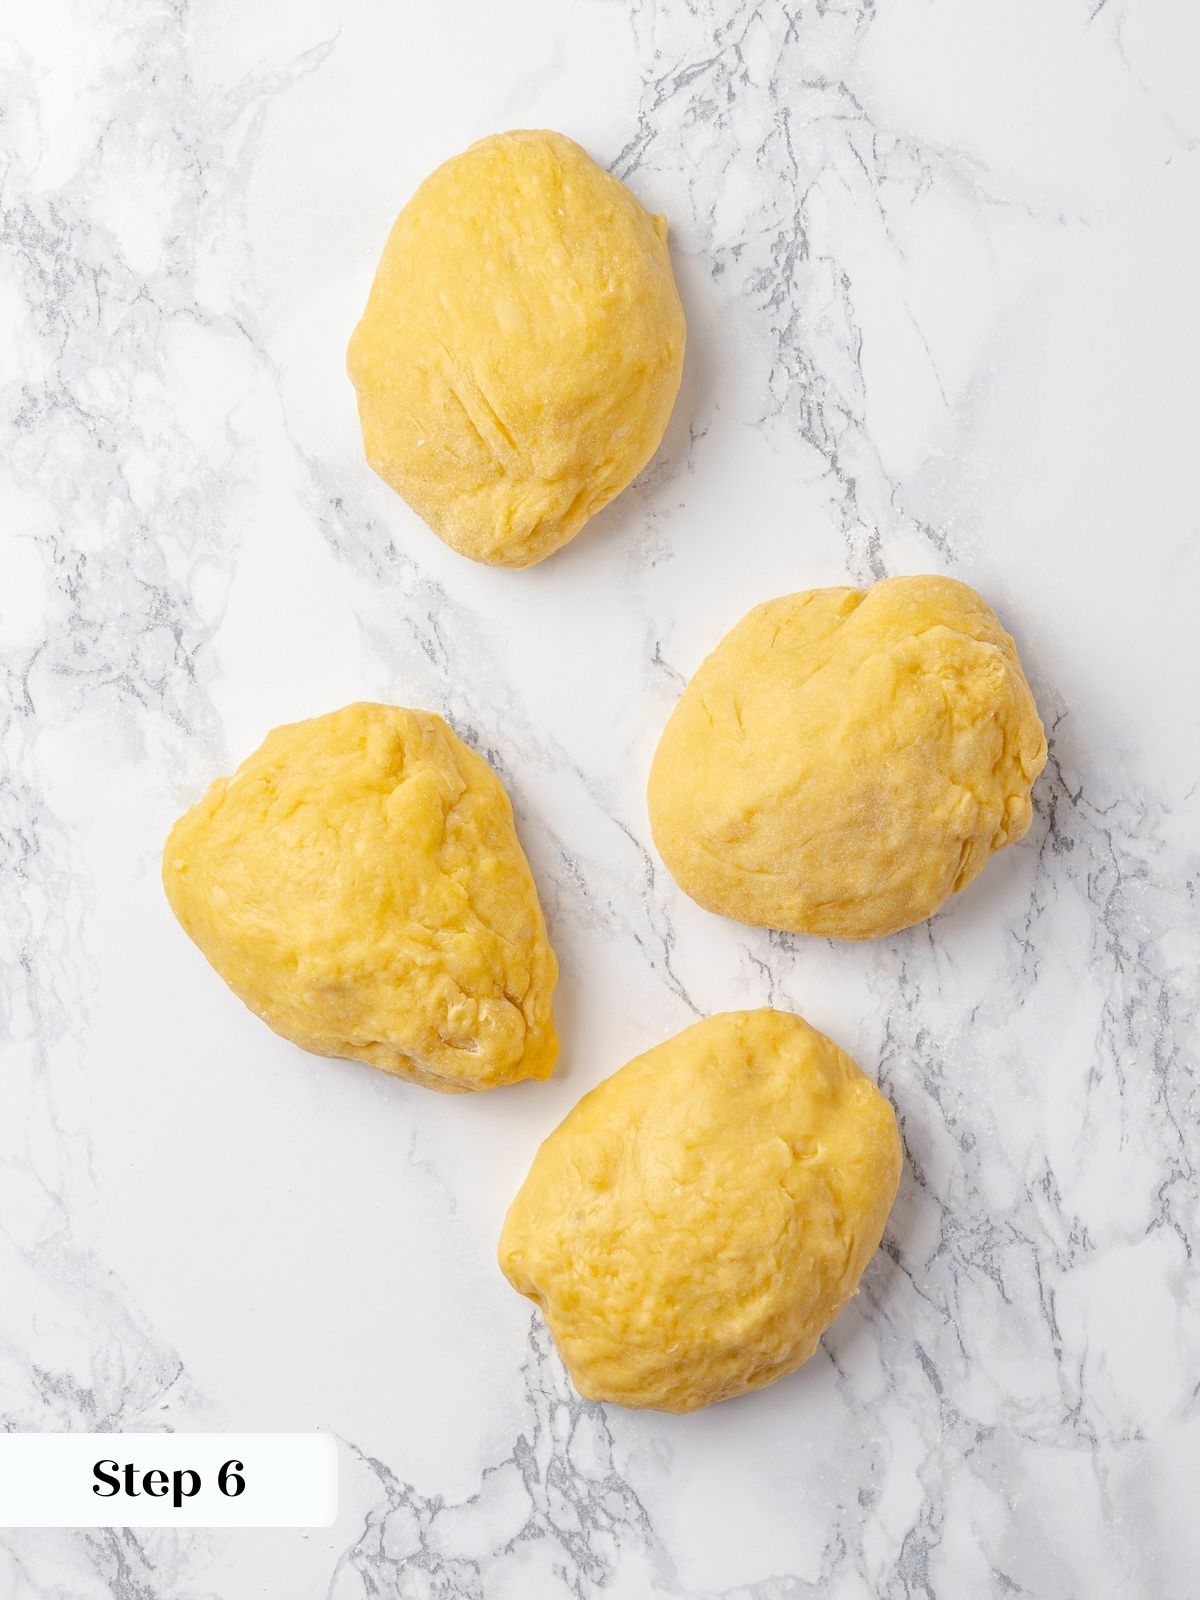

Step 6: Divide the dough. Decide if you are doing a 3 strand braid or a 4 strand braid and then divide the dough into 3 or 4 equal pieces (photo 5). For a 4 strand braid, each piece will be approximately 140 grams; for a 3 strand braid, each piece will be approximately 200 grams.
Step 7: Pre-shape into a log. Working with one piece of dough at a time, pre-shape the dough into a quick log shape. Stretch the dough into a rectangle place any small pieces of dough in the center). Fold the top 1/3 down to the center and then continue folding the folded edge over the final 1/3, sealing it against the counter with your fingers. Place it to the side and keep covered while you repeat with all remaining pieces. Let bench rest 15 minutes.
Step 8: Final shape into a log. Starting with the first piece of dough that you pre-shaped, gently work it into a square or rectangle. The size isn’t important. Place it down on the bench. Fold one straight side towards you into the center. Press to seal. Rotate the dough 180 degrees or so the part you just folded is on the opposite side (close to your body). Fold the other side of the dough towards you overlapping with the first fold. Press to seal. You just folded it like you would a letter (that’s why it’s called an “envelope fold.”)
Place your left thumb on the seam that you just made. Your hand will make an “L” shape. Using your left hand, fold the dough in towards your body around your left thumb and then seal it with the heel of your right hand. Repeat this down the length of the rectangle. You are making a log shape. Repeat once more to make a tight log shape (photo 6).
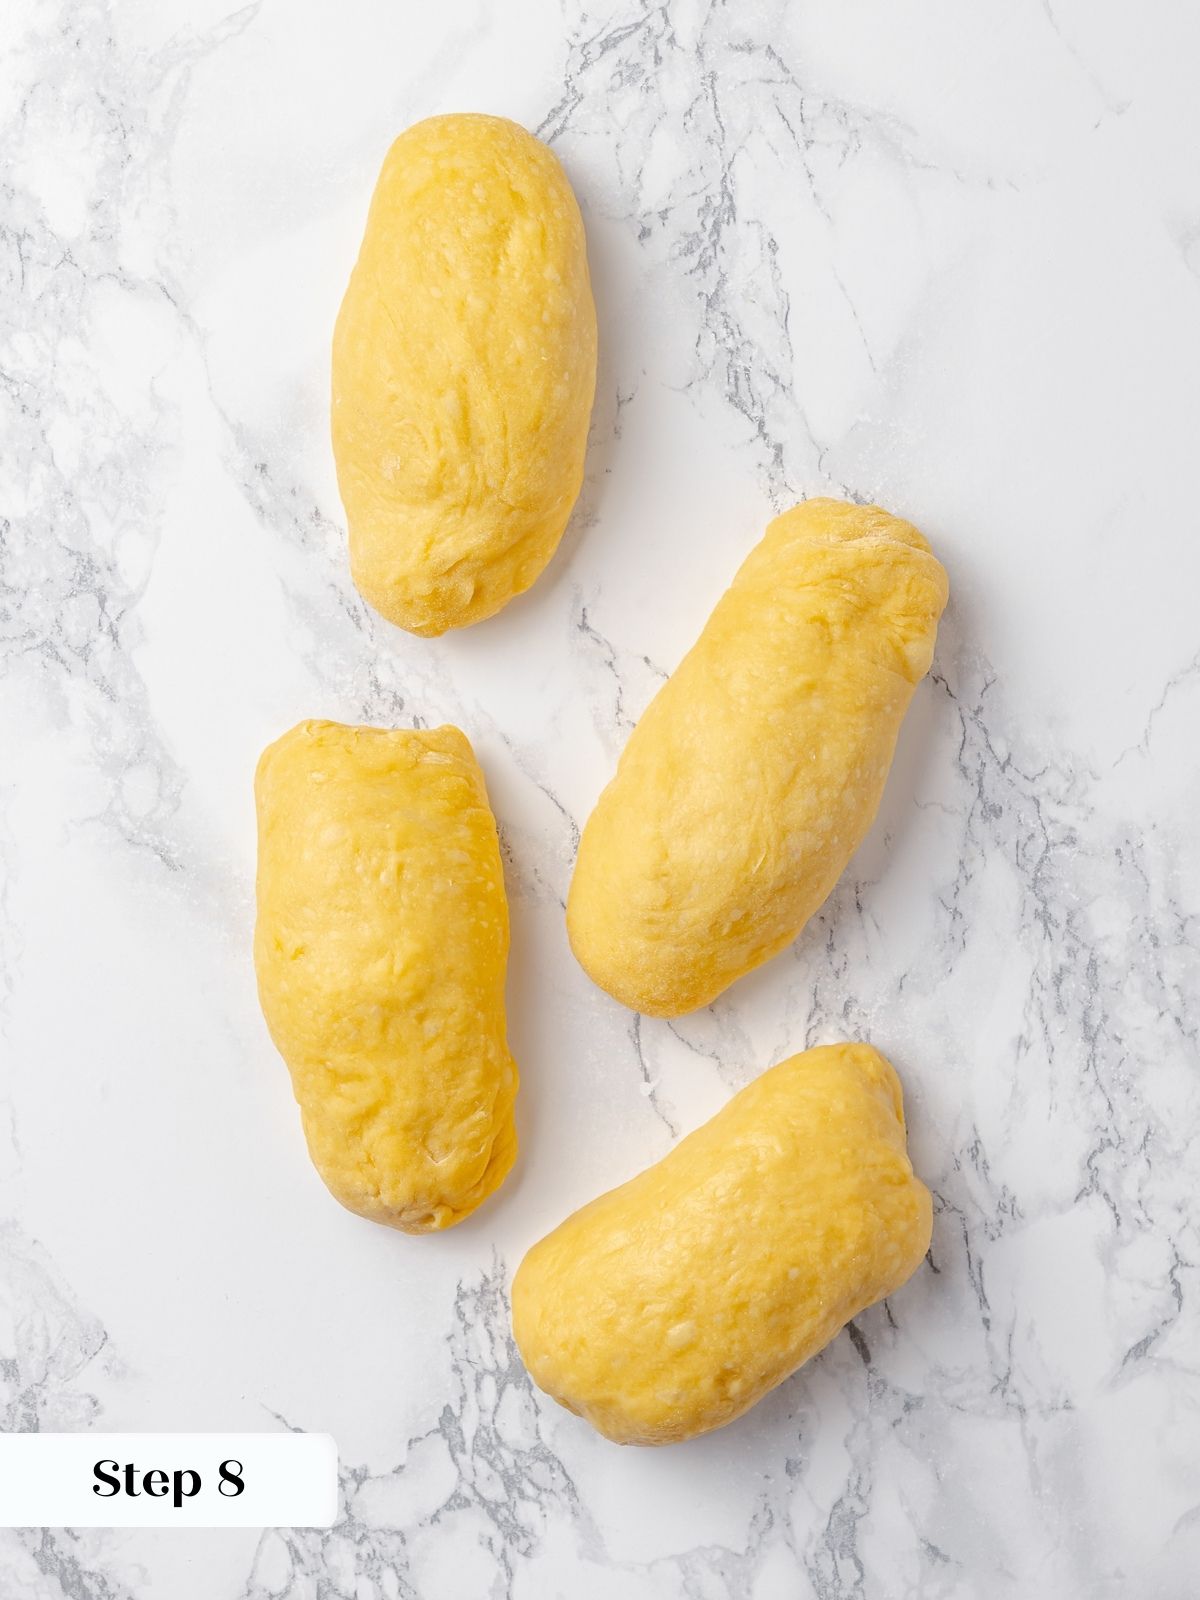
Step 9: Roll the log out using both hands like a snake or rope. Start with both hands in the center and gently roll it back and forth while moving your hands apart. This will lengthen the rope. Get it to around 12 inches. If the dough sticks excessively when rolling, you can add a flour dusting a roll them out on a very lightly floured surface. Keep covered with plastic wrap during the pre-shape, bench rest and final shape.
For the 4 strand braid I rolled an even rope, but for 3 strand braids, I keep them fatter in the center.
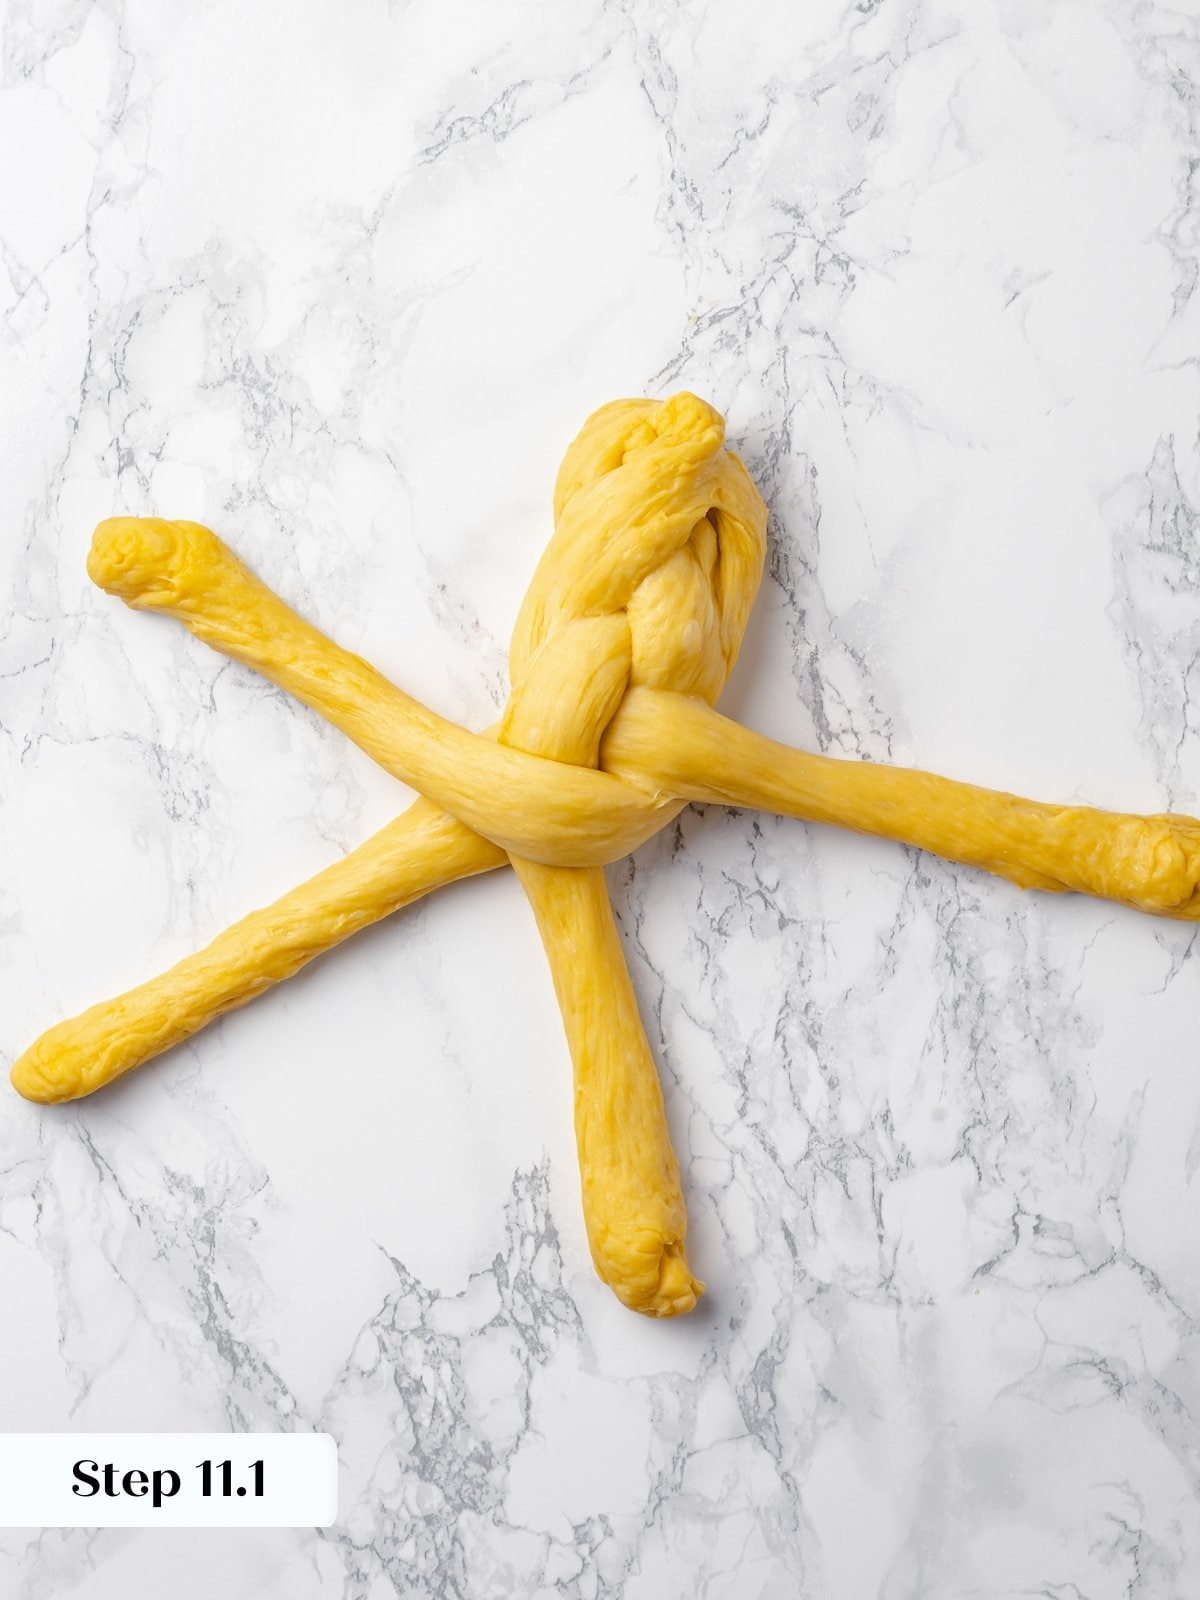
Step 10: Arrange strands for braiding. Place the ropes of dough vertically on your bench, parallel to each other (perpendicular to your body) and pinch the 3 or 4 strands together at the top (photo 7). You can press them into the bench just to secure them. Separate the strands by fanning them out.


Step 11: Braid the strands either using a 3 strand method or a 4 strand method. I’ll show you how to make a 4 strand braid in this post but this 4 strand braid video is incredibly helpful to get a quick visual. Be sure to seal and tuck both ends (photos 8 & 9).
Tip on How to Braid a 4 Strand Braid: You want to avoid braiding the strands too tightly. The dough needs space to expand both during proofing and during baking. If you braid too tightly, the dough will end up tearing and may actually spread out rather than up during baking (especially the 3 strand braid). You can see this visually in this cardamom bread.
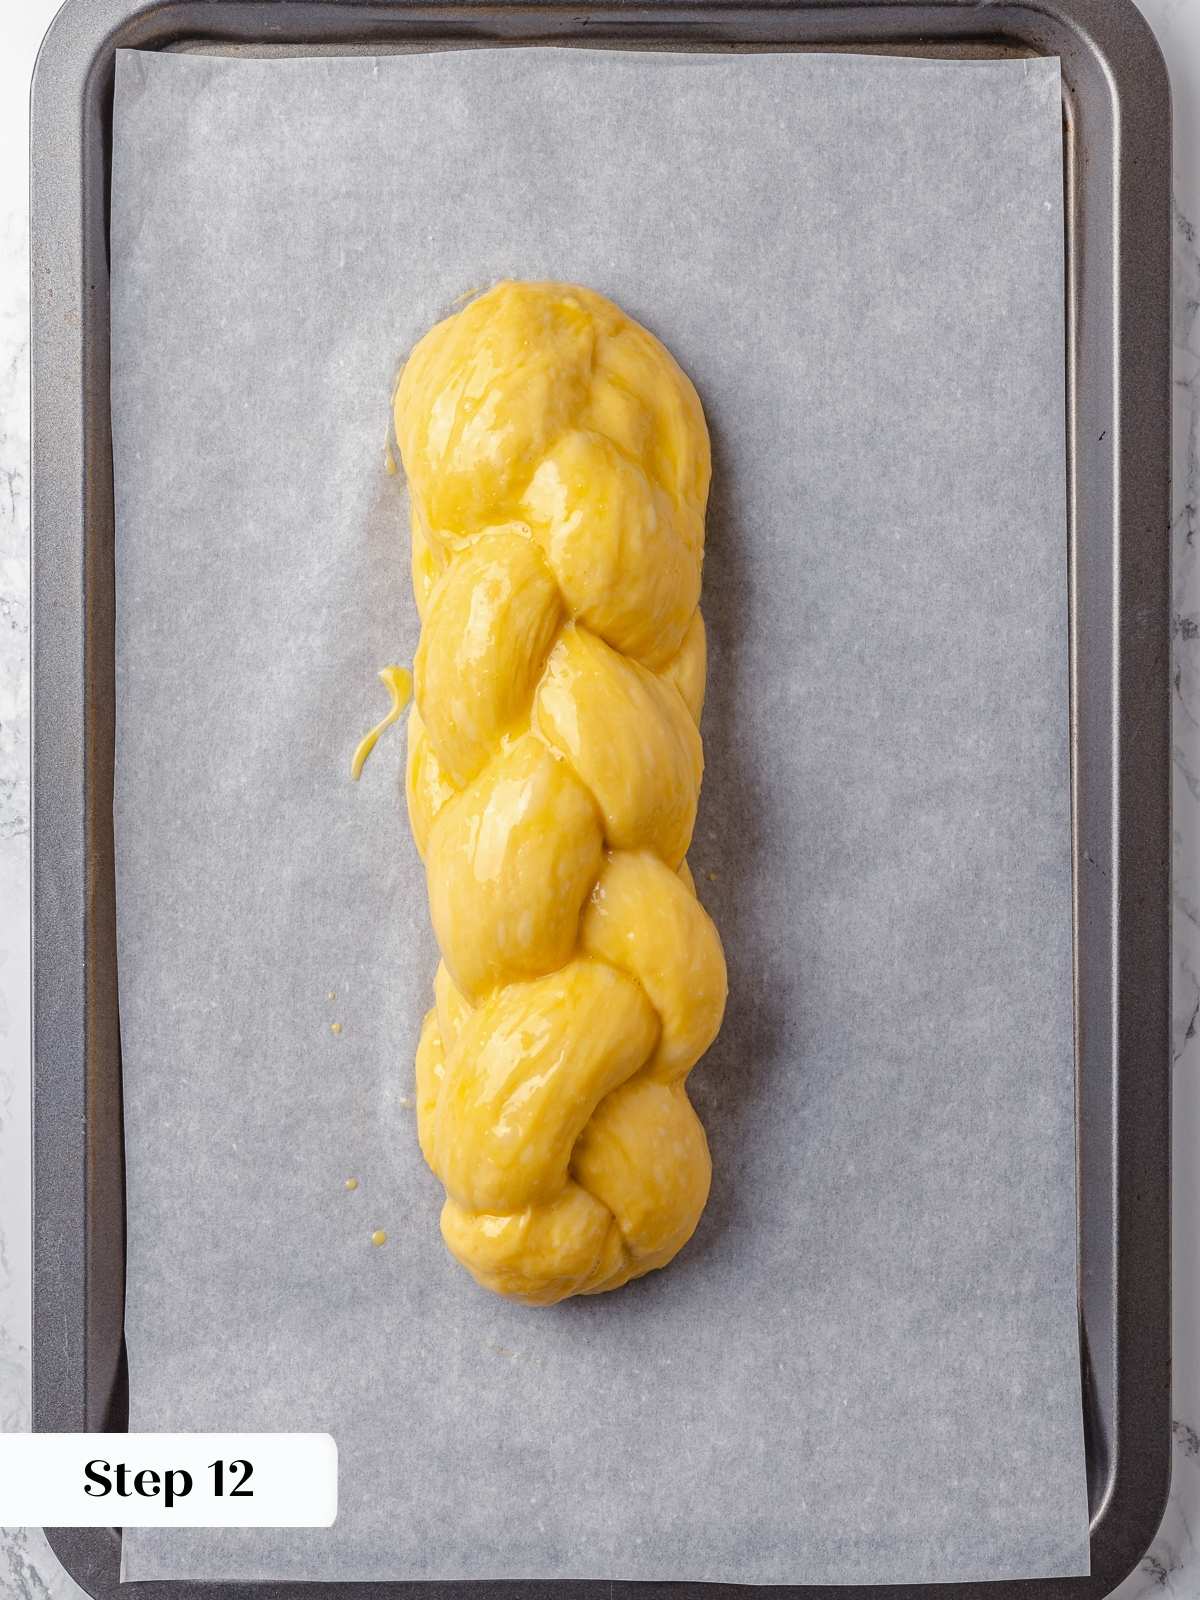
Step 12: Transfer braided dough to a parchment paper lined baking sheet. Brush with egg wash and proof uncovered (photo 10).
The egg wash (or dough) will stick to plastic wrap, so the egg wash keeps the dough from drying out and forming a skin, which would inhibit expansion.
Step 13: Final proof. Place the braided loaf in a warm place to final proof. Final proof for approximately 1 ½ hours (photo 11). During the last 20 minutes of proofing, preheat the oven to 350°F (no fan).
Step 14: Second egg wash. Once the loaf has doubled and looks and feels light and airy, gently brush egg wash over the entire surface once more. Be careful not to let it drip onto the baking sheet or it will burn during baking. This would be the time to sprinkle on any toppings like sesame seeds or cinnamon sugar.
Step 15: Bake loaf in preheated oven until dark golden brown on top or an instant read thermometer reads 185°F (photo 12). For a 4 strand braid that took 28-32 minutes, but a 3 strand braid will take closer to 35-38 minutes because each of those pieces was about 50 grams more than the ones for the 4 strand.
Not only does bake time vary based on the number of strands in your loaf of challah, but also by how LONG you made your braid. The dough is supple and will stretch as you braid, if you allow it. It is easy to get one end of the loaf that is thinner than the other or a long narrow braid. Ideally your loaf should be no longer than 14 inches or it will affect the final proof and baking times. If it is longer, don’t fret, just proof and bake it less time.
Step 16: Allow to cool on the baking sheet or move to a wire rack. There are no rules that say you can’t just dig in!
Frequently Asked Questions
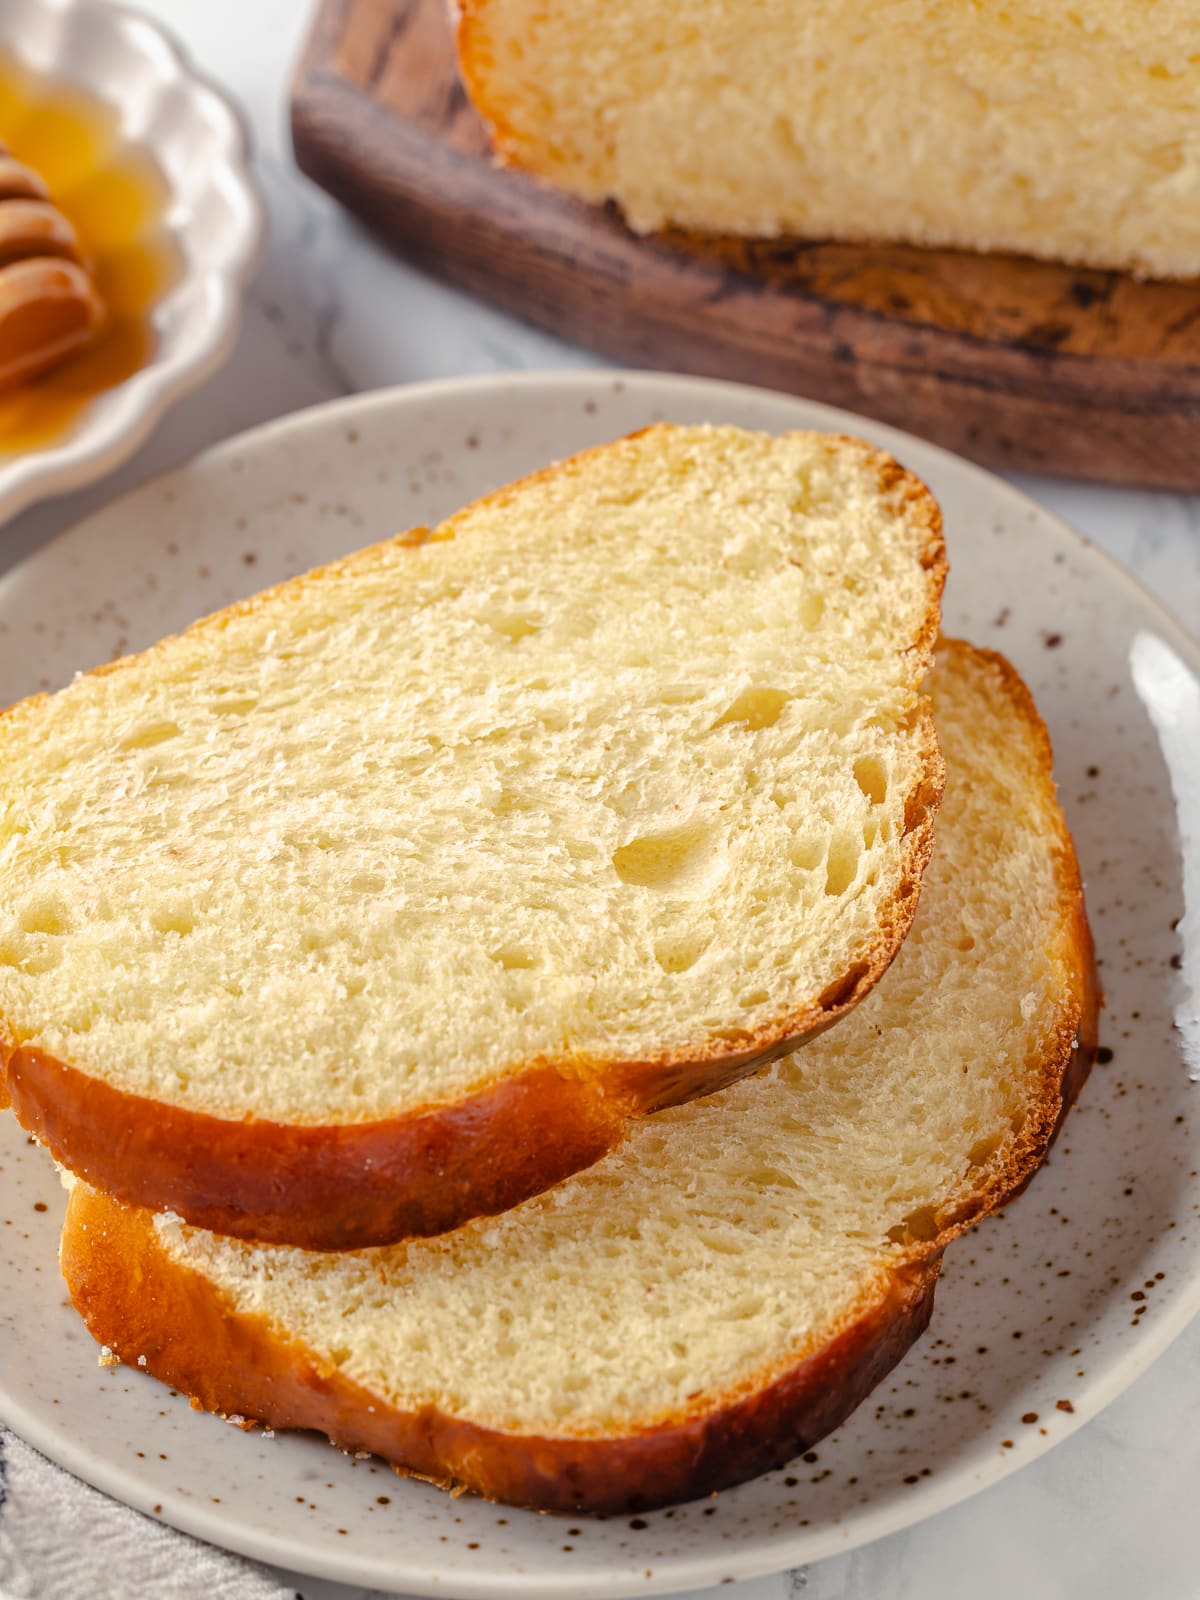
Cool baked challah completely before wrapping in plastic or storing in an airtight container. Challah is best the day it is baked but you can also cool, wrap and then store whole loaves in the freezer for 2 months. I do not recommend refrigerating baked challah.
Serve thick slices of challah with butter for dinner or lunch, or lightly toasted for breakfast! You can use leftover challah for French toast, bread pudding, or in place of the croissants in this breakfast croissant bread pudding!
Since challah is best the day it is baked, I recommend freezing baked, cooled loaves rather than preparing it in advance. You could buy time by proofing the dough for the bulk and final proof in the refrigerator, if desired. Nothing beats tearing into a freshly baked loaf of challah bread!
This recipe was developed in a professional kitchen and can be made in as large a batch as your mixer can hold. During bread school we would mix, shape and bake in batches of 36 loaves.
Recommended Braided Bread Recipes

Yeast Breads

Yeast Breads

Yeast Breads

Christmas Recipes
If you enjoyed this recipe, please leave a star rating and let me know how it goes in the comments below! I love hearing from you and your comments make my day!
Challah
Ingredients
- 2 ½ cups all-purpose flour
- ½ cup warm water
- 1 tablespoon honey
- 2 tablespoons granulated sugar
- 1 large egg
- 2 egg yolks
- 3 tablespoons vegetable oil
- 2 ¼ teaspoons active dry yeast
- 1 ¾ teaspoons kosher salt
Instructions
- In the bowl of a stand mix add warm water, yeast and honey. Whisk to distribute. Let stand 5-10 minutes or until foamy. The honey will speed it up!
- Add flour, sugar, salt, eggs and egg yolks to the stand mixer bowl and mix on low speed with the dough hook attachment until incorporated. Increased to medium speed to develop gluten. The dough will become smooth and elastic.
- Test dough with oiled hands. You want to pull a smooth window pane that lets light through and doesn’t have thick veins.
- With the mixer on the lowest speed slowly add the oil. Depending on the size of your mixer, the oil might need help incorporating. If that is the case, stop the mixer, cut up the dough with a bowl scraper or using the dough hook, and then manually knead the oil into the dough in the bowl.
- Once the oil is mostly incorporated, turn the speed up to medium-high and work the oil in completely using the dough hook. It makes a very smooth, manageable dough. It does stick to the hands a bit but oiling the hands and bowl scraper help tremendously.
- Bulk proof for approximately 1 ½ hours, performing one set of stretch and folds after 45 minutes. These folds will redistribute the yeast to new food and also degas the dough.
- Decide if you are doing a 3 strand braid or a 4 strand braid and then divide the dough into 3 or 4 equal pieces. For a 4 strand braid, each piece will be approximately 140 grams; for a 3 strand braid, each piece will be approximately 200 grams.
- Pre-shape into a log: Working with one piece of dough at a time, pre-shape the dough into a quick log shape. Stretch the dough into a rectangle (place any small pieces of dough in the center). Fold the top 1/3 down to the center and then continue folding the folded over the final 1/3, sealing it against the counter with your fingers. Place it to the side and keep covered while you repeat with all remaining pieces. Let bench rest 15 minutes.
- Final shape into a log: Starting with the first piece of dough that you pre-shaped, gently work it into a square or rectangle. The size isn’t important. Place it down on the bench. Fold one straight side towards you into the center. Press to seal. Rotate the dough 180 degrees or so the part you just folded is on the opposite side (close to your body). Fold the other side of the dough towards you overlapping with the first fold. Press to seal. You just folded it like you would a letter (that’s why it’s called an “envelope fold.”) Place your left thumb on the seam that you just made. Your hand will make an “L” shape. Using your left hand, fold the dough in towards your body around your left thumb and then seal it with the heel of your right hand. Repeat this down the length of the rectangle. You are making a log shape. Repeat once more to make a tight log shape.
- Now roll that log out using both hands like a snake or rope. Start with both hands in the center and gently roll it back and forth while moving your hands apart. This will lengthen the rope. Get it to around 12 inches.
- Keep covered with plastic wrap during the pre-shape, bench rest and final shape.
- Place the ropes of dough vertically on your bench (perpendicular to your body) and pinch the 3 or 4 strands together at the top. You can press them into the bench just to secure them.
- Braid the strands either using a 3 strand method or a 4 strand method. I’ll show you how to make a 4 strand braid in this post but this video is incredibly helpful to get a quick visual. Be sure to seal and tuck both ends.
- Transfer braided dough to a parchment paper lined baking sheet. Brush with egg wash and proof uncovered.
- Place the braided loaf in a warm place to final proof. Final proof for approximately 1 ½ hours.
- During the last 20 minutes of proofing, preheat the oven to 350°F (no fan). Once the loaf has doubled and looks and feels light and airy, gently brush egg wash over the entire surface once more. Be careful not to let it drip onto the baking sheet or it will burn during baking.
- Bake loaf in preheated oven until dark golden brown on top and an instant read thermometer reads 185°F. For a 4 strand braid that took 28-32 minutes, but a 3 strand braid will take closer to 35-38 minutes because each of those pieces was about 50 grams more than the ones for the 4 strand.
Notes
Nutrition
Nutrition information is automatically calculated, so should only be used as an approximation.
 Like this recipe? Rate & comment below!
Before You Go
I hope you enjoyed this professional chef created recipe. Check out our other delicious, yeasted bread recipes!


Question..can you make the dough the day before then braid the next day?
Great question! Yes, you can absolutely make the dough ahead. The best approach is to do the bulk proof in the fridge overnight after mixing, the cold slows the yeast down and actually develops even more flavor. The next day, take the dough out, let it come closer to room temperature (about 30-60 minutes), then shape, braid, and do your final proof as normal before baking. Just keep an eye on it during the final proof since it may take a little longer to get going after being chilled. Happy baking! ~GVD team
This is a perfect Challah recipe! The dough is really easy to braid and the bread is rich and light. I love this bread for french toast or egg in bread the next day!
I made this challah last weekend and pulled off a piece while it was still warm. The crust was shiny and tender, and the inside was rich, soft, and just sweet enough. Definitely one I’d bake again.
I made my first challah this year (though I have made brioche before, which is very similar). When you started braiding from the center, did you flip the entire dough loaf over at any point? I read somewhere that challah should be braided from the center out and once you finish one end, flip the loaf over before braiding the other side. Was wondering if you’d heard this or whether it would make a difference.
Hi Jessalyn — You’re right. It’s best to flip the entire dough over once you’ve braided one half of it, and then braid the other half. I, however, forgot to do this when braiding this bread and though the braid looked a little funky, it wasn’t anything too noticeable. But if you want it to look absolutely perfect, it’s best to flip it halfway through the braiding. Thanks for your comment!
Stephanie-
I found your blog from Smitten Kitchen’s Good Reads List; the name of your blog caught my attention, so I clicked on it. I was SO surprised (and delighted) to see you are living in Iowa City! (Me too.) I was even more surprised to learn that you are the writer who does the “eat” section in the GO portion of the Press-Citizen.
And I thought to myself: “Oh my gosh. I read her article just this morning about Christmas Cookies. How weird is this?!”
It’s a small world. Happy Holidays!
-Abby
Abby — Thanks for the comment! Crazy that you found me by way of SK and that we have some connections (and I’m glad you read my article about the Christmas cookies — I was craving cookies the entire time I wrote that :)). It IS a small world. Happy holidays to you, too!
I love you challa! Thank you for inspiration!
I love this bread. Fine Cooking’s web http://www.finecooking.com/videos/braiding-challah.aspx
site has a video on a 6 braid loaf, it’s pretty easy. You do have evenly divide your dough, a scale works well to do this.