This no knead pizza dough takes 5 minutes to mix, rises overnight on the counter, and bakes up into a chewy, golden crust that holds up to any toppings you throw at it.


A Quick Look At The Recipe
This is a brief summary of the recipe. Jump to the recipe to get the full details.
Prep Time
5 minutes
Cook Time
20 minutes
Proof/Rest Time
18 hours
Total Time
18 hours 5 minutes
Servings
24 slices
Difficulty
Intermediate
Calories *
71 kcal per serving
Technique
No-knead, overnight rise, baked
Flavor Profile
Chewy, mild, lightly yeasty, savory
* Based on nutrition panel
“I made this dough the night before a Friday pizza party and it was so easy I almost felt guilty. The crust came out perfectly chewy with those little bubbles on top that told me it was ready. I’ll never go back to same-day dough after this!I will be trying your sourdough pizza dough next!”
⭐⭐⭐⭐⭐
Renata
Why You Will Love This Recipe
- Almost no active effort. This dough comes together in about 5 minutes of mixing. The overnight rise does all the work while you sleep.
- Four crusts from one batch. One mix gives you enough dough for four individual pizzas. You can use what you need and refrigerate the rest for up to 3 days.
- Flexible and forgiving. If your schedule shifts, the refrigerated dough holds well and comes back to room temperature in about 2 to 3 hours. It fits around your week, not the other way around, just like this sourdough discard pizza dough.
- No special equipment needed. You don’t need a stand mixer, a bread machine, or any special tools. A large bowl, a wooden spoon, and a pizza stone or baking sheet are all it takes.
Pizza night has a way of becoming a whole thing in our house, and this dough is the reason it stays low-stress. Mixing it the night before means the hard part is already done before I’ve even thought about toppings.
If you love the hands-off approach here, you’ll want to try my easy no-knead focaccia recipe, or this no knead whole wheat bread too. It uses the same minimal-effort method and is just as satisfying to pull out of the oven.
Ingredients & Substitutions
- Unbleached All-Purpose Flour: This is the structure of your dough, giving the crust enough gluten development to stretch and hold toppings without tearing. Bread flour works as a substitute if you want a slightly chewier, more structured crust.
- Red Star Active Dry Yeast: Active dry yeast leavens the dough over the long 18-hour rise, producing the airy, bubbly texture you want in the finished crust. The most common mistake here is using expired yeast. Check the date on your packet before you start, because flat, dense dough with no bubbles on top after 18 hours almost always comes back to yeast that has lost its activity.
- Fine Sea Salt: Salt controls the speed of fermentation and brings out the dough’s flavor in a way unseasoned dough simply lacks. Kosher salt can be substituted, but use a slightly heavier hand since the grain size is coarser and less dense by volume.
- Water: Water hydrates the flour, activates the yeast, and develops the sticky, shaggy dough that, during the long rest, transforms into something smooth and workable. The temperature of your water matters more than most people expect. Use warm water, not hot. Water that is too hot will kill the yeast before fermentation even begins, and water that is too cold will slow the rise dramatically and leave you with underproofed dough after 18 hours. You could also make this beer pizza dough for a fun water alternative!
Variations for No Knead Pizza Dough
- Herb Dough: Stir a tablespoon of dried oregano, rosemary, or Italian seasoning directly into the flour mixture before adding water. The herbs bloom during the 18-hour rise, building flavor into the crust itself rather than just sitting on top.
- Cheesy Crust: Press shredded mozzarella or Parmesan into the outer edge of the dough circle before baking. It crisps and browns on the hot stone, giving you a golden, savory rim without any extra effort. If you love cheesy bread, make sure to check out this cheese bread!
- Deep Dish Format: Press the dough into an oiled cast iron skillet or round cake pan instead of shaping it into a freeform circle. If you love a thick, pan-style crust loaded with toppings, my sausage pesto pizza is a great direction to take this dough.
- Garlic Butter Base: Brush the shaped dough with melted butter and minced garlic before adding any sauce or toppings. It adds a rich, savory base layer that works especially well under a simple cheese or white pizza. You could also do this with my whole wheat pizza dough! (coming soon!)
Professional Tips for Perfect No Knead Pizza Dough
- Trust the bubbles, not just the clock. After 18 hours, the dough should have more than doubled, with a surface covered in small bubbles. If it looks flat or smooth, give it another hour or two before you punch it down. A dough that hasn’t fully fermented will bake up dense and tight no matter how well you shape it.
- Let the dough rest if it fights you. When you press the dough into its final circle and it keeps snapping back, that’s gluten tension. Cover it with plastic wrap and let it sit for another 10 minutes. It will relax and stretch easily without tearing.
- Preheat your oven long enough. The recipe calls for heating the oven to 450ºF for a full 30 minutes before baking, and that timing is deliberate. A fully saturated hot oven sets the crust quickly, giving you a crisp bottom and properly browned edges. It also gives your pizza stone time to heat up. Just like when making this pizza dough recipe!
- Refrigerate extra dough the right way. If you’re not using all four portions right away, shape the unused pieces into balls, wrap them in plastic wrap, and refrigerate them immediately. When you’re ready to use refrigerated dough, let it come to room temperature under a damp towel for about 2 to 3 hours, then use it within 3 days.
How to Make No Knead Pizza Dough
Use these step-by-step instructions to make a chewy, flavorful pizza crust with minimal mixing and an effortless overnight rise. Further details and measurements can be found in the recipe card below.
Make the dough
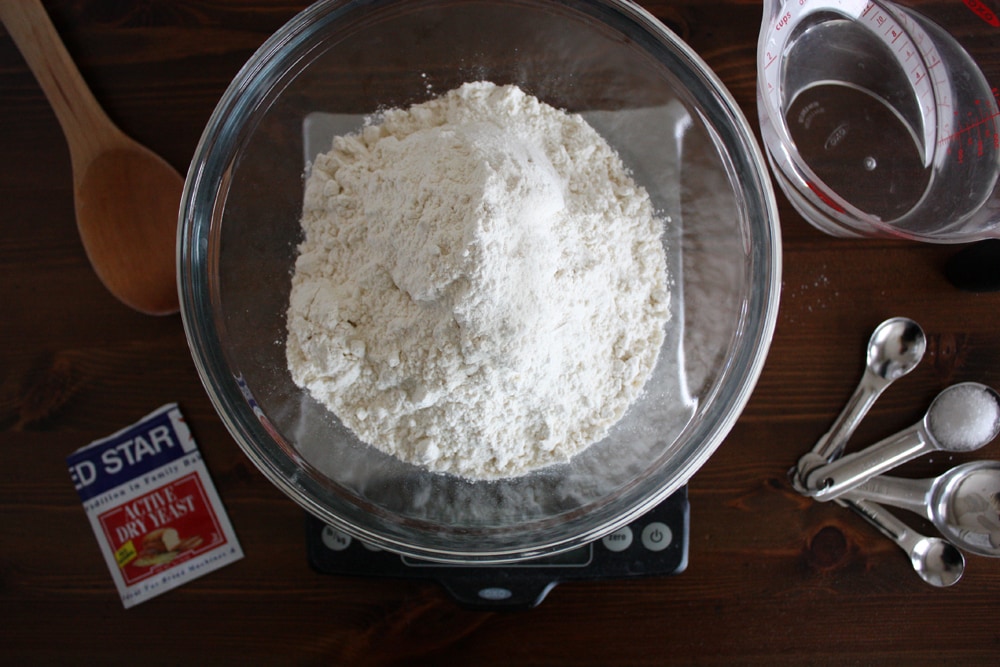
Step 1: Whisk the dry ingredients. In a large bowl, whisk together the flour, yeast, and salt until they’re evenly combined throughout.
Step 2: Add the water and stir. Pour in the water and stir with a wooden spoon until a shaggy, rough dough forms. It will look messy and feel sticky, which is completely normal! Don’t be tempted to add more flour — this is exactly how the dough is supposed to look at this stage.
Proof the dough
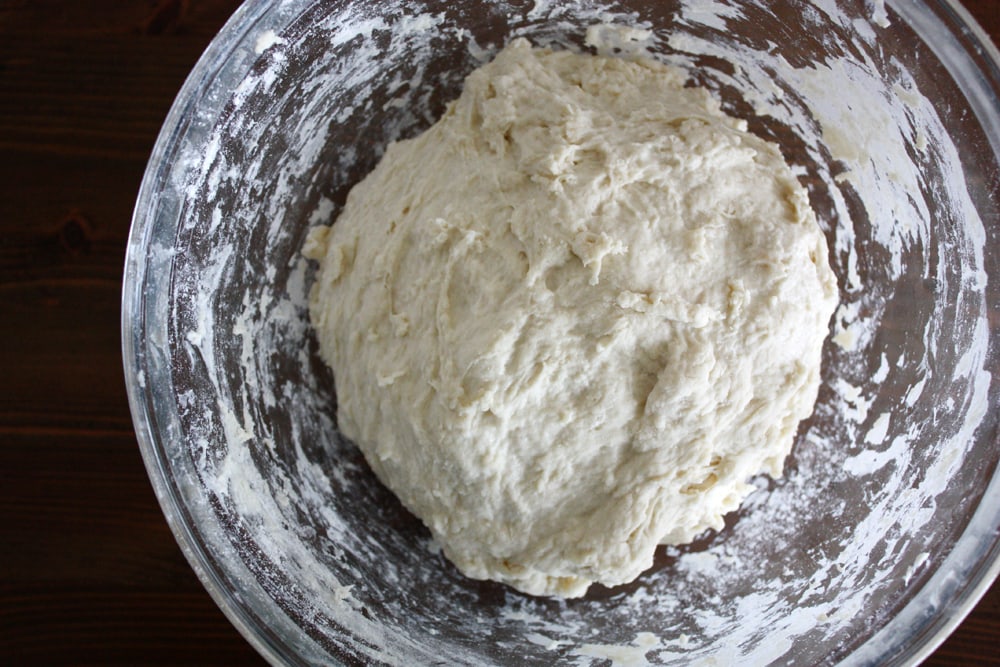
Step 3: Shape into a ball and cover. Lightly flour your hands and shape the dough into a rough ball, then return it to the bowl. Cover the bowl with lightly greased plastic wrap or a tea towel. (photo 1)
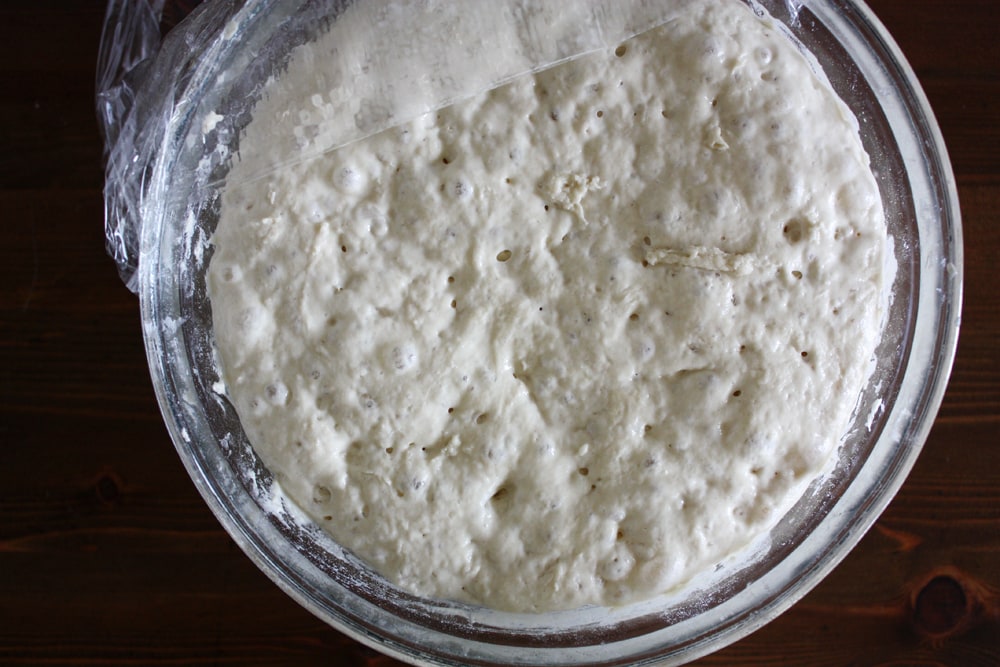
Step 4: Let the dough rise overnight. Set the covered bowl on your counter and let it rise for about 18 hours at room temperature. When it’s fully risen, the surface will be dotted with tiny bubbles and the dough will have more than doubled in size. (photo 2)
Divide and shape the dough
Step 5: Punch down and divide. Once the dough has fully risen and the surface is covered in tiny bubbles, punch it down firmly with your fist to release the gas, then transfer it to a lightly floured surface. Divide the dough into 4 equal pieces.
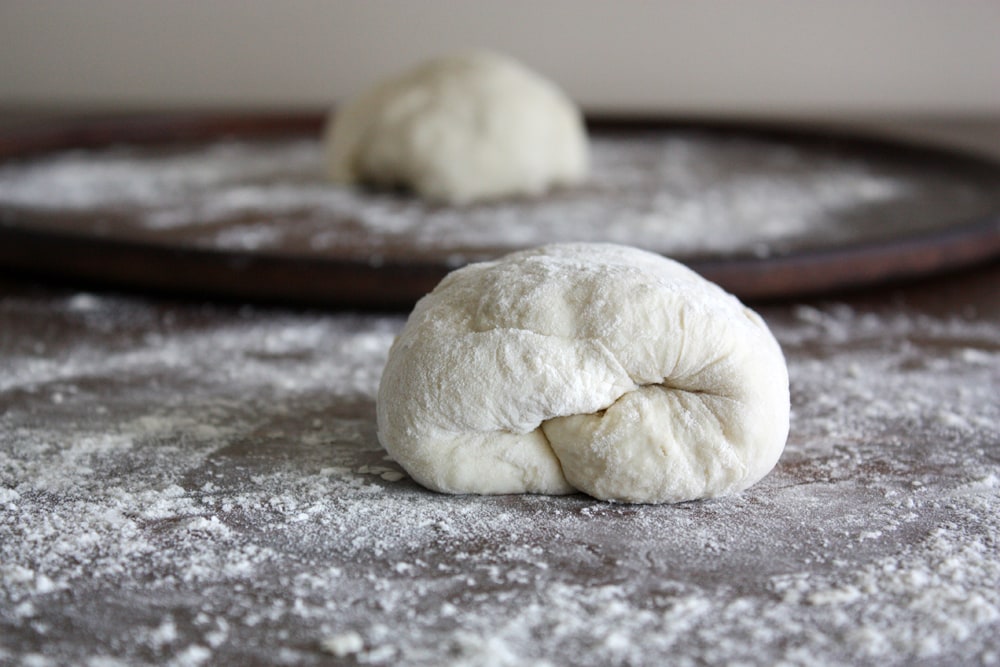
Step 6: Fold and shape each ball. Working with one piece at a time, pat the dough into a rough 6 to 8-inch circle, then fold the top down, fold the bottom up, fold the right side in, and fold the left side in. Turn the dough over so the seam faces down, then use your hands to shape it into a smooth, taut round ball. (photo 3)
Step 7: Let the dough rest. Let the covered dough balls rest for 30 minutes while your oven preheats. This rest is short but important, the gluten relaxes just enough so the dough stretches out easily without snapping back when you press it into a crust.
Step 8: Press the dough into a crust. Uncover a rested dough ball and use your fingers to gently press and stretch it into a 10 to 12-inch circle. If the dough resists and keeps pulling back, cover it with plastic wrap and give it another 10 minutes.
Bake!
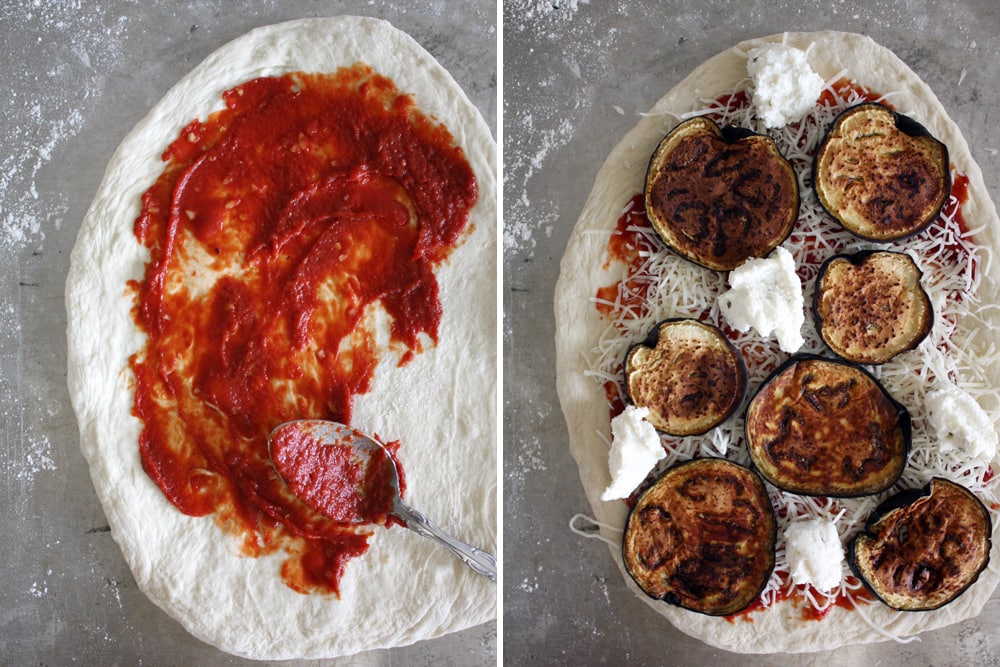
Step 9: Top and bake. Add your toppings, then transfer the pizza to the upper rack of the preheated oven. Bake for 15 to 20 minutes, rotating the pizza halfway through, until the crust is lightly browned on the edges and the cheese is bubbling and just starting to color.
Recipe FAQs
Once the dough has risen, divide it into portions and refrigerate any pieces you aren’t using right away, covered in plastic wrap. Refrigerated dough is good for up to 3 days or freeze for up to a month. When you’re ready to use it, place it on a lightly floured counter, cover it with a damp towel, and let it come to room temperature before shaping, which takes about 2 to 3 hours.
The most common reason is that the dough didn’t rest long enough after you shaped it into a ball. If it snaps back or resists when you press it into a circle, cover it with plastic wrap and give it another 10 minutes. Gluten needs time to relax, and rushing that step makes the dough fight back.
Bread flour has a higher protein content than all-purpose, which means more gluten development and a chewier crust. It works well here and is worth trying if you prefer a pizza with a little more pull and structure. The rest of the method stays exactly the same, so no adjustments needed beyond the flour swap.

Recommended Pizza Recipes!

Sourdough

Lunch & Dinners

Yeast Breads

Lunch & Dinners
No-Knead Pizza Dough
Ingredients
- 3 ¾ cups unbleached all-purpose flour, 17 ½ ounces, plus more for dusting and shaping
- ¼ teaspoon active dry yeast
- 2 teaspoons fine sea salt
- 1 ½ cups water
Instructions
- Whisk together the flour, yeast, and salt in a large bowl until thoroughly combined. Add the water and stir with a wooden spoon until a shaggy dough forms. Lightly flour your hands, shape the dough into a ball, and return it to the bowl. Cover with lightly greased plastic wrap or a tea towel and let rise at room temperature until more than doubled, about 18 hours.
- When the dough is fully risen and has a network of tiny bubbles on top, punch it down and transfer to a lightly floured surface. Divide into 4 equal pieces. Shape any pieces you aren’t using right away into balls, cover with plastic wrap, and refrigerate for later use.
- Pat each piece of dough into a 6 to 8-inch circle. Fold the top down, fold the bottom up, fold in the right side, then the left. Turn the dough seam-side down, shape into a round ball, and place on a lightly floured pizza stone or baking sheet. Sprinkle the top with flour, cover with plastic wrap, and let rest 30 minutes.
- Place a rack in the upper third of the oven and preheat to 450 degrees F for 30 minutes. Once the dough has rested, uncover and gently press into a 10 to 12-inch circle. If the dough resists, cover with plastic wrap and let it rest another 10 minutes before trying again.
- Add desired toppings. Bake on the upper rack for 15 to 20 minutes, rotating halfway through, until the crust is lightly browned and the cheese is bubbly. Cool 5 minutes before slicing.
Notes
Technique: Bread flour will give you more gluten development in the pizza dough.
Measuring: For the most consistent results, measure the flour by weight rather than by volume. Cup measurements can vary depending on how the flour is scooped.
Storage: Refrigerate any unused dough portions, covered in plastic wrap, for up to 3 days. To use, place on a lightly floured surface, cover with a damp towel, and let come to room temperature, about 2 to 3 hours, before shaping.
Nutrition
Nutrition information is automatically calculated, so should only be used as an approximation.
 Like this recipe? Rate & comment below!
Before You Go
Once you make this no knead pizza dough part of your weekly routine, pizza night gets a whole lot easier. Browse our Lunch & Dinner Recipes or make this pepper jack juicy lucy next!


I made this dough the night before a Friday pizza party and it was so easy I almost felt guilty. The crust came out perfectly chewy with those little bubbles on top that told me it was ready. I’ll never go back to same-day dough after this!I will be trying your sourdough pizza dough next!
Ha — the best recipes are the ones that make you feel like you cheated! Those little bubbles on the crust are everything — that’s the overnight fermentation working its magic. So glad it was a hit at the pizza party! And yes, once you go overnight dough there’s no going back. We think you’re going to love the sourdough version too — can’t wait to hear what you think! ~GVD team
I almost forgot I had dough rising until I walked into the kitchen the next morning and saw it puffed up like a balloon. It was so bubbly and soft, felt like pressing on a marshmallow. Made one pizza right away and froze the rest—this one’s going into the regular rotation.
Not sure if anyone is checking….but is there a way to make this a regular “Knead” recipe?
For those days when I don’t have 18 hours to wait…is there a way to convert this into a “regular” pizza dough recipe?
I’m interested in trying out this recipe but, what temperature does the water have to be? Is it cold or warm?
Cassandra, It can be room temperature or warm! I wouldn’t go above 110 degrees F and I wouldn’t use cold water, either.
Would anyone know why my dough didn’t rise? I followed The step by step instructions. I dont Know why it didn’t rise. At the same time I made the no knead bread and that raised.