
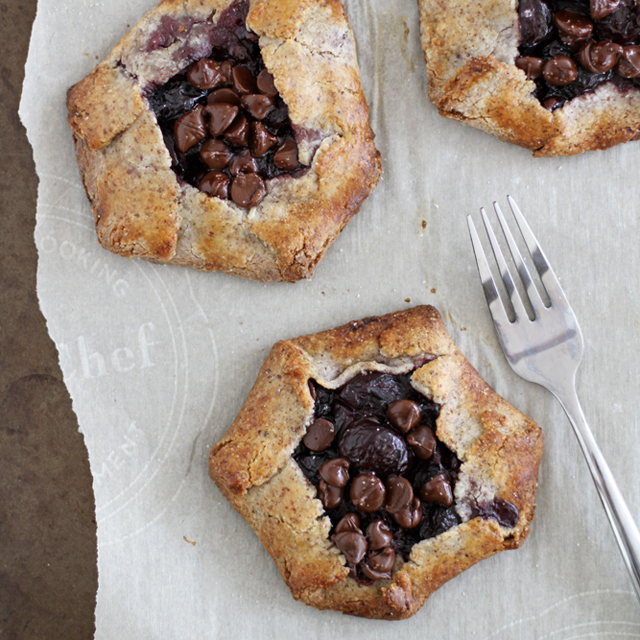
Chocolate cherry galettes are individual little pastries with a hazelnut crust, fresh cherries, and dark chocolate chips that melt right into the filling as they bake. Four mini galettes, 45 minutes, and no pie dish required.

A Quick Look At The Recipe
This is a brief summary of the recipe. Jump to the recipe to get the full details.
Prep Time
30 minutes
Cook Time
15 minutes
Total Time
45 minutes
Servings
4 mini galettes
Difficulty
Intermediate
Calories *
379 kcal per serving
Technique
Food processor crust, oven-baked
Flavor Profile
Rich, fruity, nutty, bittersweet
* Based on nutrition panel
I made these for a dinner party and everyone thought I had spent hours on them. The hazelnut crust is so tender and the cherry chocolate filling bubbles up perfectly. Will absolutely be making these again.
⭐⭐⭐⭐⭐
Renata
Why You Will Love This Recipe
- Ready in 45 minutes. These come together faster than almost any pastry recipe I know. The crust chills in the freezer instead of the refrigerator, cutting the wait to just 15 minutes.
- No pie dish, no fuss.
- The chocolate melts right in. Dark chocolate chips are scattered over the cherries before baking, then melt into the filling as it heats up. You get pockets of rich, bittersweet chocolate in every bite, with no extra steps.
- Four individual servings. Each galette is its own little pastry, making them easy to serve and share. If you love cherry desserts, my Cherry Pie Bars hit a similar note and are just as simple to put together.
Galettes are my favorite kind of baking: a little rustic, a little relaxed, and completely forgiving if the edges are not perfectly even. These chocolate cherry galettes feel special enough for company, but I honestly make them on weeknights just for the household.
They work equally well after a summer dinner as they do alongside a cup of coffee on a slow afternoon. If you are in a cherry moment right now, my Cherry Pie is another beautiful way to let the fruit shine. Or you could keep with the chocolate cherry and make these cherry brownies!
Ingredients & Substitutions
- Hazelnut Meal: This is the crust base, giving the galettes a nutty, slightly earthy flavor that pairs beautifully with both the cherries and the chocolate. Almond meal works as a direct swap if hazelnut isn’t available.
- Powdered Sugar: It sweetens the crust while keeping the texture tender and fine. Don’t substitute granulated sugar here, as it will change the dough’s texture.
- Unsalted Butter
- Heavy Cream
- Pitted Sweet Cherries: Fresh cherries work wonderfully here, and thawed, halved frozen cherries are a great option when fresh aren’t in season. Either way, halve them so they fit neatly inside the border and release their juices evenly as they bake.
- Dark Chocolate Chips: These melt into the cherry filling as the galettes bake, creating a rich, jammy center. If you love the dark chocolate-and-fruit combination, my strawberry truffles use a similar pairing with equally good results.
- Egg White
- Turbinado Sugar
Variations for Chocolate Cherry Galettes
- Raspberry and White Chocolate: Swap the cherries for fresh raspberries and use white chocolate chips in place of dark. The berries are tart enough to balance the white chocolate’s sweetness, and the hazelnut crust holds the combination beautifully. You could also do blueberries, like with my blueberry galette!
- Chocolate frangipane! Add a layer of this chocolate frangipane to make chocolate cherry galettes inspired by this strawberry galette (coming soon!)!
- Salted Caramel Cherry: Drizzle a small amount of this easy salted caramel sauce over the cherries and chocolate chips before folding the crust. The salt cuts through the chocolate’s richness and makes the filling taste more complex.
- Peach and Milk Chocolate: Replace the cherries with diced fresh peaches and swap the dark chocolate chips for milk chocolate. The peaches release a little more liquid as they bake, so keep the filling layer thin, and the border fold tight, or you could make this peach galette!
Professional Tips for Perfect Chocolate Cherry Galettes
- Keep the dough cold at every stage. This crust has a high butter content, and warm dough will stick, tear, and lose its shape when you fold the edges. Work quickly, and don’t skip either chilling step, including the 10 minutes back in the freezer after rolling.
- Roll between plastic wrap, not flour. The instructions call for cornstarch-dusted plastic wrap, and it’s worth following that closely. Cornstarch adds less moisture than flour and keeps the hazelnut crust from toughening as you roll.
- Leave a true 1-inch border. It’s tempting to pile the filling in, but overfilling makes the fold hard to hold, and the filling will bubble over the edges before the crust has time to set. A modest, even layer of cherries and chips bakes through more evenly and gives you a cleaner galette.
How to Make Chocolate Cherry Galettes
Use these step-by-step instructions to make tender, nutty individual galettes with juicy cherries and pockets of melted dark chocolate. Find further details and measurements in the recipe card below.
Make the Crust
Step 1: Add the hazelnut meal, powdered sugar, cold cubed butter, and heavy cream to a food processor. Pulse briefly until the mixture comes together into a shaggy dough ball. It won’t look perfectly smooth, and that’s completely fine — you’re looking for the dough to just hold together when pressed, not for it to be silky or uniform.
Don’t over-process. The moment the dough clumps together, stop. A few extra seconds can warm the butter and make the crust harder to work with.
Step 2: Chill the dough. Pat the dough into a flat disc, wrap it tightly in plastic wrap, and place it in the freezer for 15 minutes. The dough will feel firm and slightly crumbly at this stage, which is exactly what you want.
While the dough chills, heat your oven to 400°F and line a baking sheet with parchment paper so everything is ready when the dough comes out.
Step 3: Divide and roll the dough. Uncover the chilled dough and divide it into 4 equal pieces. Roll each piece between two sheets of plastic wrap lightly dusted with cornstarch into a rough 4-inch circle. The cornstarch keeps the dough from sticking without adding extra flour, which can make the crust tough, and keeps it gluten-free. Transfer the circles to the prepared baking sheet, then return them to the freezer for another 10 minutes.
The circles don’t need to be perfect. Rustic, uneven edges are part of what makes galettes charming, so don’t stress about getting them exactly round.
Assmeble
Step 4: Add the filling. Scatter the halved cherries and dark chocolate chips over each dough circle, leaving a 1-inch border. The filling will look generous, and that’s exactly right. Fold the border up and over the filling, pressing gently to help it hold its shape. The center stays open and exposed.
Step 5: Whisk the egg white and heavy cream together in a small bowl until combined, then brush the mixture over each folded crust edge. It gives the crust that deep, burnished color as it bakes. Sprinkle each galette lightly with turbinado sugar for a little crunch and sparkle.
Bake
Step 6: Bake the galettes for 15 to 17 minutes, until the crust is deep golden brown and the filling just begins to bubble around the chocolate and cherries. You’ll smell the chocolate before you see the bubbling, which means you’re close. Let the galettes cool completely on the baking sheet before serving.
Recipe FAQs
Store cooled galettes at room temperature, covered loosely, for up to one day. After that, transfer them to an airtight container and refrigerate for up to three days. To reheat, pop them in a 300°F oven for about 8 to 10 minutes until the crust crisps back up.
You can make and chill the dough up to a day ahead, which I recommend if you’re short on time the day you want to serve them. Keep it wrapped tightly in plastic wrap in the refrigerator, then bring it out and roll it when you’re ready to assemble. The filling comes together so quickly that the rest is easy.
This usually happens when the galettes don’t bake long enough. You’re looking for a deep golden brown crust, not just lightly golden, and the filling should just be starting to bubble. Make sure your oven is fully preheated to 400°F before you put the baking sheet in, and don’t skip the final 10-minute freeze before baking—that step helps the crust hold its shape and bake evenly.
Yes, frozen cherries work well here — just make sure they’re fully thawed, and you’ve drained off any excess liquid before halving and adding them to the dough circles. Too much extra liquid can make the filling runny and seep into the crust before it sets. Pat them gently with a paper towel if they seem especially wet, which is fine and totally normal!
Recommended Recipes with Cherries!

Pies & Tarts

Brownies & Bars
Pies & Tarts

Cobblers, Crisps & Crumbles
Chocolate Cherry Galettes
Ingredients
Hazelnut Crust
- 1 cup hazelnut meal
- ¼ cup powdered sugar
- 2 tablespoons unsalted butter, cold and cubed
- 4 teaspoons heavy cream
Filling
- 1 ¼ cups sweet cherries, pitted, fresh or frozen and thawed, halved
- ¼ cup dark chocolate chips
Topping
- 1 egg white
- 1 tablespoon heavy cream
- Turbinado sugar, for sprinkling
Instructions
- Combine hazelnut meal, powdered sugar, butter, and heavy cream in a food processor. Process just until a dough ball forms. Pat into a disc, wrap in plastic wrap, and chill in the freezer for 15 minutes.
- Heat oven to 400°F. Line a baking sheet with parchment paper.
- Divide the dough into 4 equal pieces. Roll each piece between two sheets of plastic wrap dusted with cornstarch into a 4-inch circle. Transfer to the prepared baking sheet and return to the freezer for 10 minutes.
- Top each dough circle with cherries and chocolate chips, leaving a 1-inch border. Fold the crust up around the filling, leaving the center exposed. Whisk the egg white and heavy cream together and brush over each galette. Sprinkle lightly with turbinado sugar.
- Bake 15 to 17 minutes until the crust is deep golden brown and the filling just begins to bubble. Cool completely on the baking sheet before serving.
Notes
Technique: Don’t pull the galettes from the oven at the first sign of golden color. You want a deep golden brown crust and filling that’s just starting to bubble at the edges — that’s how you know the crust is fully baked through and won’t turn soggy.
Measuring: If you’re using frozen cherries, thaw them completely and drain off any excess liquid before halving. Pat them gently with a paper towel if they seem especially wet — too much liquid can seep into the crust before it sets.
Storage: Store cooled galettes at room temperature, covered loosely, for up to one day. After that, transfer them to an airtight container in the refrigerator for up to three days. To reheat, pop them in a 300°F oven for about 8 to 10 minutes until the crust crisps back up.
Nutrition
Nutrition information is automatically calculated, so should only be used as an approximation.
 Like this recipe? Rate & comment below!
Before You Go
I hope these chocolate cherry galettes earn a regular spot in your summer baking. Browse our Dessert Recipes or make this sour cherry pie next!




I made these for a dinner party and everyone thought I had spent hours on them. The hazelnut crust is so tender and the cherry chocolate filling bubbles up perfectly. Will absolutely be making these again.
Ok…just measured ingredients for your dutch oven bread (to make tomorrow) as I have three loaves of jalapeño cheese bread almost ready for oven. ( It is almost 11PM.) I am going to grocery store in A M to get the flour so I may try these.
Keep it coming young lady…love your videos!
Hi Brenda! That sounds like a delicious late-night baking lineup: jalapeño cheese bread and galettes tomorrow? You’re speaking my language. I’m so glad you’re giving these a try! Thank you for the sweet words about the videos, that made our day! ~gvd team