Pretzel sticks recipe that actually tastes like classic hard pretzels, not dried soft ones. The method is straightforward, but the flavor is richer, snappier, and more authentic.


A Quick Look At The Recipe
This is a brief summary of the recipe. Jump to the recipe to get the full details.
Prep Time
2 hours
Cook Time
35 minutes
Total Time
2 hours 35 minutes
Servings
24 pretzel rods
Difficulty
Intermediate, but very approachable with clear timing cues
Calories *
76 kcal per serving
Technique
Mix and knead a yeast dough, shape into rods, briefly poach in an alkaline baked-soda bath, then bake until crisp.
Flavor Profile
Malty, deeply savory, classic hard-pretzel saltiness
* Based on nutrition panel
I’ve always been intimidated by hard pretzels, but the step-by-step photos and the baked baking soda tip made all the difference. Mine came out golden, crisp, and perfect for dipping in mustard. ⭐⭐⭐⭐⭐
Lauren
Why This Recipe Works
- Baked baking soda bath gives authentic pretzel flavor without using lye
- Two-flour blend creates the ideal balance of crunch and slight chew
- A brief poach and a long bake ensure the rods dry out properly
- Measured rise times develop flavor without over-proofing
Table of Contents
I used to be a strict “meals only” person. Snacks were snacks. Meals were meals. Then somewhere along the way, cheese boards replaced lunches, pretzels replaced bread baskets, and things like my soft pretzels recipe, 40-minute honey wheat pretzel twists, cheesy garlic pull-apart bread, and even pretzel hand pies started showing up where sandwiches used to live.
That shift is exactly why this pretzel sticks recipe exists. These aren’t soft pretzels baked longer and called crunchy; they’re purpose-built to dry, snap, and hold up to mustard, cheese dip, or straight-from-the-jar peanut butter.
Ingredients & Substitutions
- Warm Water (110–115°F): Proper temperature is essential to activate yeast; water that’s too hot will kill it, a principle that applies across yeast breads like classic Italian bread.
- Light Brown Sugar: Adds subtle maltiness and feeds the yeast.
- Active Dry Yeast: Provides structure and flavor development.
- Unbleached All-Purpose Flour + Bread Flour: This combination creates structure without toughness.
- Salt: Essential for flavor and dough strength.
- Baked Baking Soda: Key to hard pretzel flavor without lye.
- Egg Wash: Promotes even browning.
- Pretzel Salt or Coarse Sea Salt: Traditional finish and crunch.
See the recipe card below for full ingredient quantities.
Variations on Pretzel Sticks from Scratch
- Add sesame or everything seasoning: Swap the salt for sesame seeds or everything seasoning after the egg wash for a bakery-style finish that leans savory and snack-board ready.
- Make short pretzel sticks: Cut each dough portion in half before rolling to create compact, sturdy dippers that are easier to serve alongside cheese, spreads, or other sturdy dippers like whole wheat pita bread.
- Turn them into pretzel bites: Roll the dough slightly thinner and cut into 1½-inch pieces before poaching and baking for small, crunchy bites—perfect for snacking on their own or using as a base for sweet-and-salty recipes like this chocolate peanut butter pretzel tart.
Professional Tips
- Bake the baking soda ahead of time. This is non-negotiable for true pretzel flavor.
- Roll evenly. Inconsistent thickness leads to uneven baking.
- Bake until hardened. They should feel firm when tapped, not soft.
- Cool completely on the pan. They continue to dry as they cool.
How to Make Pretzel Sticks
Use these instructions to make perfect pretzel sticks every time.
Step 1: Activate the Yeast. Combine ¼ cup warm water with ½ teaspoon brown sugar. Add yeast, stir, and let sit 5–10 minutes until foamy.
Step 2: Mix the Dough. Combine remaining sugar, both flours, and salt. Add yeast mixture and remaining water. Mix until a dough forms.
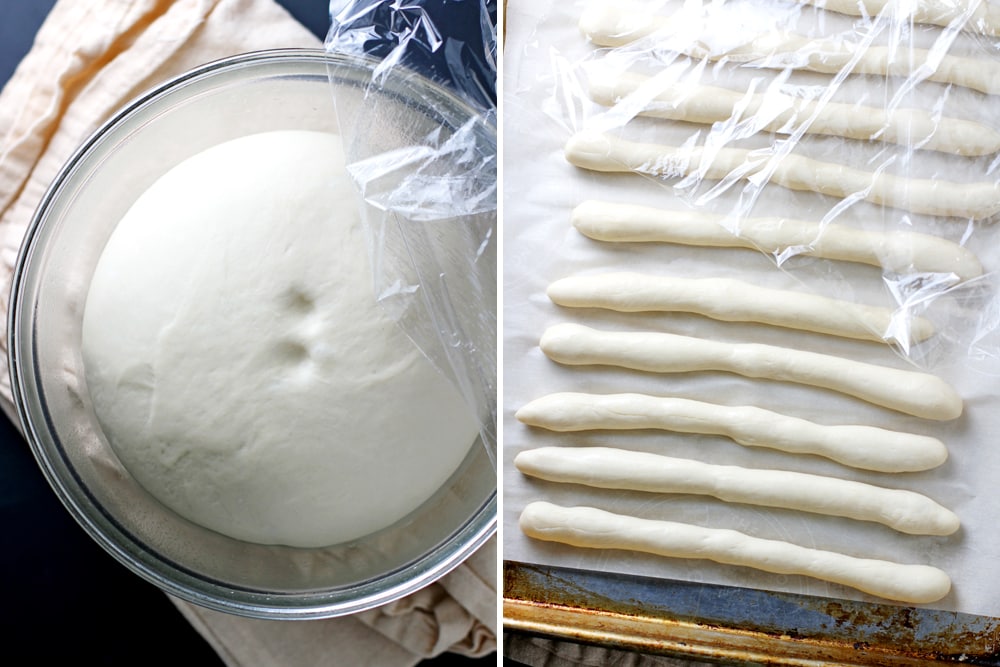
Step 3: Knead and Rise. Knead 5–10 minutes until smooth and elastic. Place in a lightly oiled bowl, cover, and let rise 1 hour until doubled.
Step 4: Shape the Pretzel Sticks. Divide dough into 24 pieces. Roll each into a 9-inch rod about ¼-inch thick. Rest 30 minutes.

Step 5: Prepare the Baking Soda Bath. Simmer water with baked baking soda and brown sugar. To learn how to use a lye bath head over to this sourdough pretzel recipe!
Step 6: Poach. Poach rods for 15 seconds, then return to baking sheets.
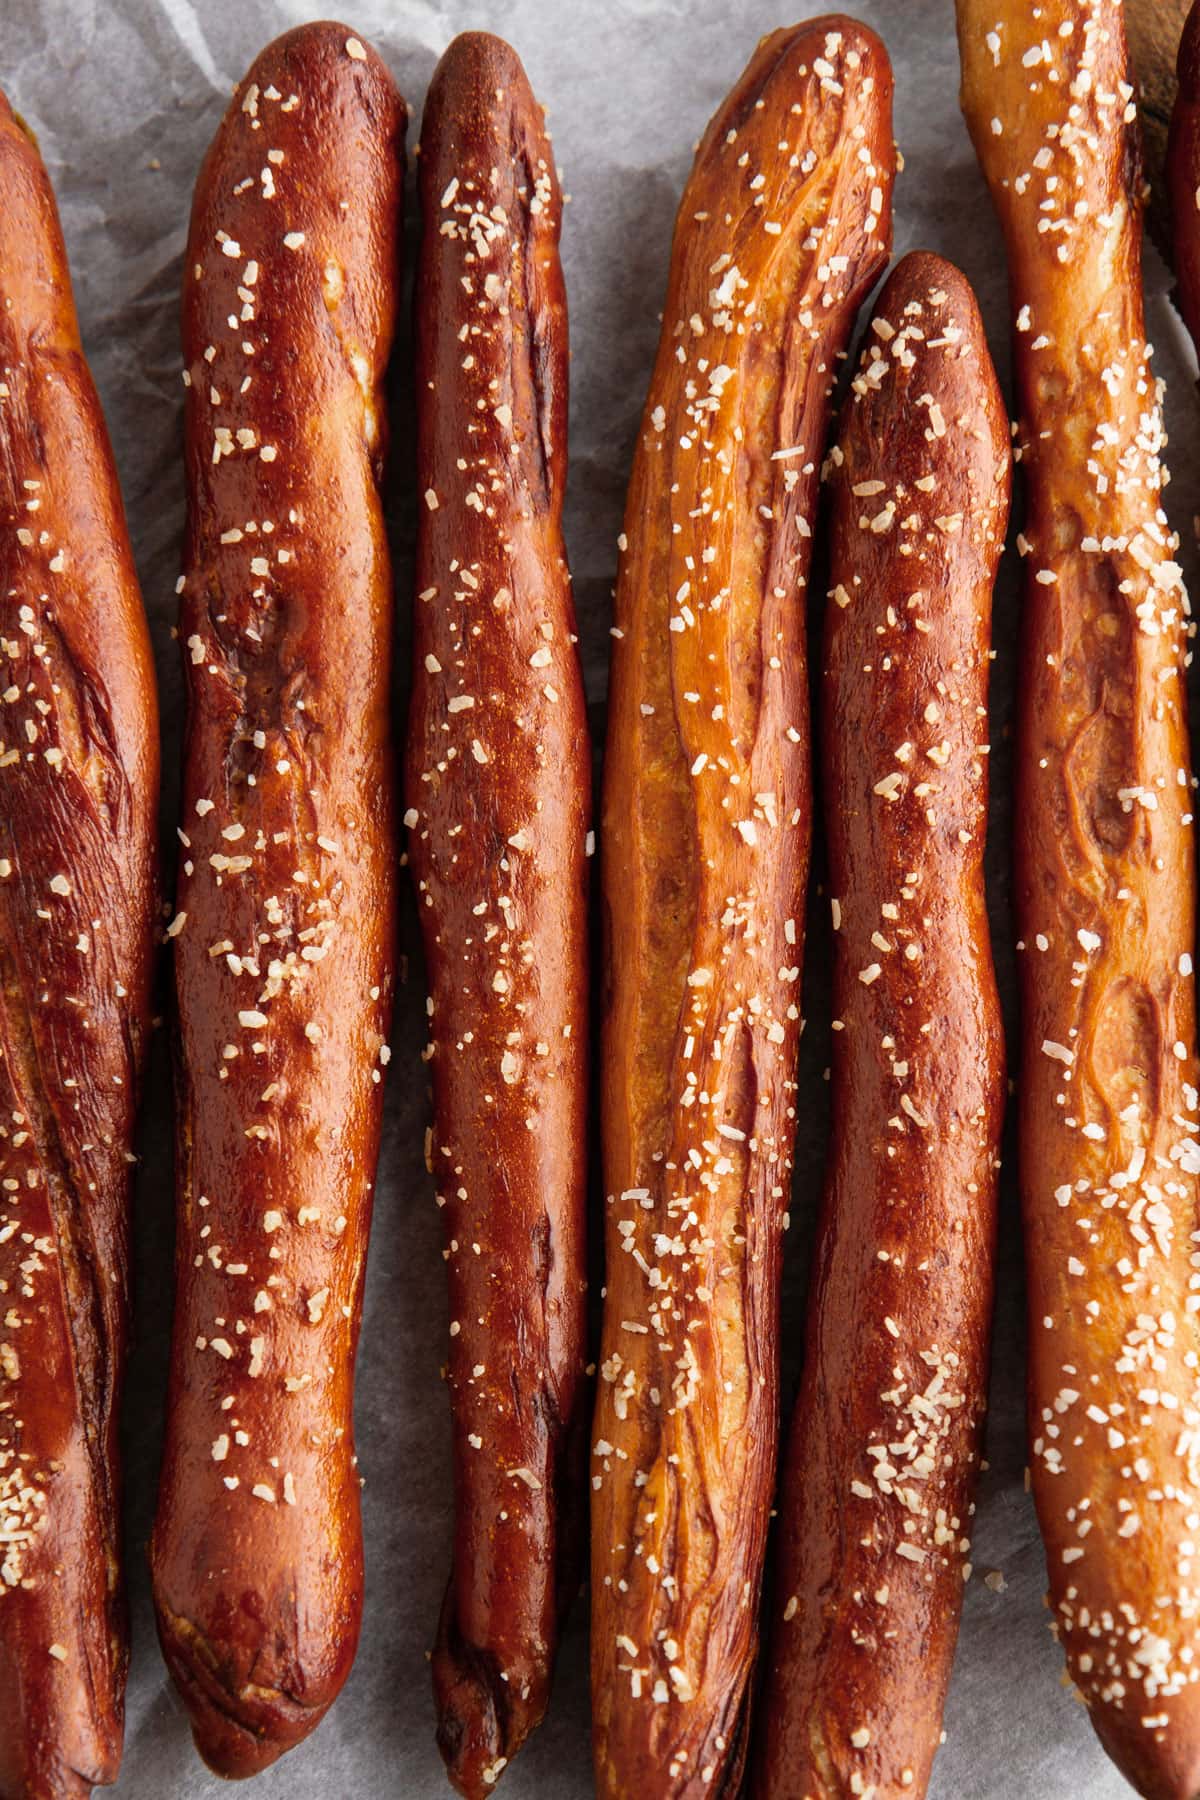
Step 7: Bake. Brush with egg wash, sprinkle with salt, and bake at 350°F for 33–38 minutes, rotating halfway.

Recipe FAQs
Pretzels are traditionally dipped in an alkaline solution before baking, most often lye or baked baking soda dissolved in water. This pretzel sticks recipe uses baked baking soda and brown sugar in the poaching liquid to safely create classic pretzel flavor, shine, and color.
Yes, pretzel dough is different from regular bread dough. While both are yeast-based, pretzel dough is dipped in an alkaline solution before baking, which creates its signature dark color, chewy interior, and distinct pretzel flavor. This pretzel sticks recipe uses a baked baking soda bath to achieve that effect without lye.
Homemade pretzel sticks last up to 1 week when fully cooled and stored in an airtight container at room temperature.
Recommended Classic Snack Recipes

Yeast Breads

Appetizers & Snacks
Appetizers & Snacks

Yeast Breads
If you enjoyed this recipe, please leave a star rating and let me know how it goes in the comments below! I love hearing from you and your comments make my day!
Homemade Hard Pretzel Rods
Ingredients
For the dough:
- 1 cup warm water, 110 to 115°F, divided
- 2 teaspoons light brown sugar, divided
- 1 ¼ teaspoons active dry yeast
- 1 ½ cups unbleached all-purpose flour
- 1 ½ cups bread flour
- ½ teaspoon salt
For the baking soda bath:
- 8 cups water
- ½ cup baked soda, not another term for baking soda*
- ½ cup light brown sugar, packed
For topping:
- 1 egg, whisked with 1 tablespoon water, egg wash
- 2 tablespoons pretzel salt , or coarse sea salt
Instructions
- In a small bowl, combine ¼ cup warm water (110–115°F) and ½ teaspoon light brown sugar. Sprinkle in the yeast and stir to dissolve. Let stand 5–10 minutes, until slightly foamy.
- In a large bowl or the bowl of a stand mixer, combine the remaining 1½ teaspoons brown sugar, both flours, and salt. Add the yeast mixture and the remaining ¾ cup warm water. Stir until a shaggy dough forms.
- Knead by hand on a lightly floured surface for 5–10 minutes, or with a dough hook on medium speed for about 5 minutes, until the dough is smooth, satiny, and elastic.
- Shape dough into a ball and place in a lightly greased bowl. Cover with lightly greased plastic wrap and let rise in a warm place for 1 hour, or until doubled in size.
- Line 2 baking sheets with parchment paper. Punch down the dough and divide into 24 equal pieces. Roll each piece into a 9-inch-long rod, about ¼-inch thick, and place 1 inch apart on the prepared baking sheets.
- Cover loosely with lightly greased plastic wrap or a clean kitchen towel. Let rest 30 minutes, until slightly puffed.
- Preheat oven to 350°F. In a large saucepan, bring 8 cups water to a gentle simmer. Add ½ cup baked baking soda and ½ cup brown sugar, stirring until dissolved.
- Working in batches, carefully lower a few dough rods into the simmering bath. Poach for 15 seconds, then remove with a slotted spoon or tongs and return to the baking sheets. Repeat with remaining rods.
- Brush the tops of the poached rods with egg wash and sprinkle evenly with pretzel salt.
- Bake for 33–38 minutes, rotating pans halfway through, until the pretzel sticks are deep golden brown and hardened.
- Cool completely on the baking sheets. Pretzel sticks will continue to firm up as they cool.
Video
Notes
Freezing: Freeze baked pretzels up to 3 months.
Flavor Tip: Best eaten same day.
Nutrition
Nutrition information is automatically calculated, so should only be used as an approximation.
 Like this recipe? Rate & comment below!
Before You Go
I hope you enjoyed this crunchy, classic pretzel sticks recipe. If you’re in a snack-forward phase of life too, be sure to explore more snack recipes next. If you love salty snacks with contrast, try pairing these with something sweet-spicy like sriracha peanut kettle corn!


Interesting Recipe
Would this recipe work with a silicone pretzel rod mold? I want to make all of the pretzels universal in length and size over rolling them by hand.
Hi Karen, the pretzel rods need to be poached in a baking soda bath before baking, which would require removing them from any mold first. Using a mold as a shaping guide beforehand could still work, just transfer them to a baking sheet after poaching! I’d also suggest using a kitchen scale to portion the dough into equal weights before shaping, which will help ensure uniform size. Let us know how they turn out! – GVD team
Putting sugar in the baking soda bath is genius! It makes the crust absolutely perfect. I set out a batch alongside a cheese board for a party, and every single one was gone before the brie even got touched. I feel like I have to make homemade pretzels forever now!
Can you make them GF and Vegan?
Hi Lou _ i’m not sure. If you try, be sure to come back and let us know how it went!
They are so so bitter, do not use this recipe
Hi Beck – sorry to hear that. I fear that you might have used pure “baking soda” and not taken the additional step of baking it or buying “baked soda” when boiling the pretzels.
Made these today. I really wanted to love them. I followed the recipe to a “t”, but I didn’t get much pretzel taste and I had to bake them much longer than suggested to finally get them hard enough to not have any soft spots. Also, how do you keep them looking like rods? Willing to try again. 🙂
Thanks for the feedback, Betsy! I haven’t tried this recipe myself yet (I’m the new owner) but it is only a matter of time because my 3 year old LOVES pretzels! After I try them, I can give you a bit more solid advice. I have replied to some earlier comments about softness, though! Feel free to scroll through those
~Lindsey
These came out great, thanks! I’m an expat living in The Netherlands, and you cannot find hard pretzels like Snyder’s here (or in Belgium or France, I checked) so this recipe is very much appreciated.
I don’t mind the slightly less crunchy aspect, but what do you think; would simply backing them longer get to that dry, crunchy interior like Snyder’s? I didn’t want to overcook them, but wondering if anyone has tried going beyond the 38 min. time.
Thanks so much for this!!
Hi Paul! I’m so glad the recipe came through for you, and I love hearing it’s filling that Snyder’s gap in The Netherlands! If you prefer a drier/crunchier interior, you can try baking them a little longer at the lower end of the oven temp (350°F), keeping a close eye so they don’t get too dark. Happy snacking! ~gvd team
I haven’t made them yet , I was wondering if they were vacuum sealed when cooled would they last as long as frozen , or how long ?
Hi Dawn! While vacuum sealing will preserve freshness, freezing is what help them last longer (3 months!), and you can do that in a ziptop plastic baggie. Thaw them at room temperature when you’re ready to enjoy! ~gvd team
I made these yesterday and they were not editable. Was hoping to use them with chocolate dipped for valentines day treats. Followed the recipe to a “t”. First out of the oven they were good, by morning I could not bite/chew through them….like rubber… what could the issue be?
So sorry they didn’t hold up! The good news is the recipe worked — fresh out of the oven is the proof! Hard pretzels are very sensitive to moisture and will turn rubbery quickly if exposed to air or humidity. Make sure they cool completely before storing, then keep them in an airtight container. If they go soft, pop them back in a 250°F oven for 10-15 minutes to crisp them back up. Hope that helps! ~GVD team
Really enjoyed them but why go to all the trouble when you can go to the corner Dollar Tree and buy a bag of Snyder’s for $1.25.
We support home bakers here at Girl Versus Dough, and all the control that comes with it! Baking at home lets you be sure there are not additives in your snacks, and lets you make your food exactly how you like it. Yes, it takes extra time, but you can usually taste the difference! Happy baking! ~gvd team