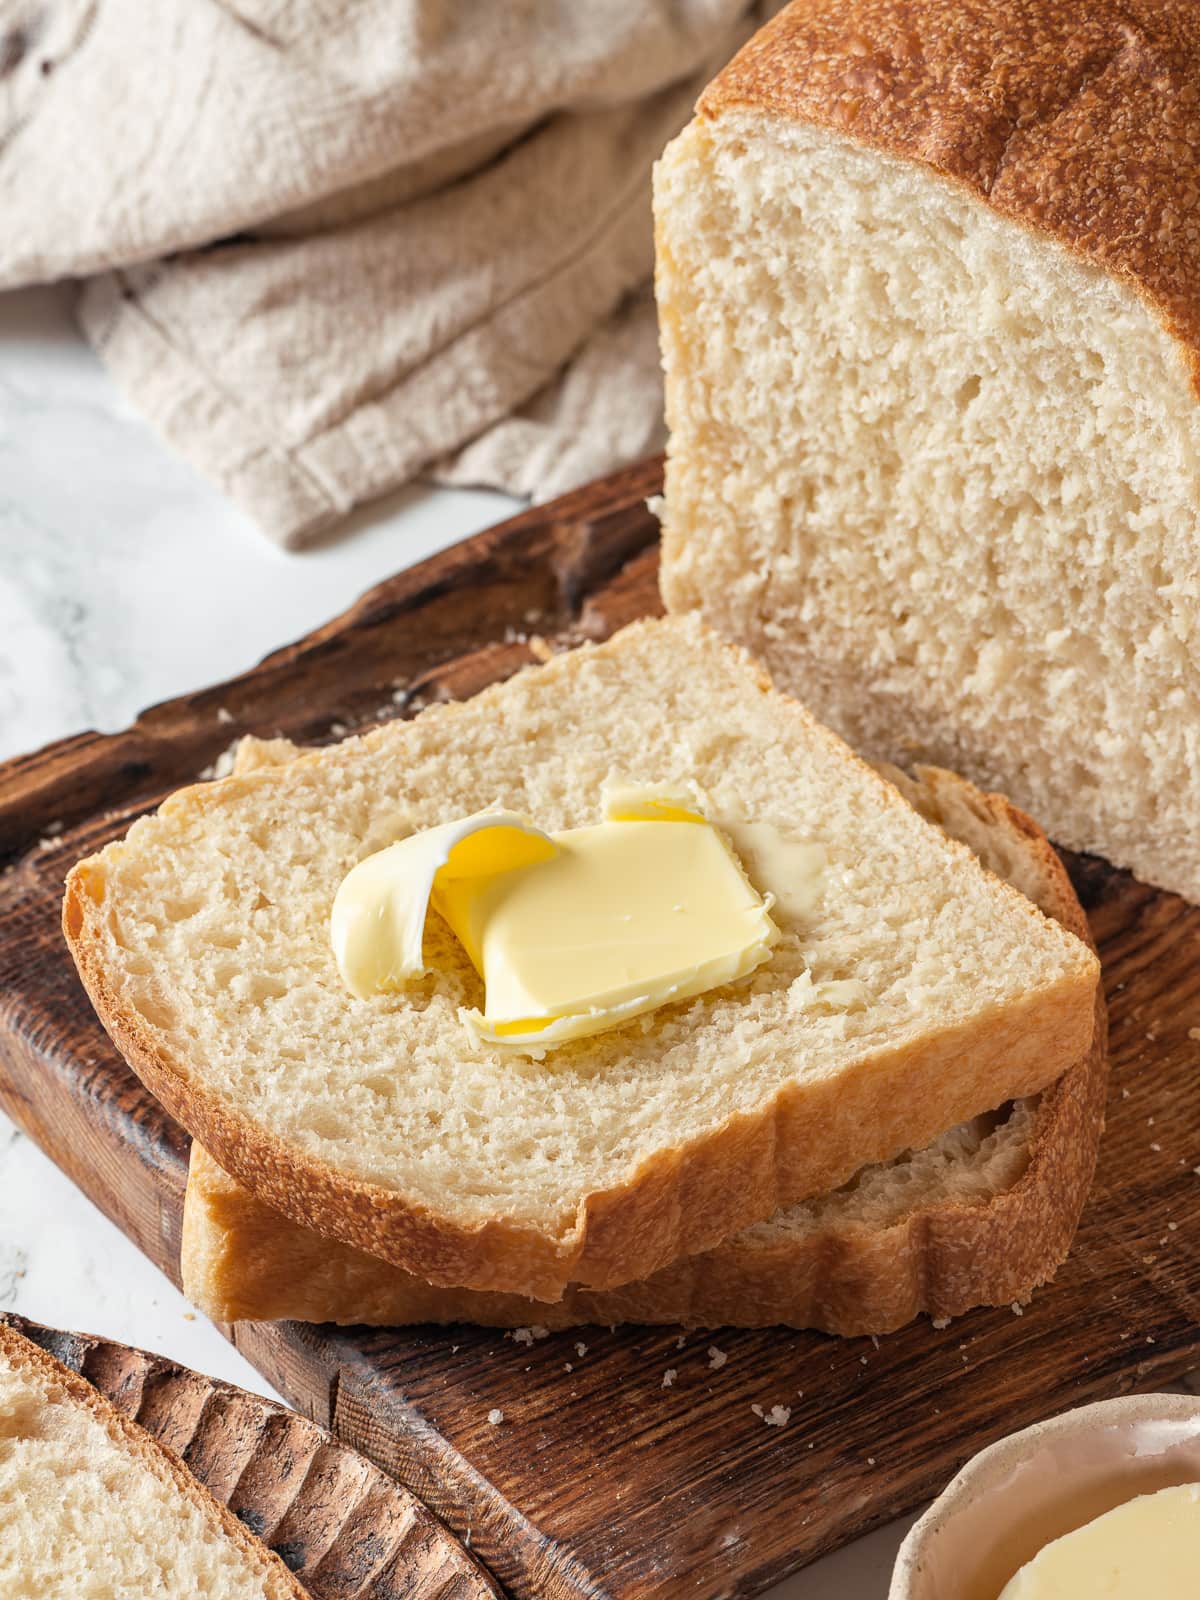
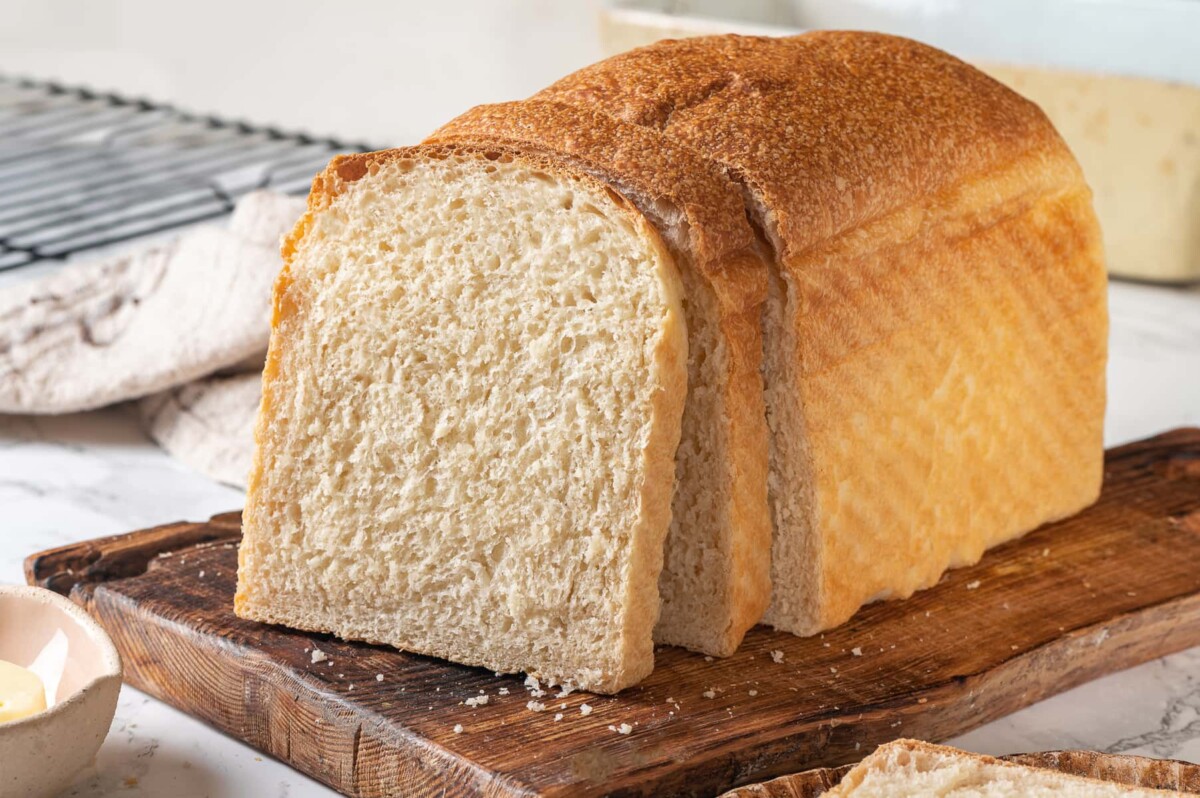
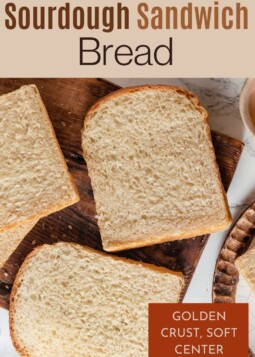
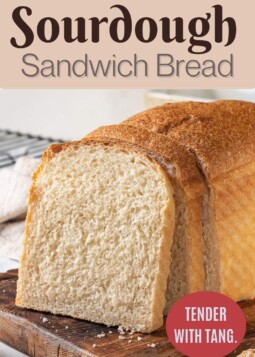
This easy sourdough sandwich bread recipe is soft and tender with a hint of sweetness and sourdough tang! A flavorful white bread recipe using active sourdough starter or discard!
A Quick Look At The Recipe
This is a brief summary of the recipe. Jump to the recipe to get the full details.
Prep Time
25 minutes
Cook Time
26 minutes
proofing + resting (depends on starter)
8 hours
Total Time
8 hours 51 minutes
Servings
14 slices
Difficulty
Easy sourdough recipe for beginners!
Calories *
146 kcal per serving
Technique
Make dough, bulk ferment, shape the dough, rest, final shape, proof and bake!
Flavor Profile
White sourdough sandwich bread.
* Based on nutrition panel
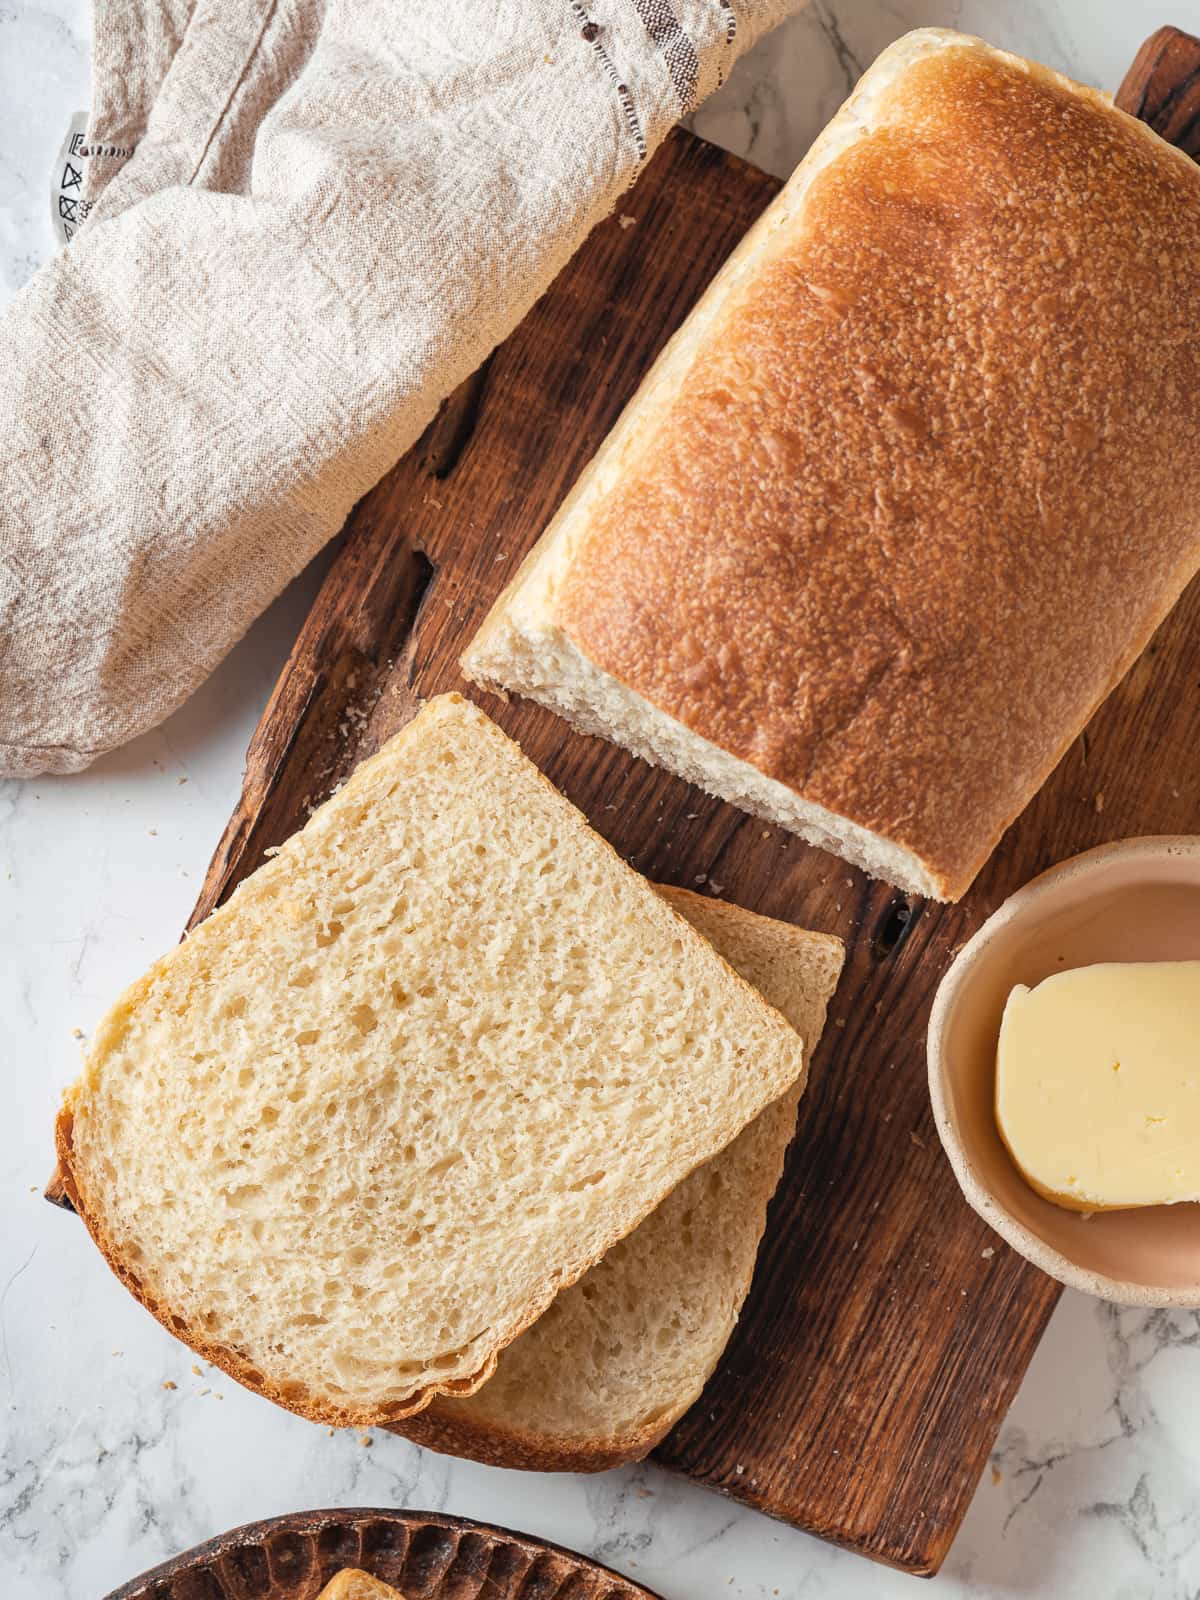
Letting the dough proof until it rose over the pan took patience, but the slices were tall and uniform. I used them for BLTs and they didn’t fall apart!⭐⭐⭐⭐⭐
Lauren
This recipe makes a white sandwich bread leavened exclusively by sourdough starter that resembles white sandwich loaves in both taste and texture. It can be made using either active starter or discard and it can be sped up by adding 1-2 teaspoons of instant yeast like I do for my sourdough dinner rolls!
It is an incredibly versatile sourdough recipe that is equally delicious as toast as it is on sandwiches. Depending on the state of your starter, you can make a bread with mild sourdough flavor or a delightful tang.
Why You Will Love this Recipe
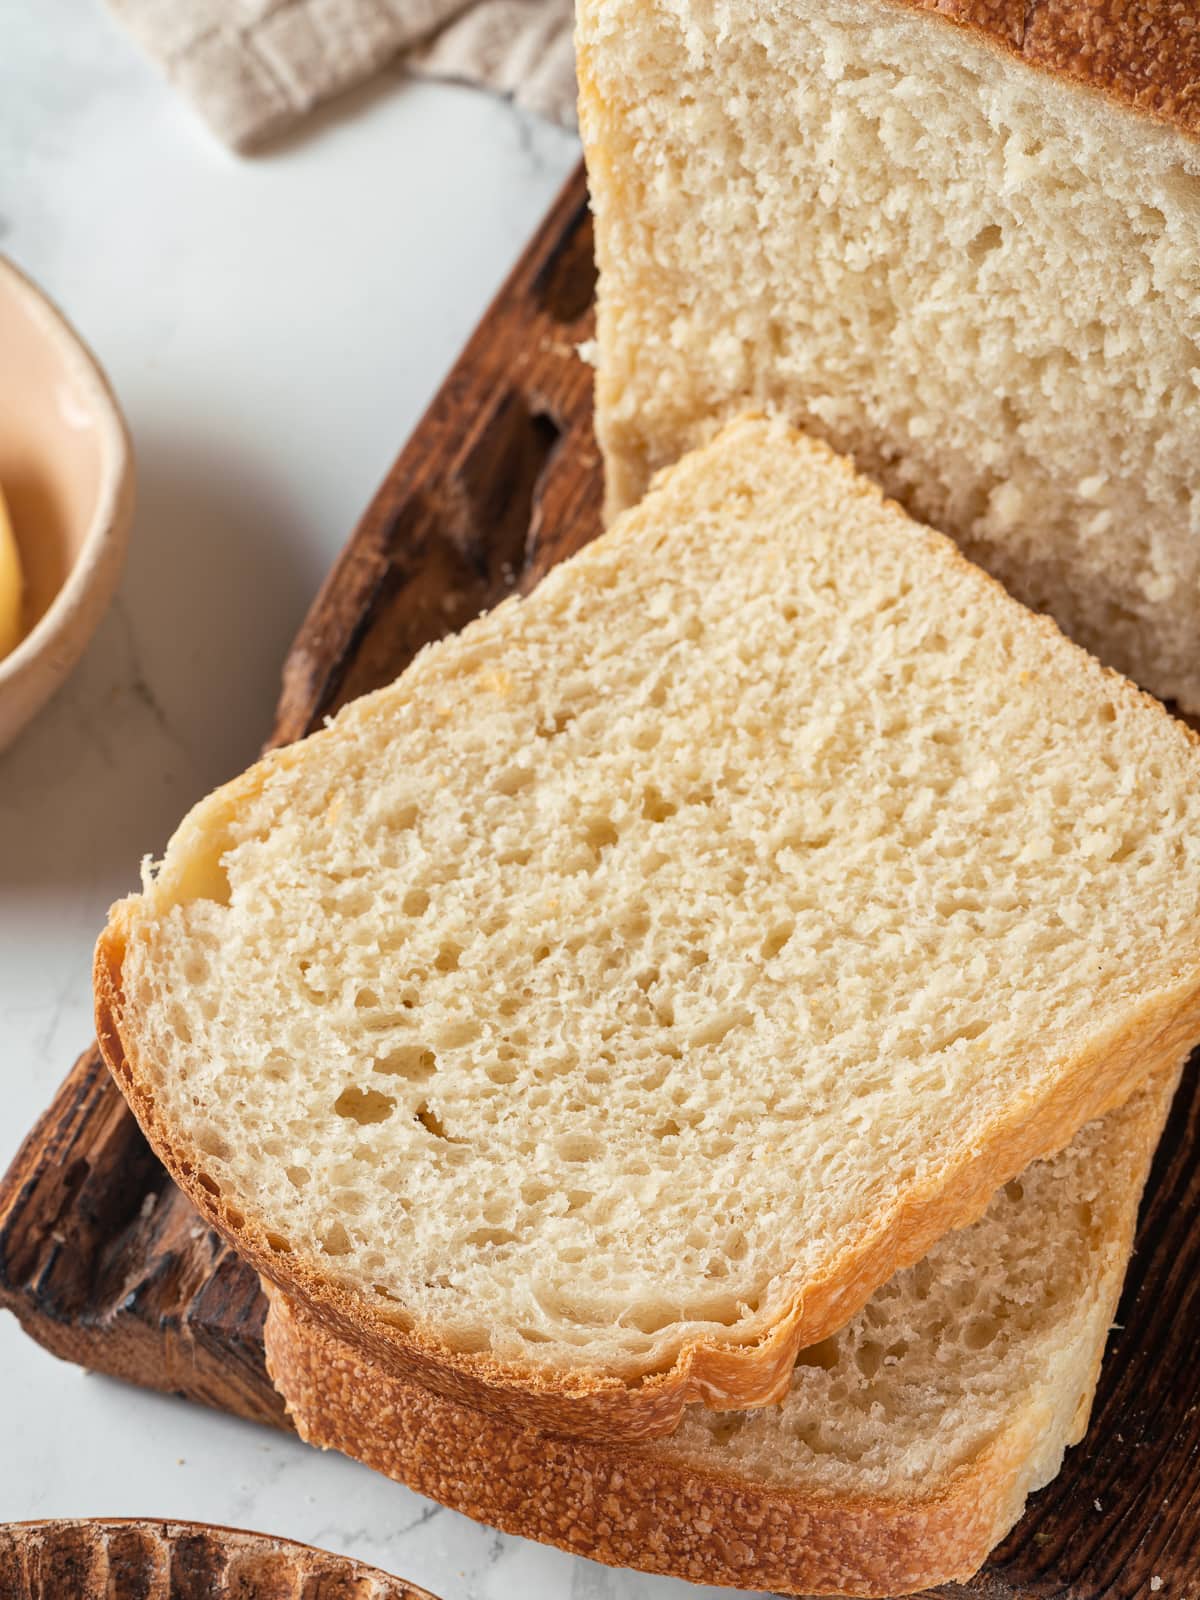
- Soft texture similar to my sandwich bread recipe. Nice tangy sourdough flavor with a little sweetness and softness from the butter and milk.
- The longer proof (overnight with discard) yielded a bread with more sourdough flavor, as would be expected. However, I actually preferred the taste of the bread made within one day rather than the longer proof time. They are both delicious but just not what I wanted in an everyday sandwich bread.
- Easy sourdough recipe for beginners! The dough is easy to mix and very forgiving; the dough is soft, supple and not sticky.
- It is incredibly easy to shape. Like this crusty sourdough bread recipe for beginners or sourdough focaccia, this sourdough sandwich bread is the perfect recipe to start with!
- An easily adaptable recipe that uses what you have on hand. Not only are there just a handful of ingredients, but I include instructions for making the same recipe whether you have active sourdough starter or discard languishing in the back of the fridge that isn’t suitable for sourdough pancakes or sourdough blueberry muffins!
Table of Contents
- Why You Will Love this Recipe
- Ingredients & Substitutions
- Variations
- Pro Tips for Making this Sourdough Sandwich Loaf
- How to Make White Sourdough Sandwich Bread
- How to make sourdough sandwich bread using discard?
- Sample Bread Baker’s Schedule
- Frequently Asked Questions
- Recommended Bread Recipes
- Sourdough Sandwich Bread Recipe
- Before You Go
Ingredients & Substitutions
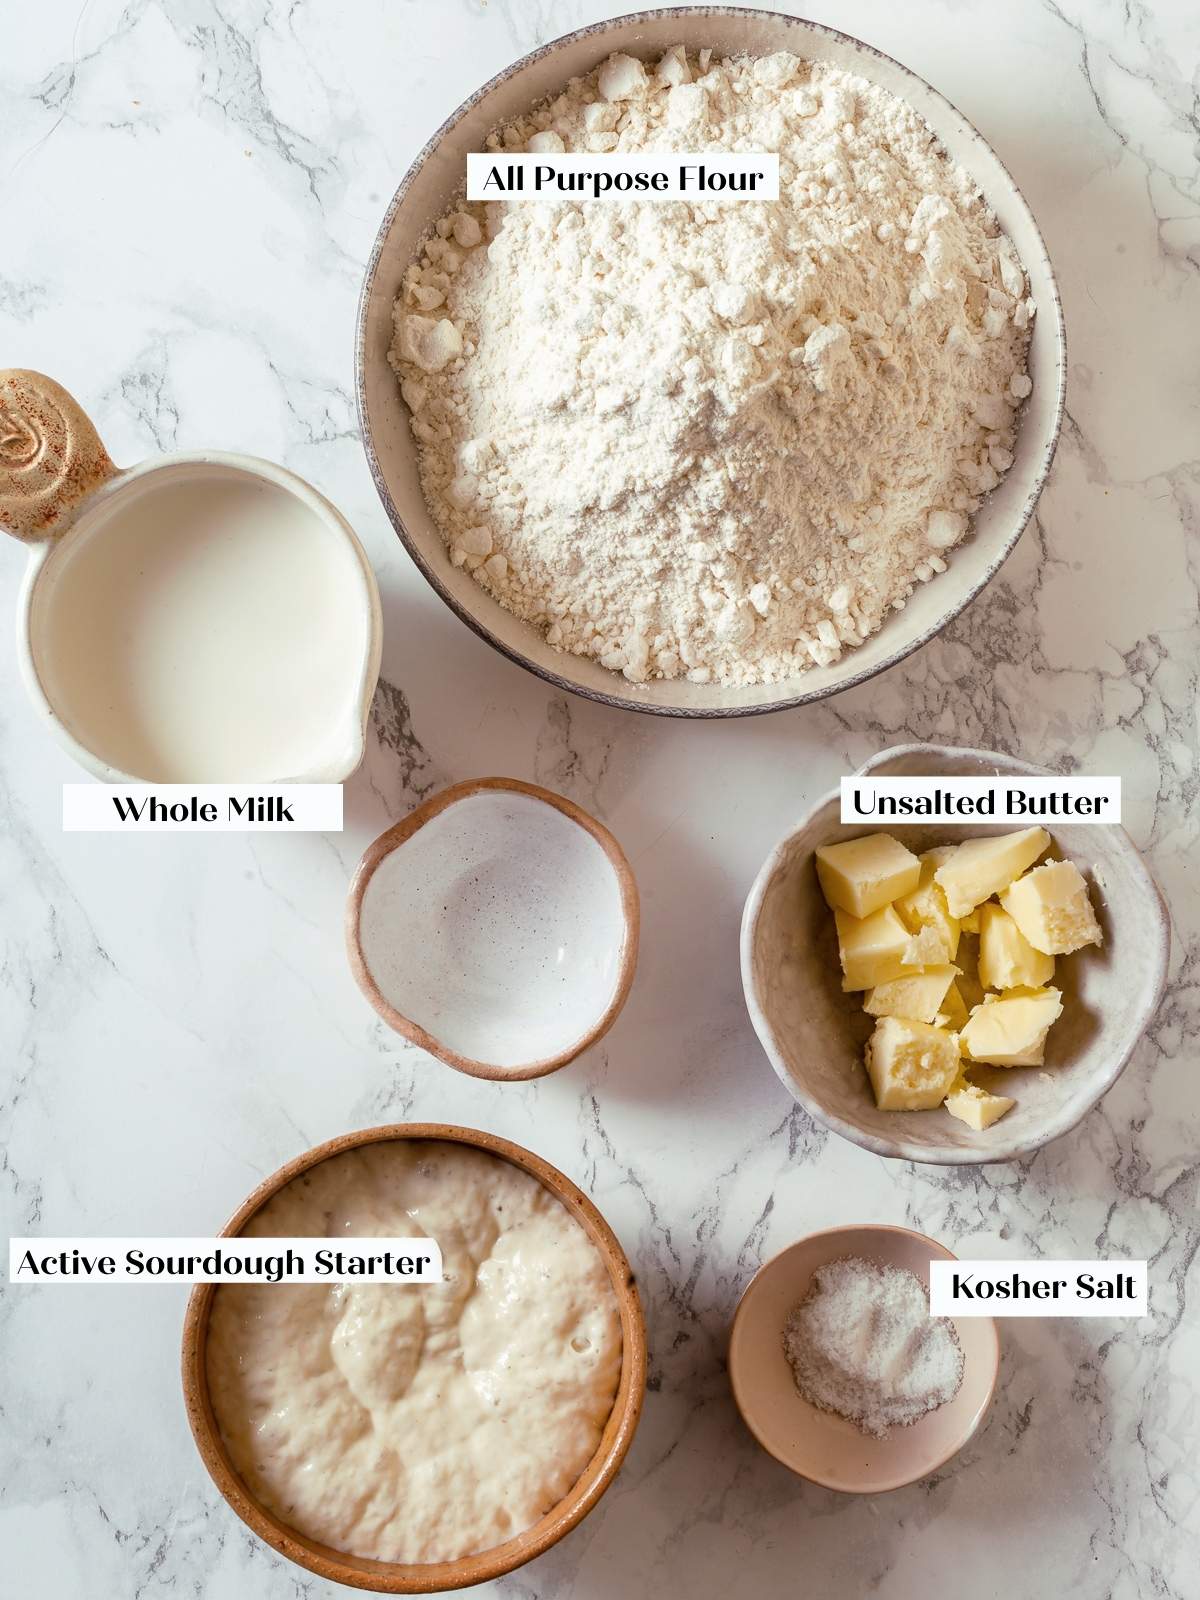
- Whole Milk: I use whole milk for the best flavor, texture and added shelf-life, but you could use your preferred alternative milk or warm water. You could also make this with buttermilk or make this buttermilk bread instead!
- Active Sourdough Starter: You can use sourdough discard or starter at its peak for this recipe. This does assume that you have an active sourdough starter. If you are lost or just beginning your journey, start with my sourdough starter recipe and learn how to feed sourdough starter. Enjoy sourdough waffles as a reward along the way!
- All-Purpose Flour: All-purpose flour will give you the softest, most tender bread. It has the right amount of protein to develop a strong gluten network for support. You can use bread flour but it will be chewier.
- Kosher Salt: Salt strengthens and tenderizes the gluten, so it helps with structure, texture and flavor!
- Granulated Sugar: There is just a hint of sweetness from the granulated sugar. You could use honey or omit it completely. It also tempers a bit of the tang from the sourdough. For a tangier loaf, proof overnight and omit the sugar!
- Unsalted Butter: Just 3 tablespoons of butter add the right amount of tenderness, a little buttery flavor and keeps the bread soft. You could also substitute vegetable oil or olive oil.
See the recipe card for full information on ingredients and quantities.
Variations
- Make it whole wheat. You can substitute up to half of the all-purpose flour in this recipe for whole wheat flour; however, if you are looking for a 100% whole wheat sandwich bread, I recommend making my whole wheat bread or whole wheat sourdough bread instead!
- Make the top shiny. You could brush the top of the loaf with egg wash right before baking to achieve a shiny top like this brioche loaf or to adhere flaked sea salt or seeds like brioche buns.
- Add a swirl. It could be a simple cinnamon swirl like this cinnamon swirl bread or you could get creative with a sweeter spiced brown sugar filling like making this eggnog swirl bread with this homemade pumpkin spice recipe!
Pro Tips for Making this Sourdough Sandwich Loaf
- The timing in this recipe varies greatly by the stage of liveliness of your sourdough starter. I have written the recipe for active sourdough starter used at its peak, but I have included instructions for using sourdough discard and for speeding up both options by adding a teaspoon of instant yeast.
- I was surprised to find that this sourdough variation on my white sandwich bread recipe dries out faster. Typically sourdough breads like no knead sourdough bread, retain their moisture for longer because of the acidity in the starter. Even the tests using true discard, which had a longer proof time, dried out within a day after baking.
- There is minimal to no oven spring during baking, so keep that in mind when proofing! A higher temperature would allow for more rise in the oven, but I don’t feel it would add to the texture or flavor of the final loaf.
How to Make White Sourdough Sandwich Bread
Use these instructions to make soft white sandwich bread with sourdough starter or discard! Further details and measurements can be found in the recipe card below.
Mix and Knead the Dough
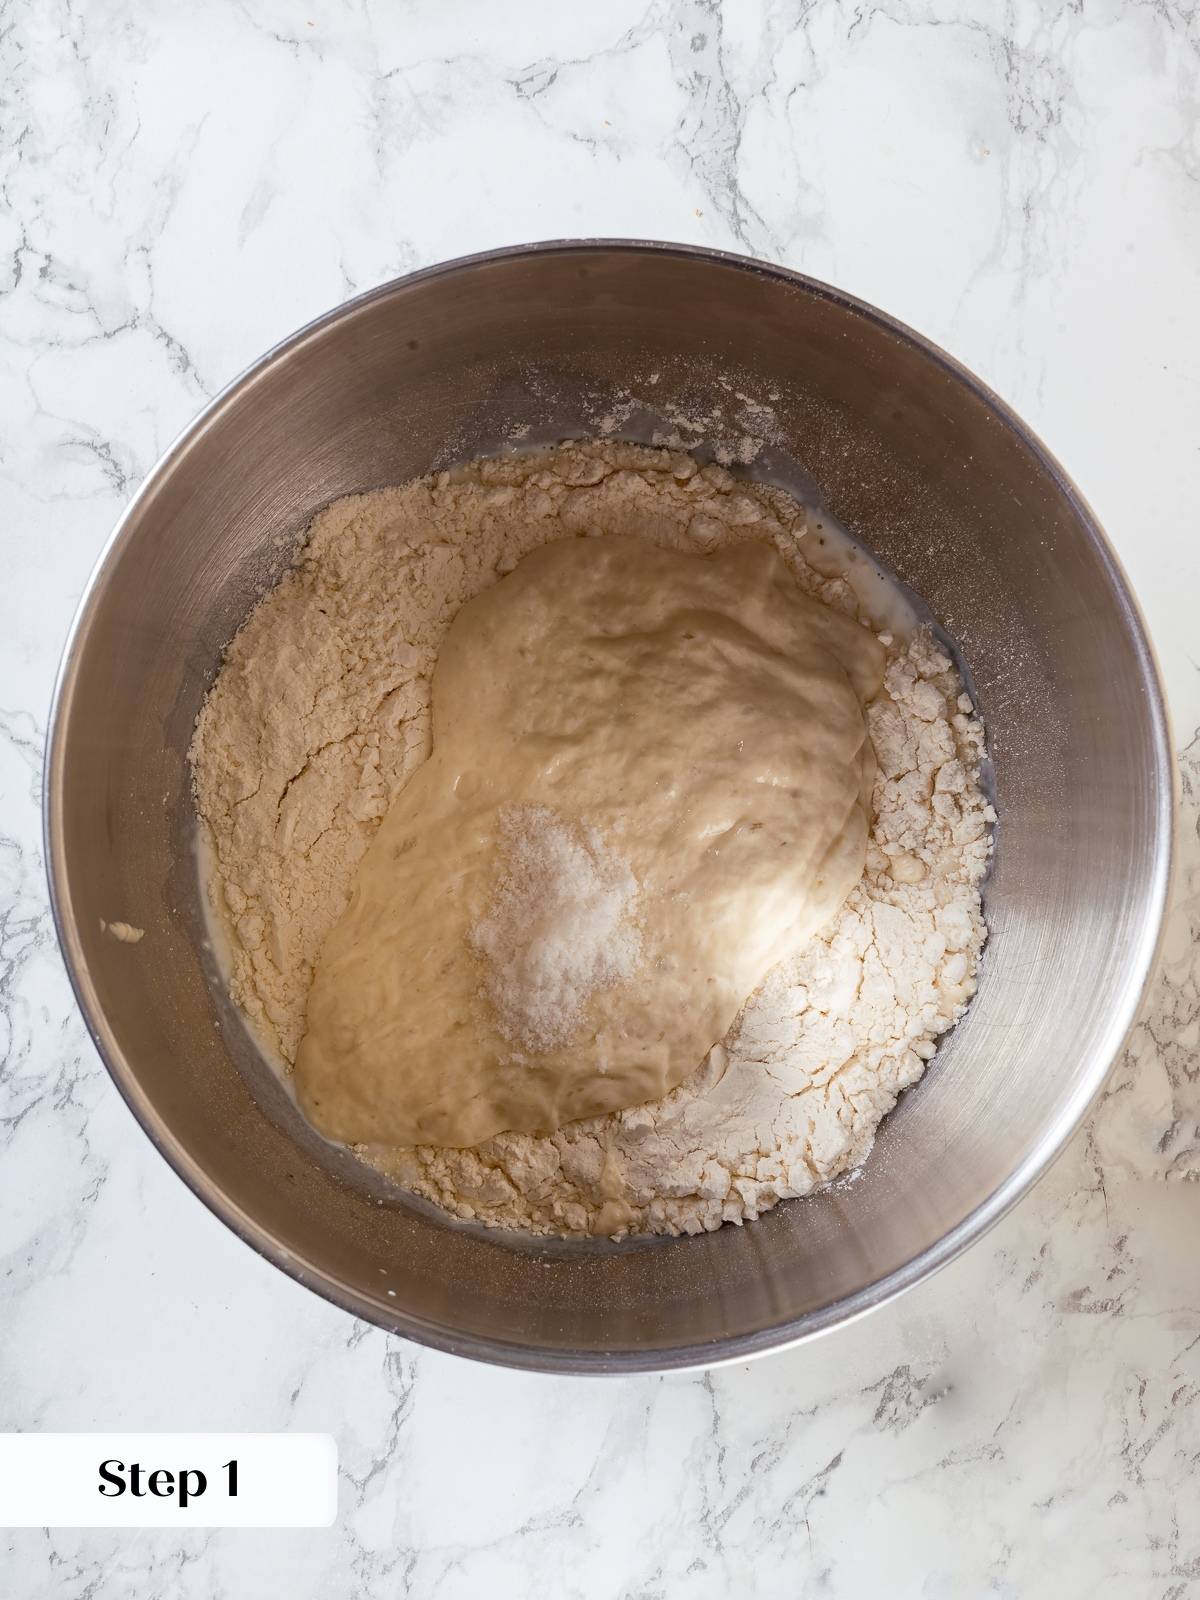
Step 1: Combine ingredients in stand mixer. In the bowl of a stand mixer fitted with the dough hook attachment, combine all-purpose flour, milk, sourdough starter, salt, and sugar (photo 1). Mix on low speed until the dough is hydrated and all the ingredients have incorporated. It will only take a minute or two.
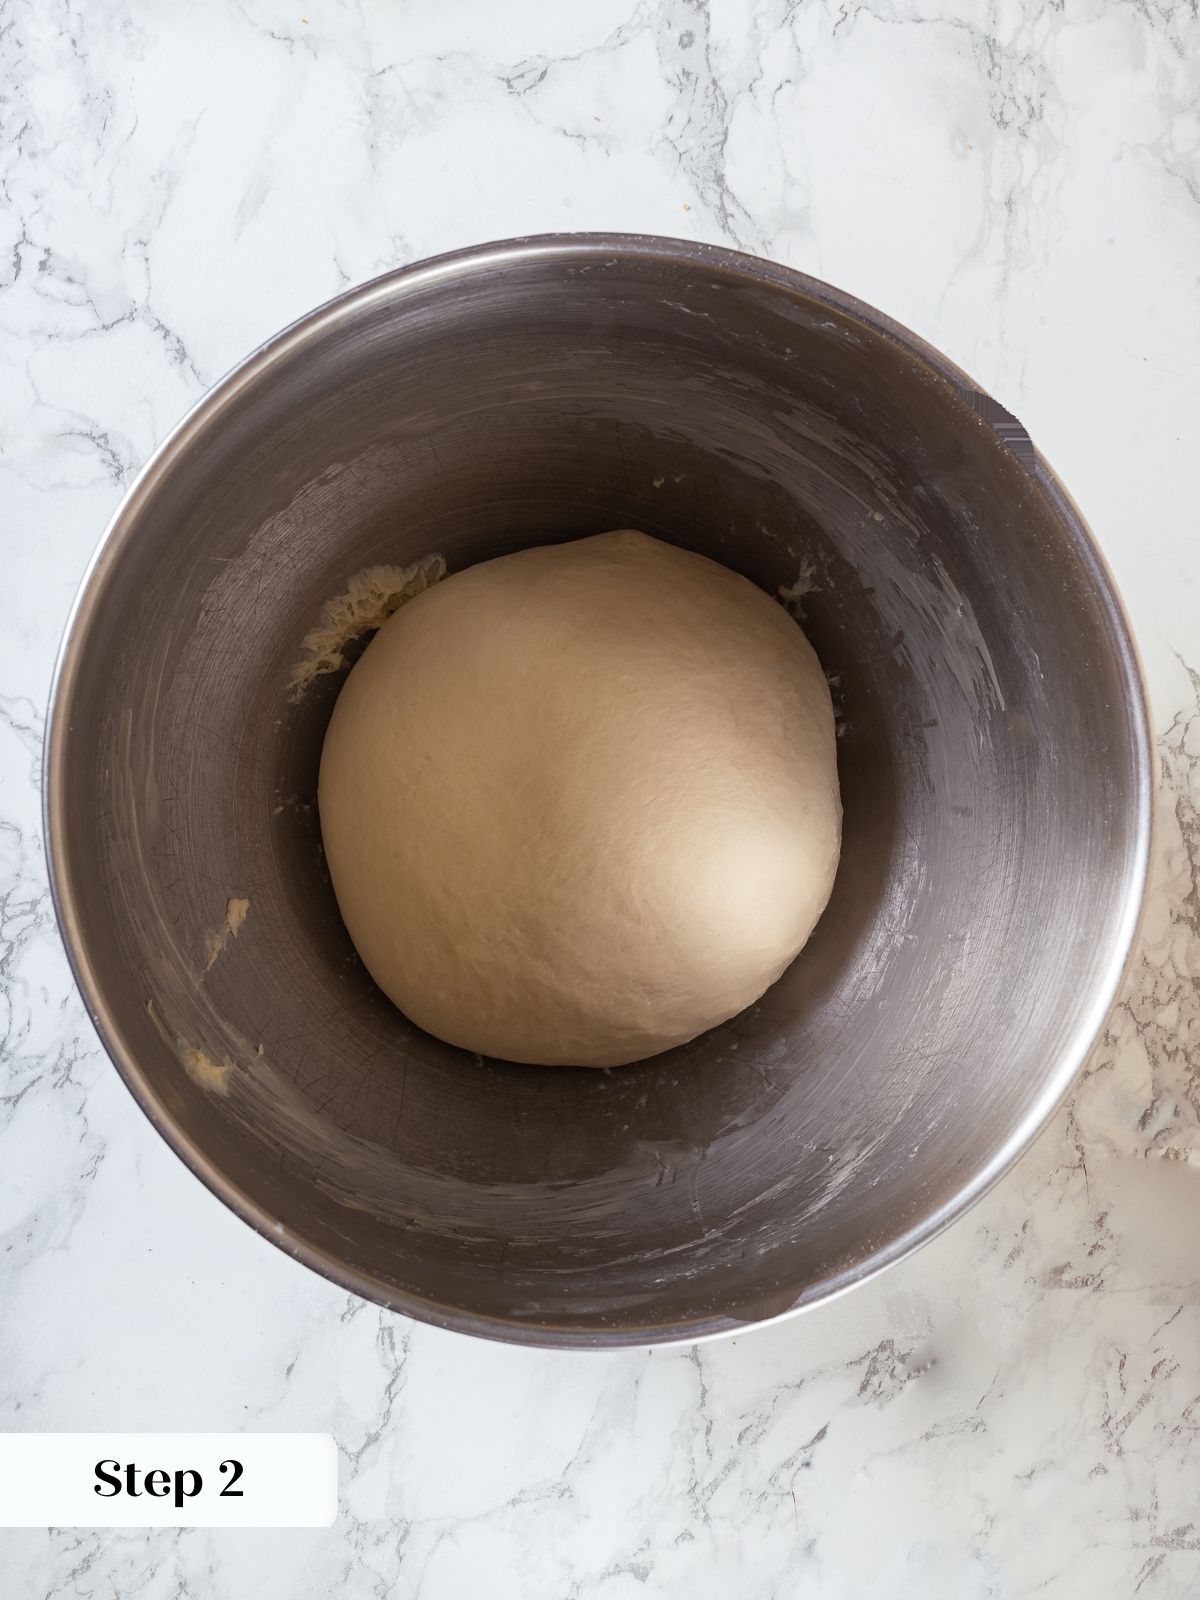
Step 2: Knead until elastic. Increase the mixer to medium speed and continue kneading for 6-8 minutes, or until a soft, strong, elastic dough forms (photo 2). Use the window-pane test to assess the dough. It should pull a smooth, thin window similar to a brioche dough.
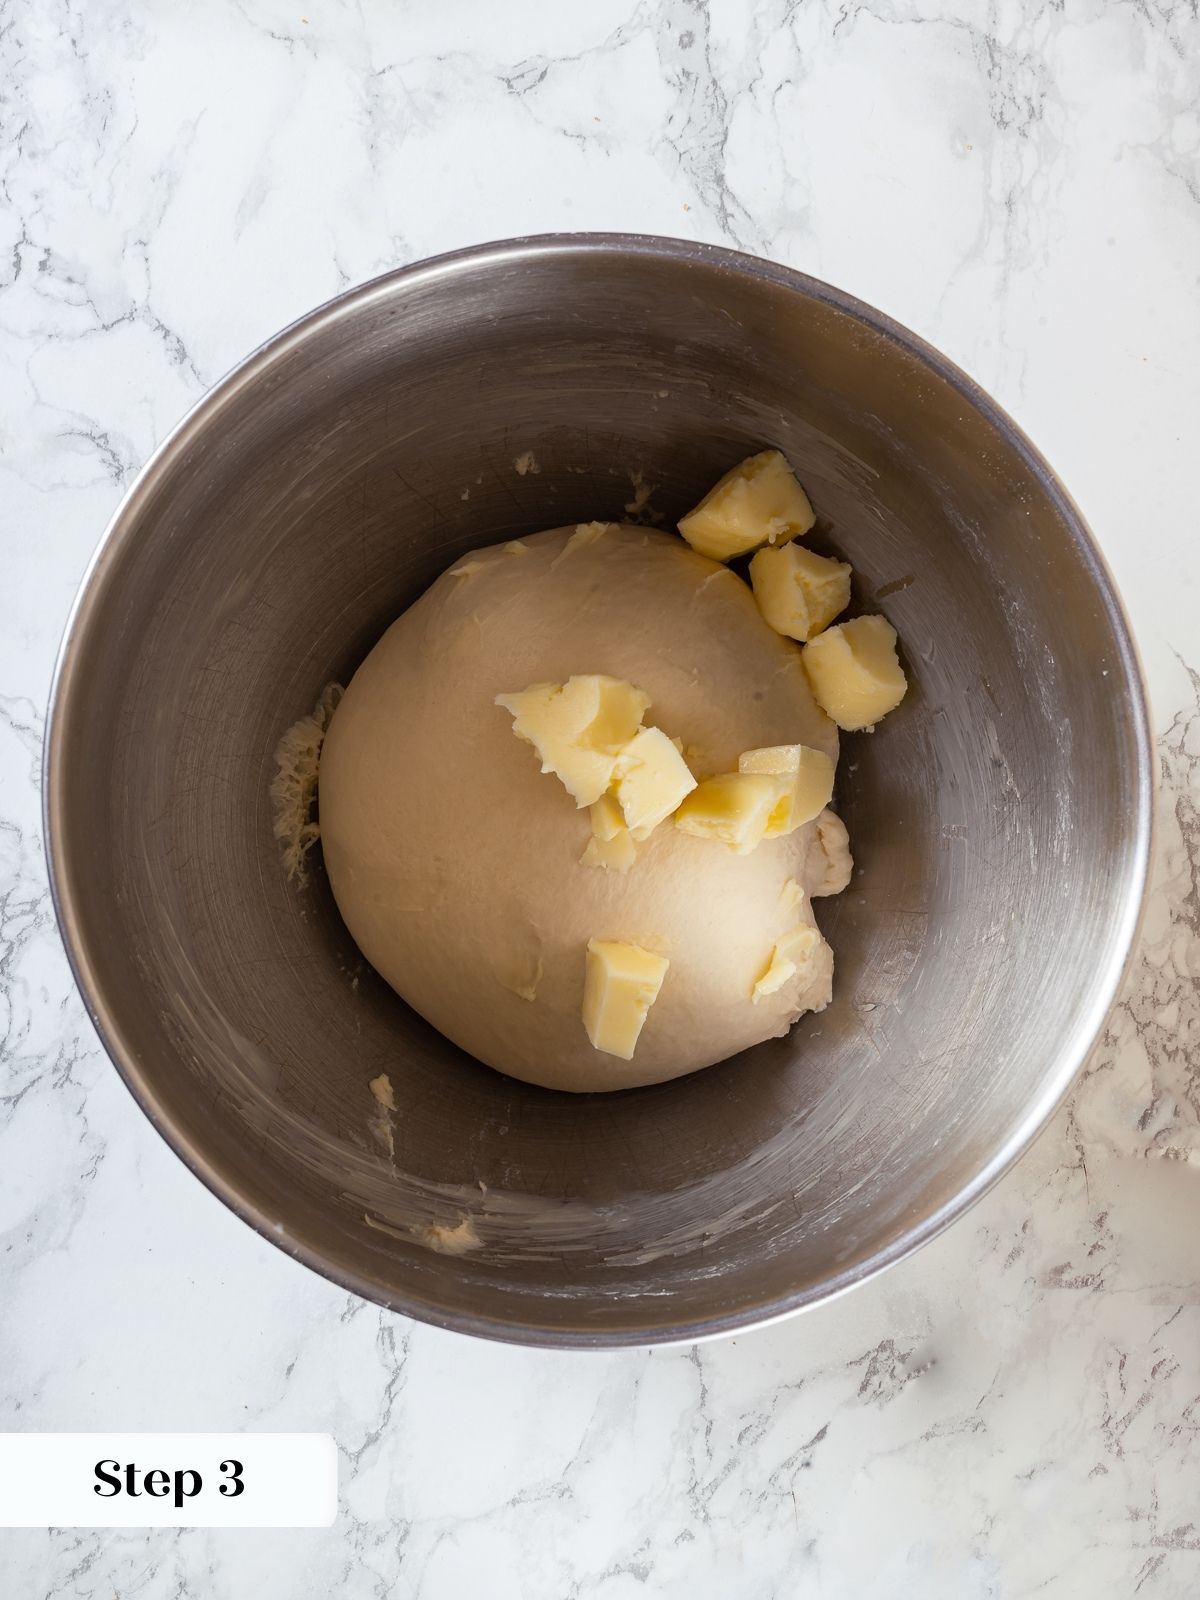
Step 3: Add the pieces of butter to the mixer bowl and reduce the speed to low (photo 3). Mix on low speed until all the butter has worked into the dough. Room temperature butter will incorporate faster, but it isn’t essential.
Bulk Fermentation
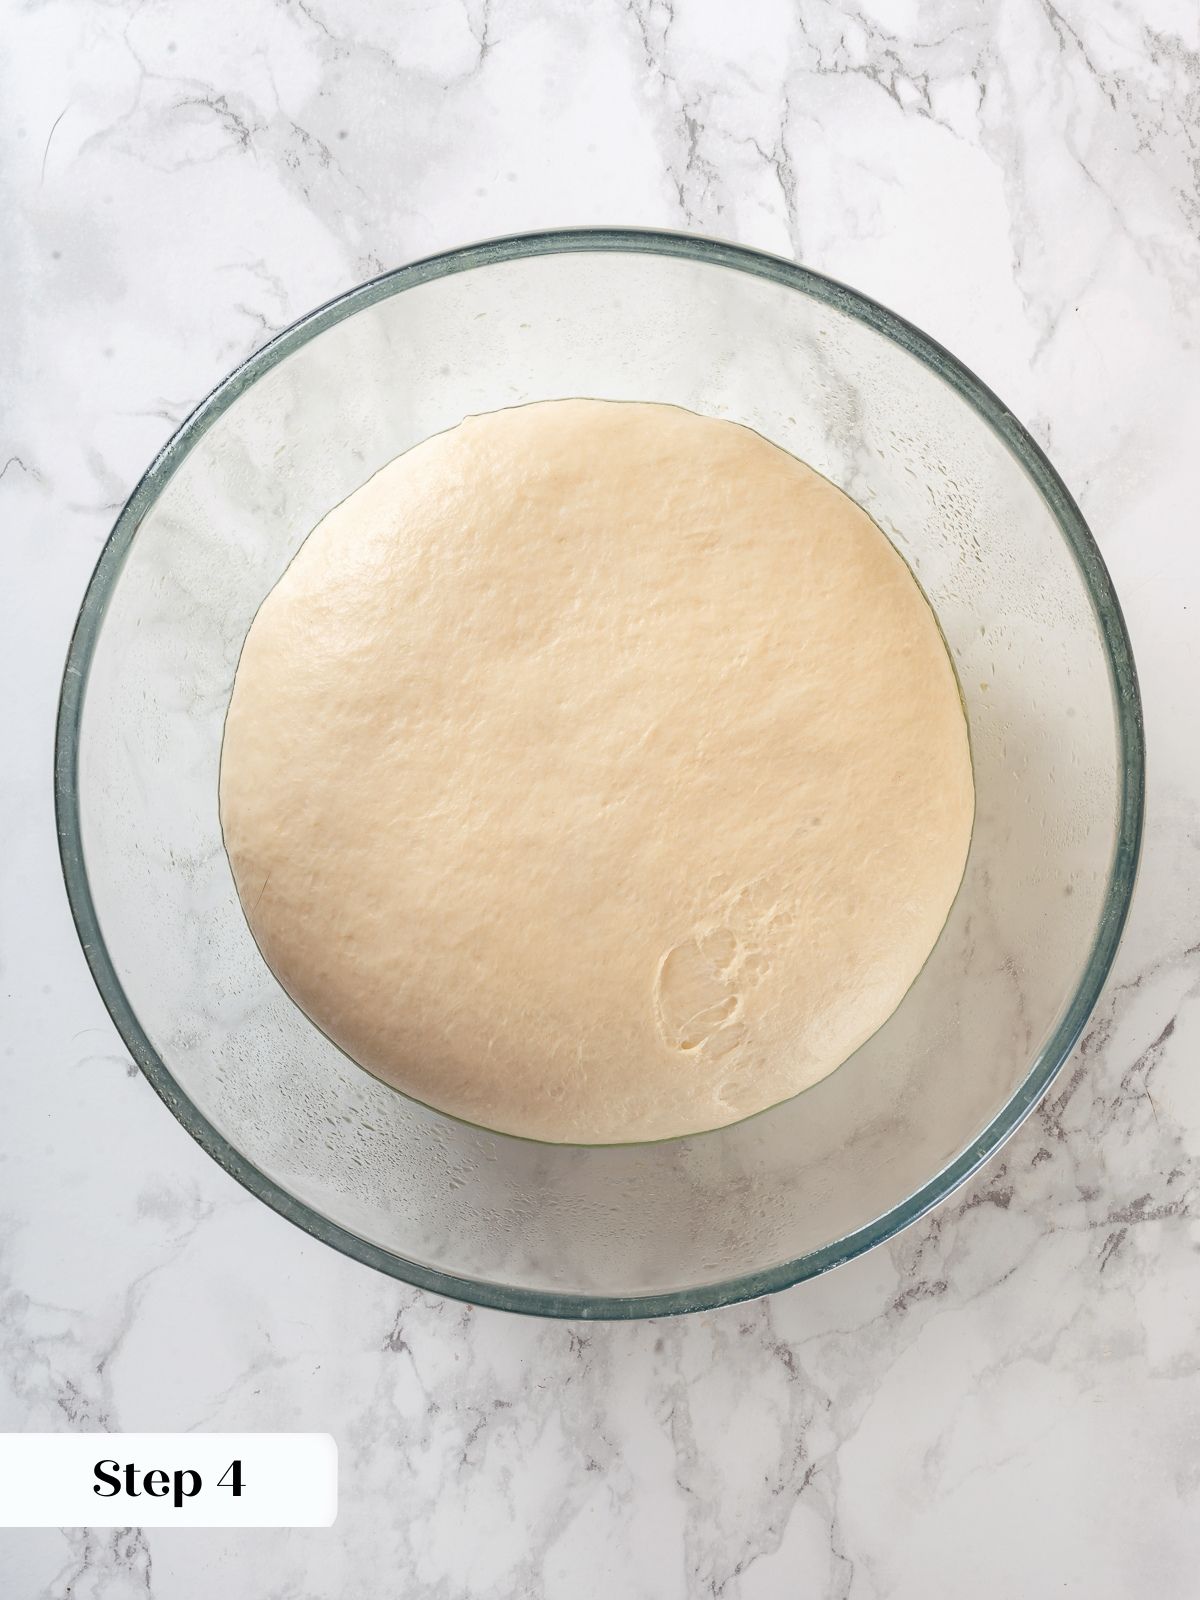
Step 4: Proof until doubled. Turn the dough out into a lightly oiled medium bowl. Cover with plastic wrap and proof at room temperature about 4 hours or until the dough doubles (photo 4).
Shape the Dough

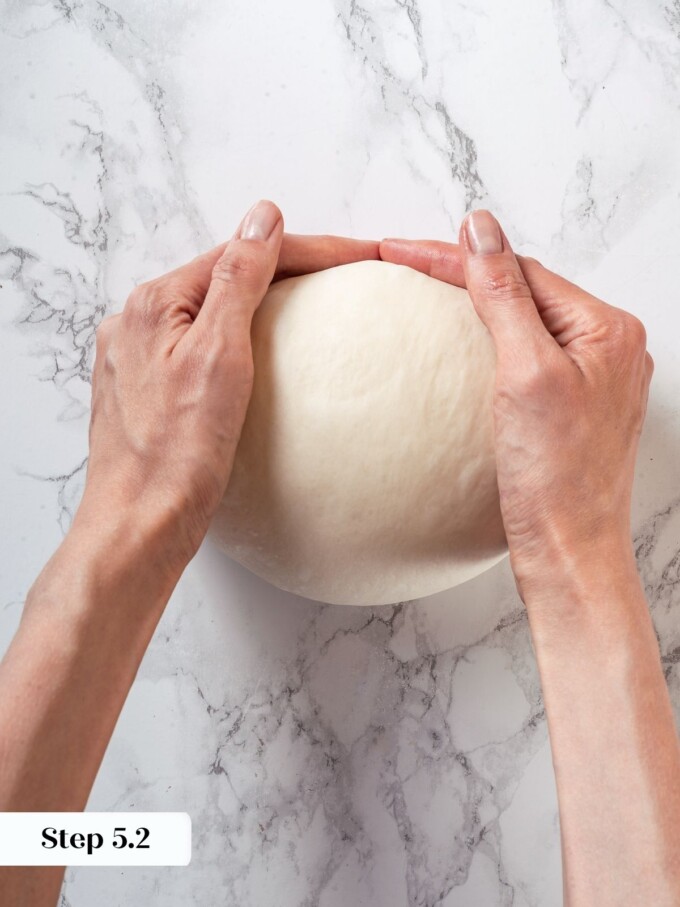
Step 5: Preshape the dough into a round (boule) by flipping it over and folding each of the four sides towards the center (photo 5). Flip back over (seam-side-down) and gently shape it into a round by pulling it towards you with both hands. Rotate a quarter turn and repeat until you have a round dough ball that sits upright on your work surface (photo 6).
I do not use any bench flour when working with this dough. I lightly oil my hands from the proof bowl and this dough does not stick. If you add more flour at this point not only will the dough be difficult to shape but the resulting bread will be dry.
Step 6: Rest the dough. Cover the dough with your plastic wrap or the overturned bowl and allow to bench rest 15-20 minutes. This is longer than most bench rests because it needs that time to relax.
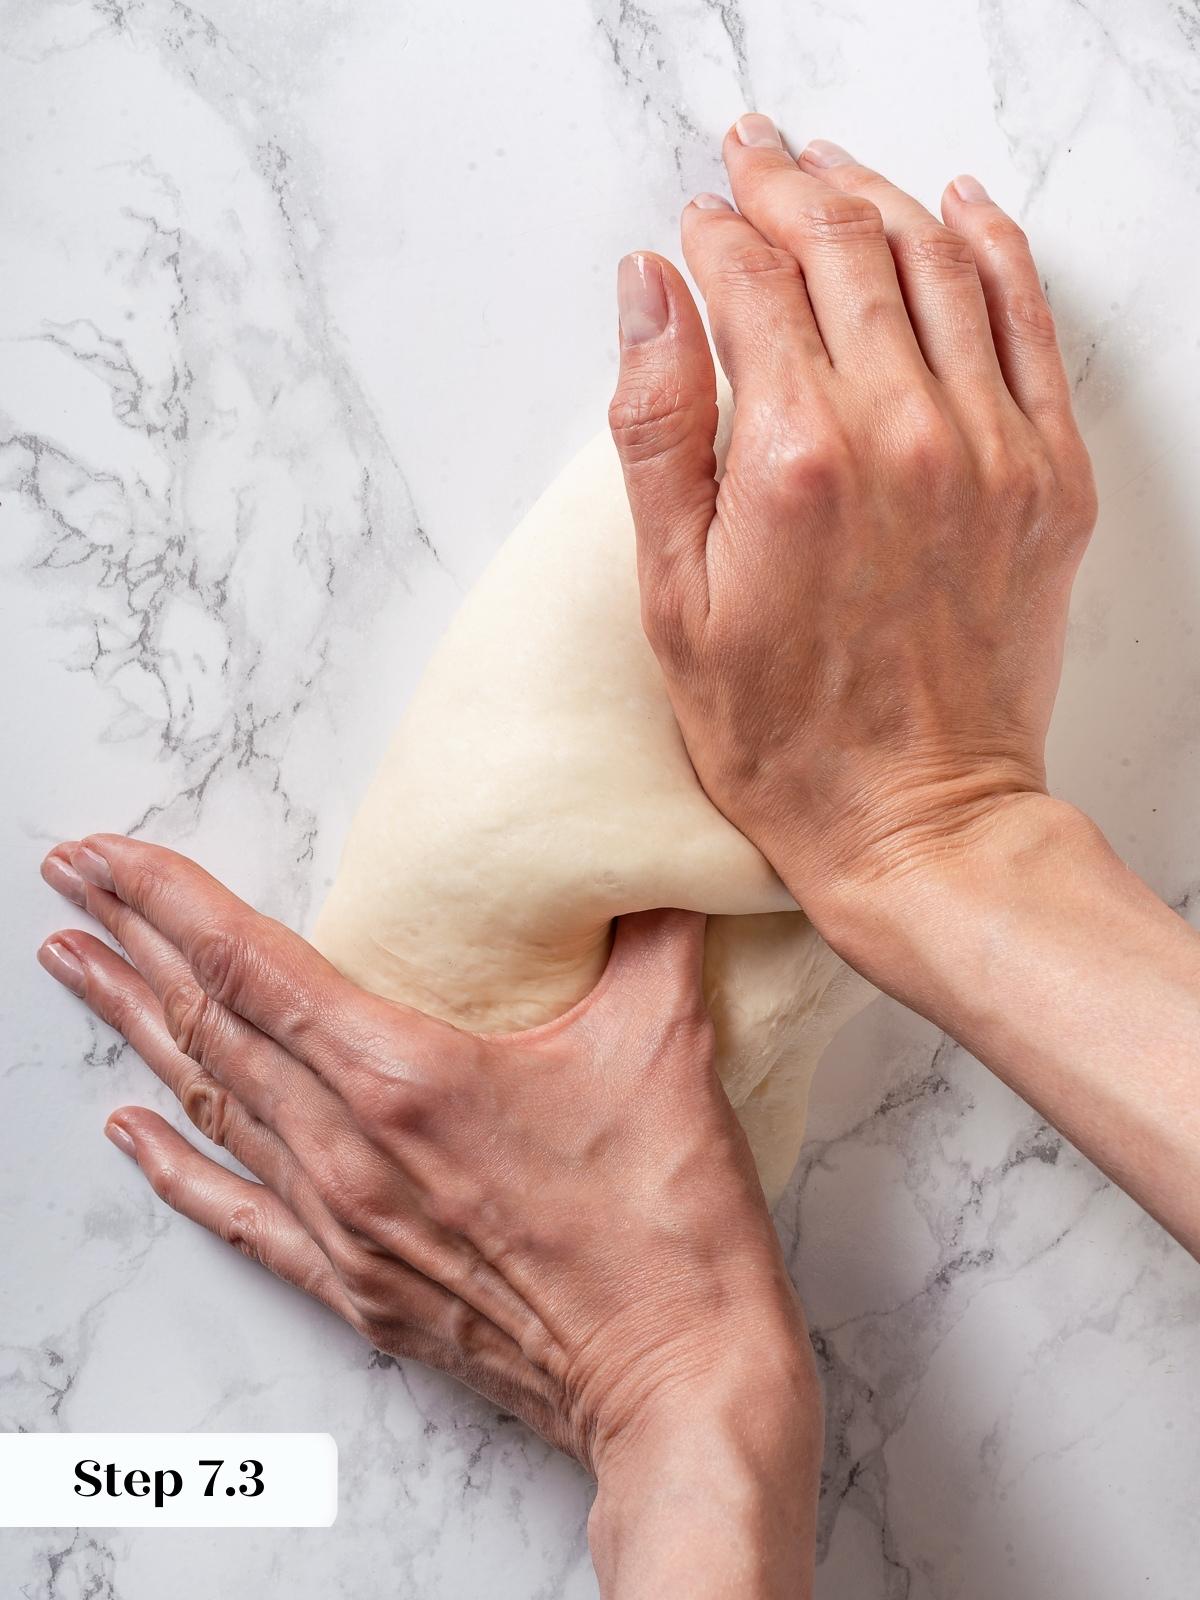
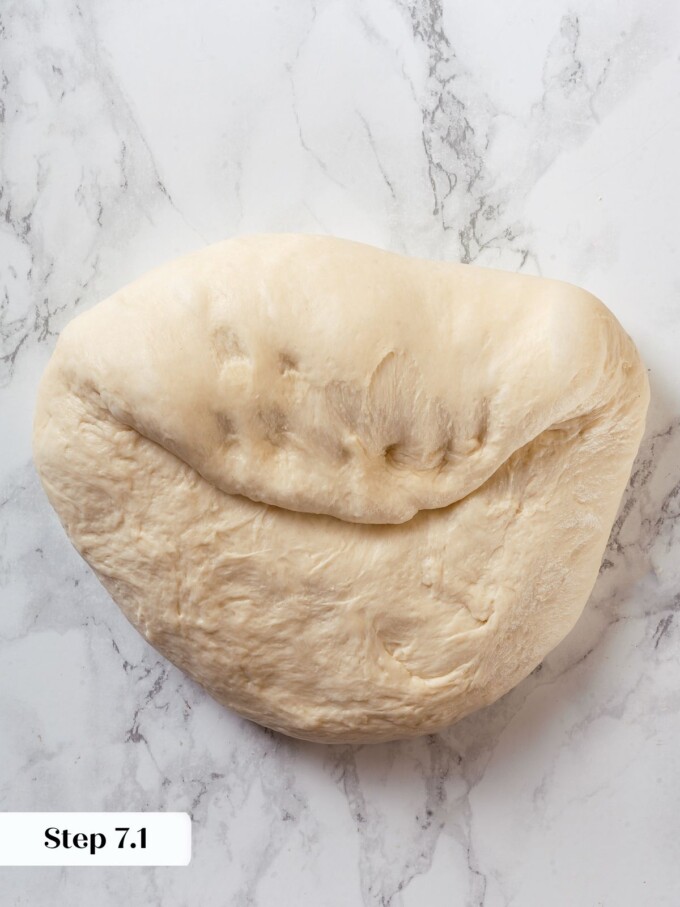
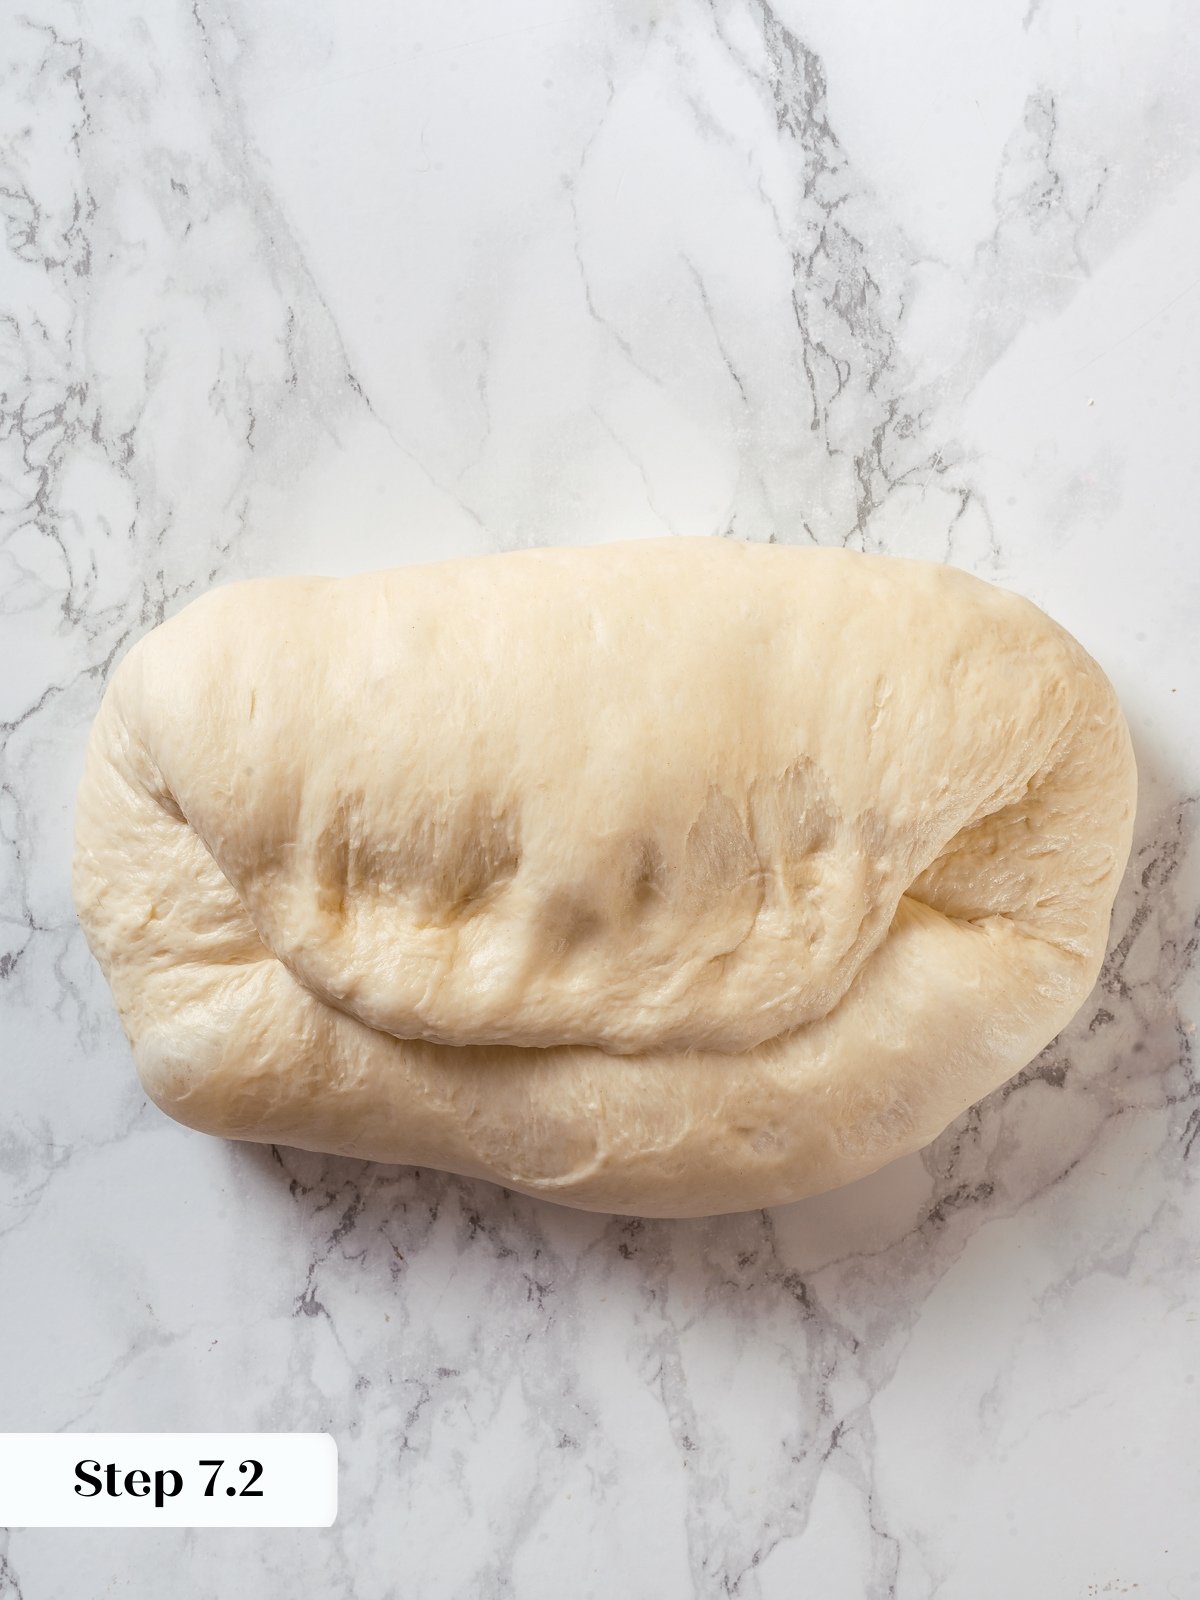
Step 7: Final shaping. Flip the dough back over, stretch gently into a rectangle, and take the side furthest from you and fold it down to the center (photo 7). Rotate the dough 180 degrees and repeat by folding the other side down towards the center (photo 8). Perform 2 thumb folds by wrapping the dough around the thumb of the left hand and sealing the edge with the heel of the right hand (photo 9). Start this motion towards the right side and gradually move left, rolling and sealing as you go. The first thumb fold will not fully close the dough log. Perform 1 more thumb fold to fully create a cylinder or log shape.
Final Proof and Bake
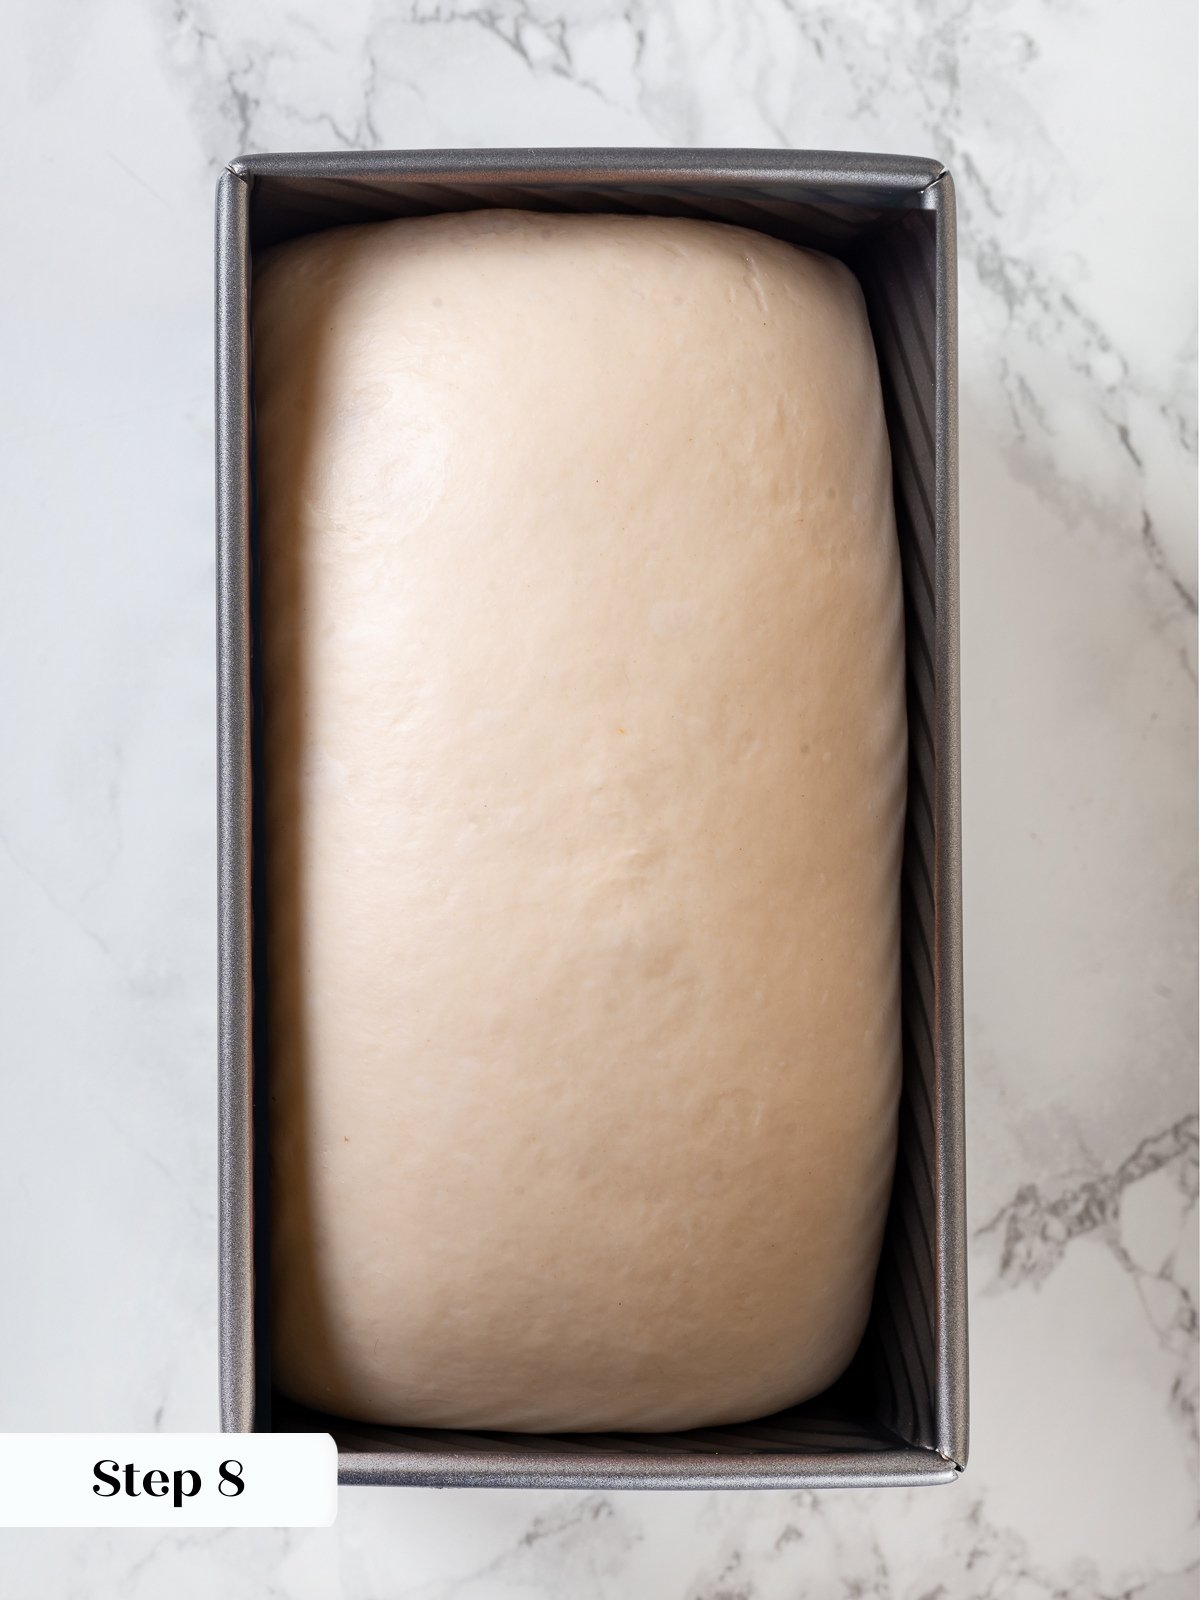
Step 8: Transfer to loaf pan and proof. Place seam side down in a 8-9 inch loaf pan sprayed with non-stick cooking spray. Cover loosely with plastic wrap (spray it if you would like with nonstick cooking spray) and allow to proof in a warm spot for 4-5 hours or until the dough has risen above the edge of the loaf pan in most places (photo 10).
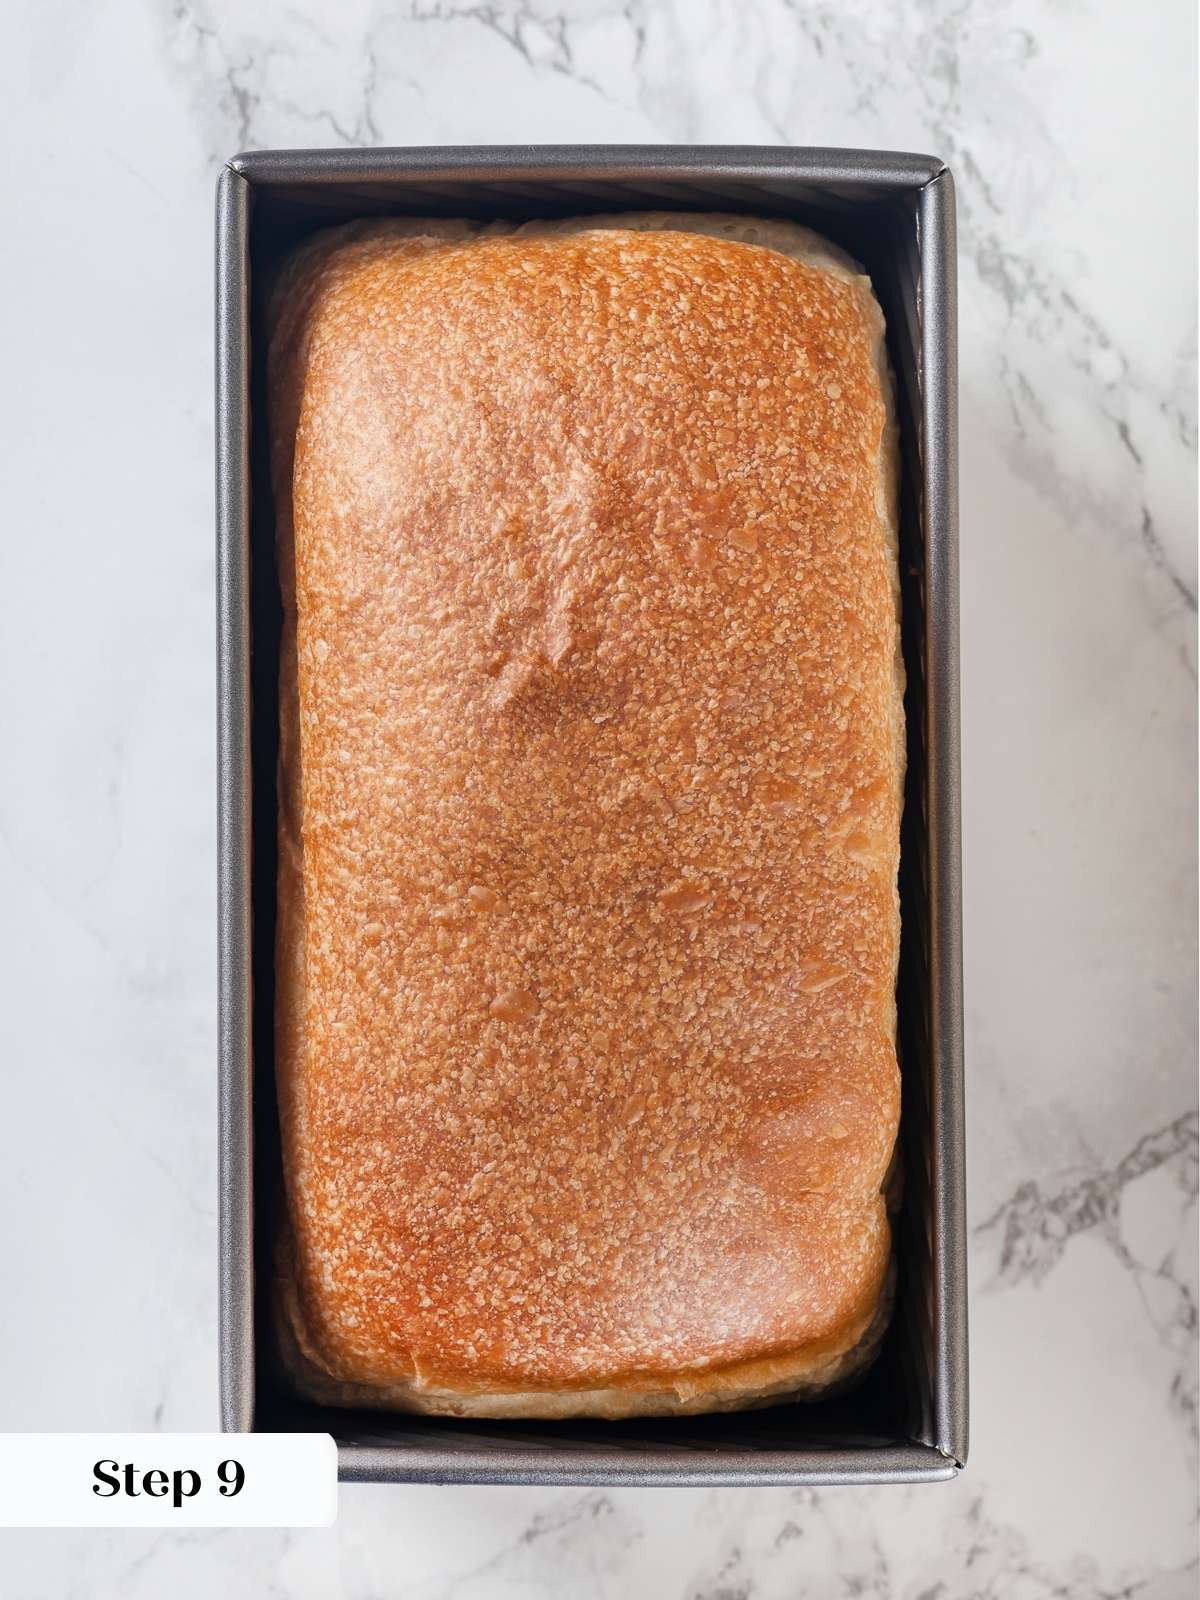
Step 9: Preheat and bake. While the dough undergoes its second rise, preheat the oven to 375°F conventional (no fan). Bake in a preheated oven for 28-30 minutes to an internal temperature of 185°F or until the top is golden brown (photo 11).
Step 10: Cool before slicing. Remove the loaf from the oven and turn out onto a wire rack to cool completely before slicing (photo 12).
How to make sourdough sandwich bread using discard?
You have two options for how to adapt this recipe using true sourdough discard from the refrigerator. The discard that I tested it with had not been fed in weeks.
- Overnight proofing without commercial yeast. The first proofing will take twice as long with discard as with active starter. Once the dough has doubled, shape it according to the directions above (Steps 5-7), cover and then final proof it in the refrigerator overnight (12-16 hours). Remove the loaf in the morning and allow to continue proofing in a warm spot 2-3 hours or until it has risen above the loaf pan in most places. The exact timing will depend on how recently you fed your discard and how warm your room is.
- Same day baking with added instant yeast. If you would like to use discard that hasn’t been fed within 24 hours or longer, you can still make this recipe within 1 day, but you will need to add 1 teaspoon instant yeast with the flour. If your discard is from the fridge and hasn’t been fed in weeks, use 2 teaspoons of instant yeast and warm milk to get the party started faster.
Sample Bread Baker’s Schedule
This sample schedule uses active sourdough starter used at its peak. My room was fairly cool, so your proofing will go faster if your kitchen is closer to 72-75°F.
9:00 PM: feed starter, make sure you have enough to feed and also to make the sourdough discard sandwich bread recipe!
8:00 AM: Mix dough and bulk proof in oiled bowl.
1:00 PM: Pre-shape dough.
1:15 PM: Final Shape and proof in loaf pan.
5:00 PM: Bake
Frequently Asked Questions
Cool sandwich bread completely on a wire rack at room temperature, then store in an airtight container or a plastic zip-top baggie at room temperature for up to a week!
I did find this bread recipe began to lose moisture after 1 day, so I recommend slicing the loaf, wrapping well in plastic wrap and then freeze in an airtight container or plastic baggie.
Certain ingredients as well as the baking temperature will not allow a thick, crusty crust to form. This bread with have a slightly crusty crust when it is first baked, but it will soften as the loaf cools. The butter and milk help keep the crust and crumb soft.
Other than the most delicious toast and sandwiches, like this bacon turkey bravo or even an open faced caprese sandwich, you could serve thick slices alongside sheet pan shakshuka for breakfast or to soak up the last bit of sauce from these slow cooker Italian meatballs!
The leftovers are the reason why I always double this recipe! It makes excellent sandwiches, peanut butter toast, French toast, French toast casserole, easy bread pudding, breadcrumbs, croutons, or this breakfast casserole with bread.
This recipe was developed in a professional kitchen by a pastry chef who is trained in professional bread baking, so you can absolutely make a larger batch of this recipe. I would recommend using the metric conversions by toggling to “Metric” under the Ingredients heading in the recipe card.
Recommended Bread Recipes

Yeast Breads

Yeast Breads

Yeast Breads

Yeast Breads
If you enjoyed this recipe, please leave a star rating and let me know how it goes in the comments below! I love hearing from you and your comments make my day!
Sourdough Sandwich Bread
Ingredients
- ¾ cup whole milk, warmed to 100°F-110°F (195g)
- 1 cup active sourdough starter, 200g
- 3 cups all-purpose flour, 372g
- 1 ½ teaspoons kosher salt, or half the amount of table salt
- 1 tablespoon granulated sugar
- 3 tablespoons butter, cut into small pieces (42g)
Instructions
Mix and Knead the Dough
- In the bowl of a stand mixer fitted with the dough hook attachment, combine all-purpose flour, milk, sourdough starter, salt, and sugar. Mix on low speed until the dough is hydrated and all the ingredients have incorporated. It will only take a minute or two.
- Increase the mixer to medium speed and continue kneading for 6-8 minutes, or until a soft, strong, elastic dough forms. Use the window-pane test to assess the dough. It should pull a smooth, thin window similar to a brioche dough.
- Add the pieces of butter to the mixer bowl and reduce the speed to low. Mix on low speed until all the butter has worked into the dough. Room temperature butter will incorporate faster, but it isn’t essential.
Bulk Fermentation
- Turn the dough out into a lightly oiled medium bowl. Cover with plastic wrap and proof at room temperature about 4 hours or until the dough doubles.
Shape the Dough
- Preshape the dough into a round (boule) by flipping it over and folding each of the four sides towards the center. Flip back over (seam-side-down) and gently shape it into a round by pulling it towards you with both hands. Rotate a quarter turn and repeat until you have a round dough ball that sits upright on your work surface.
- Cover the dough with your plastic wrap or the overturned bowl and allow to bench rest 15-20 minutes. This is longer than most bench rests because it needs that time to relax.
- Flip the dough back over, stretch gently into a rectangle, and take the side furthest from you and fold it down to the center. Rotate the dough 180 degrees and repeat by folding the other side down towards the center. Perform 2 thumb folds by wrapping the dough around the thumb of the left hand and sealing the edge with the heel of the right hand. Start this motion towards the right side and gradually move left, rolling and sealing as you go. The first thumb fold will not fully close the dough log. Perform 1 more thumb fold to fully create a cylinder or log shape.
Final Proof and Bake
- Place seam side down in a 8-9 inch loaf pan sprayed with non-stick cooking spray. Cover loosely with plastic wrap (spray it if you would like with nonstick cooking spray) and allow to proof in a warm spot for 4-5 hours or until the dough has risen above the edge of the loaf pan in most places.
- While the dough undergoes its second rise, preheat the oven to 375°F conventional (no fan). Bake in a preheated oven for 28-30 minutes to an internal temperature of 185°F or until the top is golden brown.
- Remove the loaf from the oven and turn out onto a wire rack to cool completely before slicing.
Notes
Nutrition
Nutrition information is automatically calculated, so should only be used as an approximation.
 Like this recipe? Rate & comment below!
Before You Go
I hope you enjoyed this versatile white sourdough bread recipe. Check out our other delicious sandwich bread recipes or all our sourdough recipes like this sourdough bread bowl!


Can you use lowfat milk for this? We dont keep whole in the house
Great question! Yes, low-fat milk will work just fine here, the bread will be very slightly less rich since whole milk’s fat content adds a bit of softness, but the difference is minor in a sandwich loaf like this. No other adjustments needed. Happy baking! ~GVD team
I just made this and wow! I love that you can use discard or active starter, which is perfect for those of us who always have leftover starter hanging around. The texture is incredibly soft, and the instructions are so clear, especially the shaping tips. Already planning to make another loaf this weekend and try the cinnamon swirl variation!
Letting the dough proof until it rose over the pan took patience, but the slices were tall and uniform. I used them for BLTs and they didn’t fall apart!